- Microsoft Azure Tutorial
- Microsoft Azure - Home
- Cloud Computing - Overview
- Microsoft Azure - Windows
- Microsoft Azure - Components
- Microsoft Azure - Compute Module
- Microsoft Azure - Fabric Controller
- Microsoft Azure - Storage
- Microsoft Azure - Blobs
- Microsoft Azure - Queues
- Microsoft Azure - Tables
- Microsoft Azure - CDN
- Microsoft Azure - Applications
- Microsoft Azure - Security
- Microsoft Azure - Datacenters
- Microsoft Azure - Scenarios
- Microsoft Azure Advanced
- Microsoft Azure - Management Portal
- Azure - Create Virtual Network
- Azure - Deploying Virtual Machines
- Azure - Endpoint Configuration
- Azure - Point-to-Site Connectivity
- Azure - Site-to-Site Connectivity
- Microsoft Azure - Traffic Manager
- Microsoft Azure - PowerShell
- Azure - Monitoring Virtual Machines
- Azure - Setting Up Alert Rules
- Azure - Application Deployment
- Microsoft Azure - Backup & Recovery
- Azure - Self-Service Capabilities
- Azure - Multi-Factor Authentication
- Azure - Forefront Identity Manager
- Azure - Data Import & Export Job
- Microsoft Azure - Websites
- Microsoft Azure - Scalability
- Microsoft Azure - Disk Configuration
- Microsoft Azure - Disk Caching
- Microsoft Azure - Personalize Access
- Azure - Personalize Company Brand
- Azure - Self-Service Password Reset
- Microsoft Azure - Self-Service Group
- Microsoft Azure - Create a Group
- Azure - Security Reports & Alerts
- Azure - Orchestrated Recovery
- Microsoft Azure - Health Monitoring
- Microsoft Azure - Upgrades
- Microsoft Azure Useful Resources
- Microsoft Azure - Quick Guide
- Microsoft Azure - Useful Resources
- Microsoft Azure - Discussion
Microsoft Azure - PowerShell
PowerShell is a framework or you can say an interface built by Azure team that lets the user to automate and manage Windows Azure services. It is a command line tool that uses the scripts or cmdlets to perform tasks such as creating and managing storage accounts or Virtual Machines that can easily be done using the preset commands.
Installing Azure PowerShell
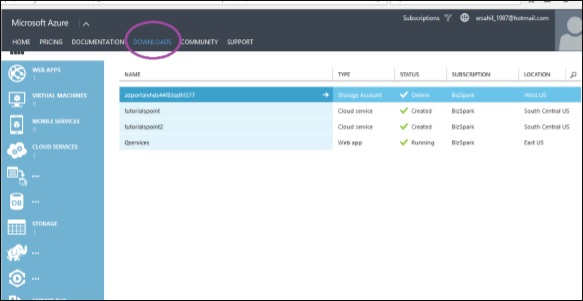
Step 1 − Login into Azure Management Portal.
Step 2 − Click ‘Downloads’.
Step 3 − In the following screen, locate ‘command-line tools’ and then ‘Windows Azure PowerShell’. Click ‘Install’ listed under it to download the setup and install it.
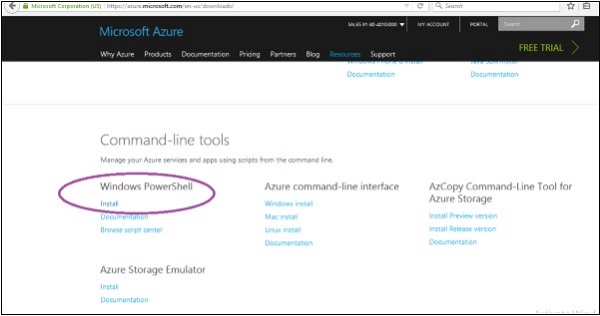
Alternatively, you can visit the link http://www.windowsazure.com/en-us/manage/downloads/
Connecting to Your Subscription
Once you have installed Azure PowerShell, you will have to connect it to your Azure subscription.
Step 1 − Locate Microsoft ‘Azure PowerShell’ in your programs.
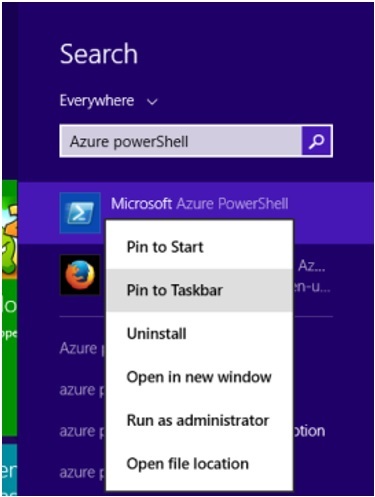
Step 2 − Pin it to the taskbar. You can run it as ISE by pinning it to the taskbar in Windows 8. Somehow, if it doesn’t show the option of ‘Run ISE as Administrator’ it is in programs. ISE lets copy paste commands easily.
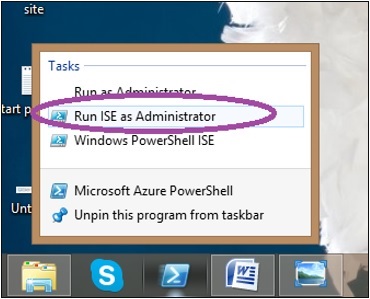
Step 3 − Right-click on ‘Microsoft Azure PowerShell’ and select ‘Run ISE as Administrator’.
Connect to Your Azure Account
Using Active Directory
To get started with Azure tasks, you will have to first add your Azure account to PowerShell. You just have to perform this step once on your computer and every time you run Azure PowerShell, it will connect to the account automatically.
Step 1 − Enter the following cmdlet in PowerShell.
Add-AzureAccount
Step 2 − The screen shown in the following image will pop up and ask for credentials of your account. Enter the credentials and sign in.
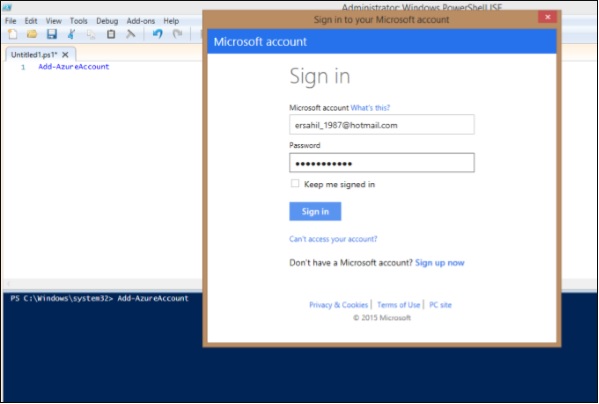
Step 3 − Now you are ready to perform tasks in Azure using Azure PowerShell.
Using Certificate
In this method, you can download a certificate on your machine and login to our account using that certificate.
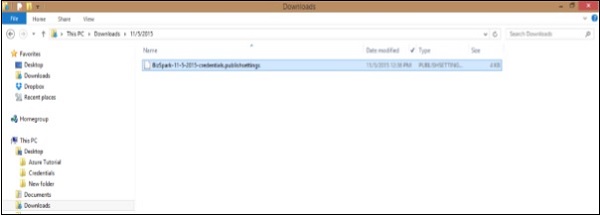
Step 1 − Enter the following cmdlet in PowerShell. You will be prompted to save a file and the file will be downloaded on your computer with the extension. publishsettings.
Get-AzurePublishSettingsFile
You will see a similar file on your computer.
Step 2 − Enter the following cmdlet. Highlighted part is the path of the file downloaded in previous step. Also replace the name of the file with yours
Import-AzurePublishSettingsFile C:\Users\Sahil\Downloads\BizSpark-11-5-2015credentials.publishsettings
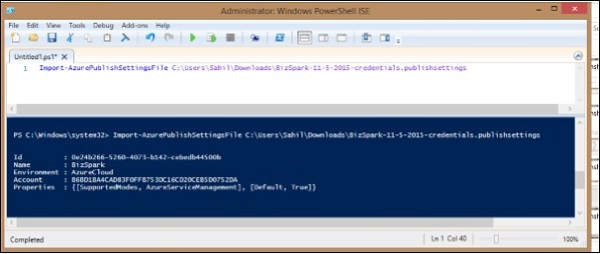
Step 3 − Just to make sure that everything has gone right. Run the following cmdlet. It will display the details of your account and subscription.
Get-AzureAccount
Get-AzureSubscription
You can add many accounts to Azure PowerShell.
Remove Azure Account
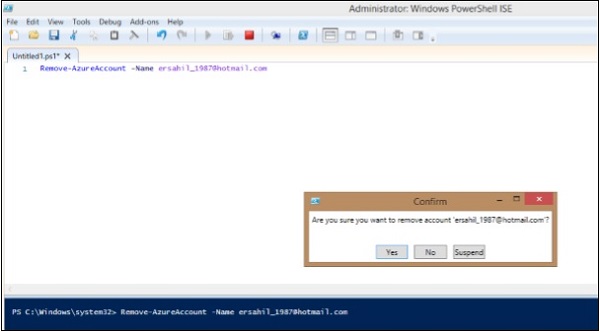
Run the following cmdlets. Replace the highlighted part with your account ID. It will ask for your confirmation and it is done.
Remove-AzureAccount -Name myaccount@somesite.example
Get Help
The following cmdlet will list all the commands available for Azure tasks.
Get-Help Azure
There are lots of tasks that can be managed using PowerShell such as creating and managing web applications, storage accounts, virtual machines, etc. In fact, many users find it quicker and better as compared to Azure Management Portal. To manage the Azure Storage using PowerShell refer to Table, Blobs and Queues chapter in this tutorial.