- Microsoft Azure Tutorial
- Microsoft Azure - Home
- Cloud Computing - Overview
- Microsoft Azure - Windows
- Microsoft Azure - Components
- Microsoft Azure - Compute Module
- Microsoft Azure - Fabric Controller
- Microsoft Azure - Storage
- Microsoft Azure - Blobs
- Microsoft Azure - Queues
- Microsoft Azure - Tables
- Microsoft Azure - CDN
- Microsoft Azure - Applications
- Microsoft Azure - Security
- Microsoft Azure - Datacenters
- Microsoft Azure - Scenarios
- Microsoft Azure Advanced
- Microsoft Azure - Management Portal
- Azure - Create Virtual Network
- Azure - Deploying Virtual Machines
- Azure - Endpoint Configuration
- Azure - Point-to-Site Connectivity
- Azure - Site-to-Site Connectivity
- Microsoft Azure - Traffic Manager
- Microsoft Azure - PowerShell
- Azure - Monitoring Virtual Machines
- Azure - Setting Up Alert Rules
- Azure - Application Deployment
- Microsoft Azure - Backup & Recovery
- Azure - Self-Service Capabilities
- Azure - Multi-Factor Authentication
- Azure - Forefront Identity Manager
- Azure - Data Import & Export Job
- Microsoft Azure - Websites
- Microsoft Azure - Scalability
- Microsoft Azure - Disk Configuration
- Microsoft Azure - Disk Caching
- Microsoft Azure - Personalize Access
- Azure - Personalize Company Brand
- Azure - Self-Service Password Reset
- Microsoft Azure - Self-Service Group
- Microsoft Azure - Create a Group
- Azure - Security Reports & Alerts
- Azure - Orchestrated Recovery
- Microsoft Azure - Health Monitoring
- Microsoft Azure - Upgrades
- Microsoft Azure Useful Resources
- Microsoft Azure - Quick Guide
- Microsoft Azure - Useful Resources
- Microsoft Azure - Discussion
Microsoft Azure - Queues
In the common language used by developers, a queue is a data structure used to store data which follows First in-First out rule. A data item can be inserted from back of the queue while it is retrieved from front. Azure queues are a very similar concept that is used to store the messages in a queue. A sender sends the message and a client receives and processes them. A message has few attributes attached to it, for example expiry time.
A client usually processes and deletes the message. Windows Azure service lets the message to be stored for 7 days and later it gets deleted automatically, if it is not deleted by the client. There can be one sender and one client or one sender and many clients or many sender and many clients.
There are two services offered by Windows Azure for message queues. This chapter covers Windows Azure queue. The other service is called ‘Service Bus queue’.
Decoupling the components is one of the advantages of message queue services. It runs in an asynchronous environment where messages can be sent among the different components of an application. Thus, it provides an efficient solution for managing workflows and tasks. For example, a message to complete a task is sent from the frontend of the application and is received by a backend worker, who then completes the task and deletes the message.
Considerations
The messages in the storage queue are not replicated anywhere, that means there is only one copy of your message. The maximum number of messages that can be processed are 20,000. The maximum size of a message can be 64 kb.
Managing Queues using PowerShell
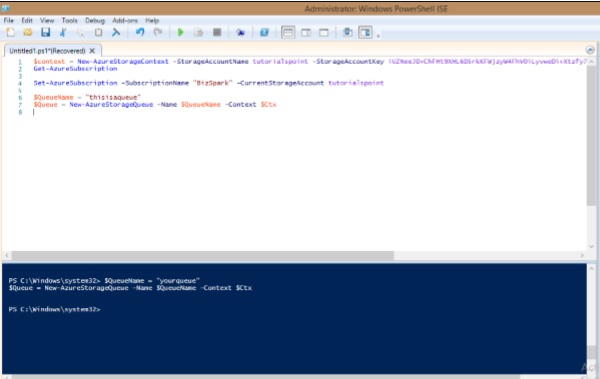
Create a Queue
Step 1 − Right-click on Windows PowerShell in the taskbar. Choose ‘Run ISE as administrator’.
Step 2 − Run the following command to access your account. Please replace the highlighted part for your account.
$context = New-AzureStorageContext -StorageAccountName tutorialspoint StorageAccountKey
iUZNeeJD+ChFHt9XHL6D5rkKFWjzyW4FhV0iLyvweDi+Xtzfy76juPzJ+mWtDmbqCWjsu/nr+1pqBJj rdOO2+A==
Step 3 − Specify the storage account in which you want to create a queue.
Set-AzureSubscription –SubscriptionName "BizSpark" -CurrentStorageAccount tutorialspoint
Step 4 − Create a Queue.
$QueueName = "thisisaqueue"
$Queue = New-AzureStorageQueue –Name $QueueName -Context $Ctx
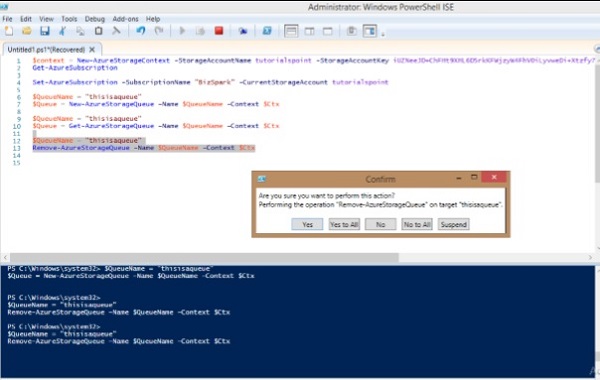
Retrieve a Queue
$QueueName = "thisisaqueue"

$Queue = Get-AzureStorageQueue –Name $QueueName –Context $Ctx
Delete a Queue
$QueueName = "thisisaqueue"

Remove-AzureStorageQueue –Name $QueueName –Context $Ctx
Insert a Message into a Queue
Step 1 − Login to your account.
$context = New-AzureStorageContext -StorageAccountName tutorialspoint StorageAccountKey

iUZNeeJD+ChFHt9XHL6D5rkKFWjzyW4FhV0iLyvweDi+Xtzfy76juPzJ+mWtDmbqCWjsu/nr+1pqBJj rdOO2+A==
Step 2 − Specify the storage account you want to use.
Set-AzureSubscription –SubscriptionName "BizSpark" -CurrentStorageAccount tutorialspoint
Step 3 − Retrieve the queue and then insert the message.
$QueueName = "myqueue"
$Queue = Get-AzureStorageQueue -Name $QueueName -Context $ctx

if ($Queue -ne $null) {
   $QueueMessage = New-Object -TypeName Microsoft.WindowsAzure.Storage.Queue.CloudQueueMessage
      -ArgumentList "my message is this"
   $Queue.CloudQueue.AddMessage($QueueMessage)
}
The ‘if’ condition in the script above checks if the queue specified exists or not.
Dequeue Next Message from Queue
Step 1 − First connect to your account and specify the storage account, by running the commands as shown in the above steps.
Step 2 − Retrieve the queue.
$QueueName = "myqueue"
$Queue = Get-AzureStorageQueue -Name $QueueName -Context $ctx
$InvisibleTimeout = [System.TimeSpan]::FromSeconds(10)
Step 3 − Dequeue the next message.
$QueueMessage = $Queue.CloudQueue.GetMessage($InvisibleTimeout)
Step 4 − Delete the dequeued message.
$Queue.CloudQueue.DeleteMessage($QueueMessage)
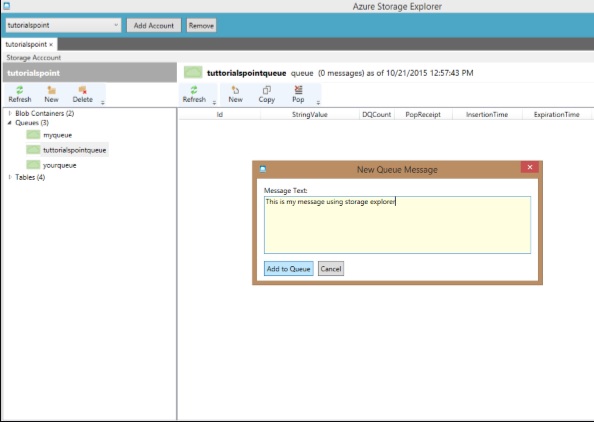
Managing Queues using Azure Storage Explorer
Step 1 − Select the storage account from the dropdown at the top right. Accounts will be displayed if you have added them during your previous use. If not, you can add account and it will ask for your credentials. After signing in, you will be logged into your account in Azure Storage Explorer.
Step 2 − You can add a new queue by selecting ‘Queues’ from the left panel and clicking ‘New’ as shown in the following image.
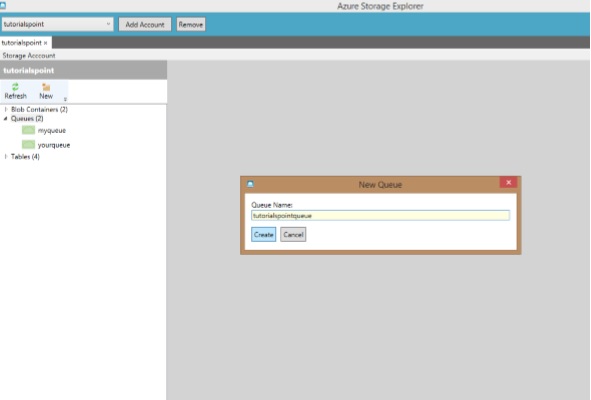
Step 3 − Enter the name of Queue and it is created in your storage account.
Step 4 − Add and delete the messages by selecting the queue in the left panel.