- Microsoft Azure Tutorial
- Microsoft Azure - Home
- Cloud Computing - Overview
- Microsoft Azure - Windows
- Microsoft Azure - Components
- Microsoft Azure - Compute Module
- Microsoft Azure - Fabric Controller
- Microsoft Azure - Storage
- Microsoft Azure - Blobs
- Microsoft Azure - Queues
- Microsoft Azure - Tables
- Microsoft Azure - CDN
- Microsoft Azure - Applications
- Microsoft Azure - Security
- Microsoft Azure - Datacenters
- Microsoft Azure - Scenarios
- Microsoft Azure Advanced
- Microsoft Azure - Management Portal
- Azure - Create Virtual Network
- Azure - Deploying Virtual Machines
- Azure - Endpoint Configuration
- Azure - Point-to-Site Connectivity
- Azure - Site-to-Site Connectivity
- Microsoft Azure - Traffic Manager
- Microsoft Azure - PowerShell
- Azure - Monitoring Virtual Machines
- Azure - Setting Up Alert Rules
- Azure - Application Deployment
- Microsoft Azure - Backup & Recovery
- Azure - Self-Service Capabilities
- Azure - Multi-Factor Authentication
- Azure - Forefront Identity Manager
- Azure - Data Import & Export Job
- Microsoft Azure - Websites
- Microsoft Azure - Scalability
- Microsoft Azure - Disk Configuration
- Microsoft Azure - Disk Caching
- Microsoft Azure - Personalize Access
- Azure - Personalize Company Brand
- Azure - Self-Service Password Reset
- Microsoft Azure - Self-Service Group
- Microsoft Azure - Create a Group
- Azure - Security Reports & Alerts
- Azure - Orchestrated Recovery
- Microsoft Azure - Health Monitoring
- Microsoft Azure - Upgrades
- Microsoft Azure Useful Resources
- Microsoft Azure - Quick Guide
- Microsoft Azure - Useful Resources
- Microsoft Azure - Discussion
Microsoft Azure - Create a Group
In this section, we are creating a group. The user who creates the group is the owner of the group and he can add or delete members in the group. Since we granted permissions to users to create their own group in the previous step, any user in this directory can create and manage a group.
Step 1 − Go to the Access Panel by visiting myapps.microsoft.com
Step 2 − Login to your azure Account.
Step 3 − At the top, you will see ‘Groups’. Click on it to create a new group.
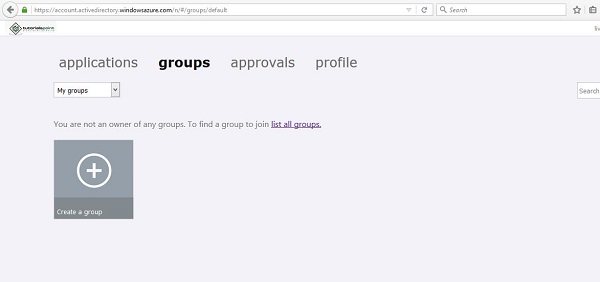
Step 4 − Choose ‘My groups/All’ from the dropdown at the top.
Step 5 − Click on ‘Create new Group’.
Step 6 − The following screen will pop up. Enter the name and description of the group.
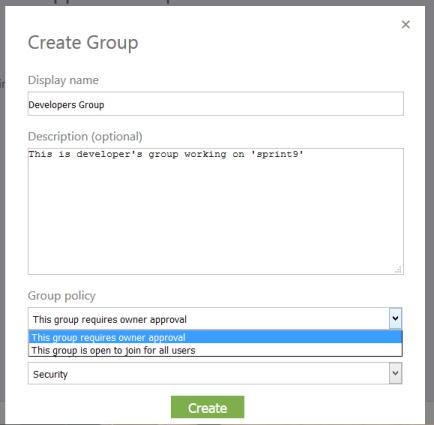
Step 7 − You can let all users to join the group or choose them to ask for the group owner’s approval before joining the group. I have chosen the first option in which approval of the owner is required. This means users who want to join the group other than users added, will have to ask for approval.
Step 8 − Choose the desired option and click ‘Create’.
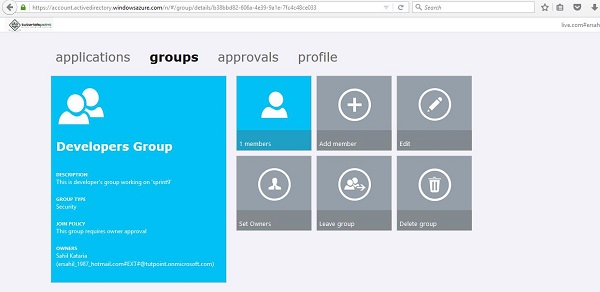
Step 9 − Come back to the ‘Groups’ page. To add members to the group, select the group. In this case, let’s select ‘Developers Group’.

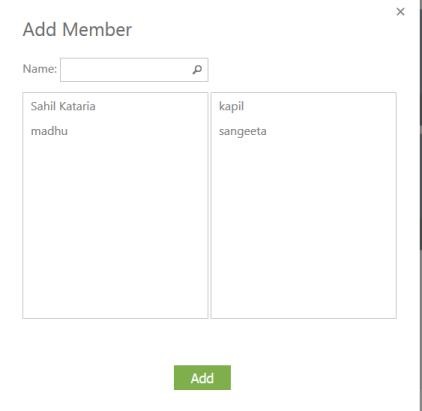
Step 10 − Click ‘Add Members’.
Step 11 − The following pop-up will list all the users in the directory. You can add the members by clicking on their name.
Step 12 − You can add/delete member, edit group’s description, and delete group on this page. Also you can make someone else the owner of this group.
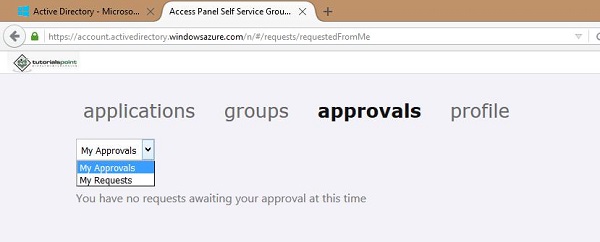
If someone wants to join the group, he will ask for the owner’s approval. The owner will get a notification and will see the request in ‘approvals’ tab of the access panel as shown in the image above. Also, if someone has requested to join a group that is owned by someone else, he will see his requests here.