- Microsoft Azure Tutorial
- Microsoft Azure - Home
- Cloud Computing - Overview
- Microsoft Azure - Windows
- Microsoft Azure - Components
- Microsoft Azure - Compute Module
- Microsoft Azure - Fabric Controller
- Microsoft Azure - Storage
- Microsoft Azure - Blobs
- Microsoft Azure - Queues
- Microsoft Azure - Tables
- Microsoft Azure - CDN
- Microsoft Azure - Applications
- Microsoft Azure - Security
- Microsoft Azure - Datacenters
- Microsoft Azure - Scenarios
- Microsoft Azure Advanced
- Microsoft Azure - Management Portal
- Azure - Create Virtual Network
- Azure - Deploying Virtual Machines
- Azure - Endpoint Configuration
- Azure - Point-to-Site Connectivity
- Azure - Site-to-Site Connectivity
- Microsoft Azure - Traffic Manager
- Microsoft Azure - PowerShell
- Azure - Monitoring Virtual Machines
- Azure - Setting Up Alert Rules
- Azure - Application Deployment
- Microsoft Azure - Backup & Recovery
- Azure - Self-Service Capabilities
- Azure - Multi-Factor Authentication
- Azure - Forefront Identity Manager
- Azure - Data Import & Export Job
- Microsoft Azure - Websites
- Microsoft Azure - Scalability
- Microsoft Azure - Disk Configuration
- Microsoft Azure - Disk Caching
- Microsoft Azure - Personalize Access
- Azure - Personalize Company Brand
- Azure - Self-Service Password Reset
- Microsoft Azure - Self-Service Group
- Microsoft Azure - Create a Group
- Azure - Security Reports & Alerts
- Azure - Orchestrated Recovery
- Microsoft Azure - Health Monitoring
- Microsoft Azure - Upgrades
- Microsoft Azure Useful Resources
- Microsoft Azure - Quick Guide
- Microsoft Azure - Useful Resources
- Microsoft Azure - Discussion
Microsoft Azure - Deploying Virtual Machines
A quick process of creating a virtual machine was included in the chapter ‘Compute Module’. This chapter contains the detailed process including how to configure virtual machines.
Quick Create
Step 1 − Login to Azure Management Portal.
Step 2 − Locate and click on ‘Virtual Machines’ in the left panel and then click on ‘Create a Virtual Machine’.
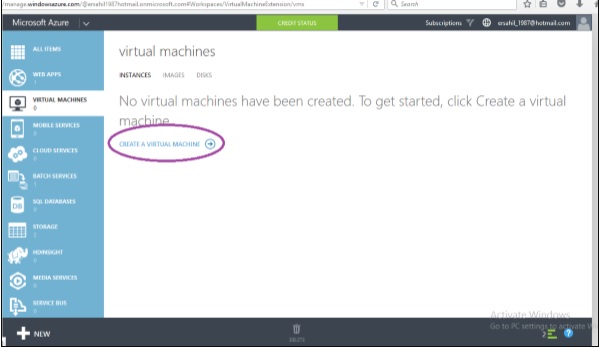
Step 3 − Alternatively, click ‘New’ at the bottom left corner and then click ‘Compute’ → ‘Virtual Machine’ →‘Quick Create’.
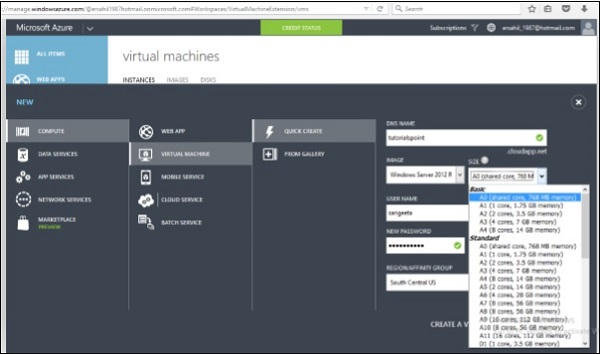
Step 4 − Enter DNS name. This has to be unique. The DNS name is used to connect to the virtual machine.
Step 5 − Select the image and size from the dropdown list. The size affects the cost of running virtual machine.
Step 6 − Enter username and password. You must remember to log in to the virtual machine later.
Step 7 − Select the relevant region.
Step 8 − Click on ‘Create a virtual machine’ and you are ready to use your new machine. It will take a few seconds for the machine to be created.
Create Virtual Machine with Advanced Settings
Step 1 − Choose ‘Custom Create’ instead of ‘Quick Create’ in the options and you will be taken to the following screen.
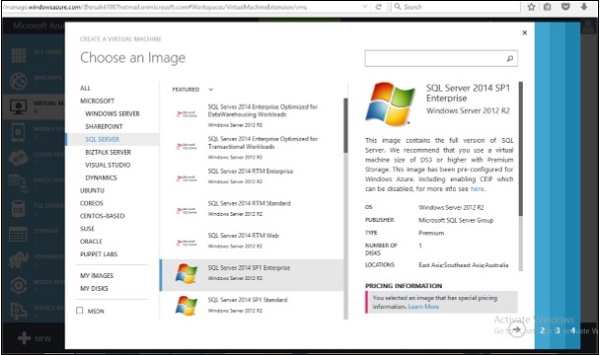
Step 2 − Choose an image from the list. In this screen, you find that choosing an image is easier based on their category shown on the left side. Let us create a virtual machine for SQL Server for which we have chosen SQL Server on the left side and all the software in this category are shown in the middle.
Step 3 − Click on the Next arrow.
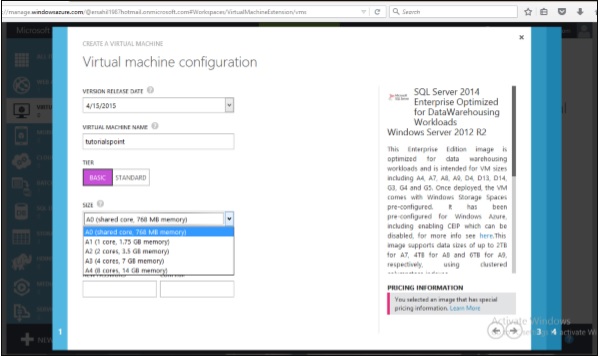
Step 4 − Choose Version Release Date and enter the VM’s name.
Step 5 − Select the Tier. The size dropdown would change items according to tier. In the basic version, you will get only first 5 options, while in the standard version you will get more options. It should be according to you and you image’s requirements. For example, in this case let’s choose SQL server. It requires minimum A4 machine with 8 cores and 14GB memory.
Step 6 − Enter the username and password and click Next arrow.
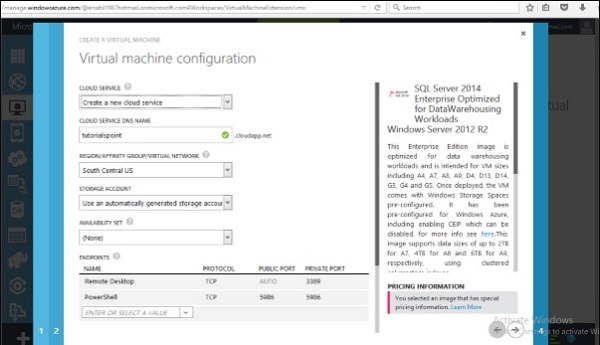
Step 7 − Enter DNS name which should be unique as mentioned earlier and select the region.
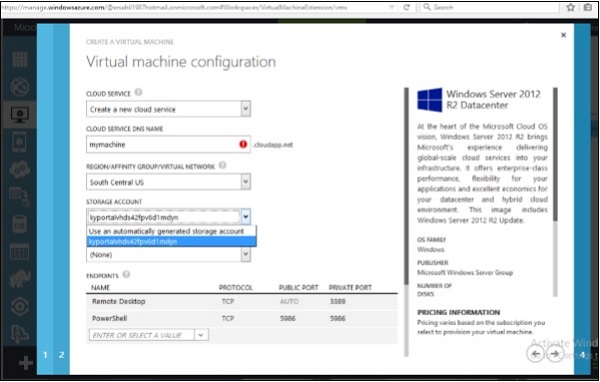
Under the storage account, it will display the storage accounts that you have already created. As seen in the following screen, an account name is shown in the dropdown which is a storage account created earlier. You can choose an already created account or even use an automatically generated account.
Step 8 − Next is Availability set. This option lets you create a set of virtual machines that will ensure that if a single point fails, it doesn’t affect your machine and keeps the work going on. Let’s choose the option ‘none’ here.
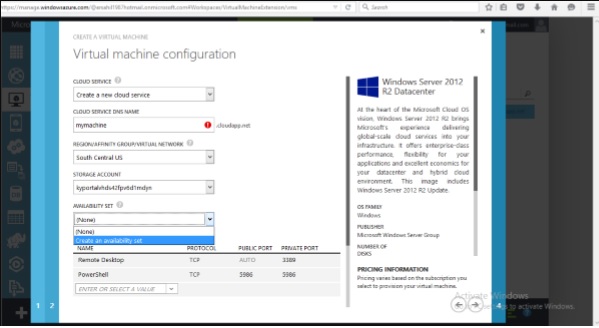
The last option is End Points. End points are used to communicate with virtual machines by other resources you can leave. In a subsequent chapter, we will provide a detailed illustration to configure endpoints.
Step 9 − Click on Next and the virtual machine will be created in a few seconds for you.
Connecting with a Virtual Network
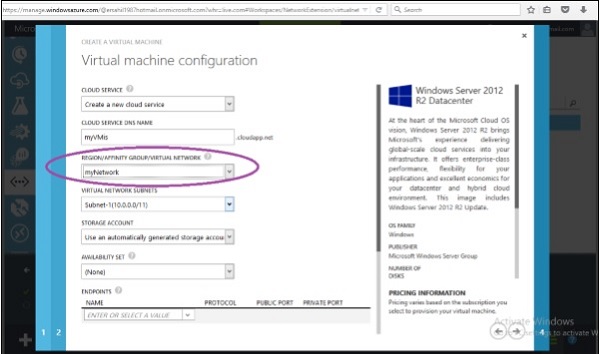
Step 1 − Create a virtual machine using the steps described earlier. If you already have a virtual network created in Azure, it will be diplayed in the highlighted dropdown list as shown in the following screen. You can choose the network as shown in following picture.
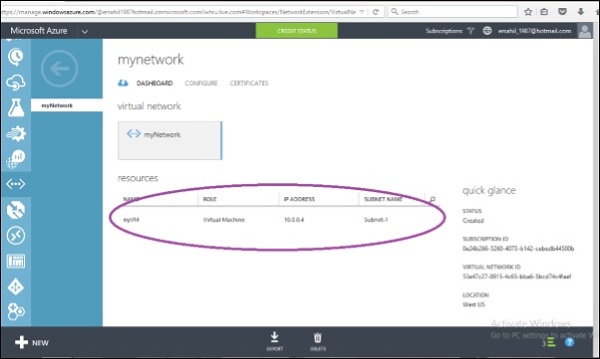
Step 2 − When you go to your Virtual Network and management portal created earlier, click on ‘Dashboard’. The virtual machine will be displyed in the resources of that network as shown in the following picture.
Accessing the Virtual Machine
There is a step by step guide on connecting to VM in ‘Compute Module’ chapter earlier in this tutorial. Please refer to it.
Considerations
While creating a virtual machine following considerations should be made −
Choose the location according to the user’s location to avoid any latency issues. It is best to choose the region nearest to the physical location of end users.
You must go through the costs that will be incurred based on the size you choose for the virtual machine beforehand, to make sure it is in control.
If you use the already created storage account you will be able to manage things better.