- Microsoft Azure Tutorial
- Microsoft Azure - Home
- Cloud Computing - Overview
- Microsoft Azure - Windows
- Microsoft Azure - Components
- Microsoft Azure - Compute Module
- Microsoft Azure - Fabric Controller
- Microsoft Azure - Storage
- Microsoft Azure - Blobs
- Microsoft Azure - Queues
- Microsoft Azure - Tables
- Microsoft Azure - CDN
- Microsoft Azure - Applications
- Microsoft Azure - Security
- Microsoft Azure - Datacenters
- Microsoft Azure - Scenarios
- Microsoft Azure Advanced
- Microsoft Azure - Management Portal
- Azure - Create Virtual Network
- Azure - Deploying Virtual Machines
- Azure - Endpoint Configuration
- Azure - Point-to-Site Connectivity
- Azure - Site-to-Site Connectivity
- Microsoft Azure - Traffic Manager
- Microsoft Azure - PowerShell
- Azure - Monitoring Virtual Machines
- Azure - Setting Up Alert Rules
- Azure - Application Deployment
- Microsoft Azure - Backup & Recovery
- Azure - Self-Service Capabilities
- Azure - Multi-Factor Authentication
- Azure - Forefront Identity Manager
- Azure - Data Import & Export Job
- Microsoft Azure - Websites
- Microsoft Azure - Scalability
- Microsoft Azure - Disk Configuration
- Microsoft Azure - Disk Caching
- Microsoft Azure - Personalize Access
- Azure - Personalize Company Brand
- Azure - Self-Service Password Reset
- Microsoft Azure - Self-Service Group
- Microsoft Azure - Create a Group
- Azure - Security Reports & Alerts
- Azure - Orchestrated Recovery
- Microsoft Azure - Health Monitoring
- Microsoft Azure - Upgrades
- Microsoft Azure Useful Resources
- Microsoft Azure - Quick Guide
- Microsoft Azure - Useful Resources
- Microsoft Azure - Discussion
Microsoft Azure - Point-to-Site Connectivity
In the last chapter, we saw how an endpoint can be created to access a virtual machine; this is quite a tedious task. If a virtual machine in virtual network needs to be connected with on-premise machine, the point-to-site connectivity is needed. Point-to-site connectivity makes it very productive to work with remote virtual machines.
Basically, a machine on-premise is connected to virtual network using point-to-site connectivity. However, we can connect up to 128 on-premise machines to virtual network in Azure. The access to the virtual network in cloud is granted through a certificate. The certificate has to be installed on each local machine that needs to be connected to the virtual network.
Enabling Point-to-Site Connectivity on Existing Virtual Network
If you have already created a virtual network in Azure, you can access it in management portal.
Step 1 − Log in to Azure management portal.
Step 2 − Click on ‘Networks’ in the left panel and select the network you want to work with.
Step 3 − Click on ‘Configure’ as shown in the following image.
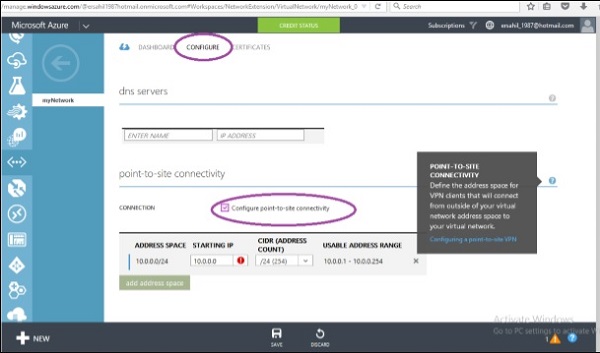
Step 4 − Check the ‘Configure Point-to-site connectivity’ checkbox. It will allow you to enter the starting IP and CIDR.
Step 5 − Scroll down and click ‘add gateway subnet’.
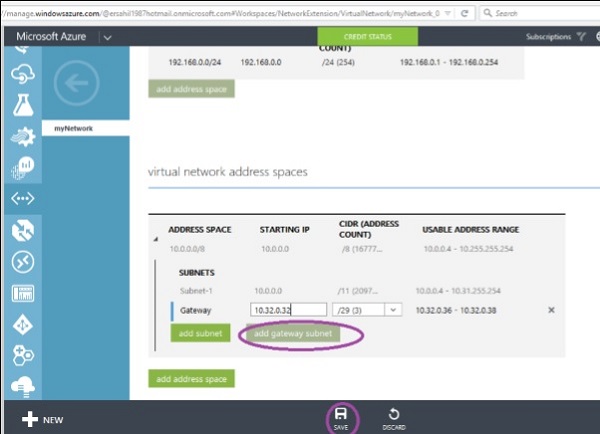
Step 6 − Enter the Gateway subnet and click ‘Save’. Message shown in the following screen will pop up.
Step 7 − Click Yes and a point-to-site connectivity is done.

You will need a certificate to access your virtual network.
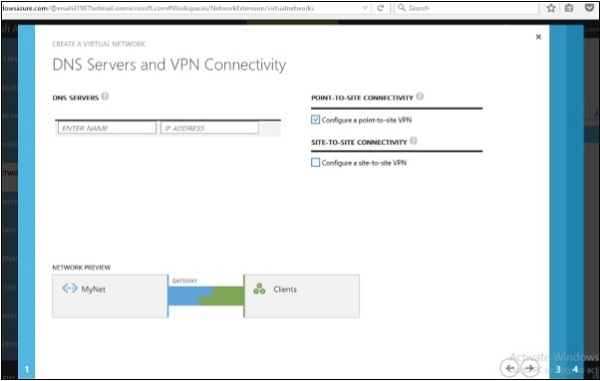
Create a New Virtual Network with Point-to-site Connectivity
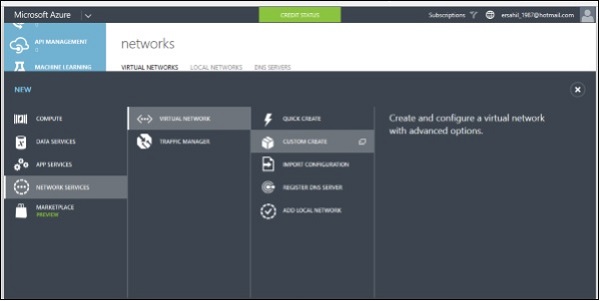
Step 1 − Click New → Network Services → Virtual Network → Custom Create.
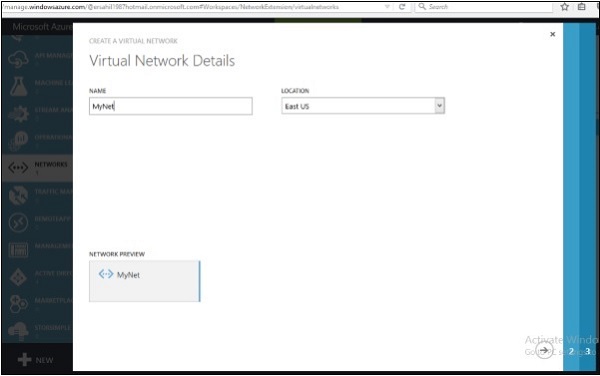
Step 2 − Enter Network’s name, select location and click on Next.
Step 3 − On the next screen, Select ‘Configure a point-to-site VPN’ and click next.
Step 4 − You can select or enter starting IP and select CIDR.
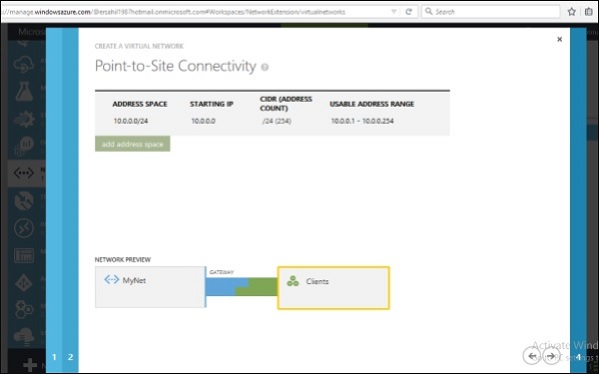
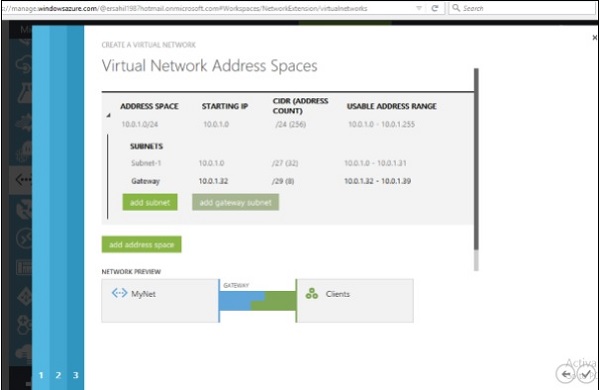
Step 5 − Enter Subnet and click ‘Add Gateway Subnet’ as done earlier and enter the required information.
Step 6 − Point-to-Site connectivity is done.
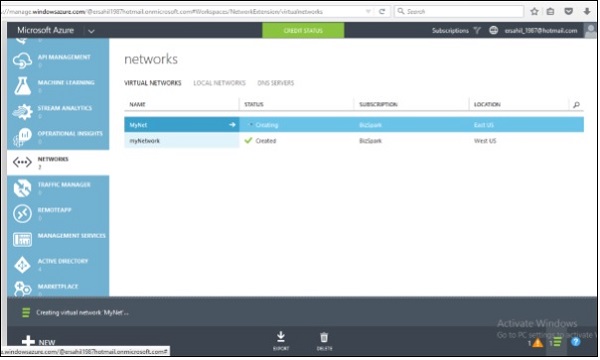
Step 7 − Click on the name of the network, as it is ‘MyNet’ in the above image.
Step 8 − Click on ‘Dashboard’ as shown in the following screen.
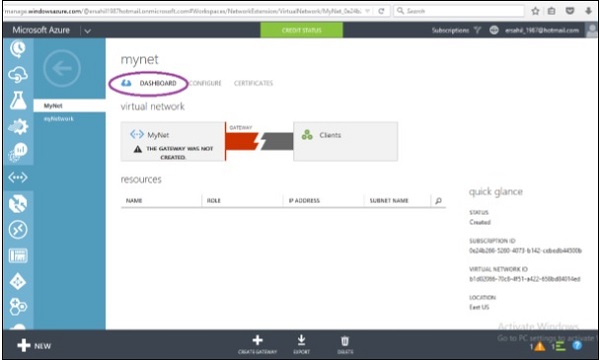
You will see that the gateway is not created yet. For it to happen, you will have to generate a certificate first.
Generate Certificates
The point-to-site VPN supports only self-signed certificate.
Create a Certificate
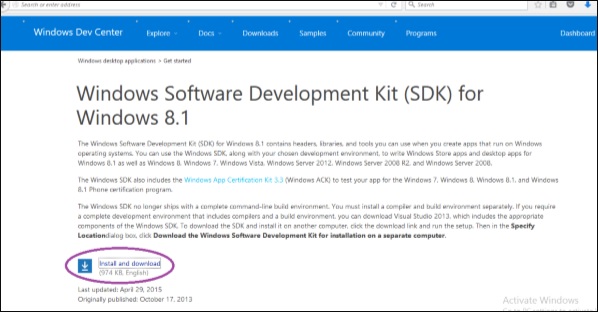
Step 1 − Go to the link msdn.microsoft.com or google ‘windows SDK for 8.1’. Then go to msdn link or the version of Windows for which you want the tool.
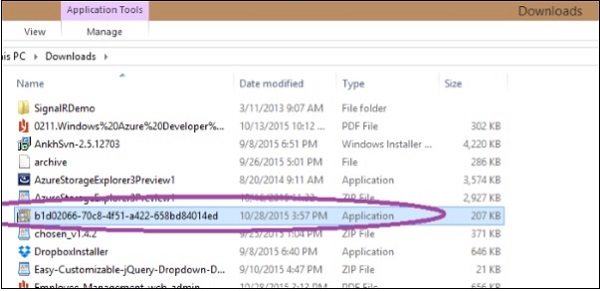
Step 2 − Download the encircled file as shown in the following image. It will be saved as .exe file named sdksetup on your machine.
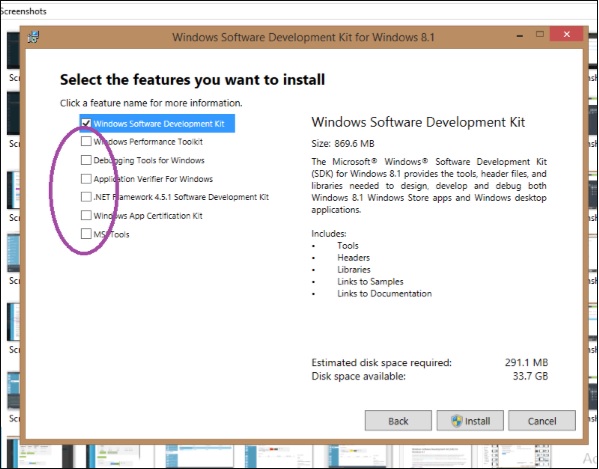
Step 3 − Run the file. While running the installation wizard, when you reach the following screen uncheck the encircled part. By default they are checked.
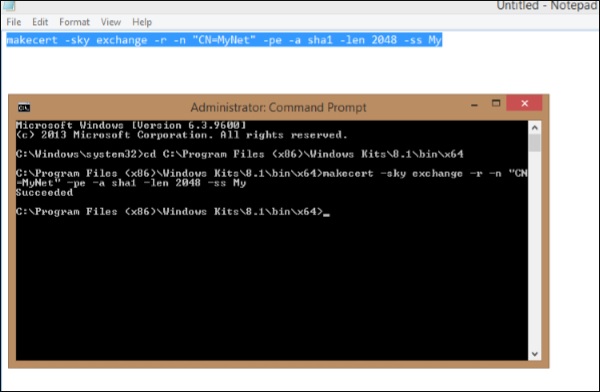
Step 4 − After installation is complete, run Command Prompt as Administrator on your computer.
Step 5 − Enter the following commands one by one for creating root certificate
cd C:\Program Files (x86)\Windows Kits\8.1\bin\x64

makecert -sky exchange -r -n "CN=MyNet" -pe -a sha1 -len 2048 -ss My
First command will change the directory in command prompt. In the above command change the highlighted part to the name of your network.
Step 6 − Next enter the following command for creating client certificate.
makecert -n "CN=MyNetClient" -pe -sky exchange -m 96 -ss My -in "MyNet" -is my -a sha1
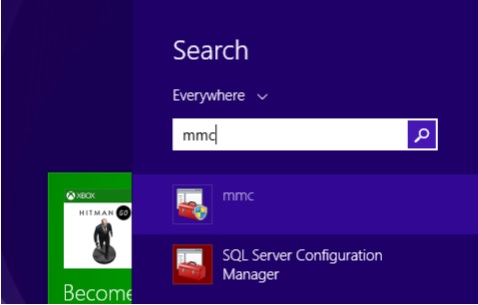
Step 7 − Look for ‘mmc’ on your computer and run it.
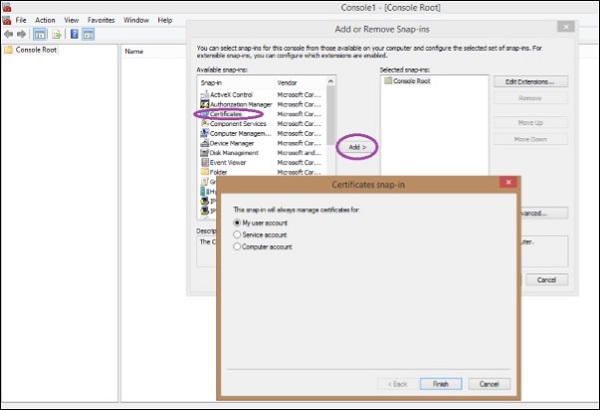
Step 8 − Click ‘File’ and ‘Add/Remove Snap-in’.
Step 9 − In the screen that pops up, click ‘Certificate’ and then on ‘add’.
Step 10 − Select ‘My User Account’ and click on ‘Finish’.
Step 11 − Expand ‘Current User’ in the left panel, then ‘Personal’ and then ‘Certificates’.
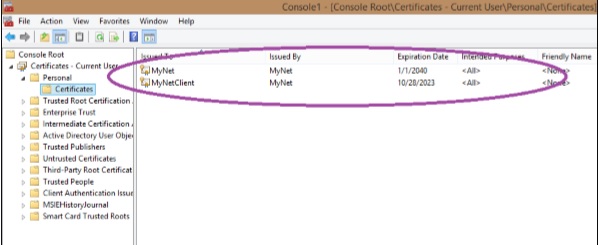
You can see the certificates here.
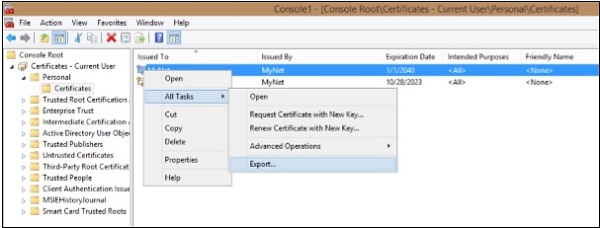
Step 12 − Right click on certificate and click ‘All Tasks’ and then ‘Export’.
Step 13 − Follow the wizard. You will have to name the certificate and select a location to save it.
Upload the Certificate
Step 1 − Login to Azure management portal.
Step 2 − Go to the network and click ‘Certificate’ and then click ‘Upload Root Certificate’.
Step 3 − Click browse and select the location of the certificate you just created.
Download the Client VPN Package
Client VPN Package will connect you to the network.
Step 1 − Go to network’s dashboard in azure management portal.
Step 2 − Scroll down and locate the following options at the right side of the screen.

Step 3 − Select the suitable option and download it. You will see a similar file on your computer. Run and install it.
Step 4 − When you’ll install it, Windows might try to prevent it. Choose ‘Run Anyway’ if this happens.
Step 5 − Go to ‘Networks’ on your machine and you will see a VPN connection available as shown in the following image.
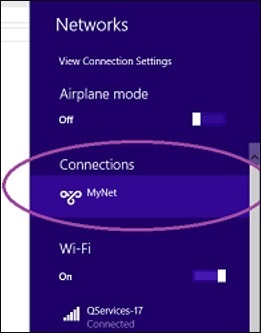
Step 6 − Click on that network as in this example ‘MyNet’ and connect. You will be connected to the network.