- Microsoft Azure Tutorial
- Microsoft Azure - Home
- Cloud Computing - Overview
- Microsoft Azure - Windows
- Microsoft Azure - Components
- Microsoft Azure - Compute Module
- Microsoft Azure - Fabric Controller
- Microsoft Azure - Storage
- Microsoft Azure - Blobs
- Microsoft Azure - Queues
- Microsoft Azure - Tables
- Microsoft Azure - CDN
- Microsoft Azure - Applications
- Microsoft Azure - Security
- Microsoft Azure - Datacenters
- Microsoft Azure - Scenarios
- Microsoft Azure Advanced
- Microsoft Azure - Management Portal
- Azure - Create Virtual Network
- Azure - Deploying Virtual Machines
- Azure - Endpoint Configuration
- Azure - Point-to-Site Connectivity
- Azure - Site-to-Site Connectivity
- Microsoft Azure - Traffic Manager
- Microsoft Azure - PowerShell
- Azure - Monitoring Virtual Machines
- Azure - Setting Up Alert Rules
- Azure - Application Deployment
- Microsoft Azure - Backup & Recovery
- Azure - Self-Service Capabilities
- Azure - Multi-Factor Authentication
- Azure - Forefront Identity Manager
- Azure - Data Import & Export Job
- Microsoft Azure - Websites
- Microsoft Azure - Scalability
- Microsoft Azure - Disk Configuration
- Microsoft Azure - Disk Caching
- Microsoft Azure - Personalize Access
- Azure - Personalize Company Brand
- Azure - Self-Service Password Reset
- Microsoft Azure - Self-Service Group
- Microsoft Azure - Create a Group
- Azure - Security Reports & Alerts
- Azure - Orchestrated Recovery
- Microsoft Azure - Health Monitoring
- Microsoft Azure - Upgrades
- Microsoft Azure Useful Resources
- Microsoft Azure - Quick Guide
- Microsoft Azure - Useful Resources
- Microsoft Azure - Discussion
Microsoft Azure - Storage
The Storage component of Windows Azure represents a durable store in the cloud. Windows Azure allows developers to store tables, blobs, and message queues. The storage can be accessed through HTTP. You can also create our own client; although Windows Azure SDK provides a client library for accessing the Storage.
In this chapter, we will learn how to create a Windows Azure Storage account and use it for storing data.
Creating Azure Storage Account
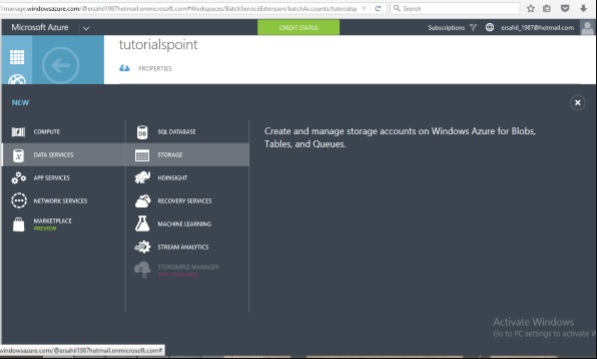
Step 1 − When you login into your Azure account, you can find ‘Storage’ under ‘Data Services’.
Step 2 − Click on ‘Quick Create’ and it will ask for ‘Account Name’.
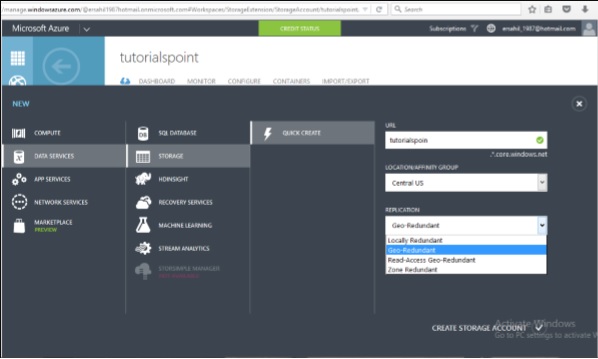
You can see there are four options in the ‘Replication’ dropdown. A copy of the data is kept so that it is durable and available at high speed. It is retained even in case of hardware failure. Let’s see what these options mean −
Locally redundant storage − Copy of the data is created in the same region where storage account is created. There are 3 copies of each request made against the data that resides on separate domains.
Zone-redundant storage (available for blobs only) − Copy of the data is created on separate facilities either in the same region or across two regions. The advantage is that even if there is failure on one facility, the data still can be retained. Three copies of data are created. One more advantage is that data can be read from a secondary location.
Geo-redundant storage − `Copy is created in a different region which means data is retained even if there is a failure in the complete region. The numbers of copies of data created are 6 in this case.
Read-access geo-redundant storage − This option allows reading of data from a secondary location when data on the primary location is not available. The number of copies created is 6. The main advantage here is that availability of data can be maximized.
There are different price plans for each replication option and the ‘Local Redundant’ is the cheapest of them all. So, choosing the replication of data depends on the cost and individual requirements.
Storage Account Endpoints
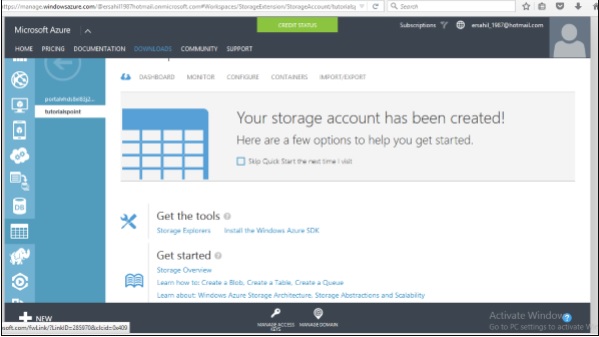
Step 1 − Click on the ‘Storage Account’ it will take you to the next screen.
Step 2 − Click on ‘Dashboard’ from top horizontal menu.
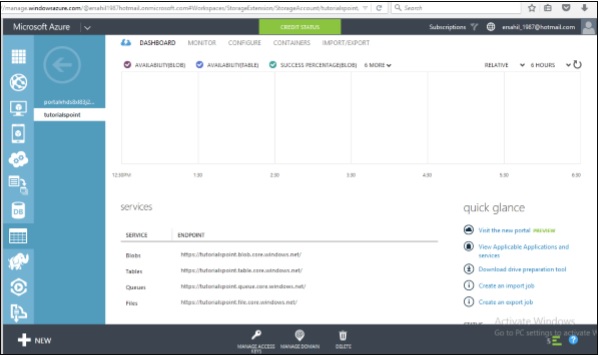
Here you can see four items under services. You can create blobs, tables, queues and files in this storage account.
There will a unique URL for each object. For example, here account name is ‘tutorialspoint’ then the default URL for blob is https://tutorialspoint.blob.core.windows.net Similarly, replace blob with table, queue and file in the URL to get the respective URLs. To access an object in the location is appended in the URL. For example, http://tutorialspoint.blob.core.windows.net/container1/blob1
Generating an Access Key
Access key is used to authenticate the access to the storage account. Two access keys are provided in order to access the account without interrupting it, in case, one key has to be regenerated.
To get the Access Keys, click on ‘Manage Access Keys’ in your storage account. The following screen will come up.
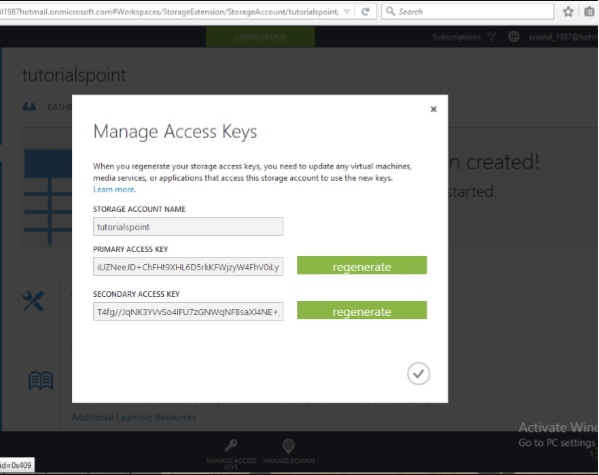
Regenerating the key at regular intervals is advised for security reasons.
Managing Data to Azure Storage
How can you upload or download data to Azure store? There are many ways to do it, but it can’t be done within the Azure portal itself. You will have to either create your own application or use an already built tool.
There are many tools available for accessing the data in an explorer that can be accessed by clicking on ‘Storage Explorer’ under ‘Get the Tools’ in your Azure storage account. Alternatively, an application can also be built using Software Development Kit (SDK) available in Windows Azure Portal. Using the PowerShell commands is also an option to upload data. PowerShell is a command line application that facilitates administering and managing the Azure storage. Preset commands are used for different tasks to manage the storage.
You can install PowerShell by going to ‘Downloads’ on the following screen in your account. You will find it under Command-Line tools.
There are specific commands for each task. You can manage you storage account, create a new account, and create a container. Additionally, blobs, tables, queues messages can also be managed using PowerShell.