- Adobe Flex Tutorial
- Flex - Home
- Flex - Overview
- Flex - Environment
- Flex - Applications
- Flex - Create Application
- Flex - Deploy Application
- Flex - Life Cycle Phases
- Flex - Style with CSS
- Flex - Style with Skin
- Flex - Data Binding
- Flex - Basic Controls
- Flex - Form Controls
- Flex - Complex Controls
- Flex - Layout Panels
- Flex - Visual Effects
- Flex - Event Handling
- Flex - Custom Controls
- Flex - RPC Services
- Flex - FlexUnit Integration
- Flex - Debug Application
- Flex - Internationalization
- Flex - Printing Support
- Adobe Flex Resources
- Flex - Quick Guide
- Flex - Useful Resources
- Flex - Discussion
Flex - Quick Guide
Flex - Overview
What is Flex?
Flex is a powerful, open source application framework that allows you to build traditional applications for browser, mobile and desktop using the same programming model, tool, and codebase.
Flex provides FLEX SDK consisting of the Flex class library (ActionScript classes), the Flex compilers, the debugger, the MXML and ActionScript programming languages, and other utilities to build expressive and interactive rich internet applications (RIA)
Flex takes care of the user interface (UI) or the client-side functionality of a web application. Server-side functionality is dependent on server-side components written in a traditional scripting language (Java/ PHP etc.)
A Flex based application actually delivered as a SWF file and it closely resembles the HTML / JavaScript portion of a traditional web application.
Flex application is deployed as SWF file(s) plus an HTML wrapper, the CSS file(s) and any server-side script files (i.e. Java, .CFM, .PHP, etc.) to the server. Like traditional web applications.
These resources are delivered from a server to the client’s browser using the customary HTTP request / response fashion and Flash Player which runs the application in a browser.
Advantages of Flex
Flex applications are usually Flash Player based which can access device capabilities like GPS, camera, local database, graphics accelerometer.
Flex applications can run on Android, BlackBerry Tablet OS, and iOS devices.
Flex applications can run on Browsers as well as on Desktop.
Flex applications are platform independent. UI can be native to platform or can be made same on each platform.
Flex applications can interact with server with all major server side technologies like Java, Spring, Hibernate, PHP, Ruby, .NET, Adobe ColdFusion, and SAP using industry standards such as REST, SOAP, JSON, JMS, and AMF.
Flex Applications assures rich user experience through intuitive interaction with the application and presenting information in a visually richer interface.
Flex application is a single page application where states can transition from one state to other state without having to fetch a new page from the server or to refresh the browser.
Flex application reduces the load on the server to great extent because it is only required to return the application once, rather than a new page every time when the user changes views.
Disadvantages of Flex
Flex applications are single threaded applications but Flex provides an asynchronous programming model to mitigate this concern.
Flex is ActionScript and XML based. Learning of these two is a must to work in Flex.
Flex - Environment Setup
This tutorial will guide you on how to prepare a development environment to start your work with Adobe Flex Framework. This tutorial will also teach you how to setup JDK and Adobe Flash Builder on your machine before you setup Flex Framework.
System Requirement
FLEX requires JDK 1.4 or higher, so the very first requirement is to have JDK installed in your machine.
| JDK | 1.4 Or above. |
|---|---|
| Memory | No minimum requirement. |
| Disk Space | No minimum requirement. |
| Operating System | No minimum requirement. |
Follow the given steps to setup your environment to start with Flex application development.
Step 1 - Verify Java installation on your machine
Now open the console and execute the following java command.
| OS | Task | Command |
|---|---|---|
| Windows | Open Command Console | c:\> java -version |
| Linux | Open Command Terminal | $ java -version |
| Mac | Open Terminal | machine:~ joseph$ java -version |
Let's verify the output for all the operating systems −
| OS | Generated Output |
|---|---|
| Windows | java version "1.6.0_21" Java(TM) SE Runtime Environment (build 1.6.0_21-b07) Java HotSpot(TM) Client VM (build 17.0-b17, mixed mode, sharing) |
| Linux | java version "1.6.0_21" Java(TM) SE Runtime Environment (build 1.6.0_21-b07) Java HotSpot(TM) Client VM (build 17.0-b17, mixed mode, sharing) |
| Mac | java version "1.6.0_21" Java(TM) SE Runtime Environment (build 1.6.0_21-b07) Java HotSpot(TM)64-Bit Server VM (build 17.0-b17, mixed mode, sharing) |
Step 2 - Setup Java Development Kit (JDK)
If you do not have Java installed, then you can install the Java Software Development Kit (SDK) from Oracle's Java site Java SE Downloads. You will find instructions for installing JDK in downloaded files, then follow the given instructions to install and configure the setup. Finally set PATH and JAVA_HOME environment variables to refer to the directory that contains java and javac, typically java_install_dir/bin and java_install_dir respectively.
Set the JAVA_HOME environment variable to point to the base directory location where Java is installed on your machine. For example −
| OS | Output |
|---|---|
| Windows | Set the environment variable JAVA_HOME to C:\Program Files\Java\jdk1.6.0_21 |
| Linux | export JAVA_HOME=/usr/local/java-current |
| Mac | export JAVA_HOME=/Library/Java/Home |
Append the Java compiler location to the System Path.
| OS | Output |
|---|---|
| Windows | Append the string ;%JAVA_HOME%\bin to the end of the system variable, Path. |
| Linux | export PATH=$PATH:$JAVA_HOME/bin/ |
| Mac | not required |
Step 3 - Setup Adobe Flash Builder 4.5
All the examples in this tutorial has been written using Adobe Flash Builder 4.5 Profession IDE Trial Version. Hence, suggest you to have latest version of Adobe Flash Builder installed on your machine. Also, check compatibility of operating system.
To install Adobe Flash Builder IDE, download the latest Adobe Flash Builder binaries from https://www.adobe.com/in/products/flash-builder.html. Once you downloaded the installation, unpack the binary distribution into a convenient location. For example, in C:\flash-builder on windows, or /usr/local/flash-builder on Linux/Unix and finally set PATH variable appropriately.
Flash Builder will start, when you execute the following commands on windows machine, or when you can simply double click on FlashBuilder.exe
%C:\flash-builder\FlashBuilder.exe
Flash Builder can be started by executing the following commands on Unix (Solaris, Linux, etc.) machine −
$/usr/local/flash-builder/FlashBuilder
Adobe Flash Builder Trial Version can be used for 60 days. Just accept the terms and conditions, and skip the initial registration steps to continue with the IDE. For our understanding, we’re using the trial version for teaching purpose.
After a successful startup, if everything is fine then it should display the following result −
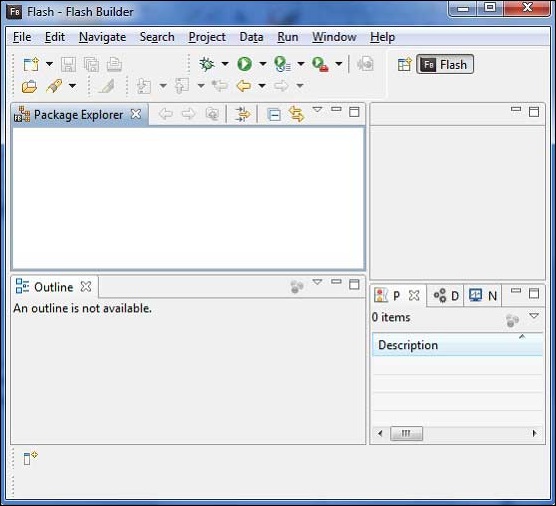
Adobe Flash Builder comes pre-configured with FLEX SDKs. We're using FLEX SDK 4.5 in our examples which come bundled with Adobe Flash Builder 4.5.
Step 4 – Setup Apache Tomcat
You can download the latest version of Tomcat from https://tomcat.apache.org/. Once, you downloaded the installation, unpack the binary distribution into a convenient location. For example, in C:\apache-tomcat-6.0.33 on windows, or /usr/local/apache-tomcat-6.0.33 on Linux/Unix and set CATALINA_HOME environment variable pointing to the installation locations.
Tomcat can be started by executing the following commands on windows machine, or you can simply double click on startup.bat
%CATALINA_HOME%\bin\startup.bat
or
C:\apache-tomcat-6.0.33\bin\startup.bat
Tomcat can be started by executing the following commands on UNIX (Solaris, Linux, etc.) machine −
$CATALINA_HOME/bin/startup.sh
Or
/usr/local/apache-tomcat-6.0.33/bin/startup.sh
After a successful startup, the default web applications included with Tomcat will be available by visiting http://localhost:8080/. If everything is fine, then it should display the following result −
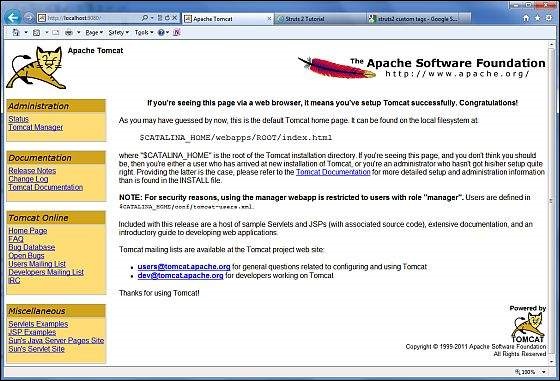
Further information about configuring and running Tomcat can be found in the documentation included here, as well as on the Tomcat web site: http://tomcat.apache.org
Tomcat can be stopped by executing the following commands on windows machine −
%CATALINA_HOME%\bin\shutdown
Or
C:\apache-tomcat-5.5.29\bin\shutdown
Tomcat can be stopped by executing the following commands on UNIX (Solaris, Linux, etc.) machine −
$CATALINA_HOME/bin/shutdown.sh
Or
/usr/local/apache-tomcat-5.5.29/bin/shutdown.sh
Flex - Applications
Before we start creating actual “HelloWorld” application using Flash Builder, let us see what the actual parts of a Flex application are −
A Flex application consists of the following four important parts, out of which last part is optional but first three parts are mandatory.
- Flex Framework Libraries
- Client-side code
- Public Resources (HTML/JS/CSS)
- Server-side code
Sample locations of different parts of a typical Flex application like HelloWord will be as shown below −
| Name | Location |
|---|---|
| Project root | HelloWorld/ |
| Flex Framework Libraries | Build Path |
| Public resources | html-template |
| Client-side code | table table-bordered/com/tutorialspoint/client |
| Server-side code | table table-bordered/com/tutorialspoint/server |
Application Build Process
To start with, Flex application requires Flex framework libraries. Later, Flash Builder automatically adds the libraries to build path.
When we build our code using Flash builder, Flash builder will do the following tasks −
Compiles the source code to HelloWorld.swf file.
Compiles a HelloWorld.html (a wrapper file for swf file) from a file index.template.html stored in html-template folder
Copies HelloWorld.swf and HelloWorld.html files in target folder, bin-debug.
Copies swfobject.js, a JavaScript code responsible to load swf file dynamically in HelloWorld.html in target folder, bin-debug
Copies framework libraries in form of swf file named frameworks_xxx.swf in target folder, bin-debug
Copies other flex modules (.swf files such as sparkskins_xxx.swf, textLayout_xxx.swf) in target folder.
Application Launch Process
Open the HelloWorld.html file available in \HelloWorld\bin-debug folder in any web-browser.
HelloWorld.swf will load automatically and application will start running.
Flex Framework Libraries
Following is the brief detail about few important framework libraries. Please note that, Flex libraries are denoted using .swc notation
| Sr.No | Nodes & Description |
|---|---|
| 1 | playerglobal.swc This library is specific to FlashPlayer installed on your machine and contains native methods supported by flash player. |
| 2 | textlayout.swc This library supports the text layout related features. |
| 3 | framework.swc This is the flex framework library contains the core features of Flex. |
| 4 | mx.swc This library stores the definitions of mx UI controls. |
| 5 | charts.swc This library supports the charting controls. |
| 6 | spark.swc This library stores the definitions of spark UI controls. |
| 7 | sparkskins.swc This library supports the skinning of spark UI controls. |
Client-side Code
Flex application code can be written in MXML as well as ActionScript.
| Sr.No | Type & Description |
|---|---|
| 1 | MXML MXML is an XML markup language that we'll use to lay out user interface components. MXML is compiled into ActionScript during build process. |
| 2 | ActionScript ActionScript is an object-oriented procedural programming language and is based on the ECMAScript (ECMA-262) edition 4 draft language specification. |
In Flex, we can mix ActionScript and MXML, to do the following −
Layout user interface components using MXML tags
Use MXML to declaratively define nonvisual aspects of an application, such as access to data sources on the server
Use MXML to create data bindings between user interface components and data sources on the server.
Use ActionScript to define event listeners inside MXML event attributes.
Add script blocks using the
Include external ActionScript files.
Import ActionScript classes.
Create ActionScript components.
Public Resources
These are help files referenced by Flex application, such as Host HTML page, CSS or images located under html-template folder. It contains following files −
| Sr.No | File Name & Description |
|---|---|
| 1 | index.template.html Host HTML page, with place holders. Flash Builder uses this template to build actual page HelloWorld.html with HelloWorld.swf file. |
| 2 | playerProductInstall.swf This is a flash utility to install Flash Player in express mode. |
| 3 | swfobject.js This is the JavaScript responsible to check version of flash player installed and to load HelloWorld.swf in HelloWorld.html page. |
| 4 | html-template/history This folder contains resources for history management of the application. |
HelloWorld.mxml
This is the actual MXML/AS (ActionScript) code written implementing the business logic of the application and that the Flex compiler translates into SWF file which will be executed by flash player in the browser.
A sample HelloWorld Entry class will be as follows −
<?xml version = "1.0" encoding = "utf-8"?>
<s:Application xmlns:fx = "http://ns.adobe.com/mxml/2009"
   xmlns:s = "library://ns.adobe.com/flex/spark"
   xmlns:mx = "library://ns.adobe.com/flex/mx"
   width = "100%" height = "100%"
   minWidth = "500" minHeight = "500"
   initialize = "application_initializeHandler(event)">

   <fx:Script>
      <![CDATA[
         import mx.controls.Alert;
         import mx.events.FlexEvent;
         protected function btnClickMe_clickHandler(event:MouseEvent):void {
            Alert.show("Hello World!");
         }

         protected function application_initializeHandler(event:FlexEvent):void {
            lblHeader.text = "My Hello World Application";
         }
      ]]>
   </fx:Script>

   <s:VGroup horizontalAlign = "center" width = "100%" height = "100%"
      paddingTop = "100" gap = "50">
      <s:Label id = "lblHeader" fontSize = "40" color = "0x777777" />
      <s:Button label = "Click Me!" id = "btnClickMe"
         click = "btnClickMe_clickHandler(event)" />
   </s:VGroup>
</s:Application>
Following table gives the description of all the tags used in the above code script.
| Sr.No | Node & Description |
|---|---|
| 1 | Application Defines the Application container that is always the root tag of a Flex application. |
| 2 | Script Contains the business logic in ActionScript language. |
| 3 | VGroup Defines a Vertical Grouping Container which can contain Flex UI controls in vertical fashion. |
| 4 | Label Represents a Label control, a very simple user interface component that displays text. |
| 5 | Button Represents a Button control, which can be clicked to do some action. |
Server-side code
This is the server side part of your application and it’s very much optional. If you are not doing any backend processing within your application, then you do not need this part but if there is some processing required at backend and your clientside application interacts with the server, then you will have to develop these components.
In the next chapter, we will use all the above-mentioned concepts to create a HelloWorld application using Flash Builder.
Flex - Create Application
We'll use Flash Builder 4.5 to create Flex Applications. Let's start with a simple HelloWorld application.
Step 1 – Create Project
The first step is to create a simple Flex Project using Flash Builder IDE. Launch project wizard using the option File > New > Flex Project. Now name your project as HelloWorld using the wizard window as follows −
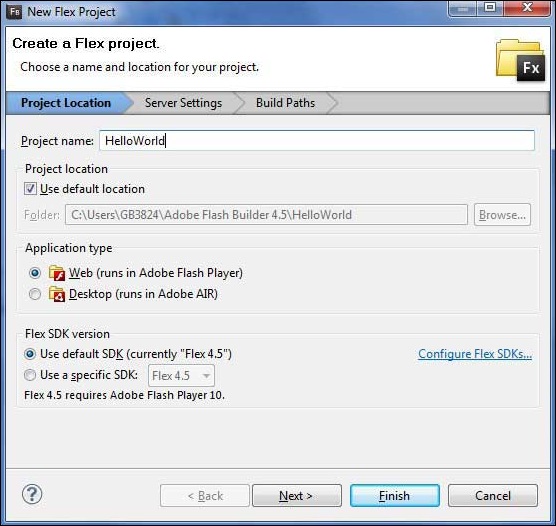
Select Application Type Web (runs in Adobe Flash Player). However, if this is not selected, then leave other default values as such and click Finish Button. Once your project is created successfully, then you will have the following content in your Project Explorer −
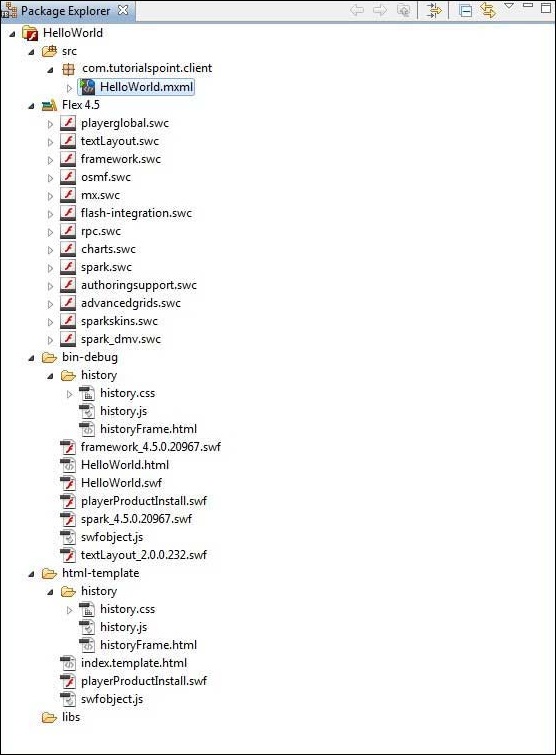
Here is a brief description of all the important folders −
| Folder | Location |
|---|---|
| table table-bordered |
Source code (mxml / as classes) files. We've created com/tutorialspoint/client folder structure containing the client-side specific java classes responsible for client UI display. |
| bin-debug | This is the output part, it represents the actual deployable web application. History folder contains support files for history management of Flex application. framework_xxx.swf, flex framework files should be used by flex application. HelloWorld.html, wrapper/host HTML File for flex application. HelloWorld.swf, our flex based application. playerProductInstall.swf, flash player express installer. spark_xxx.swf, library for spark component support. swfobject.js, JavaScript responsible to load HelloWorld.swf in HelloWorld.html. It checks flash player version and passes initialization parameter to HelloWorld.swf file. textLayout_xxx.swf, library for text component support. |
| html-template |
This represents the configurable web application. Flash Builder compiles files from html-template to bin-debug folder. History folder contains support files for history management of Flex application. index.template.html, wrapper/host HTML File for flex application having place holders for Flash Builder specific configuration. Gets compiled to HelloWorld.html in bin-debug folder during build. playerProductInstall.swf, flash player express installer gets copied to bin-debug folder during build. swfobject.js, JavaScript responsible to load HelloWorld.swf in HelloWorld.html. It checks flash player version and passes initialization parameter to HelloWorld.swf file gets copied to bindebug folder during build. |
Step 2 – Create External CSS File
Create a CSS file styles.css for Wrapper HTML page in html-template folder.
html, body {
   height:100%;
}

body {
   margin:0;
   padding:0;
   overflow:auto;
   text-align:center;
}

object:focus {
   outline:none;
}

#flashContent {
   display:none;
}

.pluginHeader {
   font-family:Arial, Helvetica, sans-serif;
   font-size:14px;
   color:#9b1204;
   text-decoration:none;
   font-weight:bold;
}

.pluginInstallText {
   font-family:Arial, Helvetica, sans-serif;
   font-size:12px;
   color:#000000;
   line-height:18px;
   font-style:normal;
}

.pluginText {
   font-family:Arial, Helvetica, sans-serif;
   font-size:12px;
   color:#000000;
   line-height:18px;
   font-style:normal;
}
Step 3 – Modify Wrapper HTML page template
Modify Wrapper HTML page template index.template.html in htmltemplate folder. Flash Builder will create a default Wrapper HTML page template html-template/index.template.html, which will be compiled to HelloWorld.html.
This file contains placeholders which Flash Builder replaces during the compilation process. For example, flash player version, application name, etc.
Let us modify this file to display custom messages in case flash plugin is not installed.
<!DOCTYPE html PUBLIC "-//W3C//DTD XHTML 1.0 Transitional//EN"
"http://www.w3.org/TR/xhtml1/DTD/xhtml1-transitional.dtd">
<html xmlns = "http://www.w3.org/1999/xhtml" lang = "en" xml:lang = "en">

   <head>
      <title>${title}</title>
      <meta name = "google" value = "notranslate" />
      <meta http-equiv = "Content-Type" content = "text/html; charset = utf-8" />
      <link rel = "stylesheet" href = "styles.css" type = "text/css"></link>
      <link rel = "stylesheet" type = "text/css" href = "history/history.css" />
      <script type = "text/javascript" table table-bordered = "history/history.js">
      </script>
      <script type = "text/javascript" table table-bordered = "swfobject.js"></script>

      <script type = "text/javascript">
         // For version detection, set to min. required Flash Player version,
         //or 0 (or 0.0.0), for no version detection.
         var swfVersionStr = "${version_major}.${version_minor}.${version_revision}";

         // To use express install, set to playerProductInstall.swf,
         //otherwise the empty string.
         var xiSwfUrlStr = "${expressInstallSwf}";
         var flashvars = {};
         var params = {};
         params.quality = "high";
         params.bgcolor = "${bgcolor}";
         params.allowscriptaccess = "sameDomain";
         params.allowfullscreen = "true";

         var attributes = {};
         attributes.id = "${application}";
         attributes.name = "${application}";
         attributes.align = "middle";
         swfobject.embedSWF (
            "${swf}.swf", "flashContent",
            "${width}", "${height}",
            swfVersionStr, xiSwfUrlStr,
            flashvars, params, attributes);

         // JavaScript enabled so display the flashContent div in case
         //it is not replaced with a swf object.
         swfobject.createCSS("#flashContent", "display:block;text-align:left;");
      </script>
   </head>

   <body>
      <div id = "flashContent">
         <p style = "margin:100px;">

            <table width = "700" cellpadding = "10" cellspacing = "2" border = "0">
               <tr>
                  <td class = "pluginHeader">Flash Player Required</td>
               </tr>

               <tr>
                  <td class = "pluginText">The Adobe Flash Player version
                     10.2.0 or greater is required.</td>
               </tr>

               <tr>
                  <td class = "pluginInstallText" align = "left">

                  <table border = "0" width = "100%">
                     <tr class = "pluginInstallText" >
                        <td>Click here to download and install Adobe Flash Player:</td>
                        <td> </td>
                        <td align = "right">
                           <script type = "text/javascript">
                              var pageHost
                                 = ((document.location.protocol == "https:") ? "https://" : "http://");
                              document.write("<a target = '_blank'"
                                 +" href = 'http://get.adobe.com/flashplayer/'><"
                                 +"img style = 'border-style: none' table table-bordered = '"
                                 +pageHost
                                 +"www.adobe.com/images/shared/download_buttons/get_flash_player.gif'"
                                 +" alt = 'Get Adobe Flash player' /></a>" );
                           </script>
                        </td>
                     </tr>
                  </table>
               </tr>
            </table>
         </p>
      </div>

      <noscript>
         <object classid = "clsid:D27CDB6E-AE6D-11cf-96B8-444553540000"
            width = "${width}" height = "${height}" id = "${application}">
            <param name = "movie" value = "${swf}.swf" />
            <param name = "quality" value = "high" />
            <param name = "bgcolor" value = "${bgcolor}" />
            <param name = "allowScriptAccess" value = "sameDomain" />
            <param name = "allowFullScreen" value = "true" />

            <!--[if !IE]>-->
            <object type = "application/x-shockwave-flash" data = "${swf}.swf"
               width = "${width}" height = "${height}">
               <param name = "quality" value = "high" />
               <param name = "bgcolor" value = "${bgcolor}" />
               <param name = "allowScriptAccess" value = "sameDomain" />
               <param name = "allowFullScreen" value = "true" />
            <!--<![endif]-->

            <!--[if gte IE 6]>-->
               <p>
                  <p style = "margin:100px;">
                     <table width = "700" cellpadding = "10" cellspacing = "2"
                        border = "0">
                        <tr>
                           <td class = "pluginHeader">Flash Player Required</td>
                        </tr>

                        <tr>
                           <td class = "pluginText">The Adobe Flash Player version
                           10.2.0 or greater is required.</td>
                        </tr>

                        <tr>
                           <td class = "pluginInstallText" align = "left">

                           <table border = "0" width = "100%">
                              <tr class = "pluginInstallText" >
                                 <td>Click here to download and install Adobe Flash
                                    Player:</td>
                                 <td> </td>
                                 <td align = "right">
                                    <script type = "text/javascript">
                                       var pageHost
                                          = ((document.location.protocol == "https:") ? "https://" : "http://");
                                       document.write("<a target = '_blank'"
                                          +" href = 'http://get.adobe.com/flashplayer/'><"
                                          +"img style = 'border-style: none' table table-bordered = '"
                                          +pageHost
                                          +"www.adobe.com/images/shared/download_buttons/get_flash_player.gif'"
                                          +" alt = 'Get Adobe Flash player' /></a>" );
                                    </script>
                                 </td>
                              </tr>
                           </table>
                        </tr>
                     </table>
                  </p>
               </p>
            <!--<![endif]-->

            <p style = "margin:100px;">
               <table width = "700" cellpadding = "10" cellspacing = "2" border = "0">
                  <tr><td class = "pluginHeader">Flash Player Required</td></tr>
                  <tr><td class = "pluginText">The Adobe Flash Player version
                     10.2.0 or greater is required.</td></tr>
                  <tr>
                     <td class = "pluginInstallText" align = "left">
                        <table border = "0" width = "100%">
                           <tr class = "pluginInstallText" >
                              <td>Click here to download and install Adobe Flash
                                 Player:</td>
                              <td> </td>
                              <td align = "right">
                                 <script type = "text/javascript">
                                    var pageHost
                                       = ((document.location.protocol == "https:") ? "https://" : "http://");
                                    document.write("<a target = '_blank'"
                                       +" href = 'http://get.adobe.com/flashplayer/'><"
                                       +"img style = 'border-style: none' table table-bordered = '"
                                       +pageHost
                                       +"www.adobe.com/images/shared/download_buttons/get_flash_player.gif'"
                                       +" alt = 'Get Adobe Flash player' /></a>" );
                                 </script>
                              </td>
                           </tr>
                        </table>
                     </td>
                  </tr>
               </table>
            </p>
         <!--[if !IE]>-->
         </object>
         <!--<![endif]-->
         </object>
      </noscript>
   </body>
</html>
Step 4 – Create Internal CSS file
Create a CSS file Style.css for HelloWorld.mxml in table tablebordered/com/tutorialspoint folder. Flex provides similar css styles for its UI Controls as there are css styles for HTML UI controls.
/* CSS file */
@namespace s "library://ns.adobe.com/flex/spark";
@namespace mx "library://ns.adobe.com/flex/mx";

.heading {
   fontFamily: Arial, Helvetica, sans-serif;
   fontSize: 17px;
   color: #9b1204;
   textDecoration:none;
   fontWeight:normal;
}

.button {
   fontWeight: bold;
}

.container {
   cornerRadius :10;
   horizontalCenter :0;
   borderColor: #777777;
   verticalCenter:0;
   backgroundColor: #efefef;
}
Step 5 – Modify Entry Level Class
Flash Builder will create a default mxml file table tablebordered/com.tutorialspoint/HelloWorld.mxml, which is having root tag <application> container for the application. Let us modify this file to display "Hello,World!" −
<?xml version = "1.0" encoding = "utf-8"?>
<s:Application xmlns:fx = "http://ns.adobe.com/mxml/2009"
   xmlns:s = "library://ns.adobe.com/flex/spark"
   xmlns:mx = "library://ns.adobe.com/flex/mx
   width = "100%" height = "100%"
      minWidth = "500" minHeight = "500"
      initialize = "application_initializeHandler(event)">

   <fx:Style source = "/com/tutorialspoint/client/Style.css" />
   <fx:Script>
      <![CDATA[
         import mx.controls.Alert;
         import mx.events.FlexEvent;
         protected function btnClickMe_clickHandler(event:MouseEvent):void {
            Alert.show("Hello World!");
         }

         protected function application_initializeHandler(event:FlexEvent):void {
            lblHeader.text = "My Hello World Application";
         }
      ]]>
   </fx:Script>

   <s:BorderContainer width = "500" height = "500" id = "mainContainer"
      styleName = "container">
      <s:VGroup width = "100%" height = "100%" gap = "50" horizontalAlign = "center"
         verticalAlign = "middle">
         <s:Label id = "lblHeader" fontSize = "40" color = "0x777777"
            styleName = "heading" />
         <s:Button label = "Click Me!" id = "btnClickMe"
            click = "btnClickMe_clickHandler(event)" styleName = "button" />
      </s:VGroup>
   </s:BorderContainer>
</s:Application>
You can create more mxml or actionscript files in the same source directory to define either new applications or to define helper routines.
Step 6 – Build Application
Flash Builder has Build Automatically by default checked. Just check the Problems View if there is any error. Once you are done with the changes, you will not see any errors.
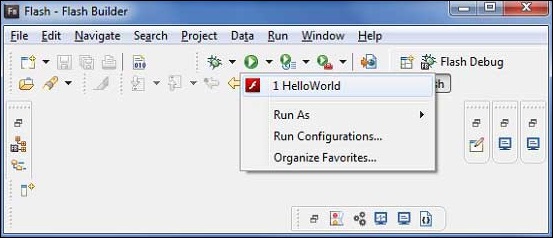
Step 7 – Run Application
Now click on ![]() Run application menu and select HelloWorld application to run the application.
Run application menu and select HelloWorld application to run the application.
If everything is fine, you must see browser pop up, application up, and running. If everything is fine with your application, it will produce the following result: [ Try it online ]
Because, you are running your application in flash player, then it will need to install Flash Player plugin for your browser. Simply follow the onscreen instructions to install the plugin. If you already have Flash Player plugin set for your browser, then you should be able to see the following output −
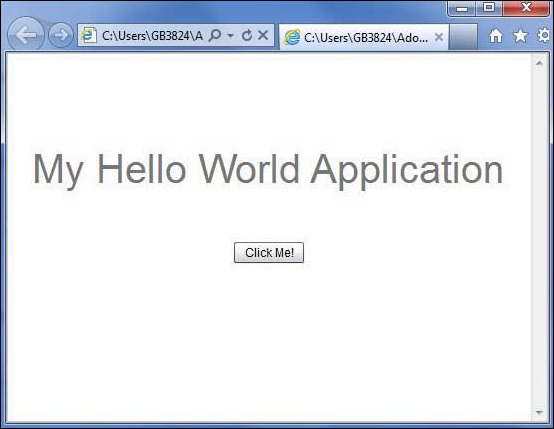
Congratulations! You have implemented your first application using Flex.
Flex - Deploy Application
This tutorial will explain you how to create an application war file and how to deploy that in Apache Tomcat Web server root.
If you understood this simple example then you will also be able to deploy a complex Flex application following the same steps.
Let us follow the following steps to create a Flex application −
| Step | Description |
|---|---|
| 1 | Create a project with a name HelloWorld under a packagecom.tutorialspoint.client as explained in the Flex - Create Application chapter. |
| 2 | Modify HelloWorld.mxml as explained below. Keep rest of the files unchanged. |
| 3 | Compile and run the application to make sure business logic is working as per the requirements. |
Follow the steps given below to create a release build of a Flex application and then deploy it to tomcat server −
The first step is to create a release build using Flash Builder IDE. Launch release build wizard using the option File > Export > Flash Builder > Release Build.
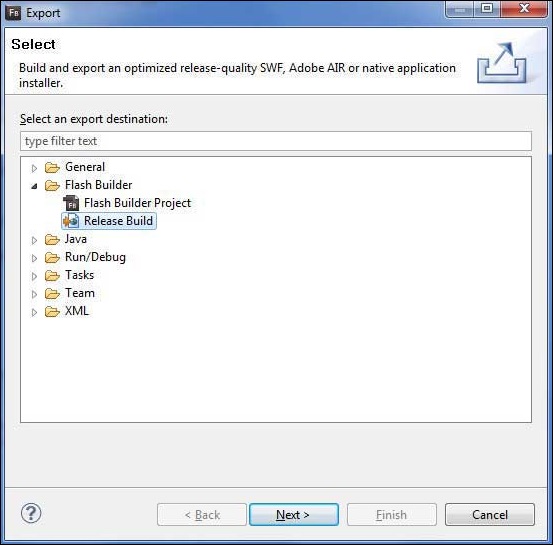
Select project as HelloWorld using the wizard window as follows
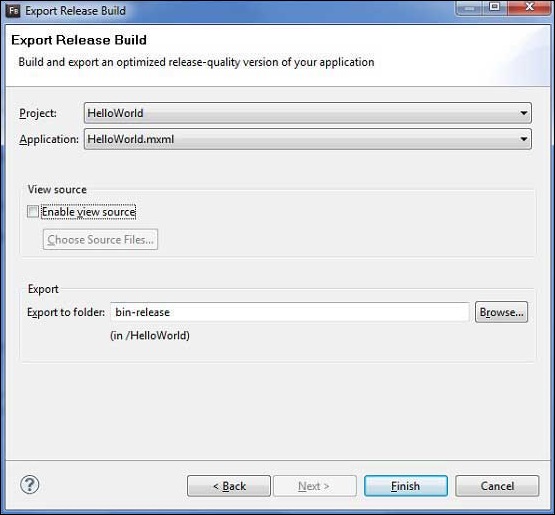
Leave other default values as such and click Finish Button. Now, Flash Builder will create a bin-release folder containing the project's release build.
Now our release build is ready, let us follow the following steps to deploy a Flex application −
| Step | Description |
|---|---|
| 1 | Zip the content of the bin-release folder of the application in the form of HelloWorld.war file and deploy it in Apache Tomcat Webserver. |
| 2 | Launch your web application using appropriate URL as explained below in the last step. |
Following is the content of the modified mxml file table table-bordered/com.tutorialspoint/HelloWorld.mxml.
<?xml version = "1.0" encoding = "utf-8"?>
<s:Application xmlns:fx = "http://ns.adobe.com/mxml/2009"
   xmlns:s = "library://ns.adobe.com/flex/spark"
   xmlns:mx = "library://ns.adobe.com/flex/mx"
   width = "100%" height = "100%"
   minWidth = "500" minHeight = "500"
   initialize = "application_initializeHandler(event)">

   <fx:Style source = "/com/tutorialspoint/client/Style.css" />
   <fx:Script>
      <![CDATA[
         import mx.controls.Alert;
         import mx.events.FlexEvent;
         protected function btnClickMe_clickHandler(event:MouseEvent):void {
            Alert.show("Hello World!");
         }

         protected function application_initializeHandler(event:FlexEvent):void {
            lblHeader.text = "My Hello World Application";
         }
      ]]>
   </fx:Script>

   <s:BorderContainer width = "500" height = "500" id = "mainContainer"
      styleName = "container">
      <s:VGroup width = "100%" height = "100%" gap = "50" horizontalAlign = "center"
         verticalAlign = "middle">
         <s:Label id = "lblHeader" fontSize = "40" color = "0x777777"
            styleName = "heading" />
         <s:Button label = "Click Me!" id = "btnClickMe"
            click = "btnClickMe_clickHandler(event)" styleName = "button" />
      </s:VGroup>
   </s:BorderContainer>
</s:Application>
Once you are ready with all the changes done, let us compile and run the application in normal mode as we did in Flex - Create Application chapter. If everything is fine with your application, then it will produce the following result: [ Try it online ]
Create WAR File
Now our application is working fine and we are ready to export it as a war file. Follow the following steps −
Go into your project's bin-release directory C:\workspace\HelloWorld\binrelease
Select all the files & folders available inside bin-release directory.
Zip all the selected files & folders in a file called HelloWorld.zip.
Rename HelloWorld.zip to HelloWorld.war.
Deploy WAR file
Stop the tomcat server.
Copy the HelloWorld.war file to tomcat installation directory > webapps folder.
Start the tomcat server.
Look inside webapps directory, there should be a folder HelloWorld got created.
Now HelloWorld.war is successfully deployed in Tomcat Webserver root.
Run Application
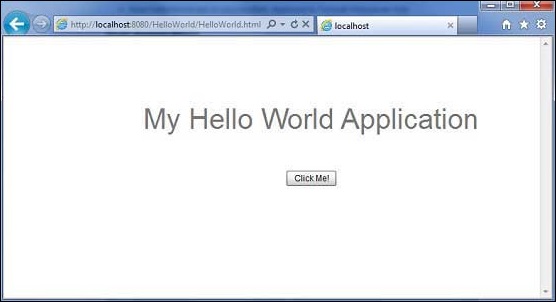
Enter a URL in web browser −
http://localhost:8080/HelloWorld/HelloWorld.html to launch the application.
Server name (localhost) and port (8080) may vary as per your tomcat configuration.
Flex - Life Cycle Phases
Life Cycle of Flex Application
Although, you can build Flex applications without understanding the life cycle phases of an application, it is good to know the basic mechanism; the order in which things occur. It will help you to configure features such as loading other Flex applications at runtime, and manage the process of loading and unloading class libraries and assets at runtime.
A good understanding of the Flex application life cycle will enable you to build better applications and optimize them because you will know where to optimally run code. For example, if you need to ensure that some code runs during a preloader, you need to know where to place the code for that event.

When we load flex application in a browser, the following events occurs during the lifecycle of flex application.
Following is the brief detail about different Flex Life cycle events.
| Sr.No | Event & Description |
|---|---|
| 1 | preInitialize: mx.core.UIComponent.preinitialize Event Type: mx.events.FlexEvent.PREINITIALIZE This event is dispatched at the beginning of the component initialization sequence. The component is in a very raw state when this event is dispatched. Many components, such as Button control creates internal child components to implement functionality. For example, the Button control creates an internal UI TextField component to represent its label text. When Flex dispatches the pre-initialize event, the children, including all the internal children, of a component have not yet been created. |
| 2 | initialize: mx.core.UIComponent.initialize Event Type: mx.events.FlexEvent.INITIALIZE This event is dispatched after pre-initialize phase. Flex framework initializes the internal structure of this component during this phase. This event automatically fires when the component is added to a parent. You do not need to call initialize() generally. |
| 3 | creationComplete: mx.core.UIComponent.creationComplete Event Type: mx.events.FlexEvent.CREATION_COMPLETE This event is dispatched when the component has finished its construction, property processing, measuring, layout, and drawing. At this point, depending on its visible property, the component is not visible even though it has been drawn. |
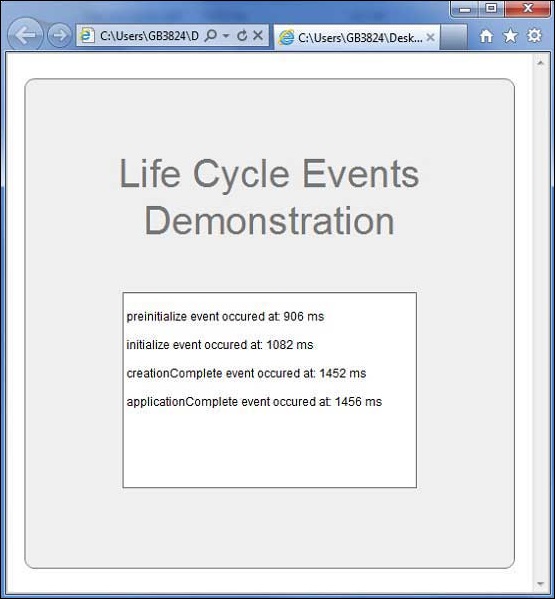
| 4 | applicationComplete: spark.components.Application.applicationComplete Event Type:mx.events.FlexEvent.APPLICATION_COMPLETE Dispatched after the Application has been initialized, processed by the LayoutManager, and attached to the display list. This is the last event of the application creation life cycle and signifies that application has been loaded completely. |
Flex Life Cycle Example
Let us follow the steps to understand test life cycle of a Flex application by creating a test application −
| Step | Description |
|---|---|
| 1 | Create a project with a name HelloWorld under a packagecom.tutorialspoint.client as explained in the Flex - Create Application chapter. |
| 2 | Modify HelloWorld.mxml as explained below. Keep rest of the files unchanged. |
| 3 | Compile and run the application to make sure business logic is working as per the requirements. |
Following is the content of the modified mxml file src/com.tutorialspoint/HelloWorld.mxml.
<?xml version = "1.0" encoding = "utf-8"?>
<s:Application xmlns:fx = "http://ns.adobe.com/mxml/2009"
   xmlns:s = "library://ns.adobe.com/flex/spark"
   xmlns:mx = "library://ns.adobe.com/flex/mx"
   width = "100%" height = "100%" minWidth = "500" minHeight = "500"
   initialize = "reportEvent(event)"
   preinitialize = "reportEvent(event)"
   creationComplete = "reportEvent(event)"
   applicationComplete = "reportEvent(event)">

   <fx:Style source = "/com/tutorialspoint/client/Style.css" />
   <fx:Script>
      <![CDATA[
         import mx.controls.Alert;
         import mx.events.FlexEvent;

         [Bindable]
         private var report:String = "";

         private function reportEvent(event:FlexEvent):void {
            report += "\n" + (event.type + " event occured at: "
            + getTimer() + " ms" + "\n");
         }
      ]]>
   </fx:Script>

   <s:BorderContainer width = "500" height = "500" id = "mainContainer"
      styleName = "container">
      <s:VGroup width = "100%" height = "100%" gap = "50"
         horizontalAlign = "center" verticalAlign = "middle">
         <s:Label textAlign = "center" width="100%" id = "lblHeader"
         fontSize = "40" color = "0x777777" styleName = "heading"
         text = "Life Cycle Events Demonstration" />
         <s:TextArea id = "reportText" text = "{report}" editable = "false"
         width = "300" height = "200">
         </s:TextArea>
      </s:VGroup>
   </s:BorderContainer>
</s:Application>
Once you are ready with all the changes done, let us compile and run the application in normal mode as we did in Flex - Create Application chapter. If everything is fine with your application, it will produce the following result: [ Try it online ]
Flex - Style with CSS
Flex supports the use of CSS syntax and styles to apply to its UI controls in the same way as CSS to HTML components.
Way # 1: Using External Style Sheet File
You can refer to a style sheet available in the class path of the application. For example consider Style.css file in com/tutorialspoint/client folder where HelloWorld.mxml file also lies.
/* CSS file */
@namespace s "library://ns.adobe.com/flex/spark";
@namespace mx "library://ns.adobe.com/flex/mx";
...
.container {
   cornerRadius :10;
   horizontalCenter :0;
   borderColor: #777777;
   verticalCenter:0;
   backgroundColor: #efefef;
}
Then css file can be referred by following code snippet
<fx:Style source = "/com/tutorialspoint/client/Style.css" />
Assign styles to UI component using styleName property
<s:BorderContainer width = "500" height = "500" id = "mainContainer"
   styleName = "container">
   ...
</s:BorderContainer>
Way # 2: Using Styles Within Ui Container Component
You can define styles within UI container component using <fx:Style> tag
Class Level Selector
<fx:Style>
   @namespace s "library://ns.adobe.com/flex/spark";
   @namespace mx "library://ns.adobe.com/flex/mx";

   /* class level selector  */
   .errorLabel {
      color: red;
   }
</fx:Style>
Assign styles to UI component using styleName property.
<s:Label id = "errorMsg" text = "This is an error message" styleName = "errorLabel" />
Id Level Selector
Style UI component using id selector.
<fx:Style>
   /* id level selector  */
   #msgLabel {
      color: gray;
   }
</fx:Style>

<s:Label id = "msgLabel" text = "This is a normal message" />
Type Level Selector
Style one type of UI Component in one GO.
<fx:Style>
   /* style applied on all buttons  */
   s|Button {
      fontSize: 15;
      color: #9933FF;
   }
</fx:Style>

<s:Button label = "Click Me!" id = "btnClickMe"
   click = "btnClickMe_clickHandler(event)" />
Flex Style with CSS Example
Let us follow the steps to check CSS styling of a Flex application by creating a test application −
| Step | Description |
|---|---|
| 1 | Create a project with a name HelloWorld under a packagecom.tutorialspoint.client as explained in the Flex - Create Application chapter. |
| 2 | Modify Style.css, HelloWorld.mxml as explained below. Keep rest of the files unchanged. |
| 3 | Compile and run the application to make sure business logic is working as per the requirements. |
Following is the content of the modified CSS file src/com.tutorialspoint/Style.css.
/* CSS file */
@namespace s "library://ns.adobe.com/flex/spark";
@namespace mx "library://ns.adobe.com/flex/mx";

.heading
{
   fontFamily: Arial, Helvetica, sans-serif;
   fontSize: 17px;
   color: #9b1204;
   textDecoration:none;
   fontWeight:normal;
}

.button {
   fontWeight: bold;
}

.container {
   cornerRadius :10;
   horizontalCenter :0;
   borderColor: #777777;
   verticalCenter:0;
   backgroundColor: #efefef;
}
Following is the content of the modified mxml file src/com.tutorialspoint/HelloWorld.mxml.
<?xml version = "1.0" encoding = "utf-8"?>
<s:Application xmlns:fx = "http://ns.adobe.com/mxml/2009"
xmlns:s = "library://ns.adobe.com/flex/spark"
xmlns:mx = "library://ns.adobe.com/flex/mx"
width = "100%" height = "100%" minWidth = "500" minHeight = "500"
initialize = "application_initializeHandler(event)">
<!--Add reference to style sheet -->
<fx:Style source = "/com/tutorialspoint/client/Style.css" />
<!--Using styles within mxml file -->
<fx:Style>
@namespace s "library://ns.adobe.com/flex/spark";
@namespace mx "library://ns.adobe.com/flex/mx";
/* class level selector */
.errorLabel {
color: red;
}
/* id level selector */
#msgLabel {
color: gray;
}
/* style applied on all buttons */
s|Button {
fontSize: 15;
color: #9933FF;
}
</fx:Style>
<fx:Script>
<![CDATA[
import mx.controls.Alert;
import mx.events.FlexEvent;
protected function btnClickMe_clickHandler(event:MouseEvent):void {
Alert.show("Hello World!");
}
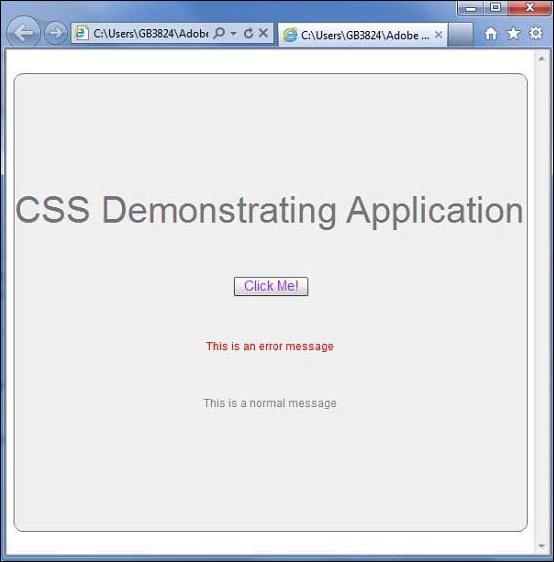
protected function application_initializeHandler(event:FlexEvent):void {
lblHeader.text = "CSS Demonstrating Application";
}
]]>
</fx:Script>
<s:BorderContainer width = "560" height = "500" id = "mainContainer"
styleName = "container">
<s:VGroup width = "100%" height = "100%" gap = "50"
horizontalAlign = "center" verticalAlign = "middle">
<s:Label width = "100%" id = "lblHeader" fontSize = "40"
color = "0x777777" styleName = "heading" />
<s:Button label = "Click Me!" id = "btnClickMe"
click = "btnClickMe_clickHandler(event)" />
<s:Label id = "errorMsg"
text = "This is an error message" styleName = "errorLabel" />
<s:Label id = "msgLabel" text = "This is a normal message" />
</s:VGroup>
</s:BorderContainer>
</s:Application>
Once you are ready with all the changes done, let us compile and run the application in normal mode as we did in Flex - Create Application chapter. If everything is fine with your application, this will produce following result: [ Try it online ]
Flex - Style with Skin
What is Skinning?
Skinning in Flex, is a process of customizing look and feel of a UI Component completely.
A Skin can define text, image, filters, transitions and states of a component.
A Skin can be created as a separate mxml or ActionScript component.
Using skin, we can control all visual aspects of a UI component.
The process of defining skin is same for all the UI component.
Step 1 – Create a Skin
Launch Create MXML Skin wizard using the option File > New > MXML Skin.
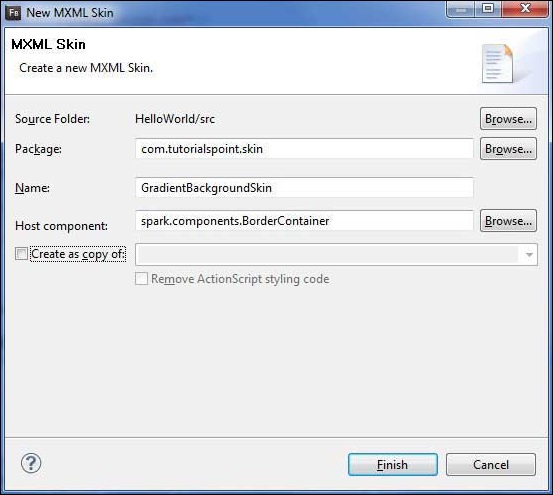
Enter Package as com.tutorialspoint.skin, name as GradientBackgroundSkin and choose host component as existing flex BorderContainer controlspark.component.BorderContainer.
Now you've created a skin for a BorderContainer. Modify content of the mxml skin file src/com.tutorialspoint/skin/GradientBackgroundSkin.mxml.
Update fill layer as follows −
<!-- fill -->
<s:Rect id = "backgroundRect" left = "0" right = "0" height = "100%" top = "0">
   <s:fill>
      <s:LinearGradient rotation = "90">
         <s:GradientEntry color = "0x888888" ratio = "0.2" />
         <s:GradientEntry color = "0x111111" ratio = "1" />
      </s:LinearGradient>
   </s:fill>
</s:Rect>
Step 2: Apply Skin
You can apply skin over a component in two ways −
Apply skin in MXML script (statically)
Apply GradientBackgroundSkin to a BorderContainer with id mainContainer using its skinClass attribute.
<s:BorderContainer width = "560" height = "500" id = "mainContainer"
   styleName = "container">
   <s:VGroup width = "100%" height = "100%" gap = "50"
      horizontalAlign = "center" verticalAlign = "middle"
      skinClass = "com.tutorialspoint.skin.GradientBackgroundSkin">
Apply skin in ActionScript (dynamically)
Apply GradientBackgroundSkin to a BorderContainer with id mainContainer using its skinClass property.
protected function gradientBackground_clickHandler(event:MouseEvent):void {
   mainContainer.setStyle("skinClass", GradientBackgroundSkin);
}
Flex Style with Skin Example
Let us follow the following steps to see skinning in action in a Flex application by creating a test application −
| Step | Description |
|---|---|
| 1 | Create a project with a name HelloWorld under a packagecom.tutorialspoint.client as explained in the Flex - Create Application chapter. |
| 2 | Create skin GradientBackgroundSkin.mxml under a packagecom.tutorialspoint.skin as explained above. Keep rest of the files unchanged. |
| 3 | Modify HelloWorld.mxml as explained below. Keep rest of the files unchanged. |
| 4 | Compile and run the application to make sure business logic is working as per the requirements. |
Following is the content of the GradientBackgroundSkin.mxml file src/com/tutorialspoint/skin/GradientBackg roundSkin.mxml.
<?xml version = "1.0" encoding = "utf-8"?>
<s:Skin xmlns:fx = "http://ns.adobe.com/mxml/2009"
   xmlns:s = "library://ns.adobe.com/flex/spark"
   xmlns:mx = "library://ns.adobe.com/flex/mx">

   <!-- host component -->
   <fx:Metadata>
      [HostComponent("spark.components.BorderContainer")]
   </fx:Metadata>

   <!-- states -->
   <s:states>
      <s:State name = "disabled" />
      <s:State name = "disabled" />
      <s:State name = "normal" />
   </s:states>

   <!-- SkinParts
   name = contentGroup, type = spark.components.Group, required = false
   -->

   <!-- fill -->
   <s:Rect id = "backgroundRect" left = "0" right = "0" height = "100%" top = "0">
      <s:fill>
         <s:LinearGradient rotation = "90">
            <s:GradientEntry color = "0x111111" ratio = "0.2" />
            <s:GradientEntry color = "0x888888" ratio = "1" />
         </s:LinearGradient>
      </s:fill>
   </s:Rect>

   <!-- must specify this for the host component -->
   <s:Group id = "contentGroup" left = "0" right = "0" top = "0" bottom = "0" />
</s:Skin>
Following is the content of the modified HelloWorld.mxml filesrc/com/tutorialspoint/client/HelloWorld.mxml.
<?xml version = "1.0" encoding = "utf-8"?>
<s:Application xmlns:fx = "http://ns.adobe.com/mxml/2009"
xmlns:s = "library://ns.adobe.com/flex/spark"
xmlns:mx = "library://ns.adobe.com/flex/mx"
width = "100%" height = "100%" minWidth = "500" minHeight = "500"
initialize = "application_initializeHandler(event)">
<fx:Style source = "/com/tutorialspoint/client/Style.css" />
<fx:Script>
<![CDATA[
import com.tutorialspoint.skin.GradientBackgroundSkin;
import mx.controls.Alert;
import mx.events.FlexEvent;
import spark.skins.spark.BorderContainerSkin;
protected function btnClickMe_clickHandler(event:MouseEvent):void {
Alert.show("Hello World!");
}
protected function application_initializeHandler(event:FlexEvent):void {
lblHeader.text = "My Hello World Application";
}
protected function gradientBackground_clickHandler(event:MouseEvent):void {
mainContainer.setStyle("skinClass", GradientBackgroundSkin );
}
protected function standardBackground_clickHandler(event:MouseEvent):void {
mainContainer.setStyle("skinClass", BorderContainerSkin );
}
]]>
</fx:Script>
<fx:Declarations>
<s:RadioButtonGroup id = "selectorGroup" />
</fx:Declarations>
<s:BorderContainer width = "500" height = "500" id = "mainContainer"
skinClass = "spark.skins.spark.BorderContainerSkin"
horizontalCenter = "0" verticalCenter = "0" cornerRadius = "10">
<s:VGroup width = "100%" height = "100%" gap = "50" horizontalAlign = "center"
verticalAlign = "middle">
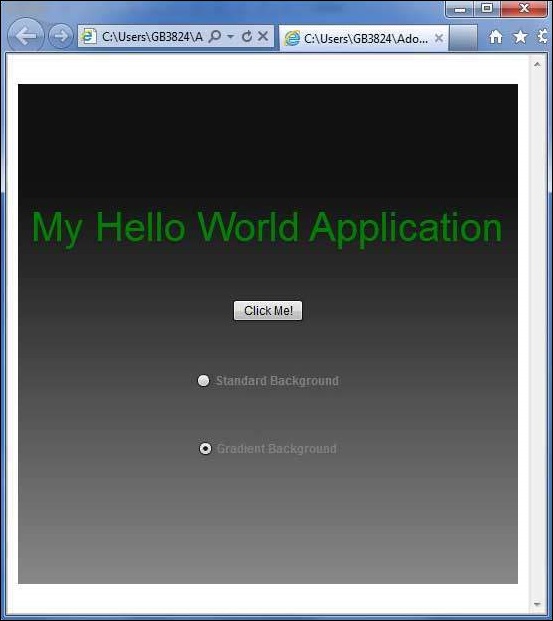
<s:Label id = "lblHeader" fontSize = "40" color = "green"
styleName = "heading" />
<s:Button label = "Click Me!" id = "btnClickMe"
click = "btnClickMe_clickHandler(event)" />
<s:RadioButton color = "gray" fontWeight = "bold"
group = "{selectorGroup}" label = "Standard Background"
click = "standardBackground_clickHandler(event)" selected = "true" />
<s:RadioButton color = "gray" fontWeight = "bold"
group = "{selectorGroup}" label = "Gradient Background"
click = "gradientBackground_clickHandler(event)" />
</s:VGroup>
</s:BorderContainer>
</s:Application>
Once you are ready with all the changes done, let us compile and run the application in normal mode as we did in Flex - Create Application chapter. If everything is fine with your application, it will produce the following result: [ Try it online ]

Flex - Data Binding
What is Data Binding?
Data Binding is a process in which data of one object is tied to another object. It requires a source property, a destination property and a triggering event which indicates, when to copy the data from source to destination.
Flex provides three ways to do Data Binding as below
- Curly brace syntax in MXML Script ({})
- <fx:binding> tag in MXML
- BindingUtils in ActionScript
Data Binding – Using Curly Braces in MXML
The following example demonstrates how to use curly braces to specify data binding of a source to destination.
<s:TextInput id = "txtInput1" />
<s:TextInput id = "txtInput2" text = "{txtInput1.text}" />
Data Binding – Using <fx:Binding> tag in MXML
The following example demonstrates how to use
<fx:Binding source = "txtInput1.text" destination = "txtInput2.text" />
<s:TextInput id = "txtInput1" />
<s:TextInput id = "txtInput2" />
Data Binding – Using BindingUtils in ActionScript
The following example demonstrates how to use BindingUtils to specify data binding of a source to destination.
<fx:Script>
   <![CDATA[
      import mx.binding.utils.BindingUtils;
      import mx.events.FlexEvent;

      protected function txtInput2_preinitializeHandler(event:FlexEvent):void {
         BindingUtils.bindProperty(txtInput2,"text",txtInput1, "text");
      }
   ]]>
</fx:Script>

<s:TextInput id = "txtInput1" />
<s:TextInput id = "txtInput2"
   preinitialize = "txtInput2_preinitializeHandler(event)" />
Flex Data Binding Example
Let us follow the steps given below to see skinning in action in a Flex application by creating a test application −
| Step | Description |
|---|---|
| 1 | Create a project with a name HelloWorld under a packagecom.tutorialspoint.client as explained in the Flex - Create Application chapter. |
| 2 | Modify HelloWorld.mxml as explained below. Keep rest of the files unchanged. |
| 3 | Compile and run the application to make sure business logic is working as per the requirements. |
Following is the content of the modified HelloWorld.mxml filesrc/com/tutorialspoint/client/HelloWorld.mxml.
<?xml version = "1.0" encoding = "utf-8"?>
<s:Application xmlns:fx = "http://ns.adobe.com/mxml/2009"
xmlns:s = "library://ns.adobe.com/flex/spark"
xmlns:mx = "library://ns.adobe.com/flex/mx
width = "100%" height = "100%" minWidth = "500" minHeight = "500">
<fx:Style source = "/com/tutorialspoint/client/Style.css" />
<fx:Script>
<![CDATA[
import mx.binding.utils.BindingUtils;
import mx.events.FlexEvent;
protected function txtInput6_preinitializeHandler(event:FlexEvent):void {
BindingUtils.bindProperty(txtInput6,"text",txtInput5, "text");
}
]]>
</fx:Script>
<fx:Binding source = "txtInput3.text" destination = "txtInput4.text" />
<s:BorderContainer width = "500" height = "550" id = "mainContainer"
styleName = "container">
<s:VGroup width = "100%" height = "100%" gap = "50" horizontalAlign = "center"
verticalAlign = "middle">
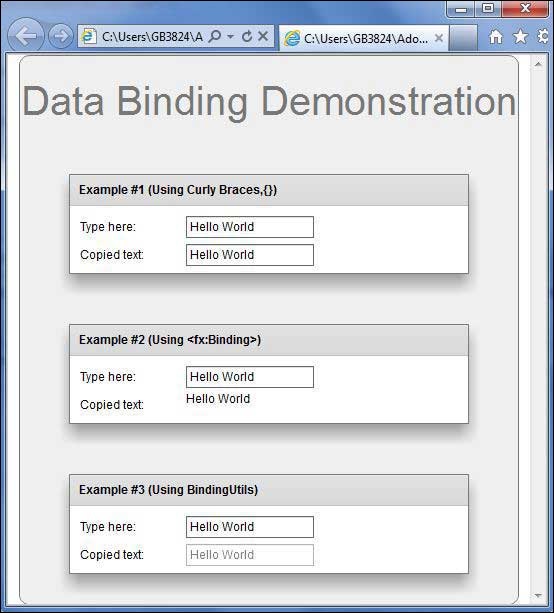
<s:Label id = "lblHeader" text = "Data Binding Demonstration"
fontSize = "40" color = "0x777777" styleName = "heading" />
<s:Panel title = "Example #1 (Using Curly Braces,\{\})" width = "400"
height = "100" >
<s:layout>
<s:VerticalLayout paddingTop = "10" paddingLeft = "10" />
</s:layout>
<s:HGroup >
<s:Label text = "Type here: " width = "100" paddingTop = "6" />
<s:TextInput id = "txtInput1" />
</s:HGroup>
<s:HGroup >
<s:Label text = "Copied text: " width = "100" paddingTop = "6" />
<s:TextInput id = "txtInput2" text = "{txtInput1.text}" />
</s:HGroup>
</s:Panel>
<s:Panel title = "Example #2 (Using <fx:Binding>)" width = "400"
height = "100" >
<s:layout>
<s:VerticalLayout paddingTop = "10" paddingLeft = "10" />
</s:layout>
<s:HGroup >
<s:Label text = "Type here: " width = "100" paddingTop = "6" />
<s:TextInput id = "txtInput3" />
</s:HGroup>
<s:HGroup >
<s:Label text = "Copied text: " width = "100" paddingTop = "6" />
<s:Label id = "txtInput4" />
</s:HGroup>
</s:Panel>
<s:Panel title = "Example #3 (Using BindingUtils)" width = "400"
height = "100" >
<s:layout>
<s:VerticalLayout paddingTop = "10" paddingLeft = "10" />
</s:layout>
<s:HGroup >
<s:Label text = "Type here: " width = "100" paddingTop = "6" />
<s:TextInput id = "txtInput5" />
</s:HGroup>
<s:HGroup >
<s:Label text = "Copied text: " width = "100" paddingTop = "6" />
<s:TextInput enabled = "false" id = "txtInput6"
preinitialize = "txtInput6_preinitializeHandler(event)" />
</s:HGroup>
</s:Panel>
</s:VGroup>
</s:BorderContainer>
</s:Application>
Once you are ready with all the changes done, let us compile and run the application in normal mode as we did in Flex - Create Application chapter. If everything is fine with your application, it will produce the following result: [ Try it online ]
Flex - Basic Controls
Every user interface considers the following three main aspects −
UI Elements − These are the core visual elements the user eventually sees and interacts with. Flex provides a huge list of widely used and common elements varying from basic to complex which we will cover in this tutorial.
Layouts − They define how UI elements should be organized on the screen and provide a final look and feel to the GUI (Graphical User Interface). This part will be covered in Layout chapter.
Behavior − These events occur when the user interacts with UI elements. This part will be covered in Event Handling chapter.
Flex UI Elements
The Flex UI library provides classes in a well-defined class hierarchy to create complex web-based user interfaces. All classes in this component hierarchy have been derived from the EventDispatcher base class as shown below −

Every Basic UI control inherits properties from UI Component class which in turn inherits properties from EventDispatcher and other top level classes.
| Sr.No | Control & Description |
|---|---|
| 1 | Flex EventDispatcher Class
The EventDispatcher class is the base class for all classes that can dispatch events. The EventDispatcher class allows any object on the display list to be an event target and as such, to use the methods of the IEventDispatcher interface. |
| 2 | Flex UIComponent
The UIComponent class is the base class for all visual components, both interactive and non-interactive. |
Basic Controls
Following are the few important Basic Controls −
| Sr.No | Controls & Description |
|---|---|
| 1 | Label
Label is a low-level UIComponent that can render one or more lines of uniformly-formatted text. |
| 2 | Text
The Text control lets you display HTML content as well as normal text in your application. |
| 3 | Image
The Image control lets you import JPEG, PNG, GIF, and SWF files at runtime. |
| 4 | LinkButton
The LinkButton control is a borderless Button control whose contents are highlighted when a user moves the mouse over it. |
Flex - Form Controls
Form controls allow the users to input data and provides them interaction capability with the application. Every Form UI controls and inherits properties from UIComponent class which in turn inherits properties from EventDispatcher and other top level classes.
| Sr.No | Control & Description |
|---|---|
| 1 | Flex EventDispatcher Class
The EventDispatcher class is the base class for all classes that can dispatch events. The EventDispatcher class allows any object on the display list to be an event target and as such, to use the methods of the IEventDispatcher interface. |
| 2 | Flex UIComponent
The UIComponent class is the base class for all visual components, both interactive and noninteractive. |
Form Controls
Following are few important Form Controls −
| Sr.No | Control & Description |
|---|---|
| 1 | Button
The Button component is a commonly used rectangular button. |
| 2 | ToggleButton
The ToggleButton component defines a toggle button. |
| 3 | CheckBox
The CheckBox component consists of an optional label and a small box that can contain a check mark or not. |
| 4 | ColorPicker
The ColorPicker control provides a way for a user to choose a color from a swatch list. |
| 5 | ComboBox
The ComboBox control is a child class of the DropDownListBase control. |
| 6 | DateChooser
The DateChooser control displays the name of a month, the year, and a grid of the days of the month, with columns labeled for the day of the week. |
| 7 | RadioButton
The RadioButton component allows the user make a single choice within a set of mutually exclusive choices. |
| 8 | TextArea
TextArea is a text-entry control that lets users enter and edit multiple lines of formatted text. |
| 9 | TextInput
TextInput is a text-entry control that lets users enter and edit a single line of uniformly-formatted text. |
| 10 | DropDownList
The DropDownList control contains a drop-down list from which the user can select a single value. |
| 11 | NumericStepper
The NumericStepper control lets you select a number from an ordered set. |
Flex - Complex Controls
Complex controls provide users with advanced capabilities to deal with large amount of data in an easier way and provides them interaction capability with the application. Every Complex UI control inherits properties from UIComponent class which in turn inherits properties from EventDispatcher and other top level classes.
| Sr.No | Control & Description |
|---|---|
| 1 | Flex EventDispatcher Class
The EventDispatcher class is the base class for all classes that can dispatch events. The EventDispatcher class allows any object on the display list to be an event target and as such, to use the methods of the IEventDispatcher interface. |
| 2 | Flex UIComponent
The UIComponent class is the base class for all visual components, both interactive and noninteractive. |
Complex Controls
Following are the few important Complex Controls −
| Sr.No | Control & Description |
|---|---|
| 1 | DataGrid
The DataGrid control displays a row of column headings above a scrollable grid. |
| 2 | AdvancedDataGrid
The AdvancedDataGrid adds few additional functionality to the standard DataGrid control to add data visualization features. |
| 3 | Menu
The Menu control creates a pop-up menu of individually selectable choices. |
| 4 | ProgressBar
The ProgressBar control provides a visual representation of the progress of a task over time. |
| 5 | RichTextEditor
The RichTextEditor control lets users enter and format text. |
| 6 | TileList
The TileList control The TileList control displays a number of items laid out in tiles. |
| 7 | Tree
The Tree control lets a user view hierarchical data arranged as an expandable tree. |
| 8 | VideoPlayer
The VideoPlayer control is a skinnable video player that supports progressive download, multi-bitrate streaming, and streaming video. |
| 9 | Accordian
An Accordian control has a collection of child MX containers or Spark NavigatorContent containers, but only one of them at a time is visible. |
| 10 | TabNavigator
The TabNavigator control includes a TabBar container for navigating between its child containers. |
| 11 | ToggleButtonBar
The ToggleButtonBar control defines a horizontal or vertical group of buttons that maintain their selected or deselected state. |
Flex - Layout Panels
Layout panel controls provides users to organize UI controls on the page. Every Layout control inherits properties from UIComponent class which in turn inherits properties from EventDispatcher and other top level classes.
| Sr.No | Control & Description |
|---|---|
| 1 | Flex EventDispatcher Class
The EventDispatcher class is the base class for all classes that can dispatch events. The EventDispatcher class allows any object on the display list to be an event target and as such, to use the methods of the IEventDispatcher interface. |
| 2 | Flex UIComponent
The UIComponent class is the base class for all visual components, both interactive and noninteractive. |
Layout Panels
Following are few important Layout Panels −
| Sr.No | Panel & Description |
|---|---|
| 1 | BorderContainer
The BorderContainer class provides a set of CSS styles that control the appearance of the border and background fill of the container. |
| 2 | Form
The Form container provides control over the layout of a form, mark form fields as required or optional, handle error messages, and bind form data to the Flex data model to perform data checking and validation. |
| 3 | VGroup
The VGroup container is a Group container that uses the VerticalLayout class. |
| 4 | HGroup
The HGroup container is a Group container that uses the HorizontalLayout class. |
| 5 | Panel
The Panel class is a container that includes a title bar, a caption, a border, and a content area for its children. |
| 6 | SkinnableContainer
The SkinnableContainer class is the base class for skinnable containers that provide visual content. |
| 7 | TabBar
The TabBar displays a set of identical tabs. |
| 8 | TitleWindow
The TitleWindow extends Panel to include a close button and move area. |
Flex - Visual Effects
We can add behavior to flex application using the concept of Effects. For example, when a text box gets focus, we can make its text become bolder and make its size slight bigger.
Every effect inherits properties from Effect class which in turn inherits properties from EventDispatcher and other top level classes.
| Sr.No | Effect & Description |
|---|---|
| 1 | Flex Effect Class
The Effect class is an abstract base class that defines the basic functionality of all Flex effects. This class defines the base factory class for all effects. |
Basic Effects
Following are the few important Basic Visual Effects −
| Sr.No | Effect & Description |
|---|---|
| 1 | Fade
The Fade effect animates the alpha property of a component. |
| 2 | WipeLeft
The WipeLeft class defines a wipe left effect. |
| 3 | WipeRight
The WipeRight class defines a wipe right effect. |
| 4 | Move3D
The Move3D class moves a target object in the x, y, and z dimensions. |
| 5 | Scale3D
The Scale3D class scales a target object in three dimensions around the transform center. |
| 6 | Rotate3D
The Rotate3D class rotate a target object in three dimensions around the x, y, or z axes. |
| 7 | Animate
This Animate effect animates an arbitrary set of properties between values. Specify the properties and values to animate by setting the motionPaths property. |
Flex - Event Handling
Flex uses concept of event to pass data from one object to another depending upon the state or user interaction within the application.
ActionScript has a generic Event class which defines much of the functionality needed to work with events. Every time an event occurs within a Flex application, three types of objects from the Event class hierarchy are created.
Event has the following three key properties
| Sr.No | Property & Description |
|---|---|
| 1 | Type The type states about what kind of event just happened. This may be click, initialize, mouseover, change, etc. The actual values will be represented by constants like MouseEvent.CLICK. |
| 2 | Target The target property of Event is an object reference to the component that generated the event.If you click a Button with an id of clickMeButton, the target of that click event will be clickMeButton |
| 3 | CurrentTarget The currentTarget property varies container hierarchy. It mainly deals with flow of events. |
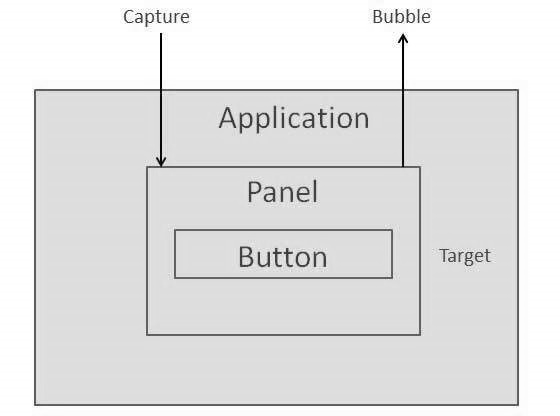
Event Flow Phases
An event goes through three phases looking for event handlers.
| Sr.No | Phase & Description |
|---|---|
| 1 | Capture In the capture phase, the program will start looking for event handlers from the outside (or top) parent to the innermost one. The capture phase stops at the parent of the object that triggered the event. |
| 2 | Target In the target phase, the component that triggered the event, is checked for an event handler. |
| 3 | Bubble The Bubble phase is reverse of capture phase, working back through the structure, from the target component's parent on up. |
Consider the following application code −
<?xml version = "1.0" encoding = "utf-8"?>
<s:Application xmlns:fx = "http://ns.adobe.com/mxml/2009"
   xmlns:s = "library://ns.adobe.com/flex/spark"
   xmlns:mx = "library://ns.adobe.com/flex/mx
   width = "100%" height = "100%" minWidth = "500" minHeight = "500" >

   <s:Panel>
      <s:Button id = "clickMeButton" label = "Click Me!" click = "doAction( );" />
   </s:Panel>
</s:Application>
When the user clicks the Button, he or she has also clicks the Panel and the Application.
The event goes through three phases looking for event-handler assignments.
Let us follow the steps below to test event handing in a Flex application −
| Step | Description |
|---|---|
| 1 | Create a project with a name HelloWorld under a package com.tutorialspoint.client as explained in the Flex - Create Application chapter. |
| 2 | Modify HelloWorld.mxml as explained below. Keep rest of the files unchanged. |
| 3 | Compile and run the application to make sure business logic is working as per the requirements. |
Following is the content of the modified mxml file src/com.tutorialspoint/HelloWorld.mxml.
<?xml version = "1.0" encoding = "utf-8"?>
<s:Application xmlns:fx = "http://ns.adobe.com/mxml/2009"
xmlns:s = "library://ns.adobe.com/flex/spark"
xmlns:mx = "library://ns.adobe.com/flex/mx
width = "100%" height = "100%" minWidth = "500" minHeight = "500">
<fx:Style source = "/com/tutorialspoint/client/Style.css" />
<fx:Script>
<![CDATA[
protected function reportEvent(event:MouseEvent):void {
var target:String = event.target.id;
var currentTarget:String = event.target.id;
var eventPhase: String;
if(event.target is Button) {
var button:Button = event.target as Button;
target = button.label + " Button";
} else if(event.target is HGroup) {
var hGroup:HGroup = event.target as HGroup;
target = hGroup.id + " HGroup";
} else if(event.target is Panel) {
var panel:Panel = event.target as Panel;
target = panel.id + " Panel";
}
if(event.currentTarget is Button) {
var button1:Button = event.currentTarget as Button;
currentTarget = button1.label + " Button";
} else if(event.currentTarget is HGroup) {
var hGroup1:HGroup = event.currentTarget as HGroup;
currentTarget = hGroup1.id + " HGroup";
} else if(event.currentTarget is Panel) {
var panel1:Panel = event.currentTarget as Panel;
currentTarget = panel1.id + " Panel";
}
var eventPhaseInt:uint = event.eventPhase;
if(eventPhaseInt == EventPhase.AT_TARGET) {
eventPhase = "Target";
} else if(eventPhaseInt == EventPhase.BUBBLING_PHASE) {
eventPhase = "Bubbling";
} else if(eventPhaseInt == EventPhase.CAPTURING_PHASE) {
eventPhase = "Capturing";
}
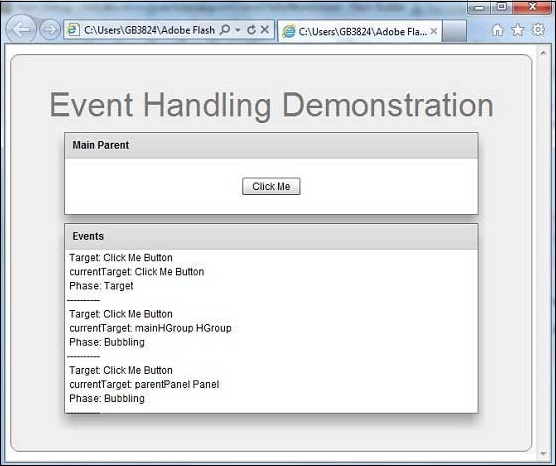
reports.text += " Target: " + target + "\n currentTarget: " +
currentTarget + "\n Phase: " + eventPhase + "\n----------\n";
}
]]>
</fx:Script>
<s:BorderContainer width = "630" height = "480" id = "mainContainer"
styleName = "container">
<s:VGroup width = "100%" height = "100%" gap = "10"
horizontalAlign = "center" verticalAlign = "middle">
<s:Label id = "lblHeader" text = "Event Handling Demonstration"
fontSize = "40" color = "0x777777" styleName = "heading" />
<s:Panel id = "parentPanel" title = "Main Parent"
click = "reportEvent(event)" width = "500"
height = "100" includeInLayout = "true" visible = "true">
<s:layout>
<s:VerticalLayout gap = "10" verticalAlign = "middle"
horizontalAlign = "center" />
</s:layout>
<s:HGroup id = "mainHGroup" click = "reportEvent(event)">
<s:Button label = "Click Me" click = "reportEvent(event)" />
</s:HGroup>
</s:Panel>
<s:Panel id = "reportPanel" title = "Events" width = "500" height = "230">
<mx:Text id = "reports" />
</s:Panel>
</s:VGroup>
</s:BorderContainer>
</s:Application>
Once you are ready with all the changes done, let us compile and run the application in normal mode as we did in Flex - Create Application chapter. If everything is fine with your application, it will produce the following result: [ Try it online ]
Flex - Custom Controls
Flex provides two ways to create custom components.
- Using ActionScript
- Using MXML
Using ActionScript
You can create a component by extending existing component. To create a component using Flash Builder, Click on File > New > ActionScript Class.
Enter the details as shown below −
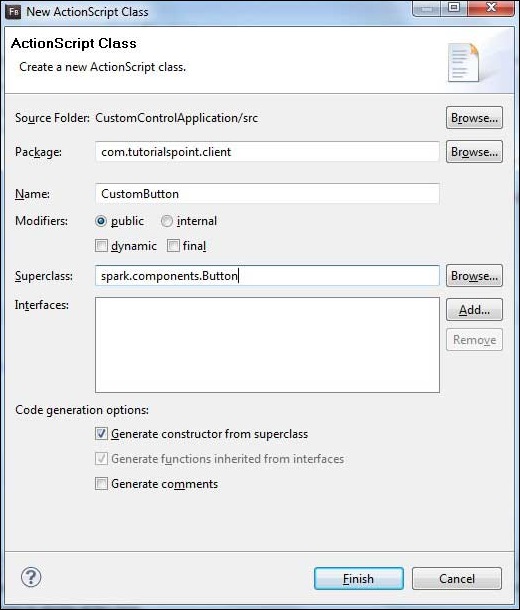
Flash Builder will create the following CustomButton.as file.
package com.tutorialspoint.client {
   import spark.components.Button;

   public class CustomButton extends Button {
      public function CustomButton() {
         super();
      }
   }
}
Using MXML
You can create a component by extending existing component. To create a component using Flash Builder, Click on File > New > MXML Component.
Enter the details as shown below.
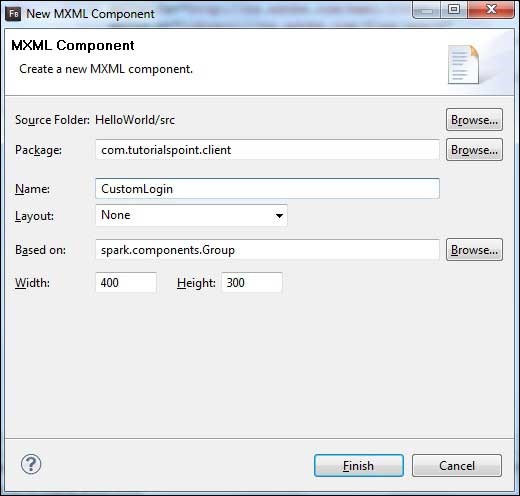
Flash Builder will create the following CustomLogin.mxml file.
<?xml version = "1.0" encoding = "utf-8"?>
<s:Group xmlns:fx = "http://ns.adobe.com/mxml/2009"
   xmlns:s = "library://ns.adobe.com/flex/spark"
   xmlns:mx = "library://ns.adobe.com/flex/mx"
   width = "400" height = "300">
</s:Group>
Let us follow the following steps to test custom controls in a Flex application −
| Step | Description |
|---|---|
| 1 | Create a project with a name HelloWorld under a package com.tutorialspoint.client as explained in the Flex - Create Application chapter. |
| 2 | Modify HelloWorld.mxml as explained below. Keep rest of the files unchanged. |
| 3 | Create CustomLogin.mxml and CustomButton.as component as explained above. Modify these files as explained below. Keep rest of the files unchanged. |
| 4 | Compile and run the application to make sure business logic is working as per the requirements. |
Following is the content of the modified mxml file src/com.tutorialspoint/client/CustomLogin.mxml.
<?xml version = "1.0" encoding = "utf-8"?>
<s:Group xmlns:fx = "http://ns.adobe.com/mxml/2009"
   xmlns:s = "library://ns.adobe.com/flex/spark"
   xmlns:mx = "library://ns.adobe.com/flex/mx" width = "400" height = "300">

   <s:Form>
      <s:FormItem label = "UserName:">
         <s:TextInput width = "200" />
      </s:FormItem>

      <s:FormItem label = "Password:">
         <s:TextInput width = "200" displayAsPassword = "true" />
      </s:FormItem>

      <s:FormItem>
         <s:Button label = "Login" />
      </s:FormItem>
   </s:Form>
</s:Group>
Following is the content of the modified mxml file src/com.tutorialspoint/client/CustomButton.as.
package com.tutorialspoint.client {
   import spark.components.Button;

   public class CustomButton extends Button {

      public function CustomButton() {
         super();
         this.setStyle("color","green");
         this.label = "Submit";
      }
   }
}
Following is the content of the modified mxml file src/com.tutorialspoint/client/HelloWorld.mxml.
<?xml version = "1.0" encoding = "utf-8"?>
<s:Application xmlns:fx = "http://ns.adobe.com/mxml/2009"
xmlns:s = "library://ns.adobe.com/flex/spark"
xmlns:mx = "library://ns.adobe.com/flex/mx"
xmlns:client = "com.tutorialspoint.client.*"
initialize = "application_initializeHandler(event)">
<fx:Style source = "/com/tutorialspoint/client/Style.css" />
<fx:Script>
<![CDATA[
import mx.events.FlexEvent;
protected function application_initializeHandler(event:FlexEvent):void {
//create a new custom button
var customButton: CustomButton = new CustomButton();
asPanel.addElement(customButton);
}
]]>
</fx:Script>
<s:BorderContainer width = "630" height = "480" id = "mainContainer"
styleName = "container">
<s:VGroup width = "100%" height = "100%" gap = "10"
horizontalAlign = "center" verticalAlign = "middle">
<s:Label id = "lblHeader" text = "Custom Controls Demonstration"
fontSize = "40" color = "0x777777" styleName = "heading" />
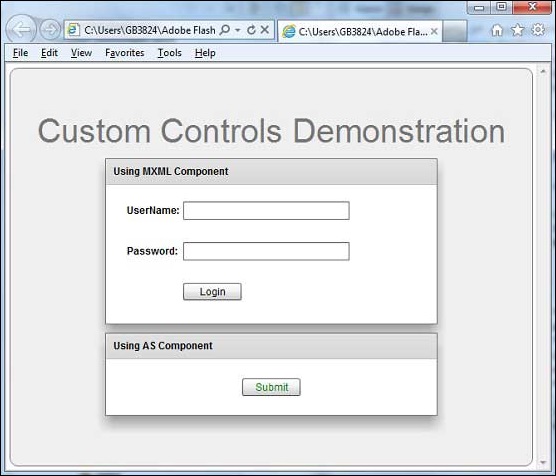
<s:Panel title = "Using MXML Component" width = "400" height = "200">
<client:CustomLogin>
</client:CustomLogin>
</s:Panel>
<s:Panel title = "Using AS Component" width = "400" height = "100">
<s:VGroup id = "asPanel" width = "100%" height = "100%" gap = "10"
horizontalAlign = "center" verticalAlign = "middle">
</s:VGroup>
</s:Panel>
</s:VGroup>
</s:BorderContainer>
</s:Application>
Once you are ready with all the changes done, let us compile and run the application in normal mode as we did in Flex - Create Application chapter. If everything is fine with your application, it will produce the following result: [ Try it online ]
Flex - RPC Services
Flex provides RPC services to provide server side data to client side. Flex provides a fair amount of control on to server side data.
Using Flex RPC services, we can define user actions to be executed on server side.
Flex RPC Sservices can be integrated with any server side technologies.
One of Flex RPC Service provide inbuilt support for compressed binary data to be transferred over the wire and is pretty fast.
Flex provides the following three types of RPC Services
| Sr.No | RPC Service & Description |
|---|---|
| 1 | HttpService <mx:HTTPService> tag is used to represent an HTTPService object in an MXML file. When you make a call to HTTPService object's send() method, it makes an HTTP request to the specified URL, and an HTTP response is returned.You can also use the HTTP HEAD, OPTIONS, TRACE, and DELETE methods. |
| 2 | WebService The <mx:WebService> is used to get access to the operations of SOAP-compliant web services. |
| 3 | RemoteObject The <mx:RemoteObject> tag is used to represent an HTTPService object in an MXML file. This tag gives you access to the methods of Java objects using Action Message Format (AMF) encoding. |
We're going to discuss HTTP Service in detail. We'll use an XML source file placed at server and access it at client side via HTTP Service.
Items.xml
<items>
   <item name = "Book" description = "History of France"></item>
   <item name = "Pen" description = "Parker Pen"></item>
   <item name = "Pencil" description = "Stationary"></item>
<items>
HTTPService Declaration
Now declare a HTTPService and pass it url of the above file
<fx:Declarations>
   <mx:HTTPService id = "itemRequest"
   url = "http://www.tutorialspoint.com/flex/Items.xml" />
</fx:Declarations>
RPC Call
Make a call to itemRequest.send() method and bind values from lastResult object of itemRequest webservice to Flex UI component.
...
itemRequest.send();
...
<mx:DataGrid id = "dgItems" height = "80%" width = "75%"
   dataProvider = "{itemRequest.lastResult.items.item}">
   <mx:columns>
      <mx:DataGridColumn headerText = "Name" dataField = "name" />
      <mx:DataGridColumn headerText = "Description" dataField = "description" />
   </mx:columns>
</mx:DataGrid>
RPC Service Call Example
Now, Let us follow the steps to test RPC services in a Flex application −
| Step | Description |
|---|---|
| 1 | Create a project with a name HelloWorld under a package com.tutorialspoint.client as explained in the Flex - Create Application chapter. |
| 2 | Modify HelloWorld.mxml as explained below. Keep rest of the files unchanged. |
| 3 | Compile and run the application to make sure business logic is working as per the requirements. |
Following is the content of the modified mxml file src/com.tutorialspoint/HelloWorld.mxml.
<?xml version = "1.0" encoding = "utf-8"?>
<s:Application xmlns:fx = "http://ns.adobe.com/mxml/2009"
   xmlns:s = "library://ns.adobe.com/flex/spark"
   xmlns:mx = "library://ns.adobe.com/flex/mx"
   minWidth = "500" minHeight = "500" creationComplete = "init(event)">

   <fx:Style source = "/com/tutorialspoint/client/Style.css" />
   <fx:Script>
      <![CDATA[
         import mx.events.FlexEvent;
         import mx.rpc.events.FaultEvent;
         import mx.rpc.events.ResultEvent;

         protected function init(event:FlexEvent):void {
            itemRequest.send();
         }
      ]]>
   </fx:Script>

   <fx:Declarations>
      <mx:HTTPService id = "itemRequest"
         url = "http://www.tutorialspoint.com/flex/Items.xml" />
   </fx:Declarations>

   <s:BorderContainer width = "630" height = "480" id = "mainContainer"
      styleName = "container">
      <s:VGroup width = "100%" height = "100%" gap = "10"
         horizontalAlign = "center" verticalAlign = "middle">
         <s:Label id = "lblHeader" text = "RPC Service Demonstration"
            fontSize = "40" color = "0x777777" styleName = "heading" />

         <s:Panel id = "parentPanel" title = "Using RPC Services"
            width = "500" height = "200" >
            <s:layout>
               <s:VerticalLayout  gap = "10"
                  verticalAlign = "middle" horizontalAlign = "center" />
            </s:layout>

            <mx:DataGrid id = "dgItems" height = "80%" width = "75%"
               dataProvider = "{itemRequest.lastResult.items.item}">

               <mx:columns>
                  <mx:DataGridColumn headerText = "Name" dataField = "name" />
                  <mx:DataGridColumn headerText = "Description"
                     dataField = "description" />
               </mx:columns>
            </mx:DataGrid>
         </s:Panel>
      </s:VGroup>
   </s:BorderContainer>
</s:Application>
Once you are ready with all the changes done, let us compile and run the application in normal mode as we did in Flex - Create Application chapter. If everything is fine with your application, it will produce the following result: [ Try it online ]
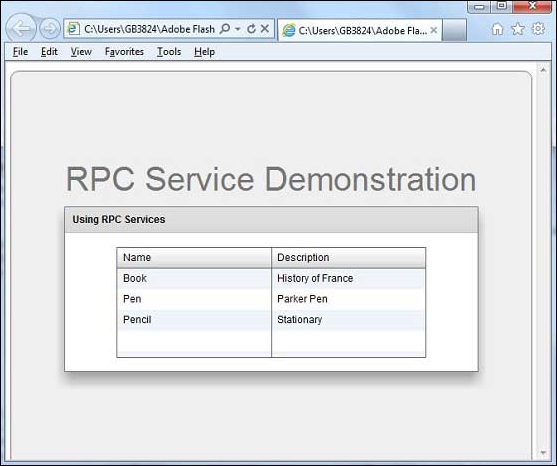
Flex - FlexUnit Integration
Flash Builder 4 has an excellent inbuilt support for FlexUnit integration in Flex development Cycle.
Create a Test Case Class
You can create a Test Case Class using Flash Builder Create Test Class wizard. Running test cases is a breeze with Flash Builder as you will see in this article.
To create a test case class using Flash Builder, Click on File > New > Test Case Class. Enter the details as shown below.
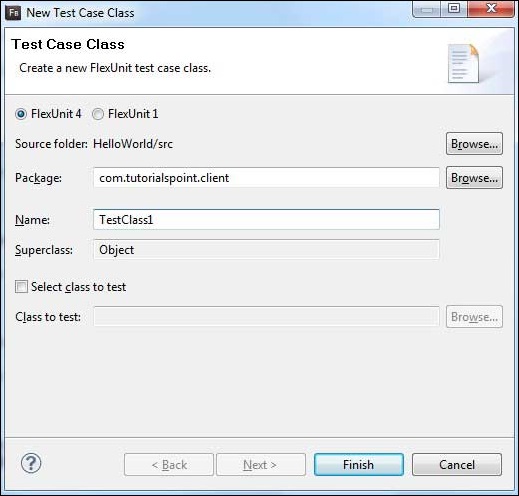
Flash Builder will create the following TestClass1.as a file.
package com.tutorialspoint.client {
   public class TestClass1 {
      [Before]
      public function setUp():void {}

      [After]
      public function tearDown():void {}

      [BeforeClass]
      public static function setUpBeforeClass():void {}

      [AfterClass]
      public static function tearDownAfterClass():void {}
   }
}
FlexUnit Integration Example
Now, let us follow the steps to test FlexUnit Integration in a Flex application −
| Step | Description |
|---|---|
| 1 | Create a project with a name HelloWorld under a package com.tutorialspoint.client as explained in the Flex - Create Application chapter. |
| 2 | Modify HelloWorld.mxml as explained below. Keep rest of the files unchanged. |
| 3 | Create TestClass1.as test case as described above and Modify TestClass1.as as explained below. |
| 4 | Compile and run the application to make sure business logic is working as per the requirements. |
Following is the content of the modified as file src/com.tutorialspoint/client/TestClass1.as.
package com.tutorialspoint.client {
   import org.flexunit.asserts.assertEquals;

   public class TestClass1 {
      private var counter: int = 1;

      [Before]
      public function setUp():void {
         //this code will run before every test case execution
      }

      [After]
      public function tearDown():void {
         //this code will run after every test case execution
      }

      [BeforeClass]
      public static function setUpBeforeClass():void {
         //this code will run once when test cases start execution
      }

      [AfterClass]
      public static function tearDownAfterClass():void {
         //this code will run once when test cases ends execution
      }

      [Test]
      public function testCounter():void {
         assertEquals(counter, 1);
      }
   }
}
Following is the content of the modified mxml file src/com.tutorialspoint/HelloWorld.mxml.
<?xml version = "1.0" encoding = "utf-8"?>
<s:Application xmlns:fx = "http://ns.adobe.com/mxml/2009"
   xmlns:s = "library://ns.adobe.com/flex/spark"
   xmlns:mx = "library://ns.adobe.com/flex/mx"
   minWidth = "500" minHeight = "500">
</s:Application>
Once you are ready with all the changes done, let us compile in normal mode as we did in Flex - Create Application chapter.
Running Test cases
Now Right Click on TestClass1 in package explorer and select Run As > FlexUnit Tests. You'll see the following output in Flash Builder test window.
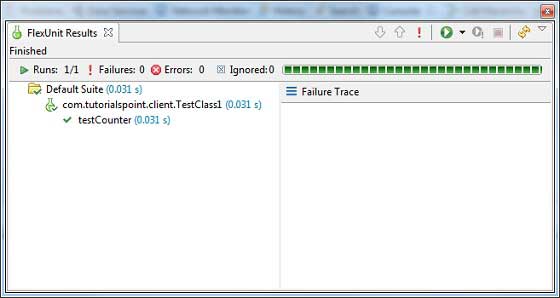
Flash Builder also shows test results in the browser.
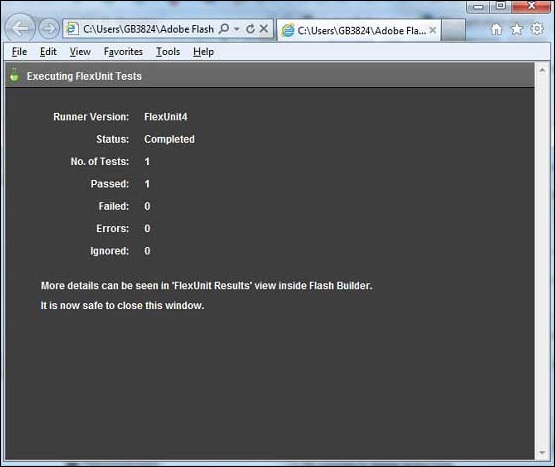
Flex - Debug Application
Flex provides excellent capability of debugging flex code and Flash Builder 4 has an excellent built-in debugger and debugging perspective support.
During debug mode, Flex Application runs on Flash Player Debugger version built in Flash Builder 4 which supports debugging capability.
So developers get an easy and inbuilt debugging configuration in Flash Builder
In this article, we'll demonstrate usage of debugging Flex Client code using Flash Builder. We'll do the following tasks
- Set break points in the code and see them in Breakpoint Explorer.
- Step through the code line by line during debugging.
- View the values of variable.
- Inspect the values of all the variables.
- Inspect the value of an expression.
- Display the stack frame for suspended threads.
Debugging Example
| Step | Description |
|---|---|
| 1 | Create a project with a name HelloWorld under a package com.tutorialspoint.client as explained in the Flex - Create Application chapter. |
| 2 | Modify HelloWorld.mxml as explained below. Keep rest of the files unchanged. |
| 3 | Compile and run the application to make sure business logic is working as per the requirements. |
Following is the content of the modified mxml file src/com.tutorialspoint/HelloWorld.mxml.
<?xml version = "1.0" encoding = "utf-8"?>
<s:Application xmlns:fx = "http://ns.adobe.com/mxml/2009"
   xmlns:s = "library://ns.adobe.com/flex/spark"
   xmlns:mx = "library://ns.adobe.com/flex/mx"
   width = "100%" height = "100%"
   minWidth = "500" minHeight = "500"
   initialize = "application_initializeHandler(event)">

   <fx:Style source = "/com/tutorialspoint/client/Style.css" />
   <fx:Script>
      <![CDATA[
         import mx.controls.Alert;
         import mx.events.FlexEvent;
         protected function btnClickMe_clickHandler(event:MouseEvent):void {
            Alert.show("Hello World!");
         }

         protected function application_initializeHandler(event:FlexEvent):void {
            lblHeader.text = "My Hello World Application";
         }
      ]]>
   </fx:Script>

   <s:BorderContainer width = "500" height = "500" id = "mainContainer"
      styleName = "container">
      <s:VGroup width = "100%" height = "100%" gap = "50" horizontalAlign = "center"
         verticalAlign = "middle">
         <s:Label id = "lblHeader" fontSize = "40" color = "0x777777"
            styleName = "heading" />
         <s:Button label = "Click Me!" id = "btnClickMe"
            click = "btnClickMe_clickHandler(event)" styleName = "button" />
      </s:VGroup>
   </s:BorderContainer>
</s:Application>
Once you are ready with all the changes done, let us compile in normal mode as we did in Flex - Create Application chapter.
Step 1 - Place Breakpoints
Place a breakpoint on the first line of application initialize Handler of HelloWorld.mxml

Step 2 - Debug Application
Now click on ![]() Debug application menu and select HelloWorld application to debug the application.
Debug application menu and select HelloWorld application to debug the application.
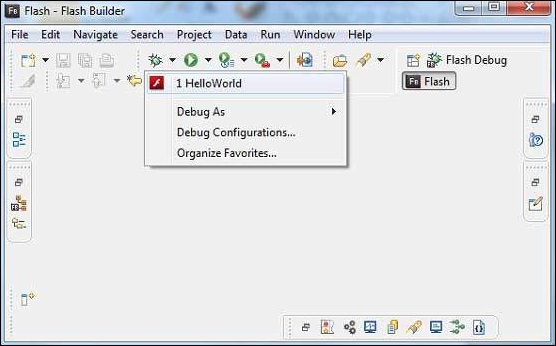
If everything is fine, application will launch in the browser and you will see following debug logs in Flash Builder console.
[SWF] \HelloWorld\bin-debug\HelloWorld.swf
- 181,509 bytes after decompression
[SWF] \HelloWorld\bin-debug\HelloWorld.swf\[[DYNAMIC]]\1
- 763,122 bytes after decompression
[SWF] \HelloWorld\bin-debug\HelloWorld.swf\[[DYNAMIC]]\2
- 1,221,837 bytes after decompression
[SWF] \HelloWorld\bin-debug\HelloWorld.swf\[[DYNAMIC]]\3
- 1,136,788 bytes after decompression
[SWF] \HelloWorld\bin-debug\HelloWorld.swf\[[DYNAMIC]]\4
- 2,019,570 bytes after decompression
[SWF] \HelloWorld\bin-debug\HelloWorld.swf\[[DYNAMIC]]\5
- 318,334 bytes after decompression
As soon as Application launches,you will see the focus on Flash Builder breakpoint as we've placed the breakpoint on first line of application_initialize Handler method.
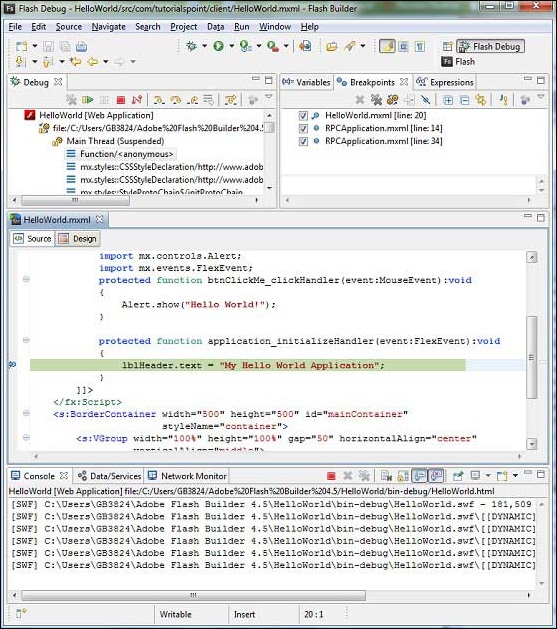
You can see the stacktrace for suspended threads.
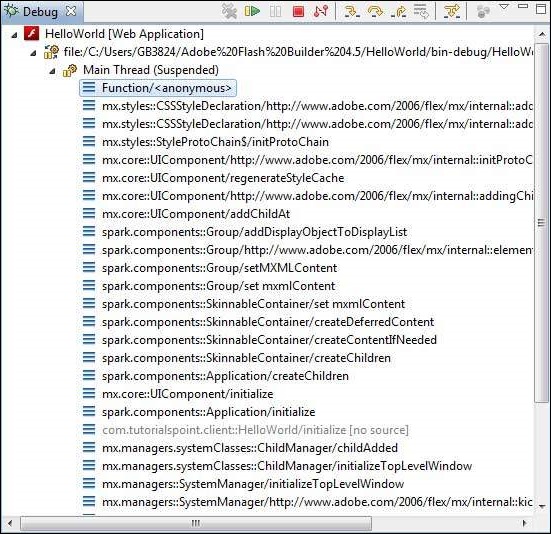
You can see the values for expressions.
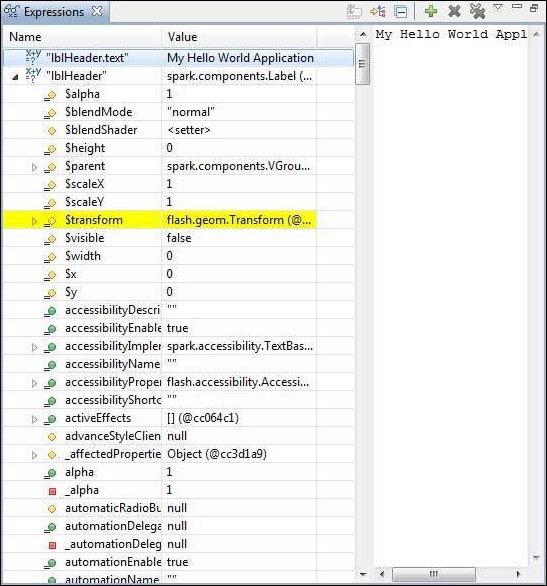
You can see the list of breakpoints placed.
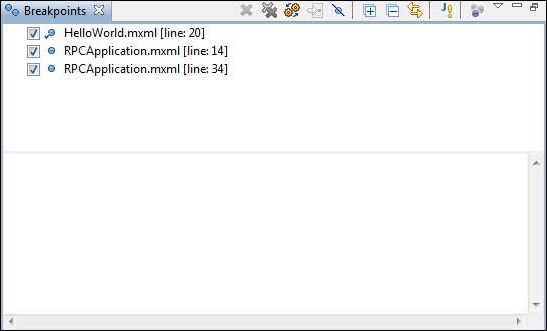
Now keep pressing F6 until you reach the last line of application_initializeHandler() method. As reference for function keys, F6 inspects code line by line, F5 steps inside further and F8 will resume the application. Now you can see the list of values of all variables of application_initializeHandler() method.
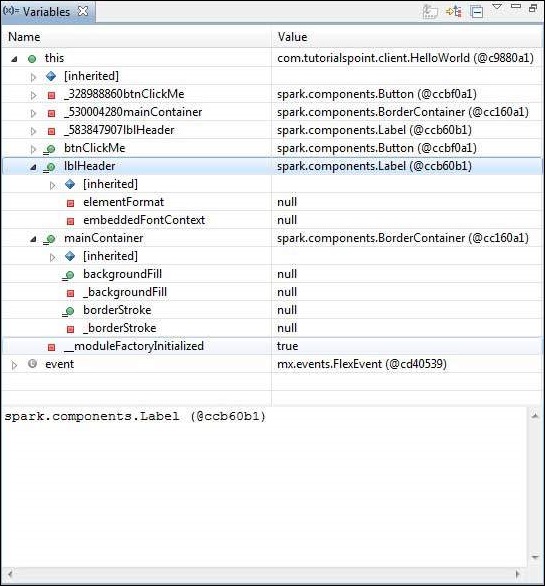
Now you can see the flex code can be debugged in the same way as a Java Application can be debugged. Place breakpoints to any line and play with debugging capabilities of flex.
Flex - Internationalization
Flex provides two ways to internationalize a Flex application, We'll demonstrate use of Compile time Internationalization being most commonly used among projects.
| Sr.No | Technique & Description |
|---|---|
| 1 | Compile Time Internationalization This technique is most prevalent and requires very little overhead at runtime; is a very efficient technique for translating both constant and parameterized strings;simplest to implement. Compile Time internationalization uses standard properties files to store translated strings and parameterized messages, and these properties files are compiled directly in the application. |
| 2 | Run Time Internationalization This technique is very flexible but slower than static string internationalization. You need to compile the localization properties files separately, leave them external to application, and load them at run time. |
Workflow of internationalizing a Flex Application
Step 1 – Create folder structure
Create a locale folder under src folder of Flex project.This will be the parent directory for all of the properties files for the locales that the application will support. Inside the locale folder, create subfolders, one for each of the application's locales to be supported. The convention for naming a locale is
{language}_{country code}
For example, en_US represents English of the United States. The locale de_DE represents German. The sample application will support two common languages: English, and German.
Step 2 – Create properties files
Create properties file containing the messages to be used in the application. We've created a HelloWorldMessages.properties file under src > locale > en_US folder in our example.
enterName = Enter your name
clickMe = Click Me
applicationTitle = Application Internationalization Demonstration
greeting = Hello {0}
Create properties files containing translated values specific to locale. We've created a HelloWorldMessages.properties file under src > locale > de_DE folder in our example. This file contains translations in german language. _de specifies the german locale and we're going to support german language in our application.
If you are creating properties file using Flash Builder then change the encoding of the file to UTF-8.Select the file and then right-click in it to open its properties window.Select Text file encoding as Other UTF-8. Apply and Save the change.
enterName = Geben Sie Ihren Namen
clickMe = Klick mich
applicationTitle = Anwendung Internationalisierung Demonstration
greeting = Hallo {0}
Step 3 – Specify Compiler options
Right-click your project and select Properties.
Select Flex Compiler, and add the following to the Additional Compiler Arguments settings −
-locale en_US de_DE
Right-click your project and select Properties.
Select Flex Build Path, and add the following to the Source Path settings −
src\locale\{locale}
Internalization Example
Now Let us follow the following steps to test Internalization technique in a Flex application −
| Step | Description |
|---|---|
| 1 | Create a project with a name HelloWorld under a package com.tutorialspoint.client as explained in the Flex - Create Application chapter. |
| 2 | Modify HelloWorld.mxml as explained below. Keep rest of the files unchanged. |
| 3 | Compile and run the application to make sure business logic is working as per the requirements. |
Following is the content of the modified mxml file src/com.tutorialspoint/HelloWorld.mxml.
<?xml version = "1.0" encoding = "utf-8"?>
   <s:Application xmlns:fx = "http://ns.adobe.com/mxml/2009"
   xmlns:s = "library://ns.adobe.com/flex/spark"
   xmlns:mx = "library://ns.adobe.com/flex/mx"
   minWidth = "500" minHeight = "500">

   <fx:Metadata>
      [ResourceBundle("HelloWorldMessages")]
   </fx:Metadata>

   <fx:Style source = "/com/tutorialspoint/client/Style.css" />
   <fx:Script>
      <![CDATA[
         import mx.controls.Alert;
         [Bindable]
         private var locales:Array =  [{label:"English", locale:"en_US"},
            {label:"German", locale:"de_DE"}];

         private function comboChangeHandler():void {
           resourceManager.localeChain = [localeComboBox.selectedItem.locale];
         }

         protected function clickMe_clickHandler(event:MouseEvent):void {
            var name:String = txtName.text;
            var inputArray:Array = new Array();
            inputArray.push(name);
            Alert.show(resourceManager.getString('HelloWorldMessages'
               ,'greeting',inputArray));
         }
      ]]>
   </fx:Script>

   <s:BorderContainer width = "500" height = "500" id = "mainContainer"
      styleName = "container">
      <s:VGroup width = "100%" height = "100%" gap = "50"
	  horizontalAlign = "center" verticalAlign = "middle">

         <s:Label id = "lblHeader" fontSize = "40"
            color = "0x777777"
            text  = "{resourceManager.getString('HelloWorldMessages','applicationTitle')}"
            styleName = "heading" width = "90%" height = "150" />

         <s:Panel width = "300" height = "150">
            <s:layout>
               <s:VerticalLayout paddingTop = "10" paddingLeft = "10" />
            </s:layout>

            <s:HGroup >
               <s:Label text = "{resourceManager.getString('HelloWorldMessages','enterName')}"
                  paddingTop = "2" />
               <s:TextInput id = "txtName" />
            </s:HGroup>

            <s:Button
               label = "{resourceManager.getString('HelloWorldMessages','clickMe')}"
               click = "clickMe_clickHandler(event)" right = "10" />
         </s:Panel>

         <mx:ComboBox id = "localeComboBox" dataProvider = "{locales}"
            change = "comboChangeHandler()" />
      </s:VGroup>
   </s:BorderContainer>
</s:Application>
Once you are ready with all the changes done, let us compile and run the application in normal mode as we did in Flex - Create Application chapter. If everything is fine with your application, it will produce the following result: [ Try it online ]
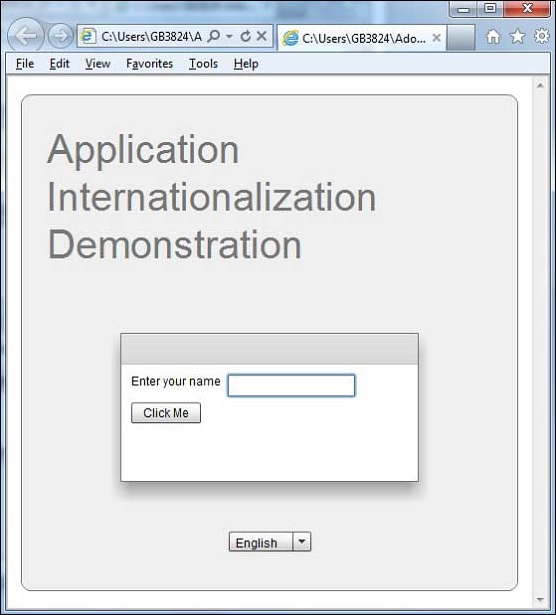
Change the language using language drop down and see the result.
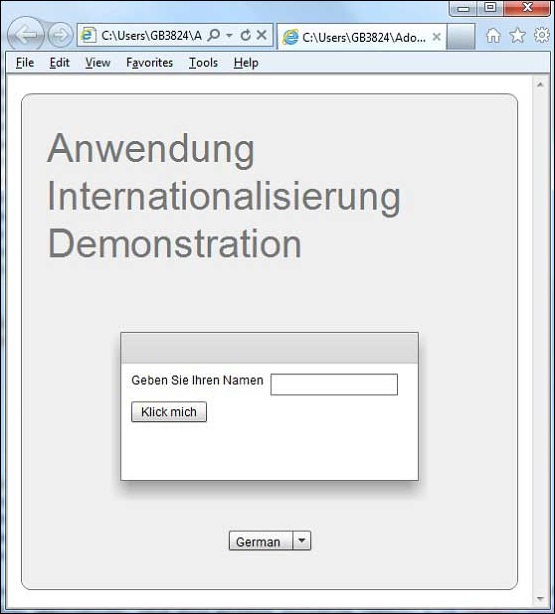
Flex - Printing Support
Flex provides a special class FlexPrintJob to print flex objects.
FlexPrintJob can be used to print one or more Flex objects, such as a Form or VBox container.
FlexPrintJob prints the object and all objects that it contains.
The objects can be all or part of the displayed interface.
The objects can be components that format data specifically for printing.
The FlexPrintJob class lets you scale the output to fit the page.
The FlexPrintJob class automatically uses multiple pages to print an object that does not fit on a single page.
The FlexPrintJob class causes the operating system to display a Print dialog box. You cannot print without some user action.
Prepare and send a print job
You print output by preparing and sending a print job. Let's create an instance of the FlexPrintJob class
var printJob:FlexPrintJob = new FlexPrintJob();
Start the print job
printJob.start();
Flex will cause the operating system to display a Print dialog box. Add one or more objects to the print job and specify how to scale them
printJob.addObject(myObject, FlexPrintJobScaleType.MATCH_WIDTH);
Each object starts on a new page. Send the print job to the printer
printJob.send();
Printing Example
| Step | Description |
|---|---|
| 1 | Create a project with a name HelloWorld under a package com.tutorialspoint.client as explained in the Flex - Create Application chapter. |
| 2 | Modify HelloWorld.mxml as explained below. Keep rest of the files unchanged. |
| 3 | Compile and run the application to make sure business logic is working as per the requirements. |
Following is the content of the modified mxml file src/com.tutorialspoint/HelloWorld.mxml.
<?xml version = "1.0" encoding = "utf-8"?>
<s:Application xmlns:fx = "http://ns.adobe.com/mxml/2009"
   xmlns:s = "library://ns.adobe.com/flex/spark"
   xmlns:mx = "library://ns.adobe.com/flex/mx"
   width = "100%" height = "100%"
   minWidth = "500" minHeight = "500"
   initialize = "application_initializeHandler(event)">

   <fx:Style source = "/com/tutorialspoint/client/Style.css" />
   <fx:Script>
     <![CDATA[
         import mx.controls.Alert;
         import mx.events.FlexEvent;
         import mx.printing.FlexPrintJob;
         import mx.printing.FlexPrintJobScaleType;

         protected function btnClickMe_clickHandler(event:MouseEvent):void {

            // Create an instance of the FlexPrintJob class.
            var printJob:FlexPrintJob = new FlexPrintJob();

            // Start the print job.
            if (printJob.start() != true) return;

            // Add the object to print. Do not scale it.
            printJob.addObject(myDataGrid, FlexPrintJobScaleType.NONE);

            // Send the job to the printer.
            printJob.send();
        }

        protected function application_initializeHandler(event:FlexEvent):void {
            lblHeader.text = "My Hello World Application";
        }
     ]]>
   </fx:Script>

   <s:BorderContainer width = "500" height = "500" id = "mainContainer"
      styleName = "container">
      <s:VGroup width = "100%" height = "100%" gap = "50"
         horizontalAlign = "center"
         verticalAlign = "middle">
         <s:Label id = "lblHeader" fontSize = "40" color = "0x777777"
            styleName = "heading" />

         <mx:DataGrid id = "myDataGrid" width = "300">
            <mx:dataProvider>
               <fx:Object Product = "Flex" Code = "1000" />
               <fx:Object Product = "GWT" Code = "2000" />
               <fx:Object Product = "JAVA" Code = "3000" />
               <fx:Object Product = "JUnit" Code = "4000" />
            </mx:dataProvider>
         </mx:DataGrid>

         <s:Button label = "Print Me!" id = "btnClickMe"
            click = "btnClickMe_clickHandler(event)"
            styleName = "button" />
      </s:VGroup>
   </s:BorderContainer>
</s:Application>
Once you are ready with all the changes done, let us compile and run the application in normal mode as we did in Flex - Create Application chapter. If everything is fine with your application, it will produce the following result: [ Try it online ]
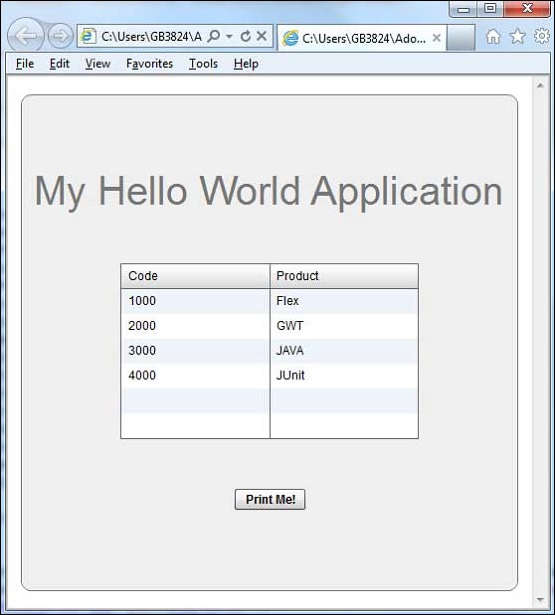
Click on print me button and you can see the printout of the data grid shown below.