- SwiftUI - Home
- SwiftUI - Overview
- SwiftUI vs UIkit
- SwiftUI Environment
- SwiftUI - Environment Setup
- SwiftUI - Basic Components
- SwiftUI - Building First Application
- SwiftUI Views
- SwiftUI - Views
- SwiftUI - Customize Text View
- SwiftUI - Custom Image View
- SwiftUI - Stacks
- SwiftUI Drawing Shapes
- SwiftUI - Shapes
- SwiftUI - Drawing line
- SwiftUI - Drawing Rectangle
- SwiftUI - Drawing Rounded Rectangle
- SwiftUI - Drawing Triangle
- SwiftUI - Drawing Circle
- SwiftUI - Drawing Star
- SwiftUI - Drawing Polygon
- SwiftUI - Drawing Pie chart
- SwiftUI - Using built-in shapes
- SwiftUI - Text
- SwiftUI - Text View
- SwiftUI - Text Input and Output
- SwiftUI - Color
- SwiftUI - Color
- SwiftUI - Colorpicker
- SwiftUI - Gradients
- SwiftUI - Adjust Color
- SwiftUI - Effects
- SwiftUI - Effects
- SwiftUI - Blend Effect
- SwiftUI - BLur Effect
- SwiftUI - Shadow Effect
- SwiftUI - Hover Effect
- SwiftUI - Animations
- SwiftUI - Animations
- SwiftUI - Creating Animations
- SwiftUI - Creating an Explicit Animation
- SwiftUI - Multiple Animations
- SwiftUI - Transitions
- SwiftUI - Asymmetric Transition
- SwiftUI - Custom Transition
- SwiftUI - Image
- SwiftUI - Images
- SwiftUI - Image as Background
- SwiftUI - Rotating Image
- SwiftUI - Media
- SwiftUI - View Layout
- SwiftUI - View Layout
- SwiftUI - View Size
- SwiftUI - View Spacing
- SwiftUI - View Padding
- SwiftUI - UI Controls
- SwiftUI - UI Controls
- SwiftUI - Button
- SwiftUI - CheckBox
- SwiftUI - Menubar
- SwiftUI - Toolbar
- SwiftUI - Search Bar
- SwiftUI - TextField
- SwiftUI - Slider
- SwiftUI - Toggle
- SwiftUI - Pickers
- SwiftUI - Menus
- SwiftUI - List & Tables
- SwiftUI - Lists
- SwiftUI - Static List
- SwiftUI - Dynamic List
- SwiftUI - Customize List
- SwiftUI - Tables
- SwiftUI - Forms
- SwiftUI - Forms
- SwiftUI - Breaking Forms in Sections
- SwiftUI - Event Handling
- SwiftUI - Event Handling
- SwiftUI - Gesture
- SwiftUI - Clipboard
- SwiftUI - Drag and Drop
- SwiftUI - Focus
- SwiftUI - Alert
- SwiftUI - Miscellaneous
- SwiftUI - Containers
- SwiftUI - Navigation
- SwiftUI - Notifications
- SwiftUI - Cross-Platform UI
- SwiftUI - Data
- SwiftUI - Accessibility
- SwiftUI - Framework Integration
- SwiftUI - Framework Integration
- SwiftUI - Interfacing with UIKit
- SwiftUI - Creating macOS App
- SwiftUI Useful Resources
- SwiftUI - Useful Resources
- SwiftUI - Discussion
SwiftUI - Views
In SwiftUI, a view is the fundamental building block which is used to create an apps user interface. A single app can have multiple views, each containing a description of what will be displayed on the screen. Whatever we see on the screen is derived from the description given in the view.
A view is a value type, not a pointer type. Views are lightweight and always present in a hierarchy.
Creating View in SwiftUI
To create a view we have to define a structure that conforms to the View protocol. The View protocol is responsible for how and what will be displayed on the view of the app. The View protocol uses the body property to define the content of the view. We are allowed to create a view either using a built-in view or using a custom view. Follow the following steps to create a simple view−
Step 1: Import SwiftUI
To create a view first of all import SwiftUI in your project.
import SwiftUI
Step 2: Define Structure Conforming to the View Protocol
Now define a structure that conforming the View protocol. It is like a blueprint which describes the functionality. The structure that conforming the view must fulfill the functionality that the protocol provides. After that, you are allowed to add your custom view in the view hierarchy so that it will become part of your app.
struct ContentView: View {
}
Step 3: Implementing body Property
After creating a structure we must implement a body property. This body property is the main requirement of the View protocol, it describes the layout and the content of the view.
In SwiftUI we do not need to declare body property explicitly instead we declare body property using some View syntax, this syntax represents that the body type conforms to the View. The type of the body depends upon the content of the body, it can be edited during the development or we can say that Swift infers type automatically.
Here we can use built-in views or custom views to create a user interface of an app. Also, we can configure the appearance of the views with the help of modifiers provided by SwiftUI. These modifiers are nothing but the method associated with the particular view.
import SwiftUI

struct ContentView: View {
   var body: some View {
      // Code..
   }
}
Step 4: Adding View to View Hierarchy
In SwiftUI, we are allowed to add views in other views simply by declaring it to the point where it will display in the hierarchy.
import SwiftUI

struct ContentView: View {
   var body: some View {
      MyNewView(x:.title)
   }
}
Step 5: Preview
We can see the preview of the view with the help of #Preview.
#Preview {
   ContentView()
}
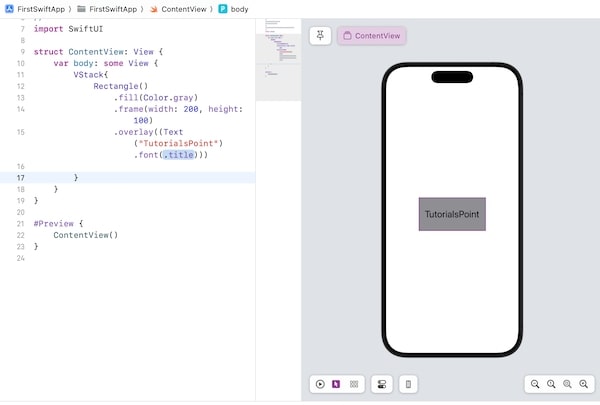
The following SwiftUI program is used to create a simple view.
import SwiftUI

struct ContentView: View {
   var body: some View {
      VStack{
         Rectangle()
         .fill(Color.gray)
         .frame(width: 200, height: 100)
         .overlay((Text("TutorialsPoint").font(.title)))
      }
   }
}
#Preview {
   ContentView()
}
Output
Built-in Views in SwiftUI
SwiftUI provides a wide range of views that are used to create a dynamic and responsive user interface. These views have a wide range of functionalities and modifiers. Some of the commonly used built-in views are as follows−
| View | Description |
|---|---|
| Text("Some Text") | It is used to display text. |
| Image("image") | It is used to display image |
| Button(action:) | It is used to display a tappable button, which performs an action when it is tapped. |
| Toggle(isOn:) | It is used to create a toggle switch. |
| Slider(value:, in:) | It is used to create a slider to select a value from the given range. |
| TextField("name", text:) | It allows users to enter and edit data. | List() | It is used to display a scrollable list. | Form() | It is used to create a form that takes input from the user. | Spacer() | It is used to add space between views. | ScrollView | It is used to create a scrollable container for its child view. |
