- SwiftUI - Home
- SwiftUI - Overview
- SwiftUI vs UIkit
- SwiftUI Environment
- SwiftUI - Environment Setup
- SwiftUI - Basic Components
- SwiftUI - Building First Application
- SwiftUI Views
- SwiftUI - Views
- SwiftUI - Customize Text View
- SwiftUI - Custom Image View
- SwiftUI - Stacks
- SwiftUI Drawing Shapes
- SwiftUI - Shapes
- SwiftUI - Drawing line
- SwiftUI - Drawing Rectangle
- SwiftUI - Drawing Rounded Rectangle
- SwiftUI - Drawing Triangle
- SwiftUI - Drawing Circle
- SwiftUI - Drawing Star
- SwiftUI - Drawing Polygon
- SwiftUI - Drawing Pie chart
- SwiftUI - Using built-in shapes
- SwiftUI - Text
- SwiftUI - Text View
- SwiftUI - Text Input and Output
- SwiftUI - Color
- SwiftUI - Color
- SwiftUI - Colorpicker
- SwiftUI - Gradients
- SwiftUI - Adjust Color
- SwiftUI - Effects
- SwiftUI - Effects
- SwiftUI - Blend Effect
- SwiftUI - BLur Effect
- SwiftUI - Shadow Effect
- SwiftUI - Hover Effect
- SwiftUI - Animations
- SwiftUI - Animations
- SwiftUI - Creating Animations
- SwiftUI - Creating an Explicit Animation
- SwiftUI - Multiple Animations
- SwiftUI - Transitions
- SwiftUI - Asymmetric Transition
- SwiftUI - Custom Transition
- SwiftUI - Image
- SwiftUI - Images
- SwiftUI - Image as Background
- SwiftUI - Rotating Image
- SwiftUI - Media
- SwiftUI - View Layout
- SwiftUI - View Layout
- SwiftUI - View Size
- SwiftUI - View Spacing
- SwiftUI - View Padding
- SwiftUI - UI Controls
- SwiftUI - UI Controls
- SwiftUI - Button
- SwiftUI - CheckBox
- SwiftUI - Menubar
- SwiftUI - Toolbar
- SwiftUI - Search Bar
- SwiftUI - TextField
- SwiftUI - Slider
- SwiftUI - Toggle
- SwiftUI - Pickers
- SwiftUI - Menus
- SwiftUI - List & Tables
- SwiftUI - Lists
- SwiftUI - Static List
- SwiftUI - Dynamic List
- SwiftUI - Customize List
- SwiftUI - Tables
- SwiftUI - Forms
- SwiftUI - Forms
- SwiftUI - Breaking Forms in Sections
- SwiftUI - Event Handling
- SwiftUI - Event Handling
- SwiftUI - Gesture
- SwiftUI - Clipboard
- SwiftUI - Drag and Drop
- SwiftUI - Focus
- SwiftUI - Alert
- SwiftUI - Miscellaneous
- SwiftUI - Containers
- SwiftUI - Navigation
- SwiftUI - Notifications
- SwiftUI - Cross-Platform UI
- SwiftUI - Data
- SwiftUI - Accessibility
- SwiftUI - Framework Integration
- SwiftUI - Framework Integration
- SwiftUI - Interfacing with UIKit
- SwiftUI - Creating macOS App
- SwiftUI Useful Resources
- SwiftUI - Useful Resources
- SwiftUI - Discussion
SwiftUI - Drawing Triangle
A triangle is a three side polygon. It has three sides, three angles, and three vertices. It is also used to in UI(user interface) design to create custom icons, decorative elements, arrows and pointers, progress indicators, masking and clipping, etc. So in this chapter we are going to learn how to create triangular shape in SwiftUI.
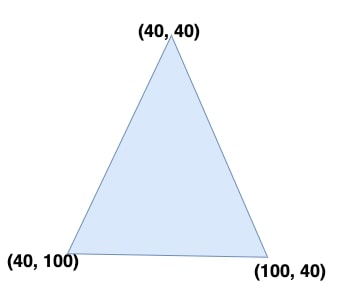
Drawing Triangle in SwiftUI
SwiftUI doesn't provide in-built triangle shape like rectangle and circle, still we can draw a custom triangle either by simply using the Path struct or by using the Shape protocol.
Both methods can draw a triangular design that fulfill the need of the applications. Now we will learn how to create triangular shape using both these methods step by step.
Steps to Draw a triangle in SwiftUI Using Path struct
Follow the steps given below to draw triangle using Path struct in SwiftUI−
Step 1: Initialize Path
First of all initialize Path and provide detailed instructions in the closure. It will help use to create a trinagle by connected a series of points and lines.
Path() {}
Step 2: Moving to the specified coordinates
Now we use the move(to:) method to move to the point of origin from where the triangle will start drawing.
Path(){
   xPath in
      xPath.move(to: CGPoint(x: 250, y: 100))
}
Step 3: Drawing triangle
Now we call the addLine(to:) method two time if we use .fill() and .closeSubpath() methods becuase they will automatically connects current point to the origin point. Otherwise we will call addLine(to:) method three times to draw three connected lines in triangular shape.
Path(){
   xPath in
      xPath.move(to: CGPoint(x: 250, y: 100))
      xPath.addLine(to: CGPoint(x: 350, y: 250))
      xPath.addLine(to: CGPoint(x: 150, y: 250))
}
Step 4: Filling the color
By default the triangle is created in black color so using .fill modifier we can change the color of the triangle according to our choice.
Path(){
   xPath in
      xPath.move(to: CGPoint(x: 250, y: 100))
      xPath.addLine(to: CGPoint(x: 350, y: 250))
      xPath.addLine(to: CGPoint(x: 150, y: 250))
}.fill(Color.teal)
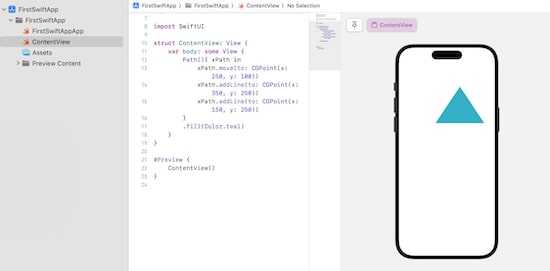
Example 1
The following SwiftUI program is used to draw a triangle using Path struct.
import SwiftUI

struct ContentView: View {
   var body: some View {
      Path(){
	     xPath in
            xPath.move(to: CGPoint(x: 250, y: 100))
            xPath.addLine(to: CGPoint(x: 350, y: 250))
            xPath.addLine(to: CGPoint(x: 150, y: 250))
      }.fill(Color.teal)
   }
}
#Preview {
   ContentView()
}
Output
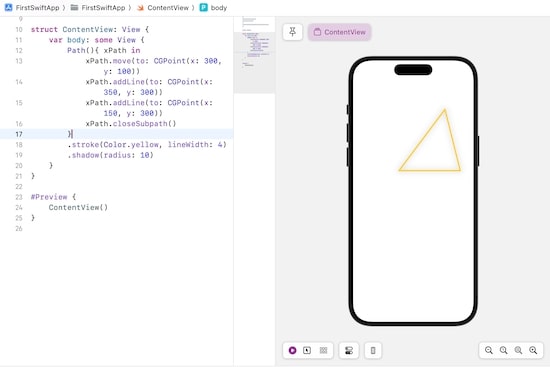
Example 2
The following SwiftUI program is used to customize triangle.
import SwiftUI

struct ContentView: View {
   var body: some View {
      Path { xPath in
         xPath.move(to: CGPoint(x: 300, y: 100))
         xPath.addLine(to: CGPoint(x: 350, y: 300))
         xPath.addLine(to: CGPoint(x: 150, y: 300))
         xPath.closeSubpath()
      }.stroke(Color.yellow, lineWidth: 4)
      .shadow(radius: 10)
   }
}

#Preview {
   ContentView()
}
Output
Steps to Draw a triangle in SwiftUI Using Shape protocol
Follow the following steps to draw triangle using Shape protocol in SwiftUI −
Step 1 − Define the Custom Shape
To draw a custom triangular shape we need to create a struct that conforms to Shape protocol. In this structure, we will define how the triangular shape will we created and the path(in:) method.
struct Triangle : Shape{}
Step 2: Create a View
Now we use the custom triangle in a SwiftUI view. It will show how the custom triangle will look.
func path(
   in rect: CGRect) -> Path {
      var xpath = Path()
      xpath.move(to: CGPoint(x: rect.minX, y: rect.maxY))
      xpath.addLine(to: CGPoint(x: rect.midX, y: rect.minY))
      xpath.addLine(to: CGPoint(x: rect.maxX, y: rect.maxY))
      xpath.addLine(to: CGPoint(x: rect.minX, y: rect.maxY))
      return xpath
}
Step 3: Adding Additional Customization
We can also customize the triangular shape using various modifiers like stroke, fill, shadow, overlay text etc.
Triangle()
   .fill(Color.yellow)
   .frame(width: 300, height: 400, alignment: .center)
Example
The Following SwiftUI program is used to create a custom triangle using Shape Protocol.
import SwiftUI
struct Triangle : Shape{
   func path(in rect: CGRect) -> Path {
      var xpath = Path()
      xpath.move(to: CGPoint(x: rect.minX, y: rect.maxY))
      xpath.addLine(to: CGPoint(x: rect.midX, y: rect.minY))
      xpath.addLine(to: CGPoint(x: rect.maxX, y: rect.maxY))
      xpath.addLine(to: CGPoint(x: rect.minX, y: rect.maxY))
      return xpath
   }
}

struct ContentView: View {
   var body: some View {
      Triangle()
         .fill(Color.yellow)
         .frame(width: 300, height: 400, alignment: .center)
   }
}

#Preview {
   ContentView()
}
Output

