- SwiftUI - Home
- SwiftUI - Overview
- SwiftUI vs UIkit
- SwiftUI Environment
- SwiftUI - Environment Setup
- SwiftUI - Basic Components
- SwiftUI - Building First Application
- SwiftUI Views
- SwiftUI - Views
- SwiftUI - Customize Text View
- SwiftUI - Custom Image View
- SwiftUI - Stacks
- SwiftUI Drawing Shapes
- SwiftUI - Shapes
- SwiftUI - Drawing line
- SwiftUI - Drawing Rectangle
- SwiftUI - Drawing Rounded Rectangle
- SwiftUI - Drawing Triangle
- SwiftUI - Drawing Circle
- SwiftUI - Drawing Star
- SwiftUI - Drawing Polygon
- SwiftUI - Drawing Pie chart
- SwiftUI - Using built-in shapes
- SwiftUI - Text
- SwiftUI - Text View
- SwiftUI - Text Input and Output
- SwiftUI - Color
- SwiftUI - Color
- SwiftUI - Colorpicker
- SwiftUI - Gradients
- SwiftUI - Adjust Color
- SwiftUI - Effects
- SwiftUI - Effects
- SwiftUI - Blend Effect
- SwiftUI - BLur Effect
- SwiftUI - Shadow Effect
- SwiftUI - Hover Effect
- SwiftUI - Animations
- SwiftUI - Animations
- SwiftUI - Creating Animations
- SwiftUI - Creating an Explicit Animation
- SwiftUI - Multiple Animations
- SwiftUI - Transitions
- SwiftUI - Asymmetric Transition
- SwiftUI - Custom Transition
- SwiftUI - Image
- SwiftUI - Images
- SwiftUI - Image as Background
- SwiftUI - Rotating Image
- SwiftUI - Media
- SwiftUI - View Layout
- SwiftUI - View Layout
- SwiftUI - View Size
- SwiftUI - View Spacing
- SwiftUI - View Padding
- SwiftUI - UI Controls
- SwiftUI - UI Controls
- SwiftUI - Button
- SwiftUI - CheckBox
- SwiftUI - Menubar
- SwiftUI - Toolbar
- SwiftUI - Search Bar
- SwiftUI - TextField
- SwiftUI - Slider
- SwiftUI - Toggle
- SwiftUI - Pickers
- SwiftUI - Menus
- SwiftUI - List & Tables
- SwiftUI - Lists
- SwiftUI - Static List
- SwiftUI - Dynamic List
- SwiftUI - Customize List
- SwiftUI - Tables
- SwiftUI - Forms
- SwiftUI - Forms
- SwiftUI - Breaking Forms in Sections
- SwiftUI - Event Handling
- SwiftUI - Event Handling
- SwiftUI - Gesture
- SwiftUI - Clipboard
- SwiftUI - Drag and Drop
- SwiftUI - Focus
- SwiftUI - Alert
- SwiftUI - Miscellaneous
- SwiftUI - Containers
- SwiftUI - Navigation
- SwiftUI - Notifications
- SwiftUI - Cross-Platform UI
- SwiftUI - Data
- SwiftUI - Accessibility
- SwiftUI - Framework Integration
- SwiftUI - Framework Integration
- SwiftUI - Interfacing with UIKit
- SwiftUI - Creating macOS App
- SwiftUI Useful Resources
- SwiftUI - Useful Resources
- SwiftUI - Discussion
SwiftUI - Rotating An Image
Rotating an image is a process of rotating an image around a central point or an axis according to the given angle. This angle can be measured in degrees or radians. In SwiftUI, we can rotate images easily with the help of the following pre-defined modifiers −
rotationEffect()
rotation3DEffect()
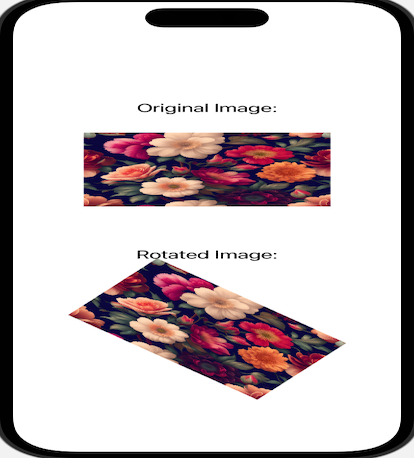
The "rotationEffect()" Modifier in SwiftUI
The rotationEffect() modifier is used to rotate the image around the given point. It is a pre-defined modifier in SwiftUI and can rotate images in 2-dimension. It rotates only the view's content around the given axis, it doesnot rotate the view's frame.
Syntax
Following is the syntax −
func rotationEffect(
   _ angle: Angle,
   anchor: UnitPoint = .center
) -> some View
Parameters
It takes the following parameters −
angle: Represent the angle to which we have to rotate the image.
anchor: Represent the unit point within the view to which we want to perform rotation. The default value of this parameter is center.
Example
The following SwiftUI program is used to rotate the image. Here we rotate the image by 40 degrees around its original axis.
import SwiftUI
struct ContentView: View {
   var body: some View {
      VStack{
         Text("Original Image:").font(.title2)
         Image("wallpaper")
            .resizable()
            .frame(width: 250, height: 140)
            .padding(20)

         // Rotated image
         Text("Rotated Image:").font(.title2).padding(50)
         Image("wallpaper")
            .resizable()
            .frame(width: 250, height: 140)
            .rotationEffect(.degrees(40))
      }
   }
}

#Preview {
   ContentView()
}
Output
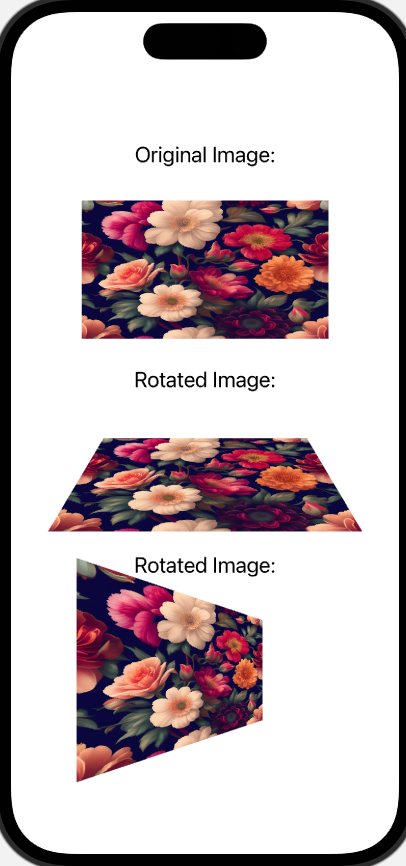
The rotation3DEffect() Modifier in SwiftUI
In SwiftUI, the rotation3DEffect() modifier is used to rotate image in 3-dimension(that is X, Y, and Z) around the given axis or points. It generally displays the rotated content in the original view's plane.
Syntax
Following is the syntax −
func rotation3DEffect(
   _ angle: Angle,
   axis: (x: CGFloat, y: CGFloat, z: CGFloat),
   anchor: UnitPoint = .center,
   anchorZ: CGFloat = 0,
   perspective: CGFloat = 1
) -> some View
Parameters
It takes the following parameters −
angle: Represent the angle to which we have to rotate the image.
axis: Represent the axis of the rotation. It contains a tuple which holds the value for all the three axis that are X, Y, and Z.
anchor: Represent the 2-D point within which we perform rotation. The default value is center.
anchorZ: Represent the Z-axis and the default value is 0.
perspective: Represent the vanishing point for the given rotation and the default value of this parameter is 1.
Example
The following SwiftUI program is used to apply 3D rotation effect on the image. Here we rotate images in 50 degrees around two different axis: X and Y.
import SwiftUI

struct ContentView: View {
   var body: some View {
      VStack{
         Text("Original Image:").font(.title2)
         Image("wallpaper")
            .resizable()
            .frame(width: 250, height: 140)
            .padding(20)

         // Rotated image
         Text("Rotated Image:").font(.title2)
         Image("wallpaper")
            .resizable()
            .frame(width: 250, height: 140)
            .rotation3DEffect(
               .degrees(50),
               axis: (x: 1, y:0, z:0)
            )
         // Rotated image
         Text("Rotated Image:").font(.title2)
         Image("wallpaper")
            .resizable()
            .frame(width: 250, height: 140)
            .rotation3DEffect(
               .degrees(50),
               axis: (x: 0, y:1, z:0)
            ).padding(10)
      }
   }
}

#Preview {
   ContentView()
}
Output