- SwiftUI - Home
- SwiftUI - Overview
- SwiftUI vs UIkit
- SwiftUI Environment
- SwiftUI - Environment Setup
- SwiftUI - Basic Components
- SwiftUI - Building First Application
- SwiftUI Views
- SwiftUI - Views
- SwiftUI - Customize Text View
- SwiftUI - Custom Image View
- SwiftUI - Stacks
- SwiftUI Drawing Shapes
- SwiftUI - Shapes
- SwiftUI - Drawing line
- SwiftUI - Drawing Rectangle
- SwiftUI - Drawing Rounded Rectangle
- SwiftUI - Drawing Triangle
- SwiftUI - Drawing Circle
- SwiftUI - Drawing Star
- SwiftUI - Drawing Polygon
- SwiftUI - Drawing Pie chart
- SwiftUI - Using built-in shapes
- SwiftUI - Text
- SwiftUI - Text View
- SwiftUI - Text Input and Output
- SwiftUI - Color
- SwiftUI - Color
- SwiftUI - Colorpicker
- SwiftUI - Gradients
- SwiftUI - Adjust Color
- SwiftUI - Effects
- SwiftUI - Effects
- SwiftUI - Blend Effect
- SwiftUI - BLur Effect
- SwiftUI - Shadow Effect
- SwiftUI - Hover Effect
- SwiftUI - Animations
- SwiftUI - Animations
- SwiftUI - Creating Animations
- SwiftUI - Creating an Explicit Animation
- SwiftUI - Multiple Animations
- SwiftUI - Transitions
- SwiftUI - Asymmetric Transition
- SwiftUI - Custom Transition
- SwiftUI - Image
- SwiftUI - Images
- SwiftUI - Image as Background
- SwiftUI - Rotating Image
- SwiftUI - Media
- SwiftUI - View Layout
- SwiftUI - View Layout
- SwiftUI - View Size
- SwiftUI - View Spacing
- SwiftUI - View Padding
- SwiftUI - UI Controls
- SwiftUI - UI Controls
- SwiftUI - Button
- SwiftUI - CheckBox
- SwiftUI - Menubar
- SwiftUI - Toolbar
- SwiftUI - Search Bar
- SwiftUI - TextField
- SwiftUI - Slider
- SwiftUI - Toggle
- SwiftUI - Pickers
- SwiftUI - Menus
- SwiftUI - List & Tables
- SwiftUI - Lists
- SwiftUI - Static List
- SwiftUI - Dynamic List
- SwiftUI - Customize List
- SwiftUI - Tables
- SwiftUI - Forms
- SwiftUI - Forms
- SwiftUI - Breaking Forms in Sections
- SwiftUI - Event Handling
- SwiftUI - Event Handling
- SwiftUI - Gesture
- SwiftUI - Clipboard
- SwiftUI - Drag and Drop
- SwiftUI - Focus
- SwiftUI - Alert
- SwiftUI - Miscellaneous
- SwiftUI - Containers
- SwiftUI - Navigation
- SwiftUI - Notifications
- SwiftUI - Cross-Platform UI
- SwiftUI - Data
- SwiftUI - Accessibility
- SwiftUI - Framework Integration
- SwiftUI - Framework Integration
- SwiftUI - Interfacing with UIKit
- SwiftUI - Creating macOS App
- SwiftUI Useful Resources
- SwiftUI - Useful Resources
- SwiftUI - Discussion
SwiftUI - Drawing a Line
A line is a fundamental concept in geometry. It is a straight path that can extend infinitely in both directions. It is denoted by two points such as A and B, and is commonly used to define various shapes like rectangles, triangles, squares, polygons, etc, angles and relationships between points. It does not have any thickness or width. Despite being one-dimensional it still can exist in two or more dimensional planes.
However a line can also be a finite portion defined by two distinct endpoints and this portion is known as a line segment. Unlike a line, a line segment has a definite length with a starting and ending point. So in this chapter, we are going to draw a line segment in SwiftUI

Drawing Line in SwiftUI
In SwiftUI, we can create line and line segments using the addLine(to:)method. This method adds a straight line segment from the current point to the given point(end point). This function takes two coordinates(CGPoint(x:, y:)) which is the length of the line from the current point and the end point to where the line will end.
Syntax
Following is the syntax −
addLine(to end: CGPoint)
It takes only one parameter that is, end. This parameter represents the coordinates of end point of the line segment
Steps to Draw Line in SwiftUI
Follow the following steps to draw line in SwiftUI −
Initialize Path
To create a line or any shape first we need to initialize Path and provide detailed instructions in the closure. The path is used to define custom shapes and lines. It allows us to create complex graphics by specifying a series of connected points and lines.
Path() {}
Moving to the Specified Coordinates
Now we use the move(to:) method to move to the specified coordinates of the given canvas. Or we can say that we use the move(to:) method to reach the current point/starting point of the line.
Path() {
   myPath in
   myPath.move(to: CGPoint(x: 70, y: 300))
}
Drawing line
Now we call the addLine(to:) method to draw a line from the current point to the specified point/end point
Path() {
   myPath in
   myPath.move(to: CGPoint(x: 70, y: 300))
   myPath.addLine(to: CGPoint(x: 300, y: 300))
}
Here the move() method contains the coordinates of the starting point and the addLine() method contains the coordinates of the end point of the line
Specifying Line Width and Color
To specify the width and color of the line we need to use the .stroke modifier
Path() {
   myPath in
      myPath.move(to: CGPoint(x: 70, y: 300))
      myPath.addLine(to: CGPoint(x: 300, y: 300))
}.stroke(Color.indigo, lineWidth: 5)
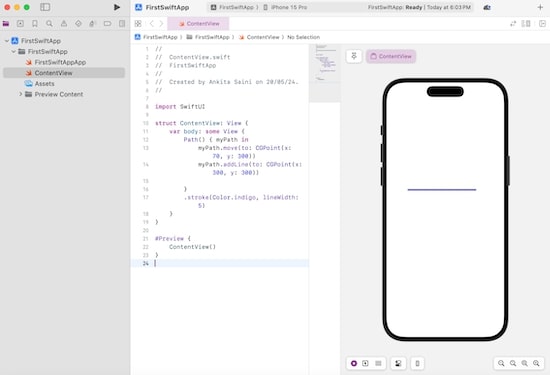
Example 1
The following SwiftUI program is used to draw a line.
import SwiftUI

struct ContentView: View {
   var body: some View {
      Path() {
         myPath in
            myPath.move(to: CGPoint(x: 70, y: 300))
            myPath.addLine(to: CGPoint(x: 300, y: 300))
        }.stroke(Color.indigo, lineWidth: 5)
    }
}
#Preview {
   ContentView()
}
Output
Example 2
The following SwiftUI program is used to draw multiple lines in the same path.
import SwiftUI

struct ContentView: View {
   var body: some View {
      Path() {
         xPath in
            xPath.move(to: CGPoint(x: 90, y: 300))
            xPath.addLine(to: CGPoint(x: 200, y: 300))
            xPath.addLine(to: CGPoint(x: 100, y: 99))
      }.stroke(Color.red, lineWidth: 5)
   }
}

#Preview {
   ContentView()
}
Output
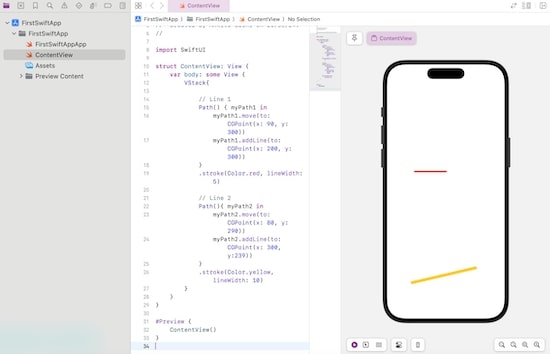
Example 3
The following SwiftUI program is used to draw multiple lines vertically in different paths. Here we use VStack to draw lines vertically.
import SwiftUI

struct ContentView: View {
   var body: some View {
      VStack{
         // Line 1
         Path() {
            myPath1 in
               myPath1.move(to: CGPoint(x: 90, y: 300))
               myPath1.addLine(to: CGPoint(x: 200, y: 300))
         }.stroke(Color.red, lineWidth: 5)

         // Line 2
         Path(){
            myPath2 in
               myPath2.move(to: CGPoint(x: 80, y: 290))
               myPath2.addLine(to: CGPoint(x: 300, y:239))
         }.stroke(Color.yellow, lineWidth: 10)
      }
   }
}

#Preview {
   ContentView()
}
Output

