- SwiftUI - Home
- SwiftUI - Overview
- SwiftUI vs UIkit
- SwiftUI Environment
- SwiftUI - Environment Setup
- SwiftUI - Basic Components
- SwiftUI - Building First Application
- SwiftUI Views
- SwiftUI - Views
- SwiftUI - Customize Text View
- SwiftUI - Custom Image View
- SwiftUI - Stacks
- SwiftUI Drawing Shapes
- SwiftUI - Shapes
- SwiftUI - Drawing line
- SwiftUI - Drawing Rectangle
- SwiftUI - Drawing Rounded Rectangle
- SwiftUI - Drawing Triangle
- SwiftUI - Drawing Circle
- SwiftUI - Drawing Star
- SwiftUI - Drawing Polygon
- SwiftUI - Drawing Pie chart
- SwiftUI - Using built-in shapes
- SwiftUI - Text
- SwiftUI - Text View
- SwiftUI - Text Input and Output
- SwiftUI - Color
- SwiftUI - Color
- SwiftUI - Colorpicker
- SwiftUI - Gradients
- SwiftUI - Adjust Color
- SwiftUI - Effects
- SwiftUI - Effects
- SwiftUI - Blend Effect
- SwiftUI - BLur Effect
- SwiftUI - Shadow Effect
- SwiftUI - Hover Effect
- SwiftUI - Animations
- SwiftUI - Animations
- SwiftUI - Creating Animations
- SwiftUI - Creating an Explicit Animation
- SwiftUI - Multiple Animations
- SwiftUI - Transitions
- SwiftUI - Asymmetric Transition
- SwiftUI - Custom Transition
- SwiftUI - Image
- SwiftUI - Images
- SwiftUI - Image as Background
- SwiftUI - Rotating Image
- SwiftUI - Media
- SwiftUI - View Layout
- SwiftUI - View Layout
- SwiftUI - View Size
- SwiftUI - View Spacing
- SwiftUI - View Padding
- SwiftUI - UI Controls
- SwiftUI - UI Controls
- SwiftUI - Button
- SwiftUI - CheckBox
- SwiftUI - Menubar
- SwiftUI - Toolbar
- SwiftUI - Search Bar
- SwiftUI - TextField
- SwiftUI - Slider
- SwiftUI - Toggle
- SwiftUI - Pickers
- SwiftUI - Menus
- SwiftUI - List & Tables
- SwiftUI - Lists
- SwiftUI - Static List
- SwiftUI - Dynamic List
- SwiftUI - Customize List
- SwiftUI - Tables
- SwiftUI - Forms
- SwiftUI - Forms
- SwiftUI - Breaking Forms in Sections
- SwiftUI - Event Handling
- SwiftUI - Event Handling
- SwiftUI - Gesture
- SwiftUI - Clipboard
- SwiftUI - Drag and Drop
- SwiftUI - Focus
- SwiftUI - Alert
- SwiftUI - Miscellaneous
- SwiftUI - Containers
- SwiftUI - Navigation
- SwiftUI - Notifications
- SwiftUI - Cross-Platform UI
- SwiftUI - Data
- SwiftUI - Accessibility
- SwiftUI - Framework Integration
- SwiftUI - Framework Integration
- SwiftUI - Interfacing with UIKit
- SwiftUI - Creating macOS App
- SwiftUI Useful Resources
- SwiftUI - Useful Resources
- SwiftUI - Discussion
SwiftUI - Media
In SwiftUI, playing videos is the most important component of the UI. It enhances the user experience and makes UI much more appealing. So from iOS 14 on-wards, Apple introduced a VideoPlayer component to play videos in the app. This view provides a video player in the current or the view in which we want and can able to display videos from URL, local or remote.
VideoPlayer View in SwiftUI
The VideoPlayer view is used to add a video player in the specified view to display small videos, movies, etc. It can display videos.
Syntax
Following is the syntax −
VideoPlayer(player: AVplayer?, videoOverlay:() -> VideoOverlay)
Parameters
Following parameters are used by this view −
player: It displays a player that is used to display audiovisual data.
videoOverlay: This closure returns a view that is present over the player's video. It is interactive but placed below the syatem provided playback controls and can get only un-handled events.
Steps to add Video Player in SwiftUI
To add a video to an app we have to follow the following steps −
Step 1: Open XCode
Open XCode and create a new project.
Step 2: Add video to XCode
Now to use video in the XCode project we have to first add that video in the project folder. To add a video go to Navigator and drag and drop the video in the project folder.
Step 3: Import AVKit
To add a media player to the project we have to first import the AVKit library. AVKit is a special framework which is used to handle audiovisual media. It provides a complete set of controls to handle audiovisual media including, navigation, picture-in-picture support, subtitles, captions, etc.
import AVKit
Step 5: Create URL of the video
After adding the video to the project folder now we have to create a URL of the image so that we can call it in the video player with the help of that URL. So we can create URL of the video with the help of url(forResource:withExtension) method.
let mediaURL: URL? = Bundle.main.url(forResource: "multipleAnimation3", withExtension: "mov")
Step 6: Use VideoPlayer
Now we use VideoPlayer in the body part of the ContentView to display the video player on the screen.
VideoPlayer(player: AVplayer?, videoOverlay:() -> VideoOverlay)
Customize Video player
In SwiftUI, we can customize the appearance of the video player with the help of the following modifiers −
| Method | Description |
|---|---|
| frame() | It is used to adjust the size of the video player. |
| background() | It is used to set the background color of the view behind the video player. |
| padding() | It is used to add space around the player or the given controls. This can define the position of the player more effectively. |
| onAppear() | It inserts an action to perform before the given view appears. |
| onDisappear() | It inserts an action to perform before the given view disappears. |
| fullScreenCover() | It is used to cover as much as possible screen by the video player. |
| offset() | It is used to adjust the position of the video player. |
Examples
Using the following examples we will understand how to work with video player −
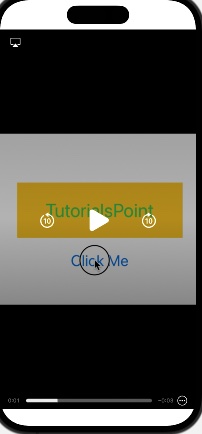
Example 1
The following SwiftUI program is used to insert a media player in the view.
import SwiftUI
import AVKit

struct ContentView: View {
   let mediaURL: URL? = Bundle.main.url(forResource: "multipleAnimation3", withExtension: "mov")

   var body: some View {
      ZStack{
         if let url = mediaURL{
            VideoPlayer(player: AVPlayer(url: url))
         }else{
            Text("Not Found")

         }
      }
   }
}

#Preview {
   ContentView()
}
Output
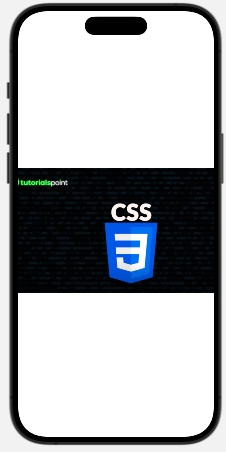
Example 2
In the following SwiftUI program, we are going to fetch a video from the remote URL.
import SwiftUI
import AVKit

struct ContentView: View {
   let mediaURL: URL? = URL(string: "https://www.youtube.com/watch?v=eGtV-sZ1wmw")

   var body: some View {
      ZStack{
         if let url = mediaURL{
            VideoPlayer(player: AVPlayer(url: url))
         }else{
            Text("Not Found").foregroundStyle(.white)

         }
      }
   }
}

#Preview {
   ContentView()
}
Output
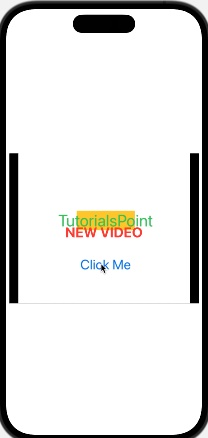
Example 3
In the following SwiftUI program, we are going to customize the video player.
import SwiftUI
import AVKit

struct ContentView: View {
   let mediaURL: URL? = Bundle.main.url(forResource: "multipleAnimation3", withExtension: "mov")

   var body: some View {
      ZStack{
         if let url = mediaURL{
            VideoPlayer(player: AVPlayer(url: url), videoOverlay: {Text("NEW VIDEO").font(.title).foregroundStyle(.red).bold()
               .padding(.top)})
            .frame(width: 380, height: 300)
         }else{
            Text("Not Found")
         }
      }
   }
}

#Preview {
   ContentView()
}
Output