- SwiftUI - Home
- SwiftUI - Overview
- SwiftUI vs UIkit
- SwiftUI Environment
- SwiftUI - Environment Setup
- SwiftUI - Basic Components
- SwiftUI - Building First Application
- SwiftUI Views
- SwiftUI - Views
- SwiftUI - Customize Text View
- SwiftUI - Custom Image View
- SwiftUI - Stacks
- SwiftUI Drawing Shapes
- SwiftUI - Shapes
- SwiftUI - Drawing line
- SwiftUI - Drawing Rectangle
- SwiftUI - Drawing Rounded Rectangle
- SwiftUI - Drawing Triangle
- SwiftUI - Drawing Circle
- SwiftUI - Drawing Star
- SwiftUI - Drawing Polygon
- SwiftUI - Drawing Pie chart
- SwiftUI - Using built-in shapes
- SwiftUI - Text
- SwiftUI - Text View
- SwiftUI - Text Input and Output
- SwiftUI - Color
- SwiftUI - Color
- SwiftUI - Colorpicker
- SwiftUI - Gradients
- SwiftUI - Adjust Color
- SwiftUI - Effects
- SwiftUI - Effects
- SwiftUI - Blend Effect
- SwiftUI - BLur Effect
- SwiftUI - Shadow Effect
- SwiftUI - Hover Effect
- SwiftUI - Animations
- SwiftUI - Animations
- SwiftUI - Creating Animations
- SwiftUI - Creating an Explicit Animation
- SwiftUI - Multiple Animations
- SwiftUI - Transitions
- SwiftUI - Asymmetric Transition
- SwiftUI - Custom Transition
- SwiftUI - Image
- SwiftUI - Images
- SwiftUI - Image as Background
- SwiftUI - Rotating Image
- SwiftUI - Media
- SwiftUI - View Layout
- SwiftUI - View Layout
- SwiftUI - View Size
- SwiftUI - View Spacing
- SwiftUI - View Padding
- SwiftUI - UI Controls
- SwiftUI - UI Controls
- SwiftUI - Button
- SwiftUI - CheckBox
- SwiftUI - Menubar
- SwiftUI - Toolbar
- SwiftUI - Search Bar
- SwiftUI - TextField
- SwiftUI - Slider
- SwiftUI - Toggle
- SwiftUI - Pickers
- SwiftUI - Menus
- SwiftUI - List & Tables
- SwiftUI - Lists
- SwiftUI - Static List
- SwiftUI - Dynamic List
- SwiftUI - Customize List
- SwiftUI - Tables
- SwiftUI - Forms
- SwiftUI - Forms
- SwiftUI - Breaking Forms in Sections
- SwiftUI - Event Handling
- SwiftUI - Event Handling
- SwiftUI - Gesture
- SwiftUI - Clipboard
- SwiftUI - Drag and Drop
- SwiftUI - Focus
- SwiftUI - Alert
- SwiftUI - Miscellaneous
- SwiftUI - Containers
- SwiftUI - Navigation
- SwiftUI - Notifications
- SwiftUI - Cross-Platform UI
- SwiftUI - Data
- SwiftUI - Accessibility
- SwiftUI - Framework Integration
- SwiftUI - Framework Integration
- SwiftUI - Interfacing with UIKit
- SwiftUI - Creating macOS App
- SwiftUI Useful Resources
- SwiftUI - Useful Resources
- SwiftUI - Discussion
SwiftUI - Data
Data management is a very important and crucial section while developing a responsive and interactive application for Apples platforms. As we know, SwiftUI uses declarative ways where the UI of the app will automatically update according to the underlying data, so whenever the data changes either due to some external event or due to the action of the user, it will directly affect the parts of the interface.
So, the management of data and their flow and state is very important. The framework provides various tools, such as state variables and bindings, to connect the data to the UI of the app. These tools manage the source of the data or any change that happens in the data. Following are the most commonly used data management techniques in SwiftUI −
@State Property Wrapper
@Binding Property Wrapper
@ObservedObject Property Wrapper
@EnvironmentObject Property Wrapper
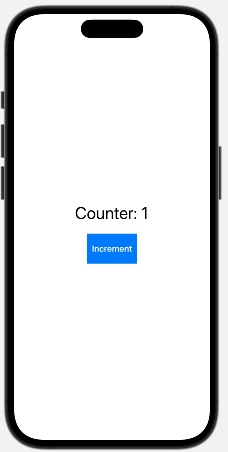
@State Property Wrapper in SwiftUI
The @State property wrapper is used to read and write value managed by the SwiftUI. It holds a single source for the given value type that we have stored in the view. It can create state variables for all types of views by using the @State attribute, and each state variable is initialized with some initial value.
So when the value of the state variable changes, SwiftUI will automatically update those sections of the view that depend upon the value of the state variable. The state variables are generally declared as private, which prevents them from being used outside the scope.
We are allowed to mutate state properties. If we pass state property to the subview, the SwiftUI will update the subview whenever the value changes in the main container view, whereas the subview cannot modify the value. To modify the value, we need to pass it as binding. We can also store Observable() in the State.
Syntax
Following is the syntax −
@State private var value : Double = 2.3
Example
The following SwiftUI program creates and access state variable. Here, the state manages the value of the count variable, whenever the value of the count changes, the view will update accordingly.
import SwiftUI
struct ContentView: View {
   // State variable
   @State private var count = 0
   var body: some View {
      VStack {
         Text("Counter: \(count)").font(.largeTitle)
         Button("Increment") {
            count += 1
         }
         .frame(width: 100, height: 60)
         .background(.blue)
         .foregroundStyle(.white)
         .font(.headline)
      }
   }
}
#Preview {
   ContentView()
}
Output
@Binding Property Wrapper in SwiftUI
The binding property wrapper creates a two-way relationship between the child and parent views so that the child can easily read and write parent data and vice versa.
Here, we can update the binding variable wherever we want, we are not required to directly store data in it. To pass the binding property wrapper we need to use $ before the property. Or we can say that we can pass state property to another view with the help of a binding property wrapper. We can also create a binding property using the @Binding property wrapper.
Syntax
Following is the syntax−
@Binding var value : Bool
Example
The following SwiftUI program creates binding property. Here we passed the state variable as a binding and created a binding variable.
import SwiftUI
struct ContentView: View {
   // state variable
   @State private var count = 0
   var body: some View {
      VStack {
         Text("Counter: \(count)").font(.largeTitle).border(.black, width: 4)

         // Passing count as a binding
         newView(count: $count)
      }
   }
}
struct newView: View {
   // Binding variable
   @Binding var count: Int
   var body: some View {
      Button("Increase Value") {
         count += 1
      }
      .frame(width: 130, height: 50)
      .background(.brown)
      .foregroundStyle(.white)
      .font(.headline)
   }
}
#Preview {
   ContentView()
}
Output

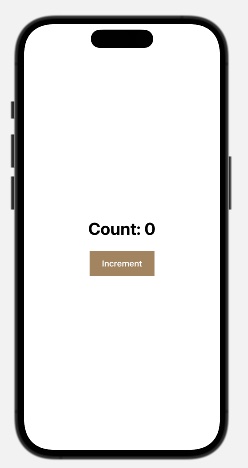
@StateObject and @ObservedObject Property Wrappers in SwiftUI
The @ObservedObject property wrapper is used to wrap observable objects and observe them whereas @StateObject is used to create and manage observable objects. Both the wrapper required objects that conform to the ObservableObject protocol.
So whenever the value observable object modifies, SwiftUI updates all the views related to the object. It does not contain any default or initial value and can be used by subviews. Here the subviews are allowed to update the property.
Syntax
Following is the syntax−
@StateObject private var model = ObservableObject()
@ObservedObject private var model = ObservableObject()
Example
The following SwiftUI program uses @StateObject and @ObservedObject properties to manage observable object.
import SwiftUI
// Creating observable object
class Counter: ObservableObject {
   @Published var count = 0
}
struct ContentView: View {
   @StateObject private var counter = Counter()
   var body: some View {

      // Passing the counter to the newView
      newView(myCounter: counter)
   }
}
struct newView: View {
   // Observing the model
   @ObservedObject var myCounter: Counter
   var body: some View {
      VStack {
         Text("Count: \(myCounter.count)")
            .font(.largeTitle)
            .bold()
            .padding()
         Button("Increment") {
            myCounter.count += 1
         }
         .frame(width: 130, height: 50)
         .background(.brown)
         .foregroundStyle(.white)
         .font(.headline)
      }
   }
}
#Preview {
   ContentView()
}
Output
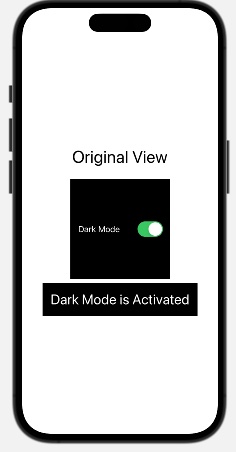
@EnvironmentObject Property Wrapper in SwiftUI
The @EnvironmentObject property wrapper is used to share data among all the views that have the observable object. It shares data without any explicitly passing data in the view hierarchy. The data is shared in the common environment across all the views in the hierarchy, and if any view updates the data, then it will automatically update all the views.
The shared object must conform to the ObservableObject protocol, and its properties must defined using @Published. The shared data must be injected in the .environmentObject() in the higher level of the view hierarchy and can accessed by any view using @EnvironmentObject.
Syntax
Following is the syntax −
@EnvironmentObject var mySettings: ObservableObject()
Example
The following SwiftUI program uses @EnvironmentObject for setting the dark mode.
import SwiftUI
class Settings: ObservableObject {
   @Published var darkMode: Bool = false
}
struct ContentView: View {
   @StateObject private var newSettings = Settings()
   var body: some View {
      VStack {
         Text("Original View")
            .font(.largeTitle)
            .padding()

         // Toggle dark mode
         ToggleView()

         // Display dark mode
         DisplayView()
      }

      // Passing newSettings in the environment object
      .environmentObject(newSettings)
   }
}
struct ToggleView: View {
   // Accessing the Settings
   @EnvironmentObject var mySettings: Settings
   var body: some View {
      // Binding darkMode to the toggle
      Toggle("Dark Mode", isOn: $mySettings.darkMode)
         .padding()
         .frame(width: 200, height: 200)
         .background(mySettings.darkMode ? .black : .white)
         .foregroundStyle(mySettings.darkMode ? .white : .black)
   }
}
struct DisplayView: View {

   // Access the Settings
   @EnvironmentObject var settings: Settings

   var body: some View {
      Text("Dark Mode is \(settings.darkMode ? "Activated" : "Deactivated")")
         .font(.title)
         .padding()
         .foregroundStyle(settings.darkMode ? .white : .black)
         .background(settings.darkMode ? .black : .white)
   }
}
#Preview {
   ContentView()
}
Output