- SwiftUI - Home
- SwiftUI - Overview
- SwiftUI vs UIkit
- SwiftUI Environment
- SwiftUI - Environment Setup
- SwiftUI - Basic Components
- SwiftUI - Building First Application
- SwiftUI Views
- SwiftUI - Views
- SwiftUI - Customize Text View
- SwiftUI - Custom Image View
- SwiftUI - Stacks
- SwiftUI Drawing Shapes
- SwiftUI - Shapes
- SwiftUI - Drawing line
- SwiftUI - Drawing Rectangle
- SwiftUI - Drawing Rounded Rectangle
- SwiftUI - Drawing Triangle
- SwiftUI - Drawing Circle
- SwiftUI - Drawing Star
- SwiftUI - Drawing Polygon
- SwiftUI - Drawing Pie chart
- SwiftUI - Using built-in shapes
- SwiftUI - Text
- SwiftUI - Text View
- SwiftUI - Text Input and Output
- SwiftUI - Color
- SwiftUI - Color
- SwiftUI - Colorpicker
- SwiftUI - Gradients
- SwiftUI - Adjust Color
- SwiftUI - Effects
- SwiftUI - Effects
- SwiftUI - Blend Effect
- SwiftUI - BLur Effect
- SwiftUI - Shadow Effect
- SwiftUI - Hover Effect
- SwiftUI - Animations
- SwiftUI - Animations
- SwiftUI - Creating Animations
- SwiftUI - Creating an Explicit Animation
- SwiftUI - Multiple Animations
- SwiftUI - Transitions
- SwiftUI - Asymmetric Transition
- SwiftUI - Custom Transition
- SwiftUI - Image
- SwiftUI - Images
- SwiftUI - Image as Background
- SwiftUI - Rotating Image
- SwiftUI - Media
- SwiftUI - View Layout
- SwiftUI - View Layout
- SwiftUI - View Size
- SwiftUI - View Spacing
- SwiftUI - View Padding
- SwiftUI - UI Controls
- SwiftUI - UI Controls
- SwiftUI - Button
- SwiftUI - CheckBox
- SwiftUI - Menubar
- SwiftUI - Toolbar
- SwiftUI - Search Bar
- SwiftUI - TextField
- SwiftUI - Slider
- SwiftUI - Toggle
- SwiftUI - Pickers
- SwiftUI - Menus
- SwiftUI - List & Tables
- SwiftUI - Lists
- SwiftUI - Static List
- SwiftUI - Dynamic List
- SwiftUI - Customize List
- SwiftUI - Tables
- SwiftUI - Forms
- SwiftUI - Forms
- SwiftUI - Breaking Forms in Sections
- SwiftUI - Event Handling
- SwiftUI - Event Handling
- SwiftUI - Gesture
- SwiftUI - Clipboard
- SwiftUI - Drag and Drop
- SwiftUI - Focus
- SwiftUI - Alert
- SwiftUI - Miscellaneous
- SwiftUI - Containers
- SwiftUI - Navigation
- SwiftUI - Notifications
- SwiftUI - Cross-Platform UI
- SwiftUI - Data
- SwiftUI - Accessibility
- SwiftUI - Framework Integration
- SwiftUI - Framework Integration
- SwiftUI - Interfacing with UIKit
- SwiftUI - Creating macOS App
- SwiftUI Useful Resources
- SwiftUI - Useful Resources
- SwiftUI - Discussion
SwiftUI - Menus
Menu view in SwiftUi is used to create a popup or a drop-down menu that contains a group of related actions. When we click on some specified button or tab, a menu containing a list of items will appear on the current view, from where the user can select the required option. A menu can contain multiple buttons that perform various actions when tapped.
Creating Menu in SwiftUI
In SwiftUI, we can create a menu very easily with the help of Menu View. The Menu view creates a menu containing labels from the localized string key. A menu can contain a nested menu, or we can say that a menu can contain sub-menus.
Syntax
Following is the syntax −
Menu(
   _ titleKey: LocalizedStringKey,
   @ViewBuilder content: () -> Content
) where Label == Text
Parameters
Following parameters are used by this view −
titleKey: Represent the content of the menu.
content: Represent the group of menu items.
Overloaded Menu Methods
We can also use menu view as the following ways −
| Menu | Description |
|---|---|
| Menu(content:() -> Content, label: () -> Label) | It is used to create a menu with a custom label. |
| Menu(_:image:content:) | It is used to create a menu where the label contains the image. |
| Menu(_:systemImage:content:) | It is used to create a menu where the label contains a system image. |
Example 1
The following SwiftUI program creates menu.
import SwiftUI

struct ContentView: View {
   var body: some View {
      VStack{
         Menu("Edit"){
            Button("Paste", action: paste)
            Button("Cut", action: cut)
            Button("Undo", action: undo)
            Button("Select", action: select)
         }
      }
   }
   func paste(){
      print("Data is pasted")
   }
   func cut(){
      print("Data is removed")
   }
   func undo(){
      print("Data is undo")
   }
   func select(){
      print("Data is selected")
   }
}
#Preview {
   ContentView()
}
Output

Example 2
The following SwiftUI program creates menu with a label and nested menu.
import SwiftUI
struct ContentView: View {
var body: some View {
VStack{
// Menu with label
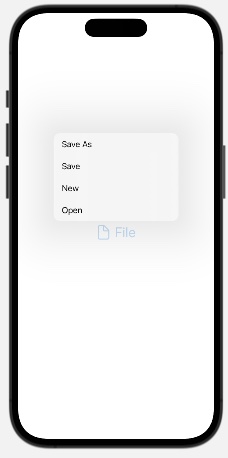
Menu{
Button("Open", action: openfile)
Button("New", action: newfile)
Button("Save", action: savefile)
Button("Save As", action: saveasfile)
Menu("Recent Open"){
Button("file1", action:file1)
Button("file2", action:file3)
Button("file3", action:file3)
}
}label:{
Label("File", systemImage: "doc").font(.title)
}
}
}
func openfile(){
print("File is opened")
}
func newfile(){
print("New File")
}
func savefile(){
print("File is saved")
}
func saveasfile(){
print("Save as file")
}
func file1(){
print("File 1 is opened")
}
func file2(){
print("File 2 is opened")
}
func file3(){
print("File 3 is opened")
}
}
#Preview {
ContentView()
}
Output
Primary Action in Menu in SwiftUI
In SwiftUI, we can create a menu with some custom primary actions, where the primary action allows us to define a default action which gets executed immediately after the menu is clicked rather than display the list of options. In this case, displaying a list of options is the secondary action of the main. It is useful when we a main action that a user performs while offering some additional list of options.
For example, a send button's main purpose is to send a message, but we can also provide additional options such as "Send Later", "Send Immediately", or "Send with attachment" in the menu.
So when we press the menu button, the primary action will execute. And when we long press the menu button, then the list of options will display. We can add primary action to a menu with the help of primaryAction parameter.
Syntax
Following is the syntax −
Menu{
   // body
}primaryAction:{

}
Example
The following SwiftUI program creates a menu with primary action.
import SwiftUI
struct ContentView: View {
var body: some View {
VStack{
// Menu with label
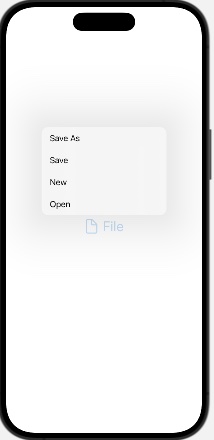
Menu{
Button("Open", action: openfile)
Button("New", action: newfile)
Button("Save", action: savefile)
Button("Save As", action: saveasfile)
}label:{
Label("File", systemImage: "doc").font(.title)
}primaryAction: {
addSource()
}
}
}
func openfile(){
print("File is opened")
}
func newfile(){
print("New File")
}
func savefile(){
print("File is saved")
}
func saveasfile(){
print("Save as file")
}
func addSource(){
print("Source code is added")
}
}
#Preview {
ContentView()
}
Output
Styling Menu in SwiftUI
In SwiftUI, we can style the menu with the help of a pre-defined menuStyle() modifier. Using this modifier, we can apply predefined styles to the menu and can also create custom styles for the menu.
Syntax
Following is the syntax −
func menuStyle(menuStyle)
Example
The following SwiftUI program creates menu with a label and nested menu.
import SwiftUI
struct ContentView: View {
var body: some View {
VStack{
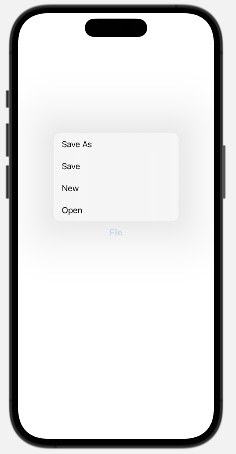
Menu("File"){
Button("Open", action: openfile)
Button("New", action: newfile)
Button("Save", action: savefile)
Button("Save As", action: saveasfile)
}.menuStyle(.borderlessButton)
}
}
func openfile(){
print("File is opened")
}
func newfile(){
print("New File")
}
func savefile(){
print("File is saved")
}
func saveasfile(){
print("Save as file")
}
func addSource(){
print("Source code is added")
}
}
#Preview {
ContentView()
}
Output