- SwiftUI - Home
- SwiftUI - Overview
- SwiftUI vs UIkit
- SwiftUI Environment
- SwiftUI - Environment Setup
- SwiftUI - Basic Components
- SwiftUI - Building First Application
- SwiftUI Views
- SwiftUI - Views
- SwiftUI - Customize Text View
- SwiftUI - Custom Image View
- SwiftUI - Stacks
- SwiftUI Drawing Shapes
- SwiftUI - Shapes
- SwiftUI - Drawing line
- SwiftUI - Drawing Rectangle
- SwiftUI - Drawing Rounded Rectangle
- SwiftUI - Drawing Triangle
- SwiftUI - Drawing Circle
- SwiftUI - Drawing Star
- SwiftUI - Drawing Polygon
- SwiftUI - Drawing Pie chart
- SwiftUI - Using built-in shapes
- SwiftUI - Text
- SwiftUI - Text View
- SwiftUI - Text Input and Output
- SwiftUI - Color
- SwiftUI - Color
- SwiftUI - Colorpicker
- SwiftUI - Gradients
- SwiftUI - Adjust Color
- SwiftUI - Effects
- SwiftUI - Effects
- SwiftUI - Blend Effect
- SwiftUI - BLur Effect
- SwiftUI - Shadow Effect
- SwiftUI - Hover Effect
- SwiftUI - Animations
- SwiftUI - Animations
- SwiftUI - Creating Animations
- SwiftUI - Creating an Explicit Animation
- SwiftUI - Multiple Animations
- SwiftUI - Transitions
- SwiftUI - Asymmetric Transition
- SwiftUI - Custom Transition
- SwiftUI - Image
- SwiftUI - Images
- SwiftUI - Image as Background
- SwiftUI - Rotating Image
- SwiftUI - Media
- SwiftUI - View Layout
- SwiftUI - View Layout
- SwiftUI - View Size
- SwiftUI - View Spacing
- SwiftUI - View Padding
- SwiftUI - UI Controls
- SwiftUI - UI Controls
- SwiftUI - Button
- SwiftUI - CheckBox
- SwiftUI - Menubar
- SwiftUI - Toolbar
- SwiftUI - Search Bar
- SwiftUI - TextField
- SwiftUI - Slider
- SwiftUI - Toggle
- SwiftUI - Pickers
- SwiftUI - Menus
- SwiftUI - List & Tables
- SwiftUI - Lists
- SwiftUI - Static List
- SwiftUI - Dynamic List
- SwiftUI - Customize List
- SwiftUI - Tables
- SwiftUI - Forms
- SwiftUI - Forms
- SwiftUI - Breaking Forms in Sections
- SwiftUI - Event Handling
- SwiftUI - Event Handling
- SwiftUI - Gesture
- SwiftUI - Clipboard
- SwiftUI - Drag and Drop
- SwiftUI - Focus
- SwiftUI - Alert
- SwiftUI - Miscellaneous
- SwiftUI - Containers
- SwiftUI - Navigation
- SwiftUI - Notifications
- SwiftUI - Cross-Platform UI
- SwiftUI - Data
- SwiftUI - Accessibility
- SwiftUI - Framework Integration
- SwiftUI - Framework Integration
- SwiftUI - Interfacing with UIKit
- SwiftUI - Creating macOS App
- SwiftUI Useful Resources
- SwiftUI - Useful Resources
- SwiftUI - Discussion
SwiftUI - Drawing a Circle
A circle is a closed figure or shape in geometry. It is created by a set of points that are at a fixed distance from a fixed point on the plane, where the fixed distance is known as the radius of the circle and the fixed point is known as the center of the circle. All the points present on the circle have the same distance from the center. So in this chapter, we will learn how to draw circles in SwiftUI.

Drawing Circle in SwiftUI
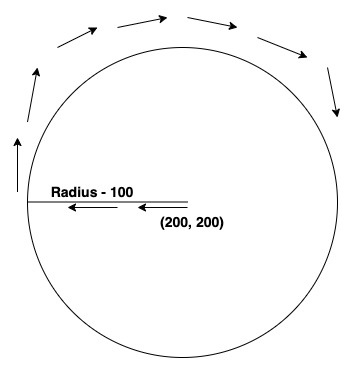
In SwiftUI, we will draw various types of circles like Solid Circle, Circle with no filling or circle stroke and custom circles. To draw a circle SwiftUI provides an in-built method name addArc(). This method calculates the starting and ending points according to the specified radius and angles, creates a curve in between these points and then inserts these curves in the path to create a circle.
Syntax
Following is the syntax −
func addArc(
   center: CGPoint,
   radius: CGFloat,
   startAngle: Angle,
   endAngle: Angle,
   clockwise: Bool,
   transform: CGAffineTransform = .identity
)
Parameter
This function takes the following parameters −
- center: The coordinates of this parameter represent the center of the arc.
- radius: The coordinates of this parameter represent the radius of the arc.
- startAngle: It represents the angle of the starting point of the arc. It calculates from the positive x-axis.
- endAngle: It represents the angle of end point of the arc. It calculates from the positive x-axis.
- clockwise If the value of this parameter is set to true, then the arc will created from clockwise. Otherwise, the arc will created counterclockwise.
- transform: It is used to apply transform to the arc before adding to the path. By default, it is set to identity transform.
Steps to Draw a Circle in SwiftUI
Follow the following steps to draw s simple solid circle in SwiftUI−
Step 1: Initialize Path
To create a circle first we need to initialize Path and provide detailed instructions in the closure. The path allows us to create complex graphics by specifying a series of connected points and lines.
Path() {}
Step 2: Moving to the center of the circle
Now we use the move(to:) method to move to the center of the circle in the given canvas. Or we can say that we use the move(to:) method to reach the center of the circle
Path(){
   yPath in
      yPath.move(to: CGPoint(x: 200, y: 200))
}
Step 3: Drawing a solid circle
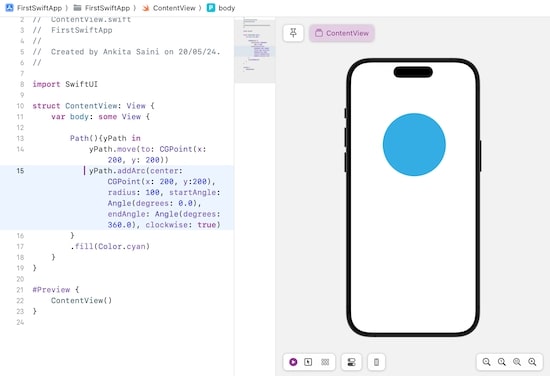
Now we call the addArc() method to draw a circle according to the initialized parameters such as center of the circle should present at coordinates(200, 200), the radius of the circle would be 100, starting and the ending angles are 0.0 degrees and 360.0 degrees and the direction of the arc is clockwise
Path(){
   yPath in
      yPath.move(to: CGPoint(x: 200, y: 200))
      yPath.addArc(center: CGPoint(x: 200, y:200), radius: 100, startAngle: Angle(degrees: 0.0), endAngle: Angle(degrees: 360.0), clockwise: true)
}
Step 4: Filling the circle
We can specify the color of the circle using the .fill() modifier. By default, the color of the circle is black. Or if we want to just stroke then we can use the .stroke() modifier.
Path(){
   yPath in
      yPath.move(to: CGPoint(x: 200, y: 200))
      yPath.addArc(center: CGPoint(x: 200, y:200), radius: 100, startAngle: Angle(degrees: 0.0), endAngle: Angle(degrees: 360.0), clockwise: true)
}.fill(Color.cyan)
Hence the circle is created as shown in the below image.
Example 1
The following SwiftUI program is used to draw a solid circle.
import SwiftUI

struct ContentView: View {
   var body: some View {
      Path(){
         yPath in
            yPath.move(to: CGPoint(x: 200, y: 200))
            yPath.addArc(center: CGPoint(x: 200, y:200), radius: 100, startAngle: Angle(degrees: 0.0), endAngle: Angle(degrees: 360.0), clockwise: true)
      }.fill(Color.cyan)
   }
}
#Preview {
   ContentView()
}
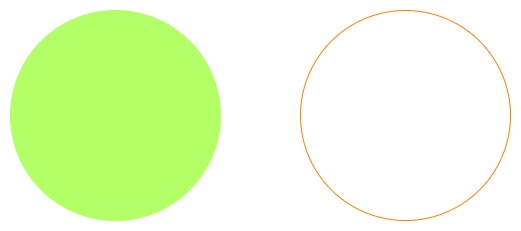
Output
Example 2
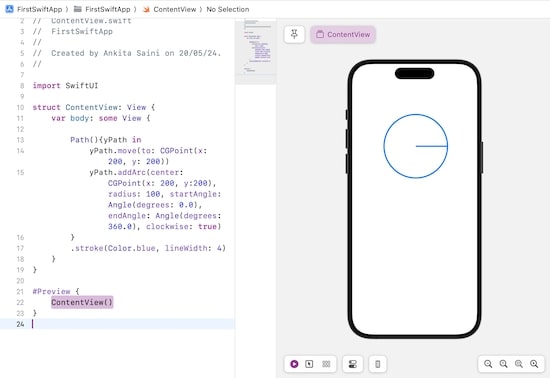
The following SwiftUI program is used to draw a stroked circle or a circle with boundary
import SwiftUI

struct ContentView: View {
   var body: some View {
      Path(){
         yPath in
         yPath.move(to: CGPoint(x: 200, y: 200))
         yPath.addArc(center: CGPoint(x: 200, y:200), radius: 100, startAngle: Angle(degrees: 0.0), endAngle: Angle(degrees: 360.0), clockwise: true)
      }.stroke(Color.blue, lineWidth: 4)
   }
}

#Preview {
    ContentView()
}
Output
Example 3
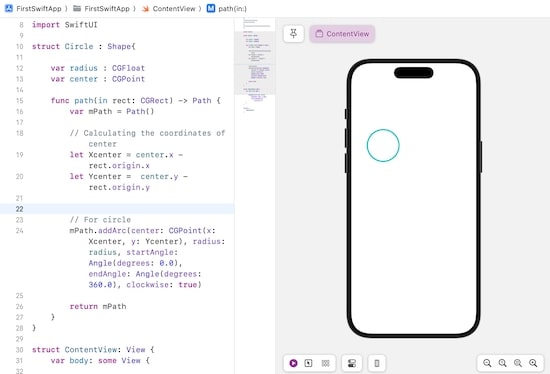
The following SwiftUI program is used to draw a custom circle. Where the circle is created according to the given coordinate of center and radius.
import SwiftUI

struct Circle : Shape {
   var radius : CGFloat
   var center : CGPoint

   func path(in rect: CGRect) -> Path {
      var mPath = Path()

      // Calculating the coordinates of center
      let Xcenter = center.x - rect.origin.x
      let Ycenter =  center.y - rect.origin.y

      // For circle
      mPath.addArc(
	     center: CGPoint(x: Xcenter, y: Ycenter),
		 radius: radius, startAngle: Angle(degrees: 0.0),
		 endAngle: Angle(degrees: 360.0),
		 clockwise: true
      )
      return mPath
   }
}

struct ContentView: View {
   var body: some View {
      Circle(radius: 50, center: CGPoint(x: 100, y: 200))
      .stroke(Color.mint, lineWidth: 4)
   }
}

#Preview {
   ContentView()
}
Output