- SAP NetWeaver - Home
- SAP NetWeaver - Introduction
- SAP NetWeaver - Architecture
- SAP NetWeaver - Components
- SAP NetWeaver - Release Details
- SAP NW - NW Version in ECC System
- SAP NetWeaver - Setting Up NW
- SAP NW - Installation Options
- Passing Parameters for Installation
- SAP NW - Transport Management
- Managing Background Jobs
- SAP NW - NW Business Client
- SAP NW - Service Configuration
- Business Client Installation
- NWBC Transaction & Navigation
- SAP Application based on NW
- SAP NetWeaver - Portal
- SAP NetWeaver - Create a System
- Enterprise Portal Roles & Group
- SAP NW - Knowledge Management
- SAP NW - KM Administration
- SAP NetWeaver - Developer Studio
- SAP NetWeaver - Web Content
- Process Integration Options
- SAP NetWeaver - Gateway
- SAP NetWeaver - Security
- SAP NetWeaver - PFCG Roles
- SAP NW - Authentication Methods
- SAP NW - Communication Security
- SAP NW - Questions and Answers
- SAP NetWeaver - Quick Guide
- SAP NetWeaver - Useful Resources
- SAP NetWeaver - Discussion
Enterprise Portal Roles and Group
All the user and roles tasks of Enterprise portal can be performed using User Management Engine (UME). UME is integrated to SAP NetWeaver Application Server. In UME, you define UME actions to apply authorizations. UME actions are JAVA permissions to define the user roles and they can be further assigned to Portal roles.
User Management Engine performs user authorization to ensure that users have the correct UME actions assigned to them before providing access to iViews and functions in Enterprise Portal.
For each portal role, there is UME action defined in the User Management Engine. Following table lists down all the key portal roles and corresponding UME actions.
| Key Portal Roles | UME Actions |
|---|---|
| Delegated User Administrator | UME.Manage_Users UME.Manage_Role_Assignment |
| Every User Core Role | UME.Manage_My_Profile |
| Standard User Role | UME.Manage_My_Profile |
| Super Administrator | UME.AclSuperUser UME.Manage_All |
| System Admin | UME.System_Admin |
| User Administrator | UME.Manage_All |
Following UME actions are defined only for Enterprise Portal roles −
- UME.AclSuperUser
- UME.Manage_Role_Assignments
- UME.Remote_Producer_Read_Access
- UME.Remote_Producer_Write_Access
Comparison between UME & Portal Roles
In NetWeaver portal, both UME roles and Portal roles can be managed by Portal administrators. UME roles contain JAVA actions; however, portal role contains access to iViews, folders, and systems.
Following table lists the key differences between UME and Portal Roles −
| Portal Roles | UME Roles |
|---|---|
| Used to manage the portal content - iViews, work sets, folders, etc. | UME actions are sets of Java permissions. |
| This is used to define how the content is grouped together and how it is displayed in the portal. By assigning a portal role, you define which content a user sees in the portal. | This is used to define the authorizations that a user has to run applications on the J2EE engine. |
| When you assign a portal role to a user or group, they get end-user permission on the role. | This provides access to applications on the J2EE engine. |
| They are created in the Role editor of Portal Content Studio. | They are created using Identity Management. |
Create a Role and Add iViews to Role
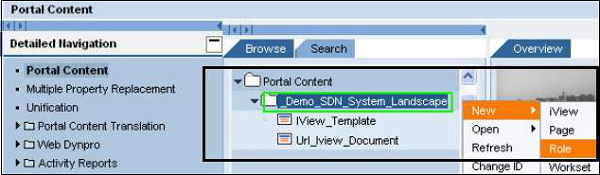
Step 1 − To create a role, navigate to Content Administration → Portal Content.
Step 2 − Right-click a folder of your choice and select New → Role.

Step 3 − To start with, create a role and name it OBNRole.
Step 4 − To start with, create a role and name it OBNRole.
Step 5 − Go to User Administration tab → Roles as shown in the following screenshot.
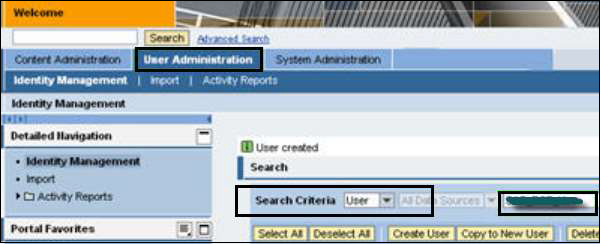
Step 6 − Find the OBNRole created in the previous step and add to it the Administrator user/other user using the Assigned role tab as shown in the following screenshot.

