- SAP BO Data Services
- SAP BODS - Overview
- SAP BODS - Architecture
- SAP BODS - Data Services Designer
- SAP BODS Repository
- SAP BODS - Repository Overview
- Repository Creating & Updating
- Data Services Management Console
- SAP BODS - DSMC Modules
- SAP BODS - DS Designer Introduction
- SAP BODS - ETL Flow in DS Designer
- SAP BODS Datastores & Formats
- SAP BODS - Datastore Overview
- SAP BODS - Changing a Datastore
- SAP BODS - Memory Datastore
- SAP BODS - Linked Datastore
- SAP BODS - Adapter Datastore
- SAP BODS - File Formats
- COBOL Copybook File Format
- Extracting Data from DB Tables
- Data Extraction from Excel Workbook
- Data Flow & Work Flow
- SAP BODS - Dataflow Introduction
- BODS - Dataflow Changing Properties
- SAP BODS - Workflow Introduction
- SAP BODS - Creating Workflows
- SAP BODS Transforms
- SAP BODS - Transforms Types
- Adding Transform to a Dataflow
- SAP BODS - Query Transform
- SAP BODS Administration
- SAP BODS - Data Services Overview
- Creating Embedded Dataflow
- Debugging & Recovery Mechanism
- Data Assessment & Data Profiling
- SAP BODS - Tuning Techniques
- Multi-user Development
- BODS - Central vs Local Repository
- BODS - Central Repository Security
- Creating a Multi-user Environment
- SAP BODS Useful Resources
- SAP BODS - Questions Answers
- SAP BODS - Quick Guide
- SAP BODS - Useful Resources
- SAP BODS - Discussion
SAP BODS - Creating Workflows
Workflows can be created using the following methods −
- Object Library
- Tool Palette
Creating a Workflow using Object Library
To create a work flow using Object Library, follow the steps given below.
Step 1 − Go to the Object Library → Workflow tab.
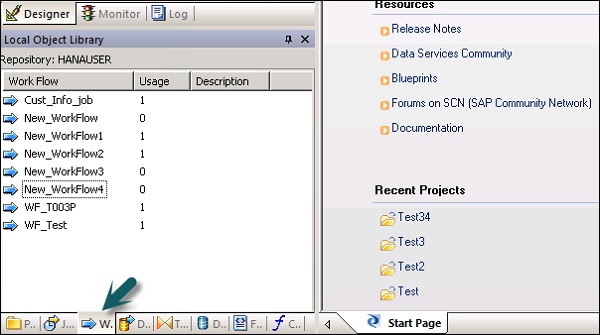
Step 2 − Right click the New option.
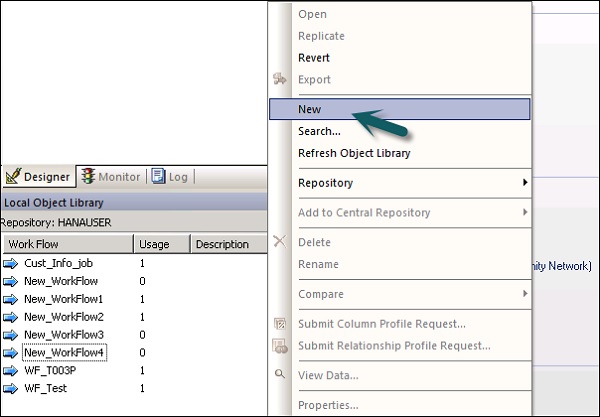
Step 3 − Enter the name of the Workflow.
Creating a workflow using tool palette
To create a workflow using tool palette, click the icon on the right side and drag work flow in the work space.
You can also set to execute workflow only once by going to the properties of workflow.
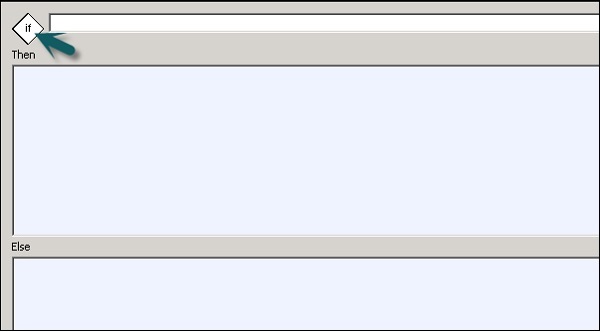
Conditionals
You can also add Conditionals to workflow. This allows you to implement the If/Else/Then logic on the workflows.
| Sr.No. | Conditional & Description |
|---|---|
| 1 | If A Boolean expression that evaluates to TRUE or FALSE. You can use functions, variables, and standard operators to construct the expression. |
| 2 | Then Work flow elements to execute if the If expression evaluates to TRUE. |
| 3 | Else (Optional) Work flow elements to execute if the If expression evaluates to FALSE. |
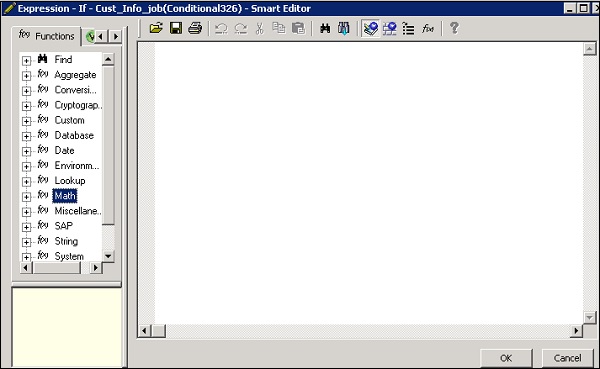
To define a Conditional
Step 1 − Go to Workflow → Click the Conditional icon on the tool palette on the right side.
Step 2 − Double click the name of Conditional to open the If-ThenElse conditional editor.
Step 3 − Enter the Boolean Expression that controls the Conditional. Click OK.
Step 4 − Drag the Data flow you want to execute the Then and Else window as per the expression in IF condition.
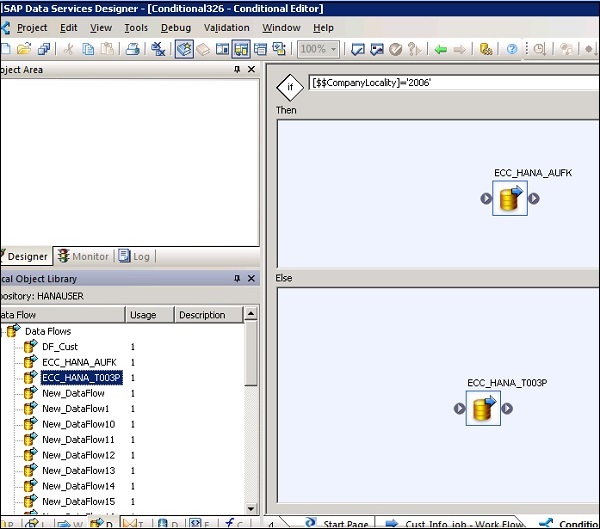
Once you complete the condition, you can debug and validate the conditional.
