- Data Comm & Networks Home
- DCN - Overview
- DCN - What is Computer Network
- DCN - Uses of Computer Network
- DCN - Computer Network Types
- DCN - Network LAN Technologies
- DCN - Computer Network Models
- DCN - Computer Network Security
- DCN - Components
- DCN - Connectors
- DCN - Switches
- DCN - Repeaters
- DCN - Gateways
- DCN - Bridges
- DCN - Socket
- DCN - Network Interface Card
- DCN - NIC: Pros and Cons
- DCN - Network Hardware
- DCN - Network Port
- Computer Network Topologies
- DCN - Computer Network Topologies
- DCN - Point-to-point Topology
- DCN - Bus Topology
- DCN - Star Topology
- DCN - Ring Topology
- DCN - Mesh Topology
- DCN - Tree Topology
- DCN - Hybrid Topology
- Physical Layer
- DCN - Physical Layer Introduction
- DCN - Digital Transmission
- DCN - Analog Transmission
- DCN - Transmission media
- DCN - Wireless Transmission
- DCN - Transmission Impairments
- DCN - Multiplexing
- DCN - Network Switching
- DCN - Circuit Switching
- DCN - Packet Switching
- DCN - Message Switching
- Data Link Layer
- DCN - Data Link Layer Introduction
- DCN - Data Link Control & Protocols
- DCN - RMON
- DCN - Token Ring Network
- DCN - Hamming Code
- DCN - Byte Stuffing
- DCN - Channel Allocation
- DCN - MAC Address
- DCN - Address Resolution Protocol
- DCN - Cyclic Redundancy Checks
- DCN - Error Control
- DCN - Flow Control
- DCN - Framing
- DCN - Error Detection & Correction
- DCN - Error Correcting Codes
- DCN - Parity Bits
- Network Layer
- DCN - Network Layer Introduction
- DCN - Network Addressing
- DCN - Routing
- DCN - Routing Table
- DCN - Internetworking
- DCN - Network Layer Protocols
- DCN - Routing Information Protocol
- DCN - Border Gateway Protocol
- DCN - OSPF Protocol
- DCN - Network Address Translation
- DCN - Network Address Translation Types
- Transport Layer
- DCN - Transport Layer Introduction
- DCN - Transmission Control Protocol
- DCN - User Datagram Protocol
- DCN - Congestion Control
- DCN - Open Loop Congestion Control
- DCN - Closed Loop Congestion Control
- DCN - Congestion Control Algorithms
- DCN - Token Bucket Algorithm
- DCN - TCP Tahoe Algorithm
- DCN - TCP Reno Algorithm
- DCN - TCP New Reno Algorithm
- DCN - TCP BIC Algorithm
- DCN - TCP CUBIC Algorithm
- DCN - TCP Service Model
- DCN - TLS Handshake
- DCN - TCP Vs. UDP
- Application Layer
- DCN - Session Layer
- DCN - Presentation Layer
- DCN - Application Layer Introduction
- DCN - Client-Server Model
- DCN - Application Protocols
- DCN - Network Services
- DCN - Virtual Private Network
- DCN - Load Shedding
- DCN - Optimality Principle
- DCN - Service Primitives
- DCN - Services of Network Security
- DCN - Hypertext Transfer Protocol
- DCN - File Transfer Protocol
- DCN - Secure Socket Layer
- Network Protocols
- DCN - ALOHA Protocol
- DCN - Pure ALOHA Protocol
- DCN - Sliding Window Protocol
- DCN - Stop and Wait Protocol
- DCN - Link State Routing
- DCN - Link State Routing Protocol
- Network Algorithms
- DCN - Shortest Path Algorithm
- DCN - Routing Algorithm
- DCN - Adaptive Routing Algorithms
- DCN - Non-Adaptive Routing Algorithms
- DCN - Leaky Bucket Algorithm
- Wireless Networks
- DCN - Wireless Networks
- DCN - Wireless LANs
- DCN - Wireless LAN & IEEE 802.11
- DCN - IEEE 802.11 Wireless LAN Standards
- DCN - IEEE 802.11 Networks
- Multiplexing
- DCN - Multiplexing & Its Types
- DCN - Time Division Multiplexing
- DCN - Synchronous TDM
- DCN - Asynchronous TDM
- DCN - Synchronous Vs. Asynchronous TDM
- DCN - Frequency Division Multiplexing
- DCN - TDM Vs. FDM
- DCN - Code Division Multiplexing
- DCN - Wavelength Division Multiplexing
- Miscellaneous
- DCN - Shortest Path Routing
- DCN - B-ISDN Reference Model
- DCN - Design Issues For Layers
- DCN - Selective-repeat ARQ
- DCN - Flooding
- DCN - E-Mail Format
- DCN - Cryptography
- DCN - Unicast, Broadcast, & Multicast
- DCN - Network Virtualization
- DCN - Flow Vs. Congestion Control
- DCN - Asynchronous Transfer Mode
- DCN - ATM Networks
- DCN - Synchronous Vs. Asynchronous Transmission
- DCN - Network Attacks
- DCN - WiMax
- DCN - Buffering
- DCN - Authentication
- DCN Useful Resources
- DCN - Quick Guide
- DCN - Useful Resources
- DCN - Discussion
Token Bucket Algorithm
Token bucket algorithm is one of the popular congestion control algorithms. When too many packets are present in the network, it causes packet delay and packet loss, which degrades the performance of the system. This situation is called congestion.
What is Token Bucket Algorithm?
Token Bucket Algorithm is a congestion control algorithm that is used for traffic shaping like leaky bucket algorithm. It limits the transmission rate of packets and helps in maintaining consistent data transmission. Tokens are generated at a constant rate and are stored in a bucket of limited capacity. Packets are only sent if tokens available is more than the size of the packet. It is used in QoS, VoIP, and Video streaming.
The following image shows how the token bucket algorithm works −

Working of Token Bucket Algorithm
Tokens are added into a bucket at a constant rate. For example: r tokens per second. The maximum capacity of the bucket is fixed, i.e., B tokens. For sending a packet, the same number of tokens as the packet size is removed. If the number of tokens is greater than the packet size, then the packet is sent. Otherwise, the packet is either delayed or discarded.
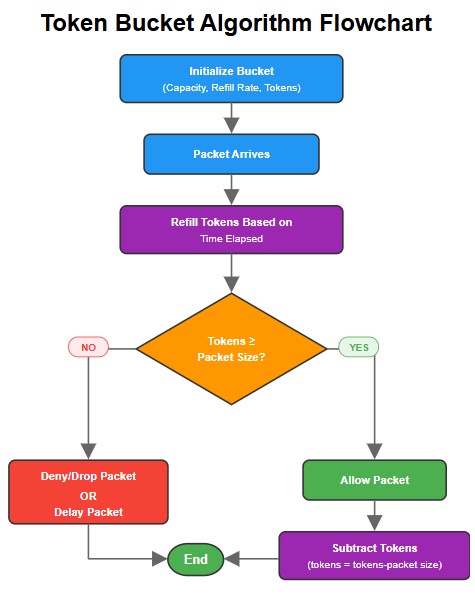
The flowchart of Token Bucket algorithm is given below −
Example of Token Bucket Algorithm
In this example, we have a bucket of maximum capacity of 10 tokens and refills at the rate of 2 tokens per second. At the beginning, the bucket has 5 tokens. Now, let us see how token bucket works with incoming packet request at different time intervals −
- At time 0 sec: A request for 3 tokens arrives. Since, bucket has 5 tokens, therefore the request is allowed. Now, 2 tokens remain in the bucket.
- At time 1 sec: A request for 4 tokens arrives. The bucket has now 2+2 tokens (since 2 tokens are added each second). The request is allowed, and the bucket becomes empty.
- At time 2 sec: A request of 5 tokens arrives. The bucket has 0+2 tokens. This request is denied as there are not enough tokens in the bucket.
- At time 3 sec: A request of 3 tokens arrives. The bucket has 2+2 tokens. The request is allowed and 1 token is left in the bucket.
Steps to Implement Token Bucket Algorithm
You can follow the steps given below to implement token bucket algorithm −
- First, define the bucket size i.e., maximum number of tokens it can hold.
- Then set the rate at which token will be generated. For example: in the above example, it is set as 2 tokens per second.
- Store the count of tokens available in the bucket.
- Tokens will be added to bucket at the above defined rate till it reaches maximum bucket capacity.
- When a packet arrives, check if packet size is less than number of tokens available.
- If tokens are more than the packet size, packet is allowed and subtract the number of tokens equal to packet size.
- If tokens are less than the packet size, then either delay the packet or drop it.
Code Implementation
Here is the code implementation of the above steps for token bucket algorithm in C++, Java, and python −
#include <iostream>
#include <vector>
#include <algorithm>
using namespace std;

// Global token bucket variables
int capacity = 10;         // Maximum tokens capacity of bucket
double tokens = 5;        // Current available tokens in the bucket
double refillRate = 2.0;   // Number of tokens added per second
double lastRefillTime = 0; // Last refill timestamp

// Function to refill tokens
void addTokens(double currentTime)
{
    double elapsed = currentTime - lastRefillTime;
    if (elapsed > 0)
    {
        double tokensToAdd = elapsed * refillRate;
        tokens = min((double)capacity, tokens + tokensToAdd);
        lastRefillTime = currentTime;
    }
}

// Function to check and allow or deny request
bool allowRequest(int tokensNeeded, double currentTime)
{
    addTokens(currentTime); // Refill tokens before checking
    if (tokens >= tokensNeeded)
    {
        tokens -= tokensNeeded; // Reduce tokens if request is allowed
        return true;            // Request allowed if enough tokens
    }
    return false; // Denied if there is not enough tokens
}

int main()
{
    // (time, tokensRequired)
    vector<pair<double, int>> requests = {
        {0.0, 3}, {1.0, 4}, {2, 5}, {3.0, 3}};

    for (auto req: requests)
    {
        double currentTime = req.first;
        int tokensNeeded = req.second;

        // Displaying current state before request
        addTokens(currentTime); // Update bucket first
        cout << "\nTime: " << currentTime << "s";
        cout << "," << " Available tokens: " << tokens << endl;

        // Checking if request can proceed
        bool allowed = allowRequest(tokensNeeded, currentTime);

        cout << "Request " << tokensNeeded << " tokens: "
                  << (allowed ? "ALLOWED": "DENIED") << endl;

        // Displaying remaining tokens after request check
        cout << "Tokens left: " << tokens << endl;
    }

    return 0;
}
The output of the above code is as follows −
Time: 0s, Available tokens: 5
Request 3 tokens: ALLOWED
Tokens left: 2

Time: 1s, Available tokens: 4
Request 4 tokens: ALLOWED
Tokens left: 0

Time: 2s, Available tokens: 2
Request 5 tokens: DENIED
Tokens left: 2

Time: 3s, Available tokens: 4
Request 3 tokens: ALLOWED
Tokens left: 1
public class Main {

    // Global token bucket variables
    static int capacity = 10;
    static double tokens = 5;
    static double refillRate = 2.0;
    static double lastRefillTime = 0;

    // Function to refill tokens
    static void addTokens(double currentTime) {
        double elapsed = currentTime - lastRefillTime;
        if (elapsed > 0) {
            double tokensToAdd = elapsed * refillRate;
            tokens = Math.min(capacity, tokens
                              + tokensToAdd);
            lastRefillTime = currentTime;
        }
    }

    // Function to allow or deny request
    static boolean allowRequest(int tokensNeeded, double currentTime) {
        addTokens(currentTime);
        if (tokens >= tokensNeeded) {
            tokens -= tokensNeeded;
            return true;
        }
        return false;
    }

    public static void main(String[] args) {

        // (time, tokensRequired)
        double[][] requests = {
            {0.0, 3},
            {1.0, 4},
            {2.0, 5},
            {3.0, 3}
        };

        for (double[] req : requests) {
            double currentTime = req[0];
            int tokensNeeded = (int) req[1];

            addTokens(currentTime); // Update bucket first

            System.out.println("\nTime: " + currentTime
                                + "s, Available tokens: " + tokens);

            boolean allowed = allowRequest(tokensNeeded, currentTime);

            System.out.println("Request " + tokensNeeded + " tokens: "
                                + (allowed ? "ALLOWED" : "DENIED"));
            System.out.println("Tokens left: " + tokens);
        }
    }
}
The output of the above code is as follows −
Time: 0.0s, Available tokens: 5.0
Request 3 tokens: ALLOWED
Tokens left: 2.0

Time: 1.0s, Available tokens: 4.0
Request 4 tokens: ALLOWED
Tokens left: 0.0

Time: 2.0s, Available tokens: 2.0
Request 5 tokens: DENIED
Tokens left: 2.0

Time: 3.0s, Available tokens: 4.0
Request 3 tokens: ALLOWED
Tokens left: 1.0
# Global token bucket variables
capacity = 10          # Maximum tokens capacity of bucket
tokens = 5.0           # Current available tokens in the bucket
refill_rate = 2.0      # Number of tokens added per second
last_refill_time = 0.0 # Last refill timestamp


# Function to refill tokens
def add_tokens(current_time):
    global tokens, last_refill_time
    elapsed = current_time - last_refill_time
    if elapsed > 0:
        tokens_to_add = elapsed * refill_rate
        tokens = min(capacity, tokens + tokens_to_add)
        last_refill_time = current_time


# Function to check and allow or deny request
def allow_request(tokens_needed, current_time):
    global tokens
    add_tokens(current_time)  # Refill tokens before checking
    if tokens >= tokens_needed:
        tokens -= tokens_needed  # Reduce tokens if request is allowed
        return True              # Request allowed if enough tokens
    return False  # Denied if there are not enough tokens


if __name__ == "__main__":
    # (time, tokensRequired)
    requests = [
        (0.0, 3),
        (1.0, 4),
        (2.0, 5),
        (3.0, 3),
    ]

    for current_time, tokens_needed in requests:
        # Displaying current state before request
        add_tokens(current_time)  # Update bucket first
        print(f"\nTime: {current_time}s, Available tokens: {tokens}")

        # Checking if request can proceed
        allowed = allow_request(tokens_needed, current_time)

        print(f"Request {tokens_needed} tokens: "
              f"{'ALLOWED' if allowed else 'DENIED'}")

        # Displaying remaining tokens after request check
        print(f"Tokens left: {tokens}")
The output of the above code is as follows −
Time: 0.0s, Available tokens: 5.0
Request 3 tokens: ALLOWED
Tokens left: 2.0

Time: 1.0s, Available tokens: 4.0
Request 4 tokens: ALLOWED
Tokens left: 0.0

Time: 2.0s, Available tokens: 2.0
Request 5 tokens: DENIED
Tokens left: 2.0

Time: 3.0s, Available tokens: 4.0
Request 3 tokens: ALLOWED
Tokens left: 1.0
Difference Between Leaky Bucket and Token Bucket Algorithm
The differences between Leaky and Token Bucket algorithm is given below −
| Leaky Bucket Algorithm | Token Bucket Algorithm |
|---|---|
| The output rate is fixed and constant. | The output rate is variable. |
| It works well for constant bit rate traffic. | It works well for variable bit rate traffic. |
| Packets are transmitted at fixed intervals. | If tokens are available, packets are transmitted immediately. |
| It is less flexible. | It is more flexible compared to leaky bucket. |
| It has higher delay. | It has less delay. |
| It is used for audio streaming and constant video streaming. | It is used for multimedia applications, cloud services, and APIs with rate limits. |
Pros and Cons of Token Bucket Algorithm
The advantages of token bucket algorithm are listed below −
- It is more flexible than the leaky bucket algorithm.
- It utilizes the network resources better.
- It is useful for multimedia and variable traffic.
- It allows temporary high-bandwidth bursts.
- It is more efficient for real-time traffic.
Here are the limitations of the token bucket algorithm −
- It is more complex than leaky bucket.
- When token bucket becomes empty, packets have to wait that increases the delay.
- It requires token synchronization among various devices.
Conclusion
Token Bucket Algorithm is a traffic shaping algorithm like leaky bucket to limit the transmission rate of packets and help in maintaining consistent data transmission. It works by generating and comparing the tokens with packet size to allow or deny the request.
