- SAP SD - Home
- SAP SD - Introduction
- Customer & Material Master Data
- SAP SD - Create Partner Function
- SAP SD - Create Material Stock
- SAP SD - Create MM For Sales View
- SAP SD - Customer Account Groups
- SAP SD - Pre-Sales Activities
- SAP SD - Create Quotations
- SAP SD - Sales Support
- SAP SD - Sales Order Processing
- SAP SD - Creation of Sales Order
- SAP SD - Defining a Sales Document
- SAP SD - Item Categories
- SAP SD - Schedule Lines Categories
- SAP SD - Copy Control
- SAP SD - Log of INComplete Items
- SAP SD - Pricing
- SAP SD - Condition Record & Table
- Condition Techniques & Types
- SAP SD - Access Sequence
- Prices, Surcharges & Discounts
- SAP SD - Product Proposals
- Listing, Determination & Exclusion
- SAP SD - Sales Order Types
- SAP SD - Free of Charge Deliveries
- SAP SD - Outline Agreements
- SAP SD - Quota Arrangement
- SAP SD - Special Business Process
- SAP SD - Shipping
- Shipping Point & Route Determination
- SAP SD - Define Routes & Stages
- SAP SD - Outbound Delivery
- SAP SD - Delivery Processing
- Picking, Packing & Post Good Issue
- SAP SD - Introduction to Billing
- SAP SD - Billing Methods
- SAP SD - Credit Management
- Mapping Enterprise Structure
SAP SD - Customer & Material Master Data
Master data is one of the key factors in Sales and Distribution module. There are two levels of masters in SD.
The first level master includes −
- Customer Master
- Material Master
- Pricing Conditions
While, the second level master is −
- Output condition
Create a Customer Master Record
The customer master data contains the information about business transaction and how transactions are recorded and executed by the system. A Master contains the information about the customers that an organization uses to do business with them.
Key tables in Customer Master
| Table Name | Key | Description |
|---|---|---|
| KNA1 | KUNNR | General Information |
| KNB1 | KUNNR,BUKRS | Company Code |
| KNVV | VKOGRG,VTWEG,SPART,KUNNR | Sales Area |
| KNBK | KUNNR,BANKS,BANKL,BANKN | Bank Data |
| VCNUM | CCINS,CCNUM | Credit Card |
| VCKUN | CCINS,CCNUM,KUNNR | Credit Card Assignment |
| KNVK | PARNR | Contact Person |
| KNVP | VKORG,VTWEG,SPART,PARVW,KUNNR | Partner Functions |
Main Transaction Codes in a Customer Master
| S.No | Transaction Codes & Description |
|---|---|
| 1 |
XD01, XD02, XD03 Used to create/change/display customer centrally |
| 2 |
VD01,VD02,VD03 Used to create/change/display customer sales area |
| 3 |
FD01,FD02,FD03 Used to create/change/display customer company code |
| 4 |
XD04 Display change documents |
| 5 |
XD05 Used to block Customer − Global, order, delivery, billing, sales area, etc. |
| 6 |
XD06 Used for deletion |
| 7 |
XD07 Change Account Group |
| 8 |
VAP1 Create Contact Person |
Creating a Customer Master Data
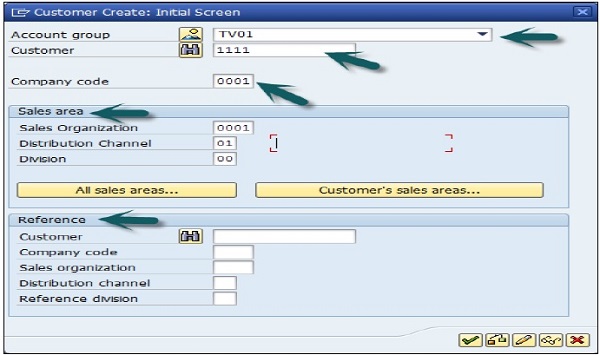
To create a customer master data, you need to use an Account group.
T-Code: XD01/VD01/FD01
Note that if you use −
XD01 − This Includes sales area in the customer master and data is stored in tables KNA1, KNB1 and KNVV.
VD01 − This includes sales area & data, which will be stored in tables KNA1, KNB1 and KNVV and there is no company code data in this.
FD01 − This is company code level & data is stored in tables KNA1 and KNB1.

Then a new window will open. Enter the following details −
- Select the Account Group from the list.
- Enter the customer number and select the company code.
Then you can enter the Sales Area details like −
- Sales Organization
- Distribution Channel
- Division
In case you want to take reference from an existing customer to create customer master, you can use the reference option.
Once all the details are selected, click the Tick mark.
A new window will open to enter the customer master data. This customer master data has 3 key sections −
- General Data like Title, Name, Address, etc.
- Company Code Data and
- Sales Area Data.
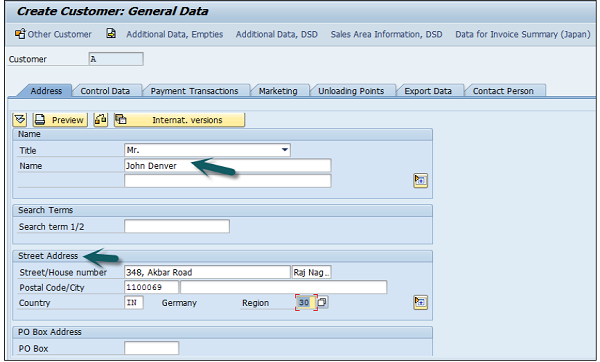
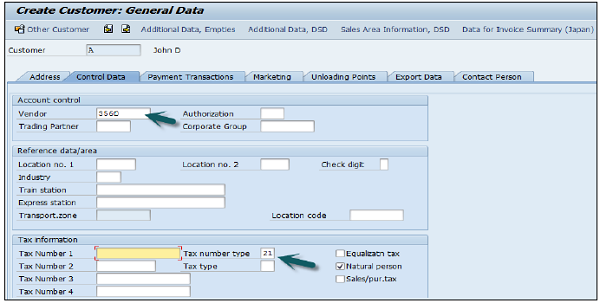
Note that this region fields define the tax calculation like VAT, CST, etc. The next step is to go to Control Data and enter the following details.
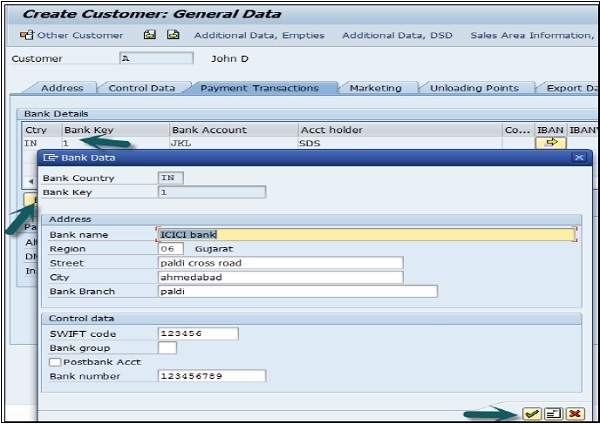
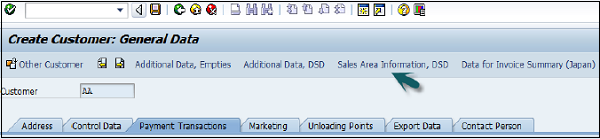
Then you have to enter the particulars in Payment Transaction tab and enter the details of Bank City, Bank Key, Bank Account and Account Holder Name. You can also add more details by clicking on the Bank data button.
The next step is to go to the Sales Area data and enter the details Shipping Data, Customer Pricing and Partner Functions, etc.
Next is to click on the Save icon at the top and you will get a confirmation that the customer has been created with #.
If you have to make any further changes to the customers master data, you can use T-Code: XD02.
