- SAP C4C - Home
- SAP C4C - Introduction
- SAP C4C - Architecture
- SAP C4C - Public vs Private
- SAP C4C - User Interface
- SAP C4C - Work Centers
- Project Implementation & Scoping
- SAP C4C - Fine-Tuning
- Organizational Management
- SAP C4C - Personalization
- SAP C4C - Adaptation
- SAP C4C - Reporting
- SAP C4C - Creating a Custom Report
- SAP C4C - Data Sources
- SAP C4C - Service Level
- SAP C4C - Service Category
- SAP C4C - User Management
- SAP C4C - Business Roles
- SAP C4C - Work Distribution
- SAP C4C - Social
- Data Migration & Workflow
- SAP C4C - Pricing
- SAP C4C - Sales Cycle
- SAP C4C - Retail
- Integration with CRM & ERP
- SAP C4C - Integration with Outlook
- SAP C4C - Mobile
- SAP C4C - Mashups
- SAP C4C - Questions and Answers
- SAP C4C - Quick Guide
- SAP C4C - Useful Resources
- SAP C4C - Discussion
SAP C4C - Quick Guide
SAP C4C - Introduction
In todays competitive market, it is important to meet customer requirements and align your sales, marketing and service business lines to provide higher customer satisfaction. It is also important to design a cheap, integral solution that helps an organization to achieve its objectives and meet customer needs in a flexible environment.
SAP Cloud for customer (C4C) is a cloud solution to manage customer sales, customer service and marketing activities efficiently and is one of the key SAP solution to manage customer relationship.
SAP C4C is based on the following individual products −
- SAP Cloud for Sales
- SAP Cloud for Marketing
- SAP Cloud for Social Engagement
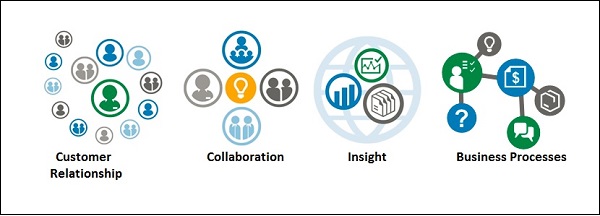
Following are the key objectives of SAP Cloud for Customer −
- Relationships
- Collaboration
- Insight
- Business Processes
SAP C4C Key Points
Following are some interesting facts about SAP C4C −
SAP Cloud for Customer solution is available from June 20, 2011.
SAP C4C is available in 19 languages as on May 2015.
You can easily integrate C4C solution to SAP ECC, CRM and Outlook using SAP NW Process Integration or SAP HANA Cloud Integration HCI for standard scenarios.
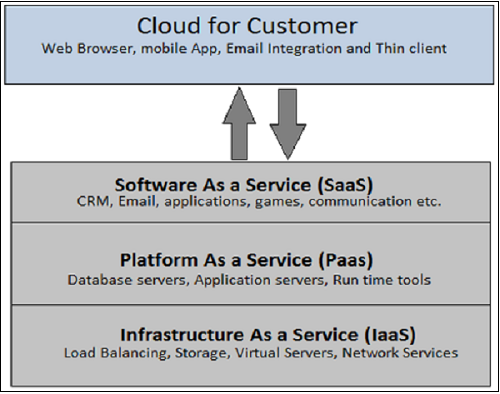
SAP C4C is a new product of SAP based on SaaS (software as a service), PaaS (Platform as a service) and IaaS (Infrastructure as a service).
SAP C4C connecters are available for popular middleware like Dell Boomi for cloud integration, Informatica, MuleSoft for application integration etc.
Advantages of SAP C4C
Following are the benefits of using C4C management −
One of the key benefits of using SAP C4C is its operation expenditure cost and operation maintenance.
You can take licenses as per your requirement and it can be increased on demand.
SAP C4C solution is managed by vendor and all operational costs and maintenance is the vendors responsibility.
SAP C4C solution allows you to manage customer needs from anywhere and with seven-layer security from cloud service providers.
You can access all customer information regardless where they are stored or available.
SAP C4C is based on cloud and use secure and fast communication using web, mobile and supporting mobile platforms iOS, Android and Windows devices, in both online and offline mode.
SAP C4C vs On-Premise
Given below are the key differences between Cloud for Customer and on-premise solution −
| Feature | Cloud for Customer | On Premise Company owned |
|---|---|---|
| Solution location | On Cloud. Off the premise | On Premise |
| Solution Ownership | SAP/subscription | Company owned |
| Business Model | Operational Expenditure | Capital Expenditure |
| Cost | Less | High |
| Licenses and Users | As per demand | Peak |
| Solution Management | Vendor | Company |
| Capital Expenditure | Only operational expenditure like end-users system and user creation | Cost of IT infrastructure is very high. Example:Servers and user licenses etc. |
SAP C4C - Architecture
SAP C4C provides prepacked integration for SAP ECC, CRM and Outlook. It consists of HTML5 UI, Silverlight UI, and mobile Apps for IOS, Android platform and HANA for HANA Cloud integration HCI.
SAP C4C has multitenant architecture where solution and components is shared between multiple customers. There is an option to go for single tenant by paying additional cost. In a multiple tenant environment, all the updates and releases are built on C4C custom solutions for multiple clients.
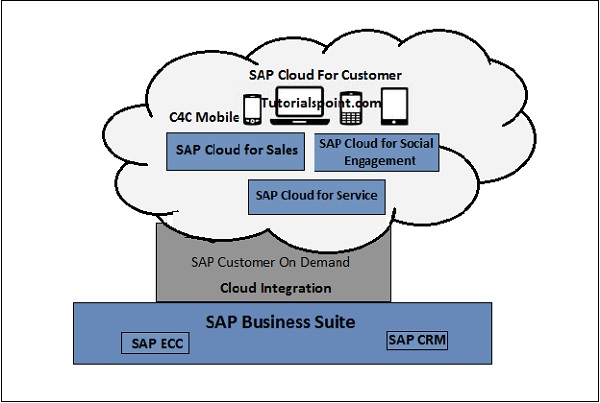
SAP C4C solution can be easily integrated with SAP ERP and CRM on premise solution. There are two ways of integration −
SAP Process Integration PI/PO − This integration is recommended when you are already using process integration for on premise systems.
SAP HANA Cloud Integration HCI − This integration is recommended when you have to perform cloud-to-cloud integration.
The C4C integration to CRM on-premise could be on the basis of −
- Level of customization required
- Whether the functionality is required to be on the cloud/on the field
- The master data governance rules within the company
- Sales organization structure, etc.
Example
The frontline sales team will generate opportunities on the move with minimal information. The Top 5 - Customer, Product, Opportunity Phase, Value, Volume and the sales assistants in the back-office will enhance the opportunities with more data that are replicated to the on-premise solution.
The C4C integration to ERP could be on the basis of types of transactions needed to be displayed to the front end sales like orders, quotations or contracts. It is based on the role of the sales person whether they need pricing information, availability checks or even customer credit information. The principle here could be that of only deploying a "Must Have" integration with the ERP transactions.
SAP C4C - Public vs Private
When a customer goes for SAP C4C production tenant, there is a test tenant provided as free to the customer. A separate unique URL is provided for each tenant. A customer can also purchase permanent test tenant subscription.
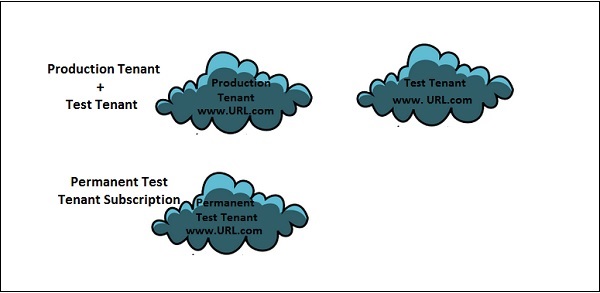
SAP C4C solution is hosted on cloud tenant that has many customers. This is called a public tenant.
C4C customers can also go for private purchase edition, which allows them to subscribe for a tenant with no other customer on it. SAP C4C production and test tenants are always of separate system. A customer cannot purchase a permanent test tenant for temporary basis. It is recommended only when SDK solution is in use.
SAP Cloud hosting cannot differentiate between a permanent and a temporary test tenant. It only supports up to two test tenants irrespective of which a customer can consider as temporary tenant and a permanent tenant.
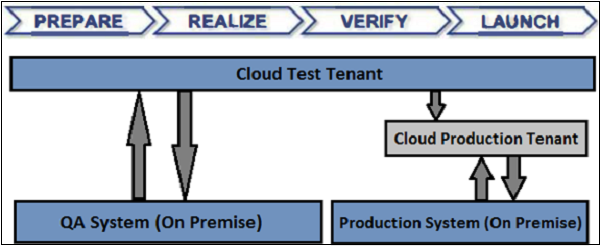
Using a test and production tenant, a project can be implemented in the following way as demonstrated in the figure −
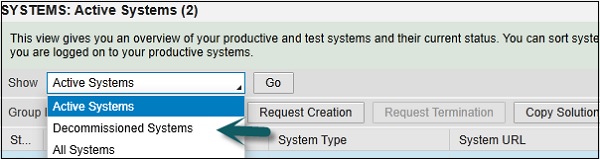
SAP C4C administrator can manage the test and production tenants using Service Control Center → System View
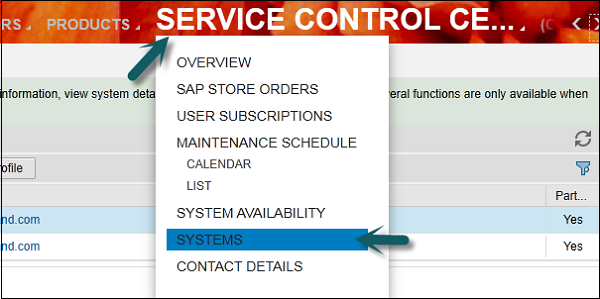
From the dropdown list, you can select Active systems, decommission system, or all systems and click on Go.
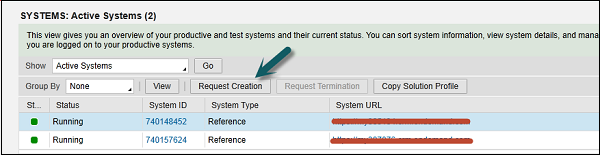
You can use request creation option to request a new system. Different options can be selected for requesting a new system like −
- Copy of Source System
- Initial System (Copy Solution Profile)
- Copy of Source System
SAP C4C - User Interface
In SAP C4C system we have two types of UIs. In this chapter, we will discuss in detail the UIs of SAP C4C.
HTML 5
SAP C4C is used by end-users. This is considered as light version and provides fast and easy access to different work centers suitable for the end-users in C4C environment.
The user interface framework for SAP C4C for end-users is based on HTML 5. All business user features and functions are available in HTML 5. Most of the administrator features and functions are still only available in Silverlight.
To access HTML 5-SAP C4C user interface, open Internet Explorer and type your tenant URL −
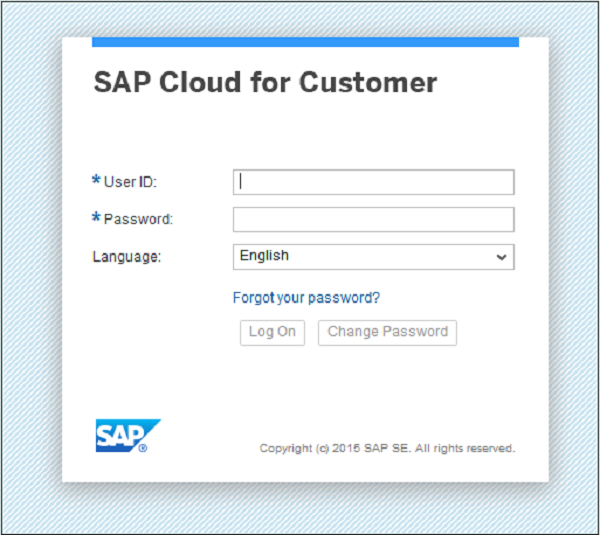
Enter the user name and password and select the language. Click Log on.
You will land on HTML 5-C4C user interface.
Silverlight
This C4C-Silverlight user interface is used by Administrator. For this, you need to install Microsoft Silverlight in your local system.
Note − The default client is HTML5 but C4C administrators can launch the Silverlight UI from the Adaptation menu to access the configuration relevant work centers.
To open Silverlight UI mode, go to the Adapt tab at the top and select Launch Microsoft Silverlight.

A new window will open. This window is SAP C4C in Silverlight mode.
SAP C4C - Work Centers
When you open SAP Cloud for Customer in Silverlight mode, you can access multiple work centers to perform various administrative and configuration tasks.
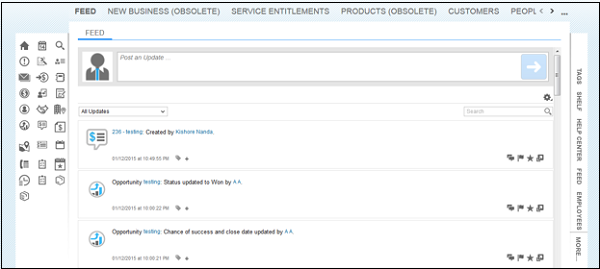
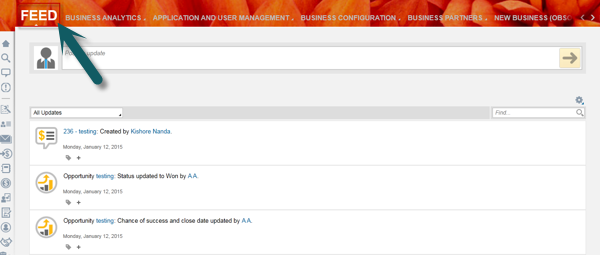
Feed
The Feed work center shows all the updates and events like create, assign of ticket, lead, sales order etc.
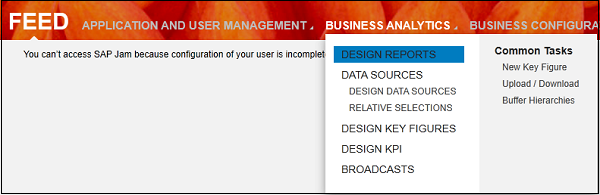
Business Analytics
The Business Analytics work center is responsible to create custom report, design new data source, design key figures, and design KPI.
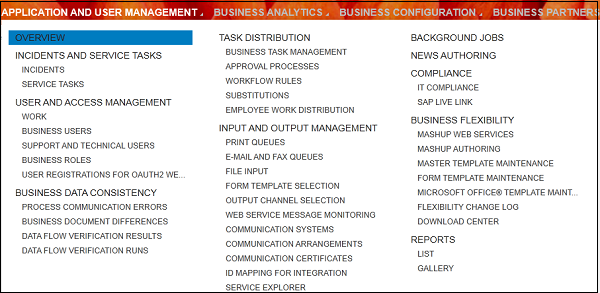
Application and User Management
The Application and User Management work center is responsible for performing tasks like creating business users, creating business roles, task distribution etc.
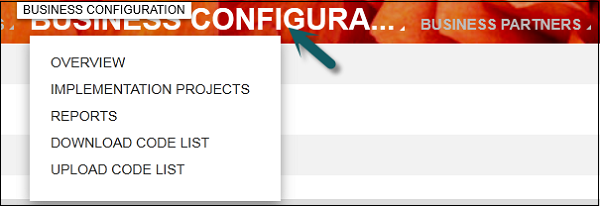
Business Configuration
The Business Configuration work center is responsible for Implementation Projects, Download and Upload Code list, etc.
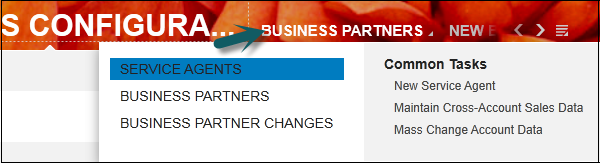
Business Partner
In the Business Partner work center, we can create and edit business partners like service agents etc.
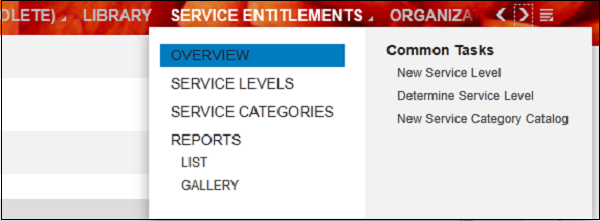
Service Entitlement
In Service Entitlement work center, we can create and edit Service Levels (SLA) and Service Categories.
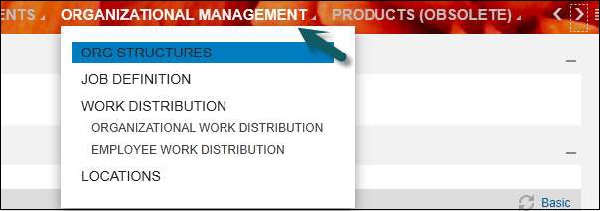
Organizational Management
In Organizational Management work center, we can create and edit organizational structure, job definitions, work distribution- organizational and employee work distribution.
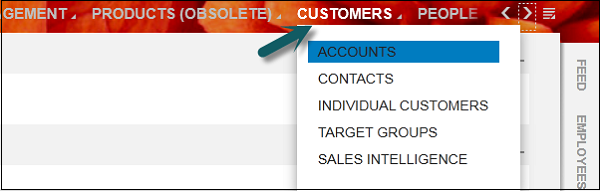
Customer
In the Customer work center, we can see customers like account, contacts, and individual customer, target group, sales intelligence etc.
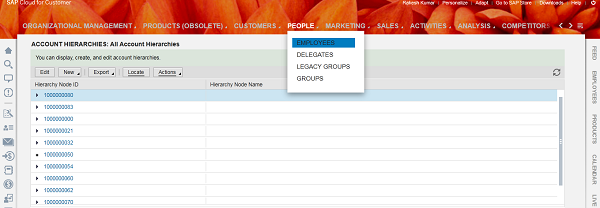
People
In this work center, we can see employees, delegates, legacy group, group, etc.
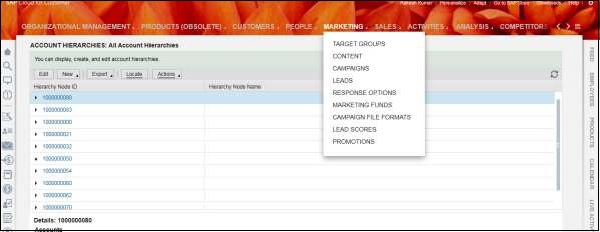
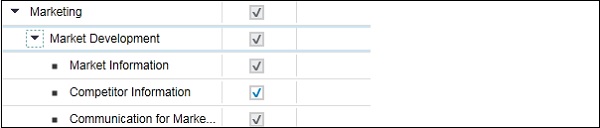
Marketing
In the Marketing work center, we can perform marketing activities like- create and edit target groups, content, campaigns, leads, response options, marketing funds, campaign file formats, lead scores, promotions.
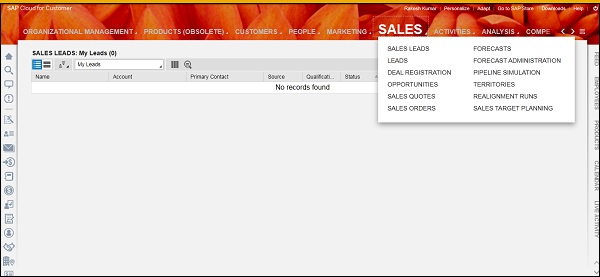
Sales
Under the Sales work center, we can perform sales activity like- Sales lead, lead, deal registration, opportunities , sales quotes, sales orders, forecasts, forecasts administration, pipeline simulation, territories, realignment run, sales target planning.
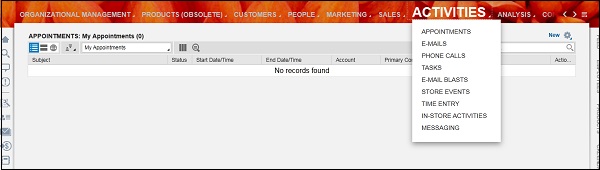
Activities
Here we can perform activities like appointments, e-mails, phone calls, tasks, E-mail blasts, store events, time entry, in- store activities, messaging, etc.
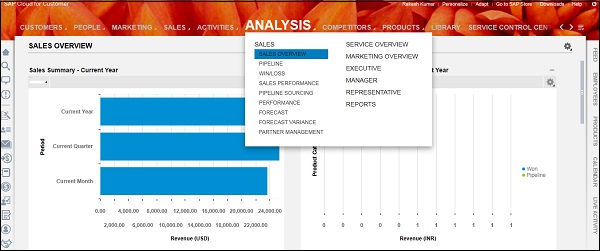
Analysis
Analysis is used to access all the reports.
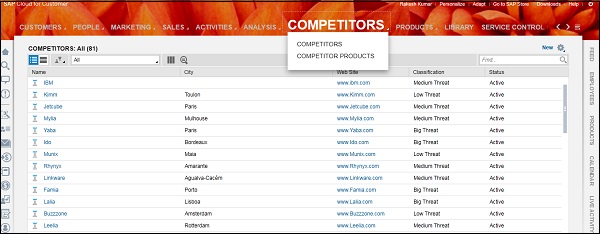
Competitor
Under the Competitor work center, we can maintain information regarding competitors and competitor products.
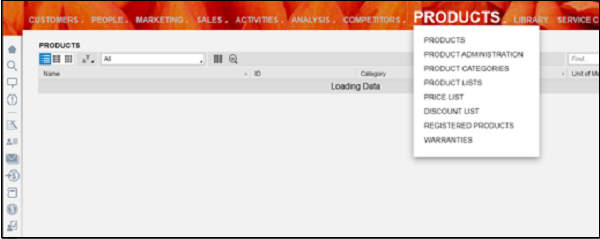
Products
Here we can create, edit and view products, product administration, product categories, product list, price list, discount list, registered products and warranties.
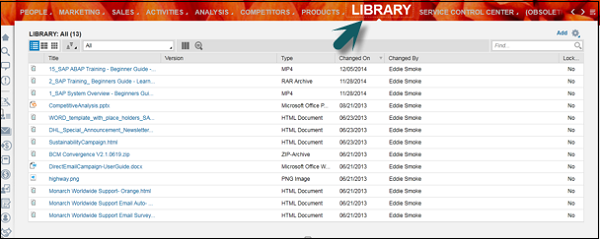
Library
The Library work center is used to share any knowledge-based article that you think may be useful for other user. You can share any useful article, document for reference.
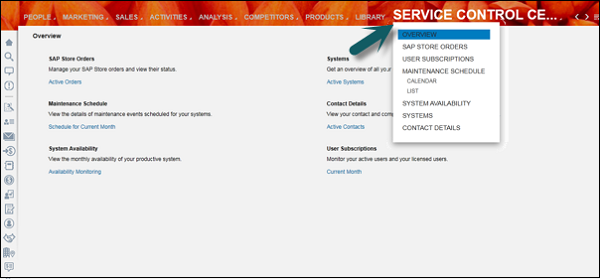
Service Control Center
Under the Service Control Center, we can see all the order that we have placed to SAP and can place new order like buying of new user licenses etc.
We can also view the maintenance schedule of the system like down-time.
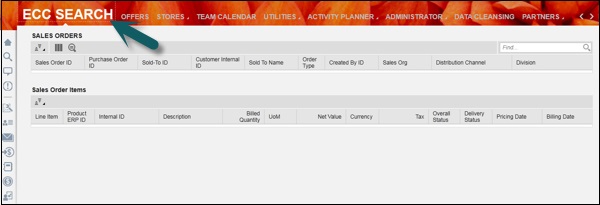
ECC Search
Under ECC Search work center, we can search sales order in back end system SAP ECC.
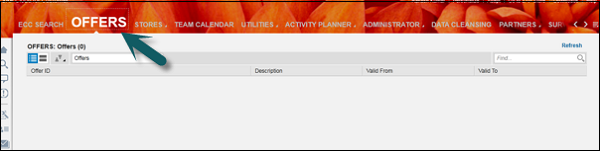
Offers
The Offers work center is used to maintain offers in C4C.
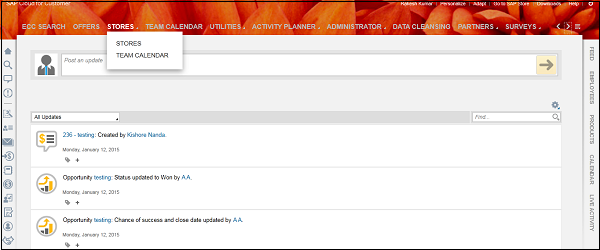
Stores
In Stores work center, we can maintain details about stores and team calendar.
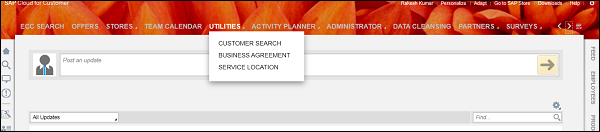
Utilities
Under the utilities work center, we can view business agreements, service locations and customer search.
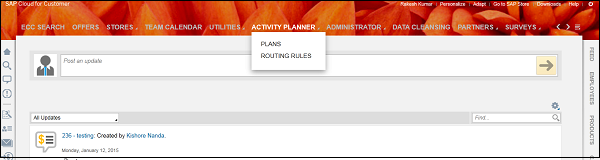
Activity Planner
Under the Activity Planner work center, we can have plans and routing rules for C4C system.
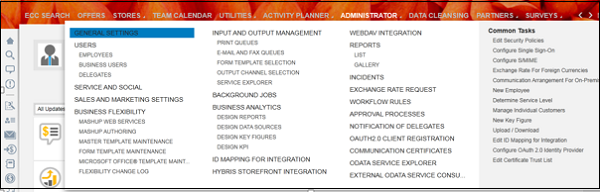
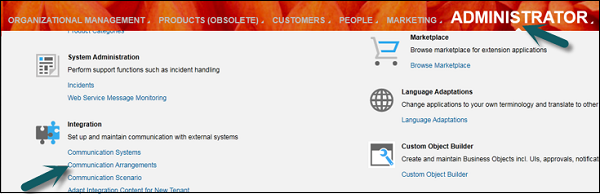
Administrator
This is a very important work center and is available to the admin users. Most of the customization activities in C4C is done in this work center. This work center is available in Silverlight view of C4C system.
It has many customizations like service and social, sales and marketing setting, mash up services, workflows, user management, approval process etc.
Data Cleansing
The Data Cleansing work center is used to perform data cleaning processes.

Partners
Under Partners work center, we can view partners, partner contacts, and partner applications.

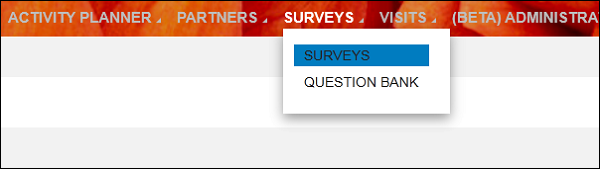
Surveys
The Surveys work center is used to maintain surveys.
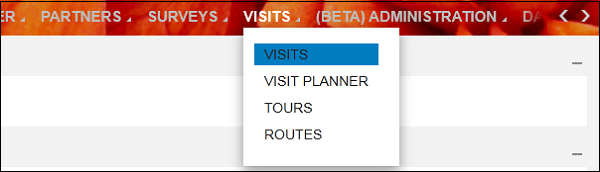
Visits
The Visits work center is used to perform visit planner, maintain visits, routes and tours.
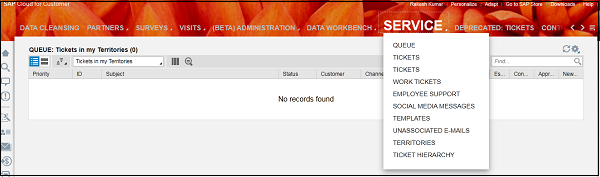
Service
The Service work center is a very important tab for service agents. You can view tickets, work tickets, queues etc.
Installed Base
Installed base has all the information regarding product that is installed at customer-end like manufacture, serial number, model, warranty etc.

Resource Scheduler
Resource Scheduler is used to maintain resource scheduler like roster of employee.

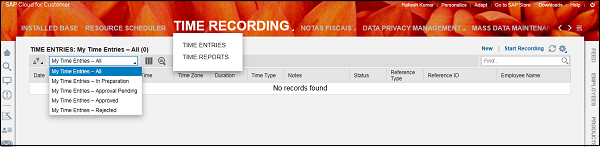
Time Recording
In Time Recording work center, we can maintain time entries and time report. We can measure the working time of service agent on particular task.
Partner Development
In Partner Development work center, we give authorization to the user to perform SDK (software development kit) operation.

SAP C4C - Project Implementation & Scoping
As a part of SAP C4C, there are various activities, which you need to perform under project implementation. We will discuss some of the key activities here.
Preparation Phase
First step in implementation is preparing the system. This includes creating system administrator for implementation, scoping of C4C system, defining migration strategies for data from on premise to cloud system, etc.
Fine tuning
As per the scope of project, fine tuning involves performing customization in SAP ECC onpremise system to perform configuration and set up your customizing as per the project scope. It includes creating users and business roles, defining organization structure and management rules, etc.
Data Migration and Integration
Data Migration and Integration includes performing manual data migration by using default templates cloud system. In case of integration is in scope then perform initial data load from on-premise source system to cloud system.
Test
In the Test phase, you perform unit, regression, Data test, etc.
Go Live
Go Live work center includes activities like user enablement. SAP C4C administrator is enabled who takes care of day-to-day operation and support activities before it goes live. Once this is done, you can set the system to Live.
SAP C4C Scoping
When you start project implementation in Cloud for Customer, you need to select the scoping elements that are required for business. There are the different available Scoping Elements under different categories that you can select.
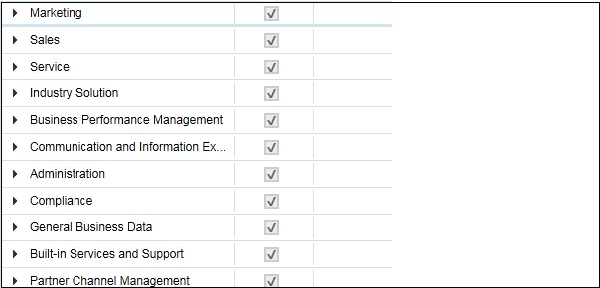
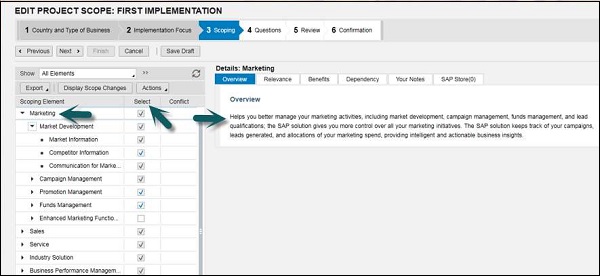
Each of these elements allows you to select activities related to project implementation. For example, for marketing, you can define project scoping from the following activities −
Similarly, you can select scoping elements under Sales, Service, Business Performance Management, communication and information Exchange and from other elements.
Project Implementation in SAP C4C
To implement a project in SAP C4C, follow the steps given below −
Step 1
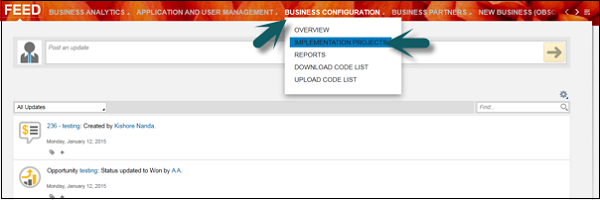
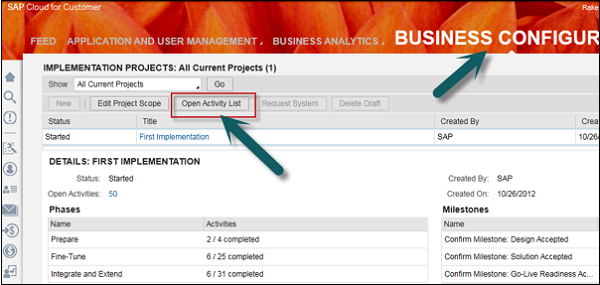
Go to Business Configuration work center -> Implementation Project.
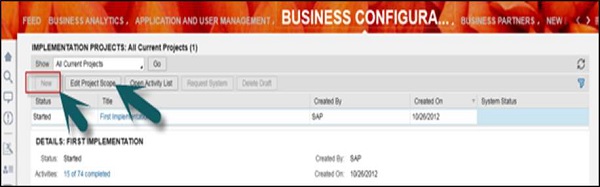
Step 2
Click the New tab to start implementing a new project. As a project already exists, click Edit Project Scope to see the steps in implementation.
Implementation Steps
Once you click Edit Project scope, you will see the following implementation steps
Step 1 - Country and Type of Business
Select the name of the country where you have to implement the solution. This allows you to put specific country conditions like language and financial settings. Once you select the country, click Next.

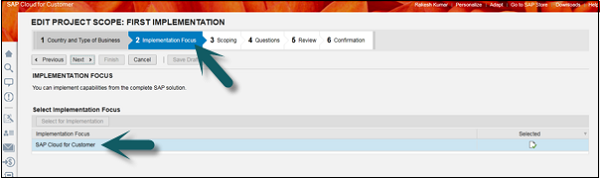
Step 2 - Implementation Focus
In this step, you need to select the solution to implement. You can select SAP Cloud for customer and click Next.
Step 3 - Scoping
Select scoping elements to implement in the new project. Different Scoping Elements are available under different categories in the left pane. In the right pane, you can see the details of each element under the Overview tab.
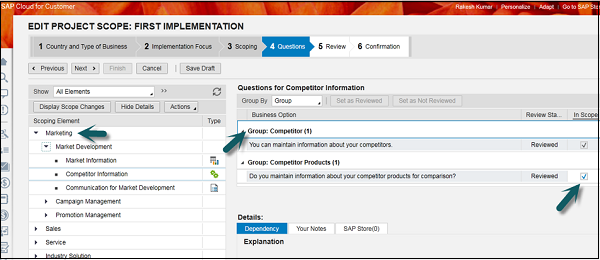
Step 4 - Questions
This is a step under scoping where you review questions as per your business needs. You have different elements to select and under each category, you have questioning information that you have to answer.
Example
Under the Marketing element, you have an option to select questions about competitor information and competitor product.
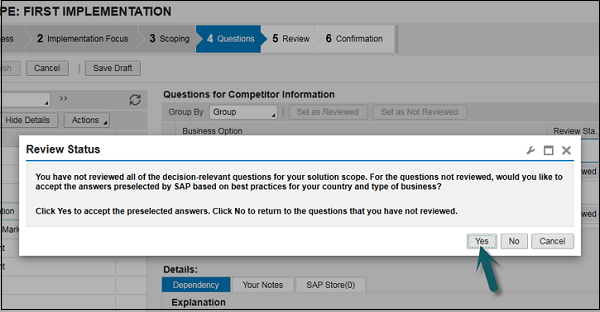
In case you do not want to review all the questions, click the Next button at the top. You will be prompted to select the answers preselected by SAP, based on the best practices for your country and type of business as shown in the following screen shot.
Click Yes.
Step 5 - Review
This step allows you to review your project before you confirm the project implementation. You can view the report based on the implemented solution and project scoping.
Your Solution Proposal − Executive Summary
This option allows you to view the summary of your companys profile, complete description of areas, work centers and business packages selected.
You can also maintain the description of your project, planned implementation time line, etc.
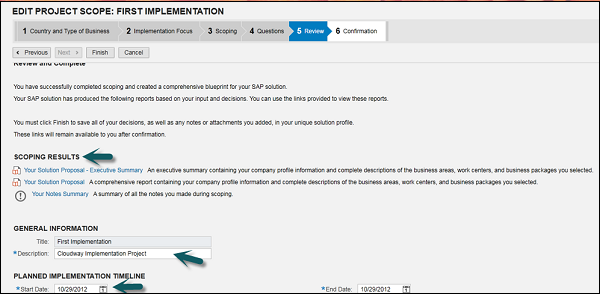
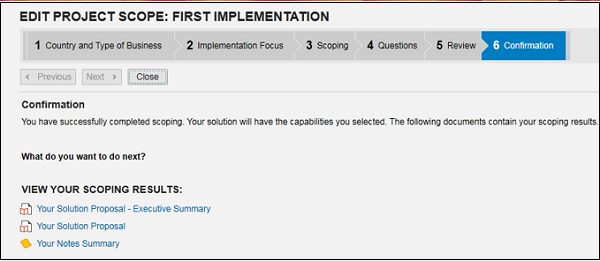
Step 6 - Confirmation
You can view your scoping results before you complete your project implementation. Just as in Review tab, you can view the scoping summary and reports under the Scoping result. Once you are done, click Close.
SAP C4C - Fine-Tuning
Before your project goes live, you need to perform fine-tuning in your project. This phase organizes all the mandatory configuration activities that you need to complete in a logical sequence.
This allows you to tailor the solution to your specific needs before going live by checking predefined settings and entering additional settings for your selected scope. You can also add optional configuration activities.
Example − You can maintain number range for different entities like product, customer etc. as per your business needs.
Fine-tune and Go Live
Follow the given steps to perform fine-tuning and go live in a new implementation project.
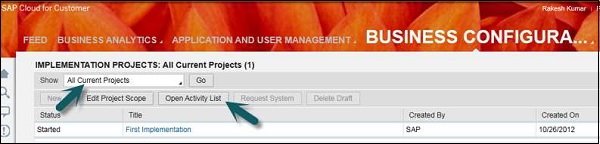
Step 1
Go to Business configuration -→ Implementation Project.

Step 2
In the new window, select All Current Projects from the drop down list and click Open Activity List.
This allows you to view all the preliminary activities you need to carry out to get your company ready to use the solution productively. The activities in this phase are mainly related to project management and include reviewing the project plan, confirming that scoping has been completed, and knowledge is transferred to the administrators. You can also create your own activities manually and add them to the activity list.
Step 3
Click the Prepare tab. Under the Prepare tab, you can see all the open activities of your current project.
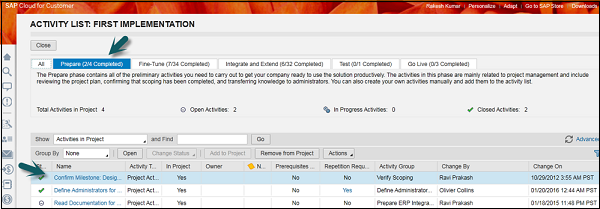
Click Total Activities under the Prepare tab. Here, you will see the count of Open Activities, In progress Activities, and Closed Activities.
Step 4
Click the Fine Tune tab. The Fine Tune phase organizes all the mandatory configuration activities that you need to complete in a logical sequence. Its allows you to tailor the solution to your specific needs before going live by checking the predefined settings and entering additional settings for your selected scope. You can also add optional configuration activities.
Step 5
Click the Integrate and Extend tab. The Integrate and Extend phase allows you to transfer your configured solution to your company to start using it productively. You do this by integrating with third party applications that already operate in your company and move the basic, master, and transaction data from your legacy system(s) to your new solution. You also decide what form, report, and user interface extensions you require to meet your company's specific needs.
Step 6
Click the Test tab. Perform unit, regression, data test, etc. under this tab. In addition, request of Production system (copy of Test should be performed). The Test phase contains activities that allow you to define test scenarios and guides, verify that your core business processes are running as desired, and transfer knowledge to the end-users before your solution goes live.
The Go-Live Phase
The Go Live phase includes the final activities that you must complete to enable your solution to be used productively in your company. Typical activities include preparing and performing cutover, setting up internal support teams, and confirming that you are ready to go live.
At the end of this phase, all mandatory and outstanding configuration issues are resolved, legacy data is migrated to the production system, knowledge transfer is complete, and the project is signed off and closed.
Step 7
Click the Launch/Go-Live tab.
SAP C4C - Organizational Management
Organizational Management (OM) provides the central source of organizational information in SAP C4C. It is used for creating the organizational structure and provides a graphical representation of an organization chart. In addition, it shows the different entities and aspects of the company. SAP C4C accesses OM whenever business processes require information related to the companys organization.
To set up a correct organization structure, you should follow −
Time Dependency − All the information stored is time dependent, as you need to enter a valid from and to date.
Active Version vs Planning Version − You can also select between the planning version and the active version of the organizational information.
Consistency Checks − You can perform some checks, which help in maintaining OM all the time.
Partial Activation − You can also activate an organizational structure in parts, while continuing to work with other parts.
SAP C4C Organizational Structure
An organization can be structured in different ways based on the goals and targets and it defines the modes in which an organization operates. The organizational structure set up defines the reporting lines and automatic work distribution.
Setting up an organizational structure enables automated routing of work such as leads, accounts and service requests. The organizational structure comprises of units and provides a unified, graphical representation of your companys organizational data.
Decide whether −
- You want to distribute the work based on your companys structure.
- You have created or uploaded employee and product data.
- You have gathered all the data relevant to the organizational management, such as the legal, managerial, and functional data of your enterprise.
When you set up an organizational structure, it is always recommended you follow the top down approach, i.e., start with company residence and add the business lines, sales and service team.
Set up an Organizational structure
Following steps will help you to set up an Organization Structure −
Step 1
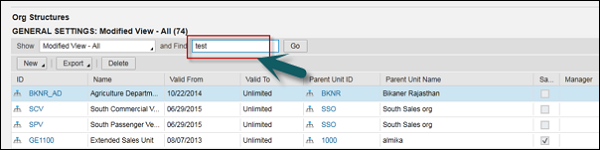
Go to Administrator and select Org Structures.

Step 2
Click Organization Unit → New.
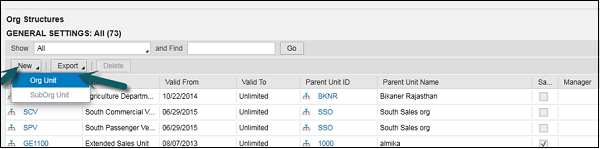
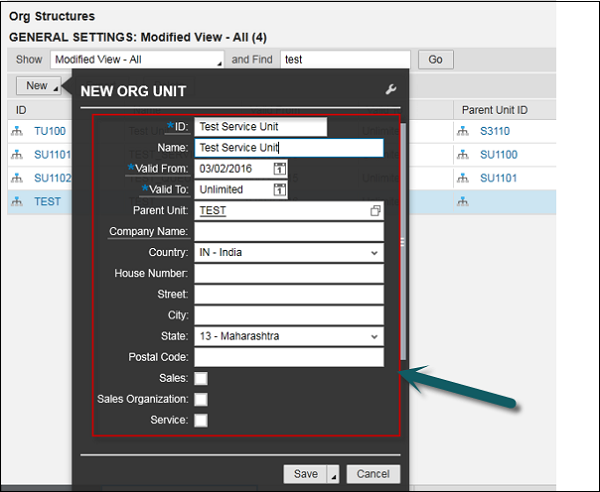
Step 3
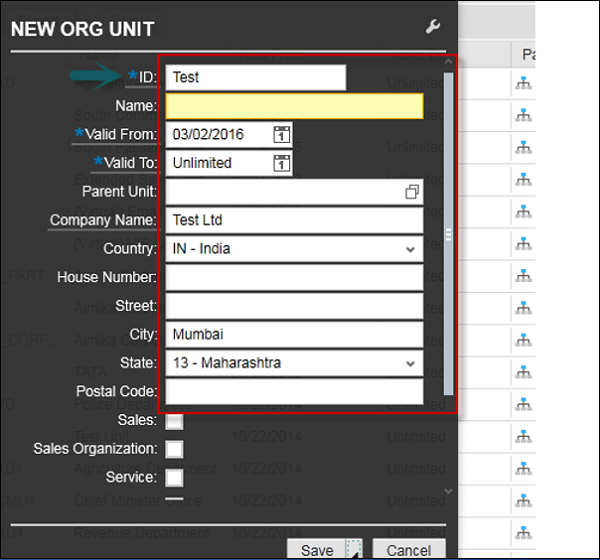
A new window opens. In this new window, enter the following details such as- Org Unit, Select ID, Valid from, Valid To, Company name and Country, etc.
Step 4
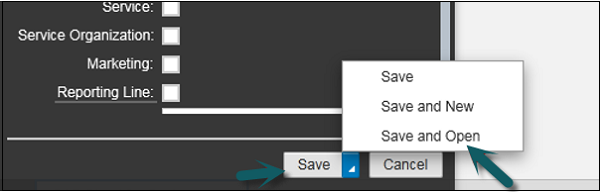
Click Save and select Save and open from the available options.
Step 5
To save it as a parent unit, you have to check the option Company Name as shown below.
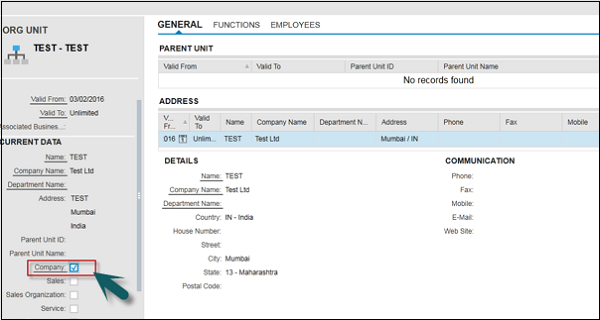
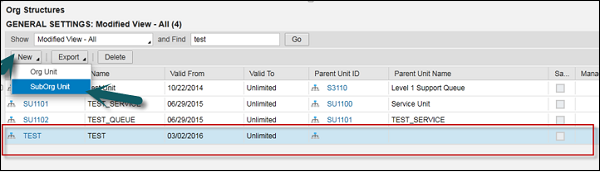
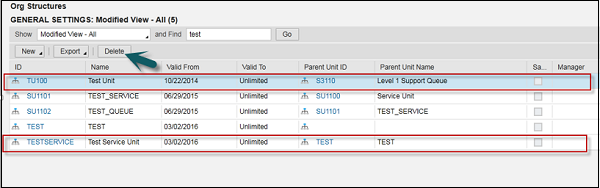
An organization unit is created. Now you have to create sub units, business division, sales team, etc. To create a subunit, search the organization unit you have just created.
Step 6
Select Test Organization unit and click New SubOrg unit.
Step 7
Enter all the data for relevant fields for SubOrg unit as per the requirement and click the Save and Open button.
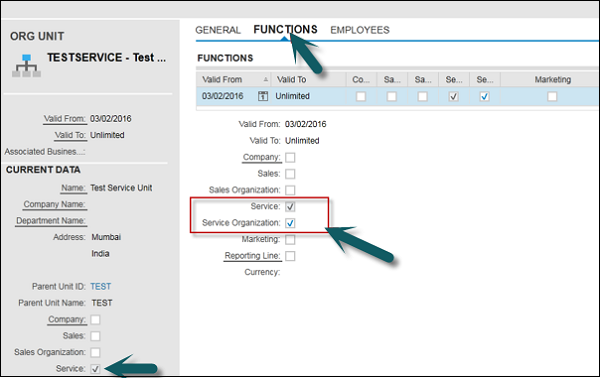
Step 8
Go to the Functions tab at the top. If it is a service organization, select Service. Similarly, select sales for sales unit, marketing for marketing unit.
Step 9
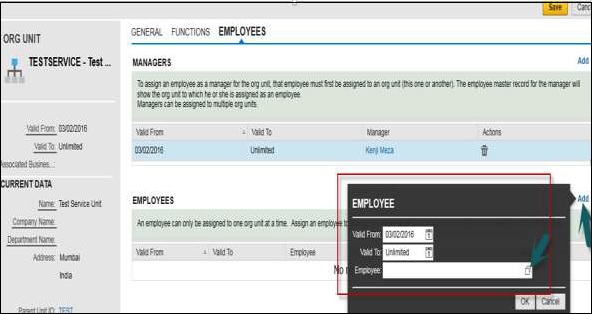
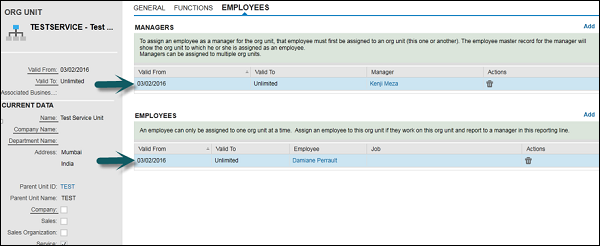
Add employee and manager to this organization. Go to the Employee tab at the top and click Add.
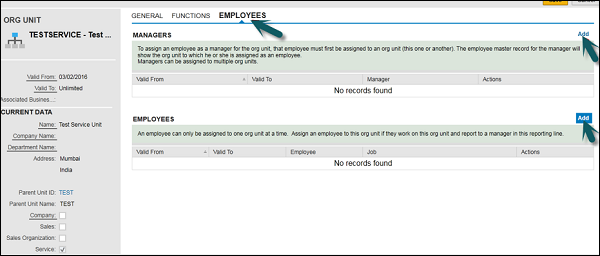
Step 10
When you click Add under Manager, add managers name and validity period.

Step 11
Similarly, add an employee in this sub unit. Select an employee type as sales agent, etc.
Step 12
In addition, you can create Sales org unit, marketing org unit. All the steps are same; just choose the function as sale or marketing while creating the org structure.
Step 13
To delete an organizational unit or sub unit, you can select the object from the list and click Delete.
SAP C4C - Personalization
Personalization involves changing screen layouts, fields and output forms for a single user or group of users. SAP C4C provides several features that enable you to customize fields, screen layouts, and output forms.
Personalization
Personalization enables individual users to modify their own view of the UI screen. Using Personalization, impacts the user making a change to the screen. This allows the users to tailor the system in a way they want to use it on a daily (or regular) basis.
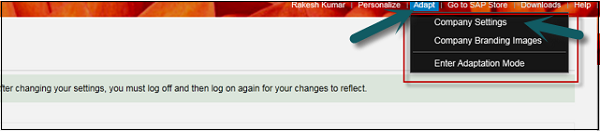
In C4C, an administrator can disable this feature by going to Adapt → Company Setting → Disable user Personalization features.

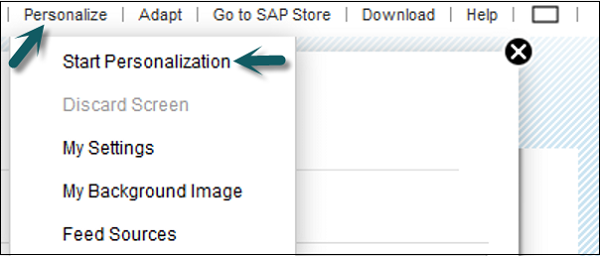
Step 1
To start personalization, click the Personalize tab at the top.

The following options are available under the Personalization tab −
- Start Personalization
- My Settings
- My Background image
- Feed Sources.
Step 2
Select Start personalization.
You can see the personalization screen.
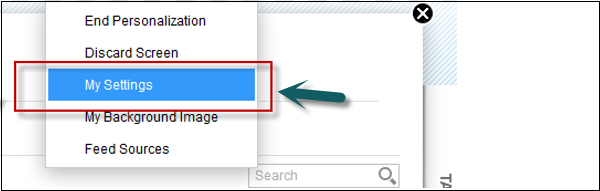
Step 3
Go to My Settings; you can perform various personalization settings as per requirement.
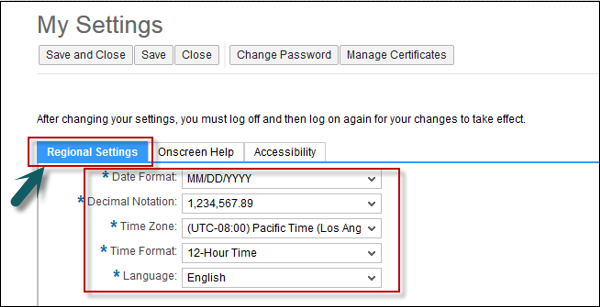
Step 4
Go to Regional Settings. You can personalize date formats, different decimal notation, different time zone, different time format, different languages as per your requirement.
Step 5
Under the Onscreen Help tab, you can select Country. Country specific help will be activated and the help content can be seen in Help Center. A user can view these additional country specific help, if he has any issues.

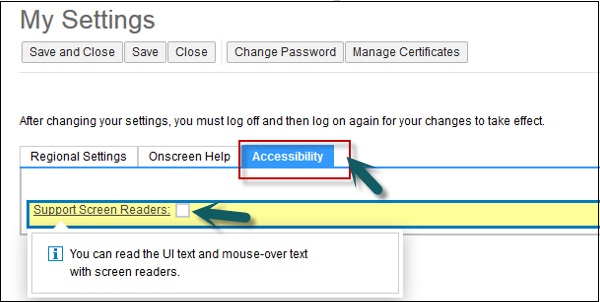
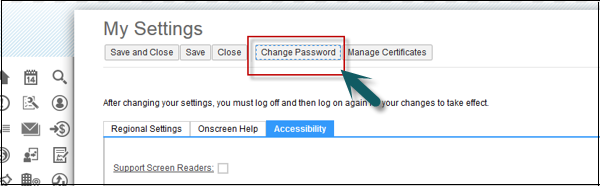
Step 6
Under the Accessibility tab, check the support screen readers checkbox. It allows a user to read the User Interface (UI) text and mouse over text with screen readers.
Step 7
You can change the password by clicking the Change Password command button under My Settings.
Note − All the personalization performed above, is usually done by the end-user on their HTML 5 screen. These personalization changes are on their screens only and do not reflect on any other user screen.
SAP C4C - Adaptation
In this chapter, we will learn Customization, done by C4C administrators in Silverlight UI screen. An administrator can restrict an end-user to personalize his/her screen and can personalize for all the users. This process is called Adaptation.
Adaptation refers to a set of tool, the administrators can use to add or modify fields, change master screen layouts, assign screen layouts to specific roles, restrict dropdown list values, and modify output forms. You can also migrate adaptation changes from one system to another C4C system.
The screen adaptation feature allows changes to the fields and screens that is displayed to all users in Cloud for Customer environment. This is an important feature. In case there is some critical business data that has to be captured, this feature can be used to show on the screens of all the users.
The following steps will guide you through the process of adaptation.
Step 1
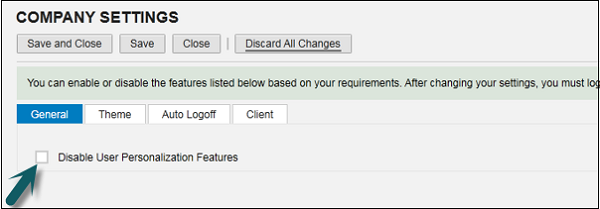
To perform Adaption in Silverlight UI, go to Adapt → Company Settings.
Step 2
Click the General tab. You can restrict individual users to personalize their screens. To restrict, select checkbox Disable User Personalization Features.
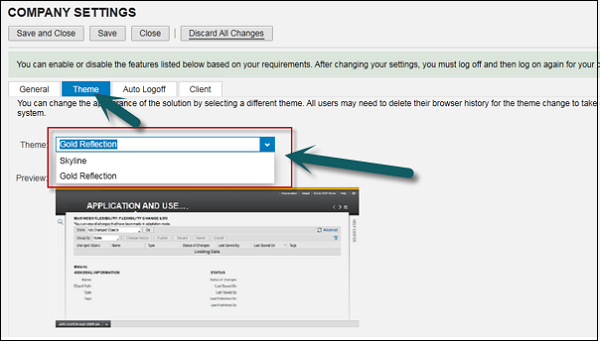
Step 3
Click the tab Theme. You can select the theme from drop down options and the theme that you will select will automatically reflect in all user profiles in the C4C environment.
Step 4
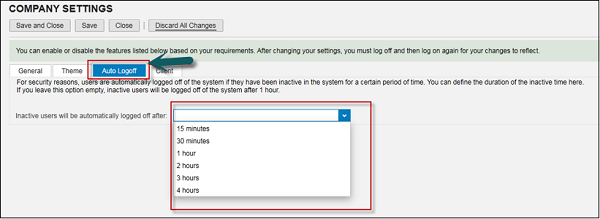
Click Auto logoff. Under this tab, you can define the auto log off period from the drop down list when a user is inactive. For security reasons, users are automatically logged off from the system if they have been inactive in the system for a certain period of time. You can define the duration of the inactive time here.
In case you leave this option empty, by default, inactive users will be logged off the system after 1 hour.
Step 5
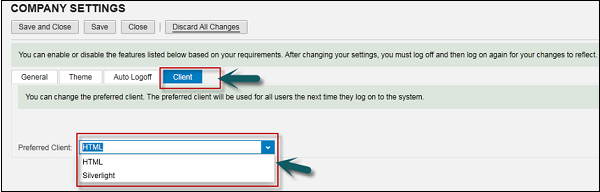
Click the next tab- Client. Select the preferred client between HTML and Silverlight. You can change the preferred client. The preferred client will be used for all users the next time they log on the system.
Step 6
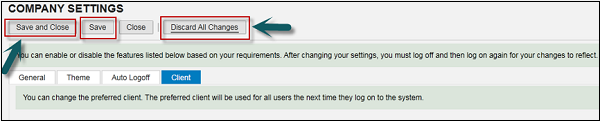
After all changes are done, select from the options- Save and Close, Save, Close, and Discard all changes as shown in the screen shot below −
C4C Adaption Extension Fields
Extension fields are additional fields that the administrators can add to the solution in order to meet a specific business requirement. If applicable, these features add new field to the end of the data migration worksheet.
When you first create an extension field, you navigate to a screen on which you want it to appear and add it to a section of the screen. Each screen section is based on an underlying business context. The business context typically corresponds to a part of a business document or other object. For example, the header data of sales quote. The business context is used to determine which other screens you can add the field to. In addition, it is also used to determine the form templates, analytical data sources and reports, enterprise search categories, and extension scenarios that the field can be added to.
To add a new field, first you need to navigate to the relevant screen and enter Adaptation mode via Adapt → Edit Master Layout. The area of the screen is where the new field should be created, i.e., in the account details area.

SAP C4C - Reporting
In SAP C4C, analytics data in the cloud solution is real time and there is no persistency in a separate Business Warehouse layer.
SAP C4C supports the following types of reporting.
Standard reports − These are standard reports that are provided with C4C solution.
Custom reports − This includes custom reports in C4C that are created as per business requirement.
Interactive Dashboards − These are user-interactive dashboards that are created separately.
SAP C4C Standard Reports
The reporting feature is integrated in C4C solution that allows you to support business processes and to check performance as per business KPIs. This helps you to make decisions with real time data.
Report Analysis and Integration
In C4C Cloud solution, you can insert data from reports into Microsoft Excel document. You can use logon to C4C environment on the ribbon and you can directly refresh the data in excel document including all subsequent activities in Cloud for customer environment.
To modify reports so that those changes apply to all users, you can make the change as an administrator by creating a new view or copy of a report via Business Analytics.
SAP C4C supports the following features in analytics −
- Microsoft Excel based analysis and formatting of reports
- Drilldown on iPad
- Mark reports as favorites
- Enable reports on smart devices
SAP C4C Custom Reports
In SAP C4C, you can create custom reports based on custom fields in your solution and these custom fields can be added to data sources or reports.
You can join or combine heterogeneous data sources that are created in C4C environment or those that are delivered with the solution, as well as create custom calculated measures and comparison metrics.
Data Sources for Report Creation
The first step is in the report creation process through the Report wizard is to select a data source. In SAP C4C, various pre-defined data sources are provided with the solution. You can also create and edit your own data sources to suit your business requirements and processes and use your data sources for reporting.
To create your data sources, you can combine or join data sources to merge data into a new data source. You can also create a cloud data source by importing outside information.
Important Terms in Reporting
Following are the key terms used in reporting in SAP C4C −
Key Figures
Key figures are defined as key performance indicators in the report. You can also refine the data appearing in key figures by setting up restricted or calculated key figures.
You can define a restricted key figure as key figure restricted to a specified characteristic value and is often created for comparison metrics.
In C4C reporting, a calculated key figure is defined as the key figure that contains some calculation rules or formulas. A calculated key figure can be created from existing key figures in the selected data source.
Characteristics
These are assigned to restricted key figures and to add additional behavior you can define properties of the characteristics.
Work Centers
You should assign the reports to work centers to make them available to users.
Assigning Reports to Roles
You can also enable the assignment of reports to business roles when you implement a new project under fine tuning option. This allows you to assign reports to business roles directly and hence restricts by role which users can view the reports that are assigned in work center. To enable this: You can go to Administrator → Analytics → Settings
Report Views
When you assign a report to the work center, you can create views, which appear in enduser report list. A view can be created by choosing key figures and characteristics for columns and rows in a table, then selecting a chart type to best represent that data.
When you create a view, you can also define conditions and exceptions for key figures that alter how your data is presented based on rules and thresholds.
SAP C4C - Creating a Custom Report
Many defaults are provided in SAP Cloud for Customer delivered solution. If these reports do not meet the requirement, you can also create custom reports by adding data fields from different sources.
Create a Custom Report
Follow the steps given below to create a Custom Report.
Step 1
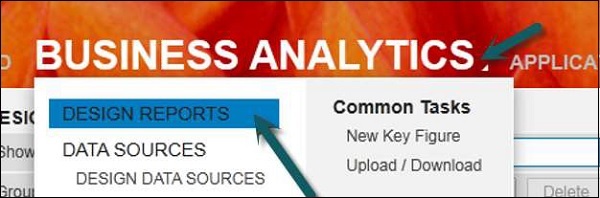
Go to Business Analytics Work Center → Design Reports.
Step 2
To create a new Report, Click New and select Report. There are other options like − Report As Copy which can be used to copy or modify an existing report.
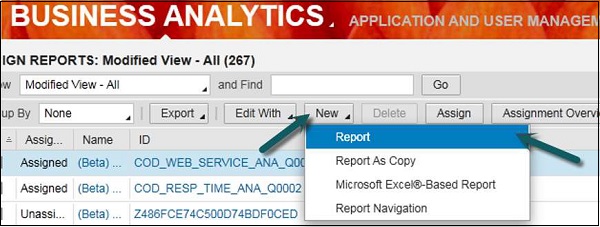
It will open Report creation wizard. To create a report there are certain steps that has to be completed −
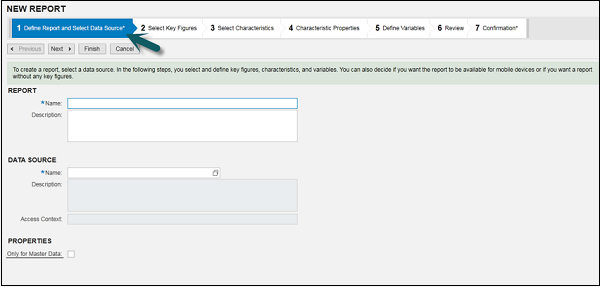
Step 3
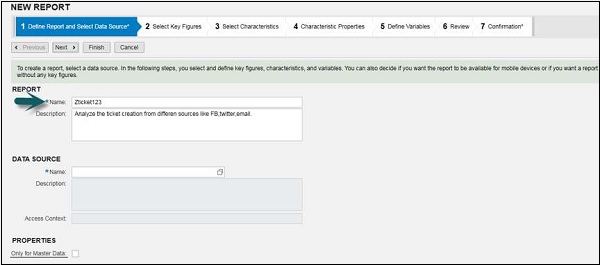
You have to enter the name and description of the new report.
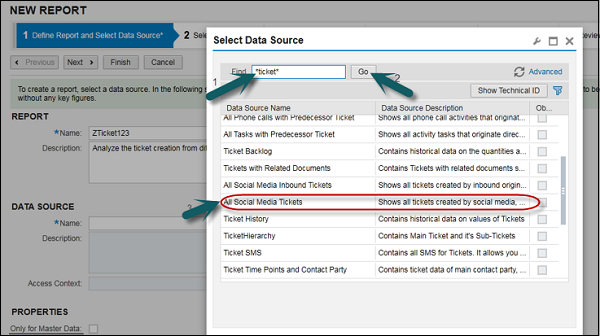
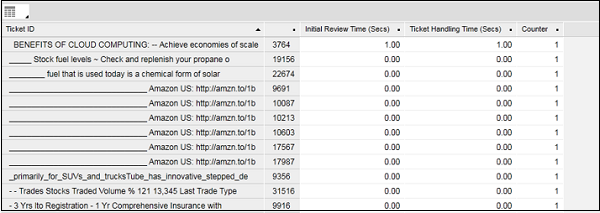
Example − Let us say you want to create a report to analyze the service ticket created from different sources like Facebook, Twitter or via mail. Let us say name it as- ZTicket123.
Enter the description- Analyze the ticket creation from different sources like FB, twitter, email.
Step 4
Select Data Source. You have to select the data source as per the requirement. Data source contains the fields that are required in report. To add data sources, you should have the knowledge of the data source you are using.
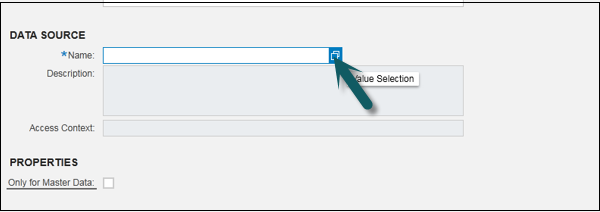
In this scenario, I have selected data source- All Social Media Tickets as it contains the fields that require in the report.
Step 5
To select the data source, type ticket and click Go → All Social Media Tickets. Click Next at the top.
Step 6
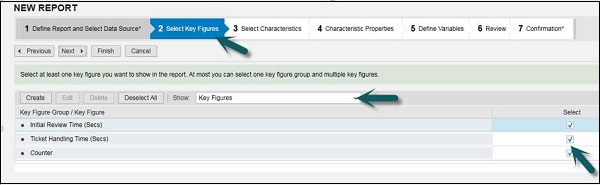
Click Select key figures. You can use the check boxes to select the key figures as per requirement. Once you select the key figures, click Next.
Step 7
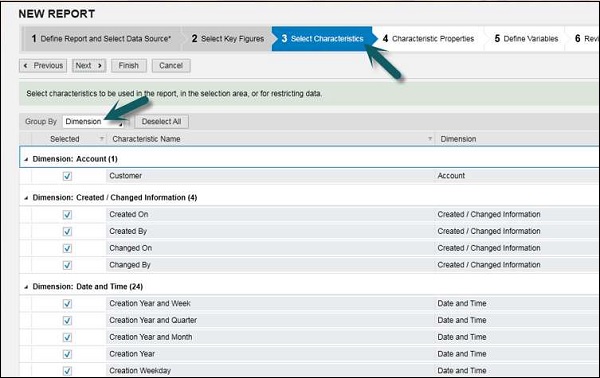
Select Characteristics can help you in selecting the characteristics as per the needs. These fields will be available in the report. You can select all or deselect all. Click Next.
Step 8
The next step is to maintain the Characteristic Properties. Click Characteristic Properties. Characteristic Properties includes properties that you want to display in your report.
You can see four tabs for each property- General, Display, Value Selection and Hierarchy.
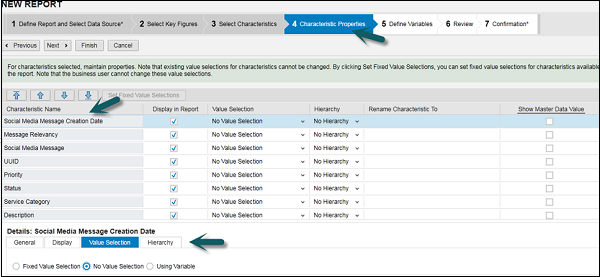
Once you select the property, click Next.
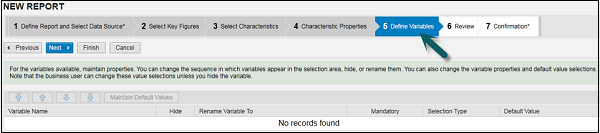
Step 9
Click Define Variables. Enter the variable values. If you select variable value selection for any of the property, you need to define variable in this step. Click Next.
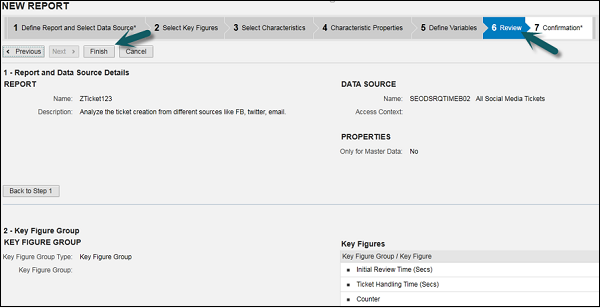
Step 10
Under Review tab, you can review all the fields that are defined for report creation. You can see a summary of key figures, characteristics and properties and any variable values that have been selected in previous steps.
You can also view Data source details- like data source name and description.
Select Key Figures group. Once you review all the fields, click Finish.
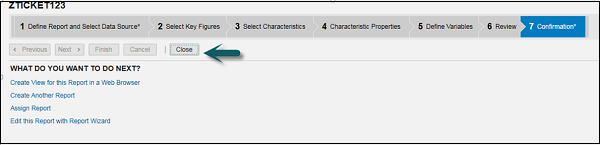
Step 11
Under the Confirmation tab, you will get the confirmation that the report is created. Click Close. You also get different options to create a new report, assign view to this report, etc.
View Created Report
To search for a report, follow the steps given below.
Step 1
Go to Business Analytics → Enter the Report Name → Go.
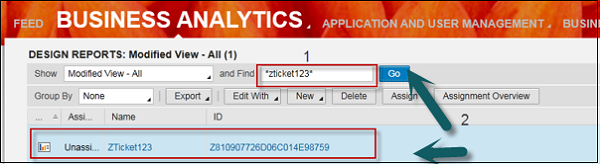
Step 2
Select the report that you have created. On the left side, you can see the following fields −
Columns − It shows the Key figures that you have selected.
Rows − It shows the fields that we have required.

Step 3
Select Not Currently Shown. It shows all the fields that you have selected under characteristics at the time of report creation and you can select fields, which you require in the report. Drag those fields to the rows. To move any field you can drag or click the arrow at the corner of each field and select Move to Rows.
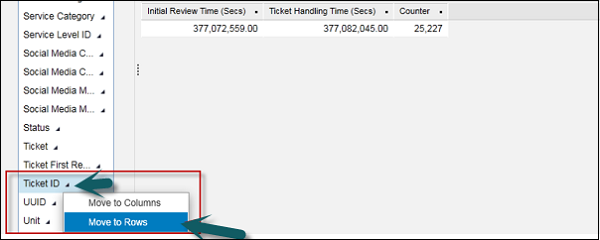
Step 4
Once you add all the characteristics under rows, you can view the report.
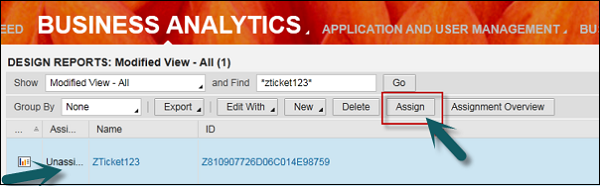
Step 5
To assign a report to the work center, select the report and click Assign.
SAP C4C - Data Sources
When standard data sources are not able to fulfill your reporting requirements, you can create custom data sources in C4C cloud environment.
There are two methods to create custom data source −
- Combined Data source.
- Joined Data Source.
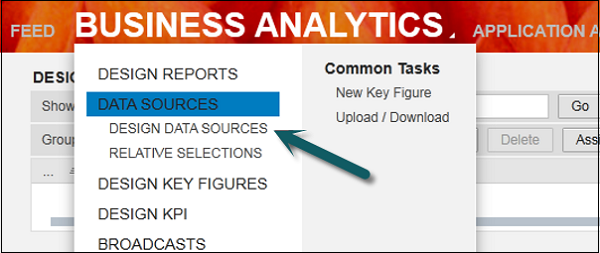
Go to Business Analytics → Data sources → Design Data Sources
When you click New, you can select the type of data source you want to create.
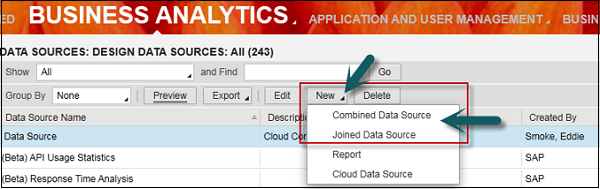
Note − Combined Data Sources only merge data from different data sources and it does not check without checking for any matches between the Data Sources.
Joined Data Sources allows you to merge the data between two or more data sources and merging results the matching of data.
SAP C4C - Service Level
In SAP Cloud for Customer, service level defines the time when a ticket for a customer must be responded and completed. Service levels help the organizations define objectives for handling customer messages. Using these, you can measure the performance and the quality of your customer service.
Service levels also help to define new rules as per the ticket category and description whenever a new customer message comes in the C4C system. Using service levels, a system can determine the service level based on those rules, and then based on that service level, the initial response and completion due time points are calculated.
Create a Service Level
Step 1
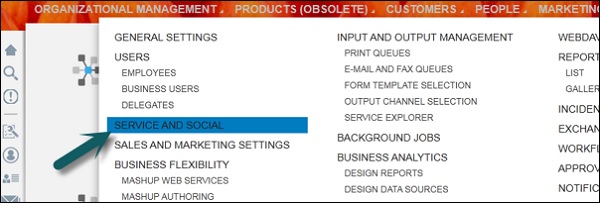
To define Service Levels, go to Administrator → Service and Social.
Step 2
Click Service Level in the next window that opens.

Step 3
Click New and select Service Level.
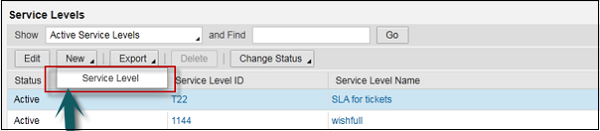
A new window will open.
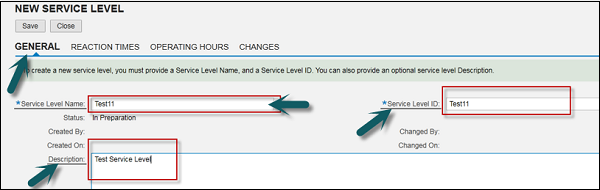
Step 4
Click the General tab. Enter the Service level Name, Service Level ID and Description.
To create a new service level, you must provide a Service Level Name, and a Service Level ID. You can also provide an optional service level Description.
Step 5
Navigate to the next tab Reaction Times. In this section, you define the time when service agent responds to the ticket.
This time depends on SLAs (Service Level Agreement) signed with the customer and also with ticket priority and type of customer.
Example − High priority ticket will have low response time or high-end customers have low response time. It means, ticket related to these customers will respond fast as compared to other ticket.
To create a milestone, click Add Row and choose the type of milestone. Select Alert When Overdue if you want the system to send an automatic alert to the responsible person when the target milestone-time point is exceeded.
Click Add Row. Select the milestone as per business requirement and click Alert When Overdue.
When you select this option, the system will send an alert to the service agent. Select the required milestones.
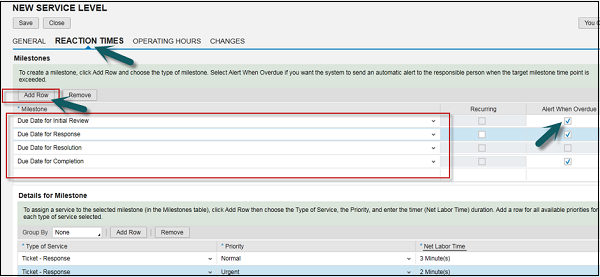
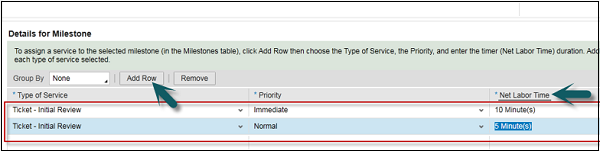
To enter the reaction time for all milestones, go to Details for milestone → Add Row. Repeat this process for all the above milestones. Select the milestones one by one and then enter the reaction time for these milestones.
To assign a service to the selected milestone (in the Milestones table) click Add Row. Choose the Type of Service, the Priority, and enter the timer (Net Labor Time) duration. Add a row for all the available priorities for each type of service selected.
Step 6
Navigate to Operating Hours tab. Operation hour is the working hour of the service agent, i.e., from what time to what time an agent is available.
Select the working day calendar. Enter the days of week of working of a service agent. Click Add Row and then select the checkboxes for the required days of week. Enter the time ranges.
Click Add Row and enter the start time and the end time of the working hours of the service agent.

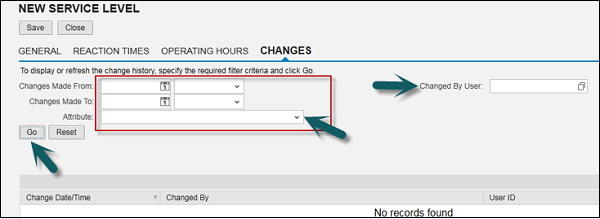
Step 7
Navigate to the Changes tab. You can see all the changes that you made in the SLA over the time. Select different available criteria and click Go.
To display or refresh the change history, specify the required filter criteria and click Go.
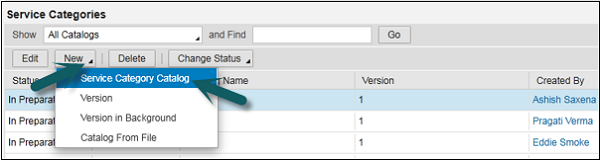
SAP C4C - Service Category
Service categories allows you to create and organize service categories and incident categories within service category catalogs. These categories are used throughout the system to capture consistent information, to allow reporting and benchmarking, and determining service level assignments.
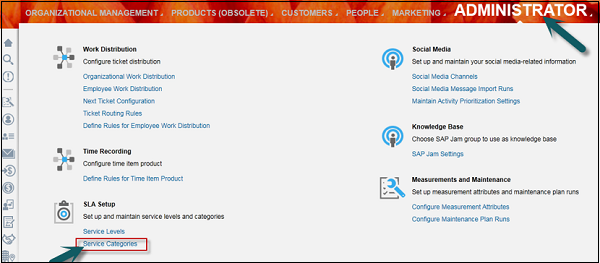
To maintain Service Category, go to Administrator → Service and Social → Service Categories
A new window opens. Go to New and select Service Category Catalog.
SAP C4C - User Managament
In SAP C4C, user management deals with maintaining the employee records in a system and creation of users and business roles. As per the business roles, you can assign different access rights and data restrictions to the users.
Create an Employee
To create an employee in the C4C system, follow the steps given below.
Step 1
Open Silverlight UI, Go to Administrator → click Employees.
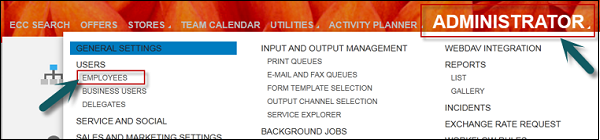
A new window opens.
Step 2
To create a new employee, click New → Employee.

Step 3
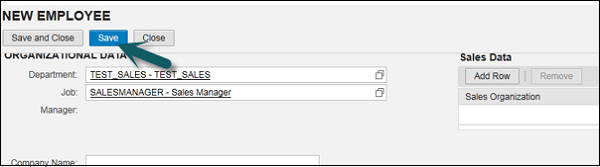
Enter all the fields in Employee like name, gender, preferred language, validity, Organizational data, Address etc.
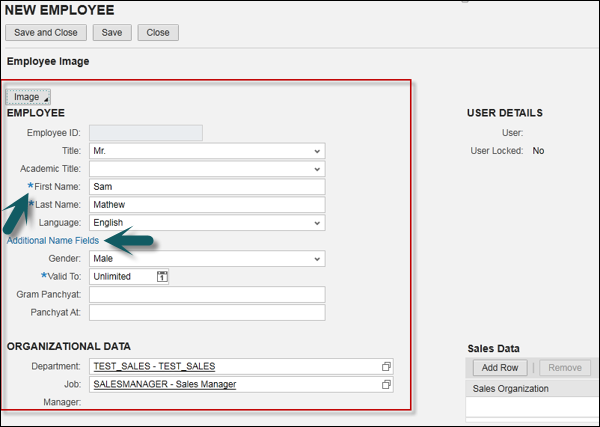
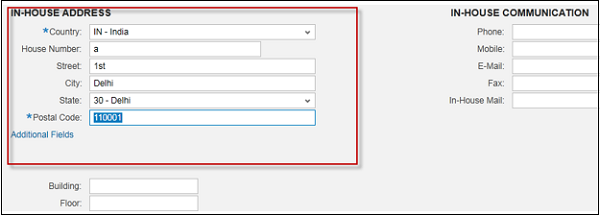
Step 4
Click Save.
SAP C4C - Business Roles
You can create business roles and assign them to work centers to perform their job functions. To help standardize system access, business roles can be created. This enables you to predefine access rights in the form of a template, so that you can assign them to multiple business users, who perform similar business tasks.
Create Business Roles
Follow the steps to create business roles.
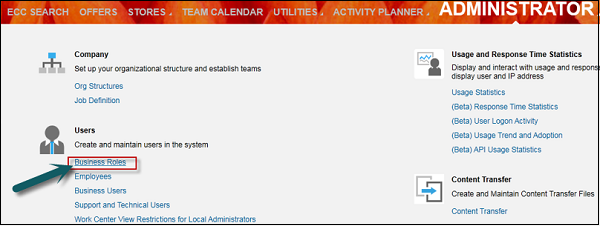
Step 1
To create Business roles in C4C system, go to Administration → General Settings.

Step 2
Click Business Roles.
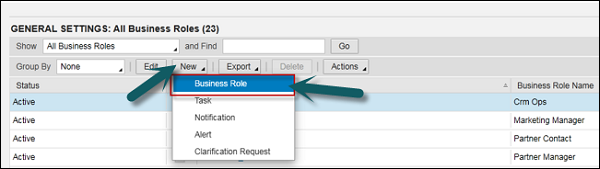
Step 3
Click New. Select Business Roles.
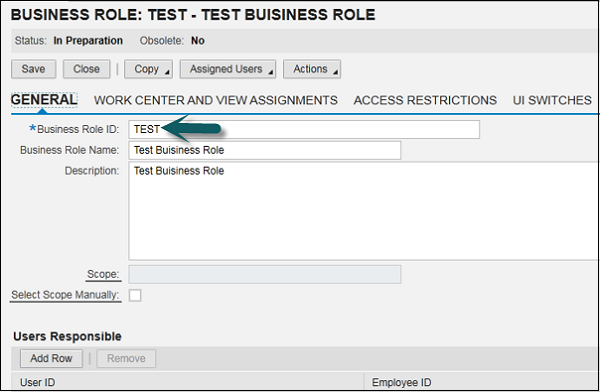
Step 4
Enter all the required fields like Business Role ID, Business Role Name, and Description etc.
Step 5
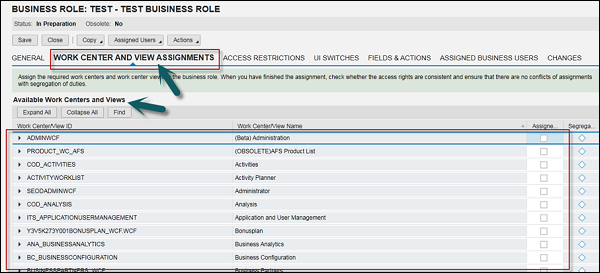
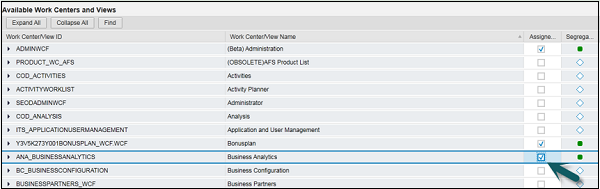
Click Work center and View assignments, select work centers as per the requirement.
Assign the required work centers and work center views to the business role. When you have finished the assignment, check whether the access rights are consistent and ensure that there are no conflicts of assignments with segregation of duties.
Step 6
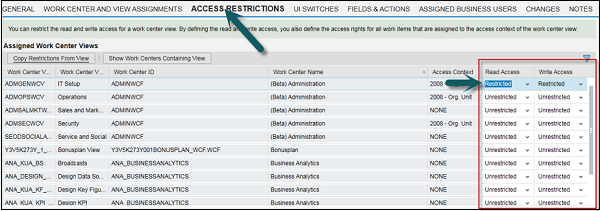
Navigate to access restrictions, enter values for read access and write access. You can restrict the read and write access for a work center view. By defining the read and write access, you also define the access rights for all work items that are assigned to the access context of the work center view.
Step 7
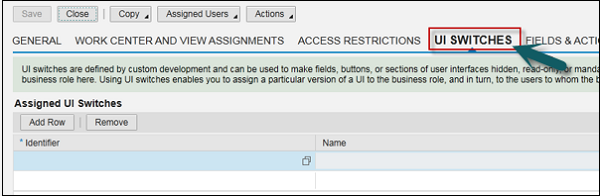
Navigate to UI Switches. UI switches are defined by custom development and can be used to make fields, buttons, or sections of user interfaces hidden, read-only, or mandatory. You can assign any UI switches that have been developed to the business role here. Using UI switches enables you to assign a particular version of a UI to the business role, and in turn, to the users to whom the business role is assigned.
Step 8
Navigate to Fields & Actions. If you want to make certain fields read only or hidden for a user, you can make these settings here and then assign a business role to the user. In the same way, you can also disable certain actions for a user.
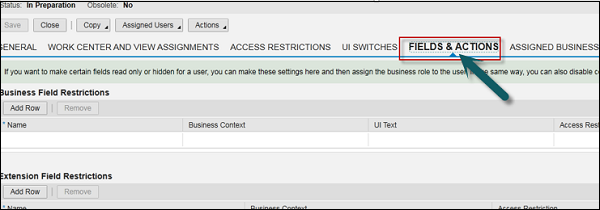
Step 9
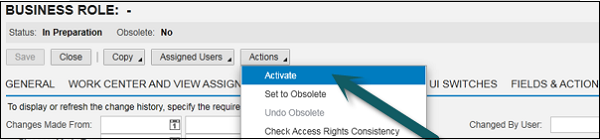
Click Action and select Activate. Click Save.
After creating the template, you can directly assign it to the user or copy the access rights directly from an already existing user. The specified Work Center and views will be automatically populated.
This is a time-saving and an easy way to cope with a large number of users.
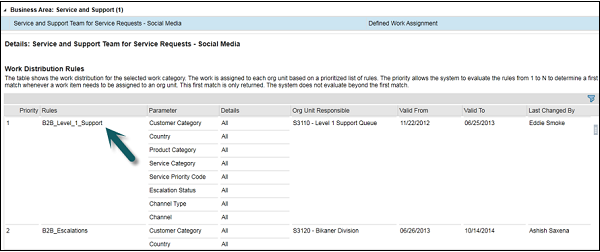
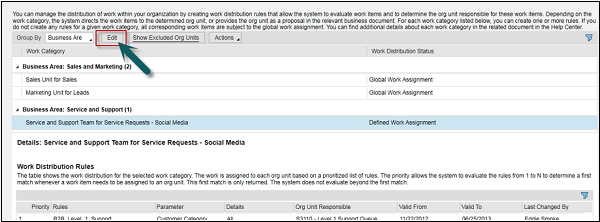
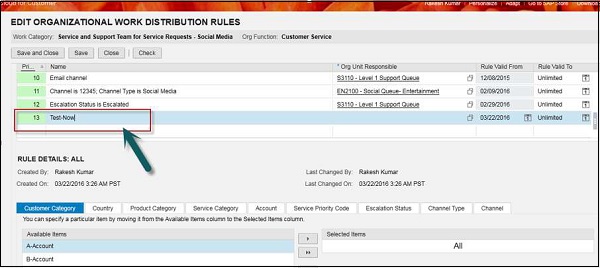
SAP C4C - Work Distribution
In SAP C4C, work distribution is used to route the tickets to particular teams or agent queues. By default, all incoming customer service tickets are visible to all business users with the corresponding access rights.
Organizational Work Distribution and Employee Work Distribution enable you to manage the distribution of customer tickets within your service organization. You create rules that allow the system to evaluate the tickets and distribute them to the responsible team or the responsible processing agent.
You can manage the distribution of work within your organization by creating work distribution rules that allow the system to evaluate work items and to determine the organization unit responsible for these work items. Depending on the work category, the system directs the work items to the determined organization unit, or provides the organization unit as a proposal in the relevant business document.
For each work category listed below, you can create one or more rules. If you do not create any rules for a given work category, all corresponding work items are subject to the global work assignment. You can find additional details about each work category in the related document in the Help Center.
Create Work Distribution
Following are the steps to perform work distribution.
Step 1
To perform work distribution, go to Administration → Organization Work Distribution
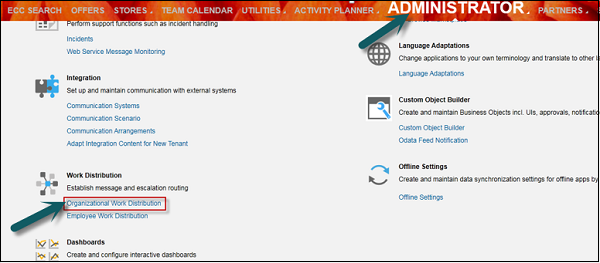
Step 2
Navigate to Service and support team for service requests - Social Media. You can do organizational work distribution for service and support team for service request ticket from social media channel.
You can also perform Organizational work distribution for sales unit for sales transaction and leads for marketing unit.
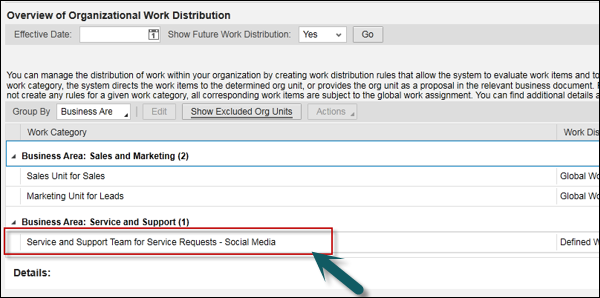
The table shows the work distribution for the selected work category. The work is assigned to each organization unit based on a prioritized list of rules. The priority allows the system to evaluate the rules from 1 to N to determine a first match whenever a work item needs to be assigned to an organization unit. This first match is only returned. The system does not evaluate beyond the first match.
Step 3
Navigate to Edit option.
Step 4
You can edit the rules associated with the selected work category. Each rule displays its name and the organizational unit that is responsible for the work contained in the work category. You can display all changes made to the rules in the Changes view.
If you change a rule that begins before the effective date, this rule will be delimited from the day before the effective date. A new rule will be created by the system with the same values and changes already entered by you. This new rule is then applicable from the effective date.
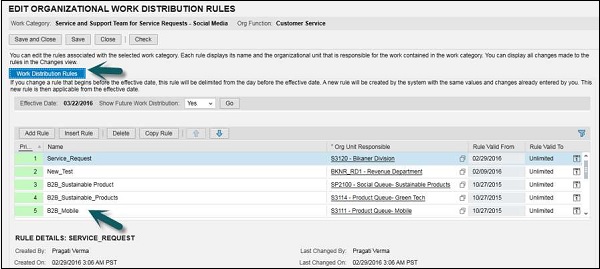
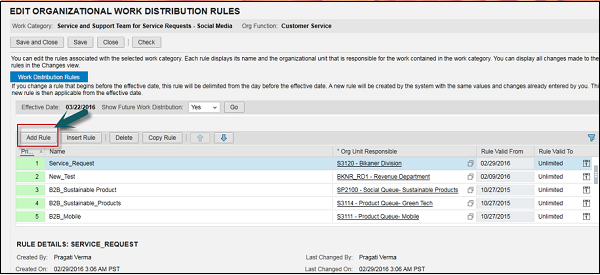
Step 5
You can create a new rule here. Click Add Rule.
You have options −
Add Rule − To create new rule,
Insert Rule − To insert the existing rule.
Delete Rule − To delete the existing rule.
Copy Rule − To copy an existing rule.
Step 6
Enter the name of the Rule. Example- Test-Now.
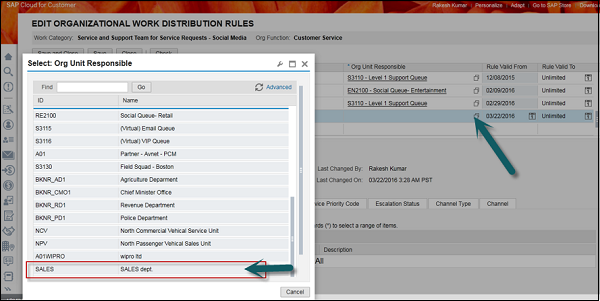
Step 7
Select the desired Organization unit.
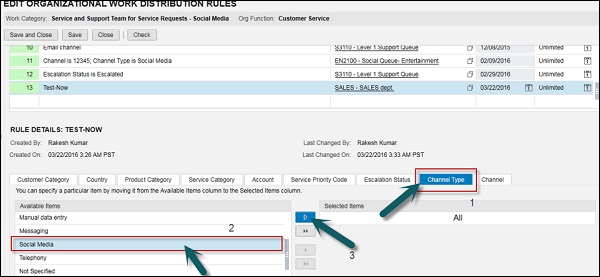
Step 8
The next step is to enter the condition. You can have multiple options for entering the conditions to make a Rule. Like customer category, Country, Product category, service category, account, service priority code, escalation status, Channel type, Channel.
You can select channel type and select Social media channel. That means all the tickets from Social media will directly go to the Sales Department organization unit.
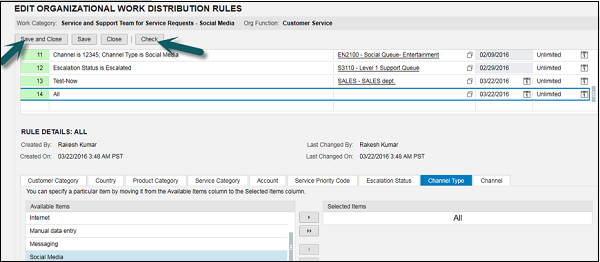
Step 9
Click the Check button. It will check for any inconsistency. Click Save.
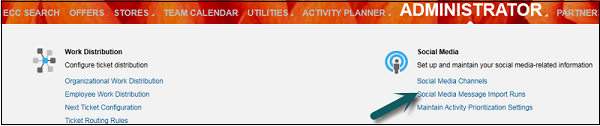
SAP C4C - Social
You can use SAP C4C for Social Engagement to deliver a great customer experience by listening to and engaging with your customer using social media.
You can also coordinate within your team and across the organization to resolve issues that are opened by customer efficiently and effectively.
You can perform the following configuration activities related to SAP C4C for Social Engagement −
- Setting up channels.
- Setting up import runs.
Setting up Channels
Following are the steps to set up a channel −
Step 1
Go to Administration → Service and Social.
Step 2
Navigate to Social Media → Social Media Channels.
Step 3
To create a new social media channel, click New.

You have multiple options to integrate the channel with Facebook, Instagram, Twitter, You Tube and SAP social media analytics.
Step 4
You have two options to connect with Facebook −
Option 1 − If you know the App ID and APP Secret of Facebook page, you can maintain it manually.
Option 2 − Click Connect with Channel. It will directly redirect you to the Facebook page; you need to enter your face book login credentials.
Step 5
Enter your Facebook credentials.
In a similar way, you can create import runs under Social Media → Social Media Message Import runs.
SAP C4C - Data Migration & Workflow
In SAP Cloud for Customer C4C, data migration feature enable you to transfer your legacy data using predefined templates. You can transfer your important data from one system to other.
Data Migration
Follow the steps given below −
Step 1
Navigate to Business Configuration → Open Activity List.
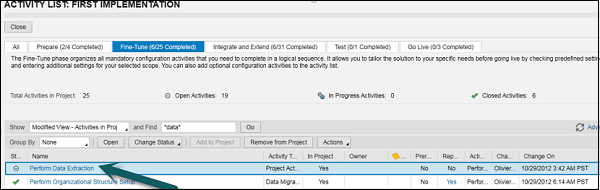
Step 2
Under the Fine tune tab, enter *data* in the find field. Click Go.
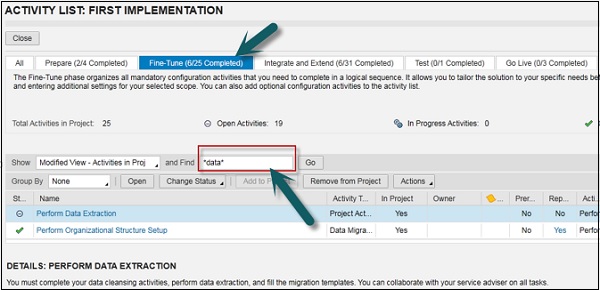
You have the following two options under Fine Tune −
- Perform data extraction.
- Download Migration template.
You can select download migration template. Migration templates are used to collect and prepare your legacy data for migration to your SAP cloud solution. There is a unique migration template for each migration activity.
To download single template, click Download. To download several templates, select the templates and click Download to ZIP File. Afterwards, carefully read the filling instructions in the migration template.
Work Flow
In SAP C4C, you can define and activate rules for updating the fields and set up notification automatically. When a condition is met, the field update automatically change the value of fields.
You can set the notifications to the users to inform that an item has been changed and a task has been completed successfully. If you set up email notifications, they can also be sent to customers.
Example − When a ticket status has been changed, you can configure a notification to user.
When you define workflow rules, you specify basic data for each rule, the conditions under which the rule is invoked, and a field is updated, or a notification is sent, and in the case of a notification, the list of recipients.
You can define workflow rules for automatic field updates for the following items −
- Accounts
- Contacts
- Opportunities
- Tickets
Example − Creating a rule for sending the notification to the agent responsible. The ticket is created with priority urgent in the system.
Creating Workflow Rules
Let us see how to create a rule for sending the notification to the agent responsible when a ticket is created with urgent priority in the system −
Step 1
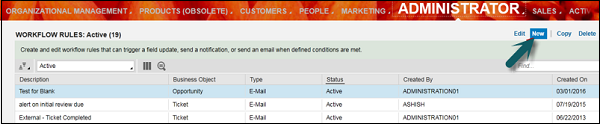
Navigate to Administration → Workflow Rules.
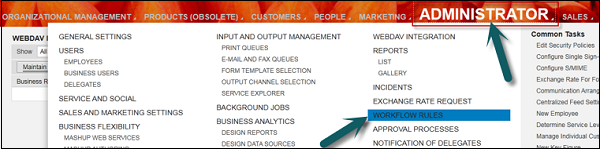
Step 2
To create a new rule, Click New.
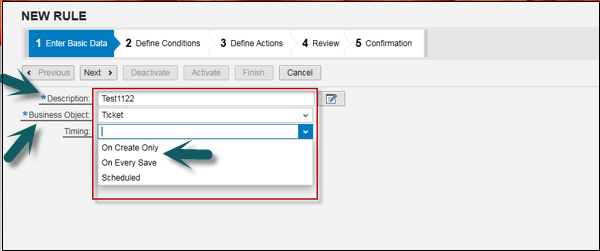
Step 3
In the new window, enter the following details −
Enter Basis data − In this field, you maintain the basic data, maintain description, business object and timing.
Business Object − Select the business object, which is required for your objective.You can select Business object is Ticket, because you are creating a workflow rule for ticket.
Timing − Timing means when the workflow rule should execute. You can select from the following three options.
On Create only − If you select this option, at the time of ticket creation, workflow will work.
On Every Save − This means when you save the ticket, workflow will work.
Scheduled − This option allows you to schedule the time and at the scheduled time, workflow will work. Click Next.
Step 4
Click Add Group.
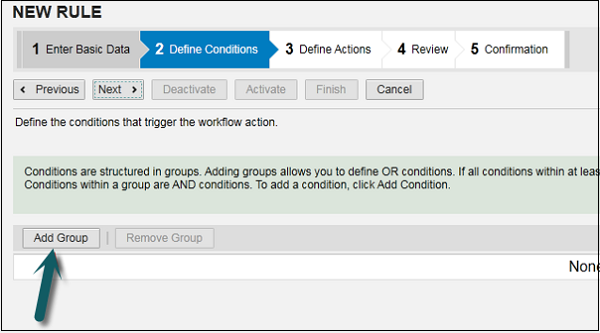
Step 5
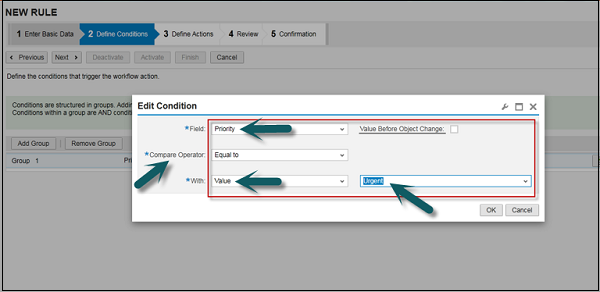
Conditions are structured in groups. Adding groups allows you to define OR conditions. This means when all the conditions within at least one group are met, the overall condition is fulfilled.
Conditions within a group are AND conditions. To add a condition, click Add Condition. Maintain all field as per your need. You will set the condition on priority as urgent.
Once you define the condition, click Next.
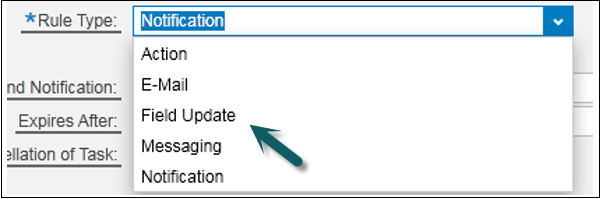
Step 6
In the next window, enter the action. You have multiple option of actions. You can select from the following actions −
- Field Update
- Messaging
- Notification
Step 7
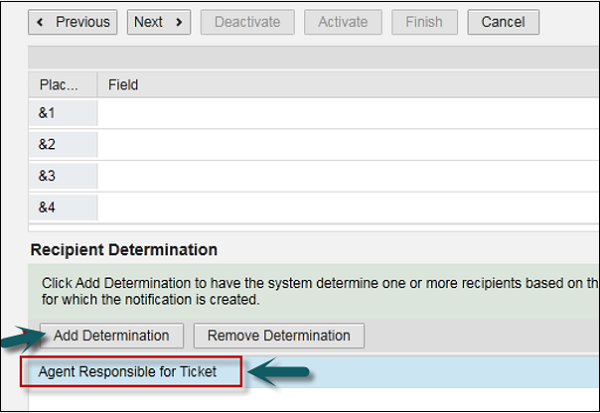
Click Add Determination to have the system determine one or more recipients based on the business object for which the notification is created.
Click Add Determination and Select Agent Responsible for ticket from the drop down list.
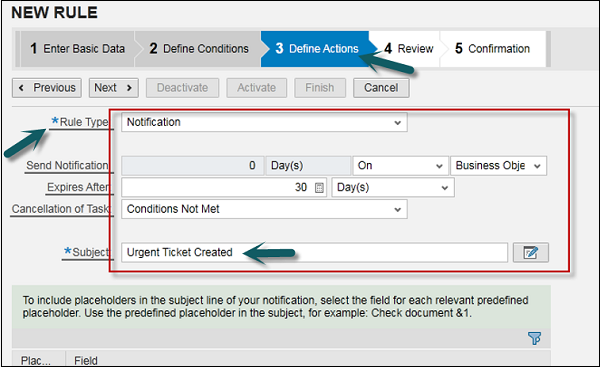
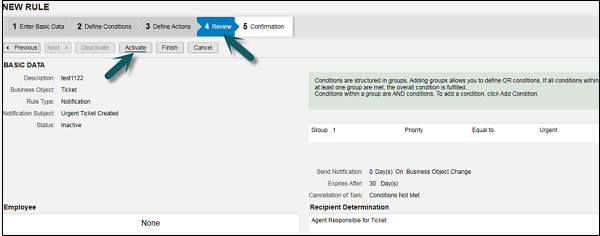
Step 8
Review the rule and click the Activate button as shown below −
SAP C4C - Pricing
Pricing in C4C depends on price master data, which is derived from Price master list. Price master data is maintained in Products work center.
SAP C4C for sales contains a list of predefined list of elements and you can activate them under the scoping phase of project implementation.
To view Price List, go to Product work center → Price List.

You can create, maintain and mass update price master data such as price lists and discount lists.
SAP C4C - Sales Cycle
In SAP C4C, a sales cycle consists of all key activities under the Sales process such as −
- Sales Order
- Sales Quotes
- Sales Lead
Sales Quotes
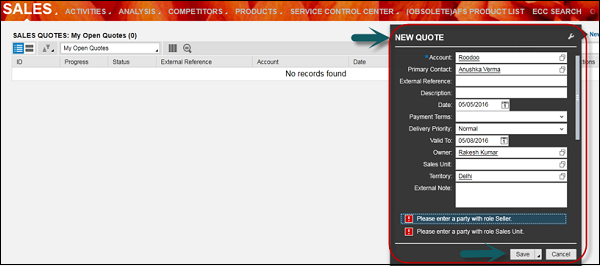
Sales quotes is used to offer products to the customers as per specific terms and fixed conditions. A sales quote bounds the seller to sell products for a specific period of time and price. Sales agents are responsible for the creation of sales quote in a company.
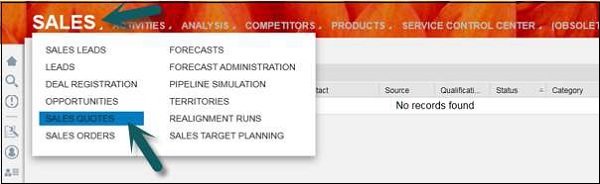
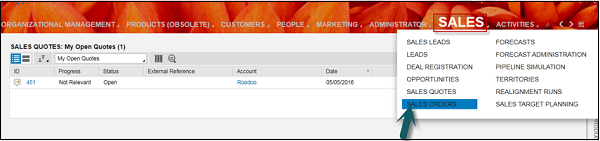
Step 1
Navigate to Sales work center → Sales Quotes.
Step 2
Click New to enter account/customer data for creating sales quotes. Once you enter all the details, click Save.
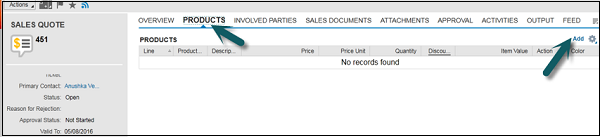
Step 3
In the next window, under the Products tab, click Add. You can add the product that you are selling to the customer in this tab.
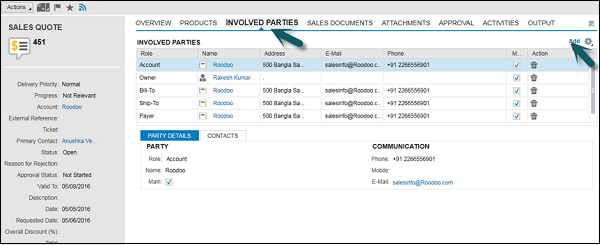
Step 4
Go to Involved Parties tab, you can add all the parties involved to execute the transactions such as- bill to party, ship to party, sold to party etc.
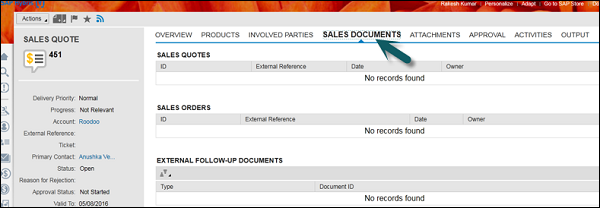
Step 5
Go to Sales Document. You can get the details of all the sales documents (sales quotes, sales order etc.) that are related to this sales quote. If your sales quote is created with reference to some other sales document, you can see the details in this tab.
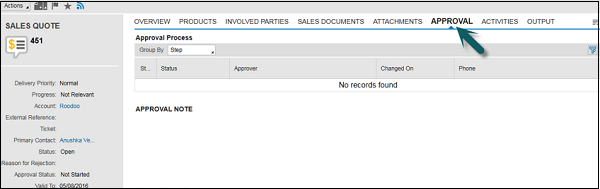
Step 6
Go to the Attachment tab, you can attach any other external documents. Go to the Approval tab, you can see the approval process like approval required from senior to process this sales quote, etc.
You can also see the status here pending, approved, rejected etc.
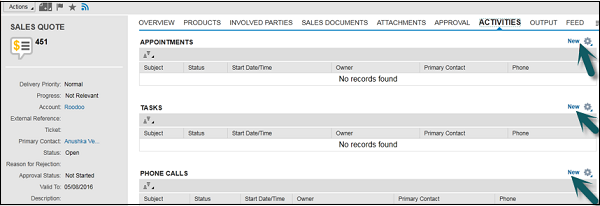
Step 7
Navigate to the Activities tab. Create activities related to the sales representative like create an appointment through phone calls, e-mails etc.
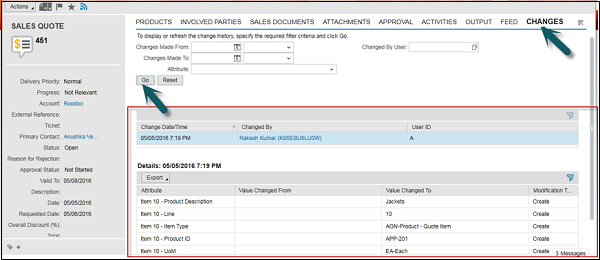
Step 8
Under the Changes tab, click Go. You can see all the changes made in this sales quote by all the user on different times on this sales quotes. You can get to know what all changes that has made to this sales quote.
Sales Order
Sales order is defined as a document that is sent to the customer for delivery of goods and services. Sales order is generated when a customer accepts a sales quote.
A sales order is an internal document of a company. To create Sales order follow the steps given below −
Step 1
Go to Sales Work Center → Sales Order.
Step 2
To open a new sales order, go to New. In the new window, you need to enter all the details and click Save.
Step 3
In the new window, enter the details such as- Products, Involved Parties, Approval, Activities, Attachments and Changes.

SAP C4C - Retail
SAP C4C Retail allows retail stores to provide their customer with personalized shopping experience by suggesting recommended products and easy check out options. Using SAP C4C Retail, a retail store employee can import all user details, offers and in-store products from C4C system and use it to emphasize great store experience.
A SAP C4C Retail store agent can perform the following functions −
Customer View − An agent can check and view the past order details of a customer and hence provide personalized service by recommending a few products.
Customer Check-In − The customer checks in to the store for shopping.
Customer Look up − Retail agent can look up for the details of any customer who walks in to the store, his loyalty status, contact details, etc.
Product Recommendation − Sales agent can recommend products to the customer as per his or her wish list.
Product Look up − Retail agent can look up the products for customers and provide details like prices, offers and location of products in store.
Availability Check − C4C Retail agent can perform the availability check for specific products in their stores as well as other store locations.
SAP C4C Retail targets tow business roles in managing customer relationship management −
- Store Associate
- Store Manager
You can look up the customer details to get a better understanding of customer preferences to serve them better.
Step 1
Navigate to Customers Work Center → Individual Customers.

Step 2
You have an option of searching for the customer by name, loyalty ID, phone number, email address, or postal address.
Step 3
Once you find the customer, click the name in the customer list.
If retail is scoped, you can view retail-specific work centers such as overview, preferences, shopping lists, shopping history, and offers.
Step 4
You can move on to the Preferences tab to display consumer maintained preferences. Based on the preferences, you can also suggest products guide them to where the products are located in the store.

Shopping List
In SAP C4C Retail, a Shopping List tab shows all the shared shopping lists a customer has maintained in his account. You can define a shopping list as shared list or wish list that a consumer maintains and shares with other members of the household.
A customer can also invite other members of household to edit the shared list by giving access to shopping list. Every time a household member enters items into the shared list, after updating the list, the added items display in the list.
C4C Retail agent can access a customers shopping list that allows agents to provide personalized and exceptional customer service.

SAP C4C - Integration with CRM & ERP
Many companies has an on premise solution that contains master data, customer and product information, and pricing data. Details from SAP ECC system is required when opportunities are won and sales order is generated.
Following are the key reasons why an integration is required with SAP ERP and CRM system −
To provide an organization level solution for all sales, marketing and service activities including all subsidiaries, sales offices.
Many companies prefer as SAP Cloud solution for customer user experience that helps sales representatives to provide outstanding customer experience and SAP CRM as back end system to support key activities.
An organization wants to extend existing CRM platform to new users.
SAP CRM system is up and running smoothly but the company wants to switch over to cloud solution for managing new deployments and releases.
To replace existing cloud SFA solution with SAP Cloud for Customer.
SAP provides standard integration scenarios for integration with SAP ERP and SAP CRM. Integration with ERP and CRM is very common.
Integration with ERP
Two common integration scenarios that are prepacked with cloud solution are −
- SAP NetWeaver Process Integrator.
- SAP HANA cloud Integration HCI.
SAP HANA Cloud Integration is SAPs cloud middleware that can be used for Integration. It is a cloud option of the customers who do not currently have an integration middleware. The integration middleware enables the customization of the integration as well as design of new integration scenarios.
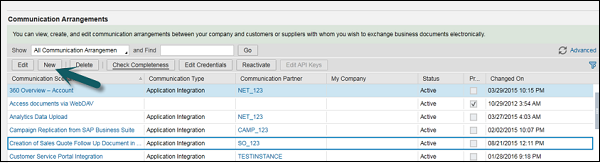
Create Communication System in C4C
Following are the steps to create communication system in SAP C4C.
Step 1
Navigate to Administration work center → Communication system → New.
A new window - New Communication System opens.
Step 2
Enter ID, system access type and system Instance ID. Enter other fields as per the requirement.
Select SAP Business Suit if you are creating communication system for integrating SAP on premise system (SAP ECC or SAP CRM) with SAP C4C.
Enter Business System Id, IDOC logical Systems Id, SAP Client, Preferred application protocol. These are on premise data. Therefore, we need to get this information from on premise system to enter here.
Click Save.

Step 3
The next step is to enter the details in Communication Arrangements.
Step 4
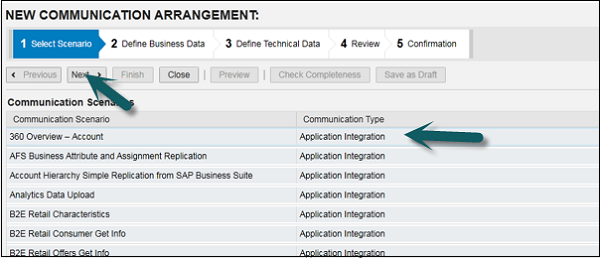
Click New.
Step 5
A new window New Communication Arrangement will open. You need to select the communication scenario from the list as per the requirement. You have to select an account, as you want to replicate accounts from on premise system to SAP C4C system.
Under the Select Scenarios tab, select the communications scenario for which you want to create a communication arrangement and click Next.
Based on the communication scenario you selected, the system presets the fields in the next steps with default values. You can change the values, if necessary.
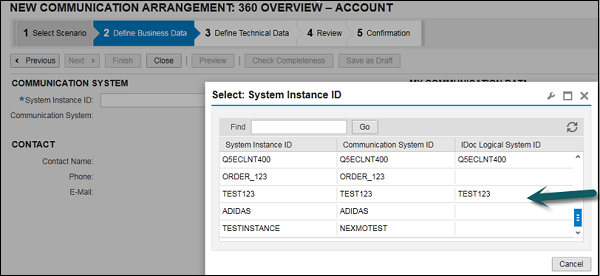
Step 6
Under Define Business Data, select system instance id. Click Value selection.
If you have selected a B2B scenario, enter the ID of the business partner and select the associated Identification type.
Select the communication system that we have created from the list and click Next.
Step 7
In the Define Technical Data step, define the technical settings for inbound and outbound communication. Enter the application method and Authentication Method → Next.

Step 8
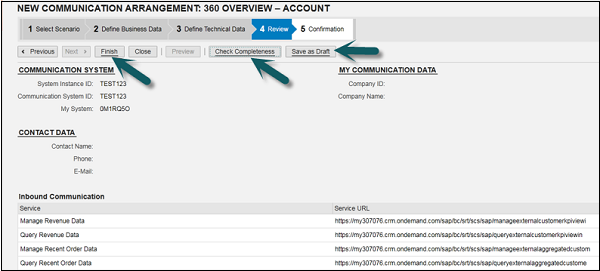
In the Review step, review the data you entered in the previous steps.
To ensure that all data is correct, click Check Completeness.
To create and activate your communication arrangement in the system, click Finish. You can also save an inactive version of the communication arrangement by clicking Save as Draft.
You can also create new communication scenario by going to Administrator work center → Communication scenario.
SAP C4C - Integration with Outlook
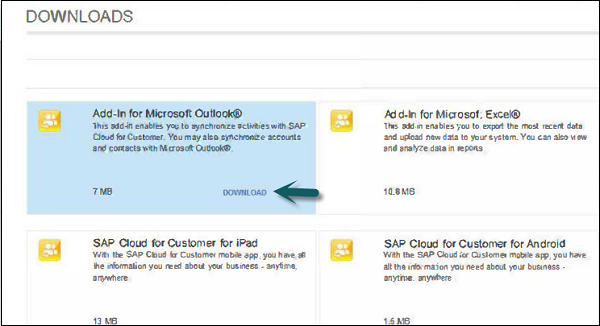
In SAP C4C, you can also integrate your cloud solution with your email using Add In for Microsoft Outlook to support sales, service and marketing scenarios.
To ensure integration between C4C and Outlook, you need to ensure scoping is selected at the time of project implementation.
All users who wants to use SAP C4C with Outlook, they should install Add-in on their computers. Add in can be downloaded from the solution and steps should be followed in the set up wizard to complete the installation.
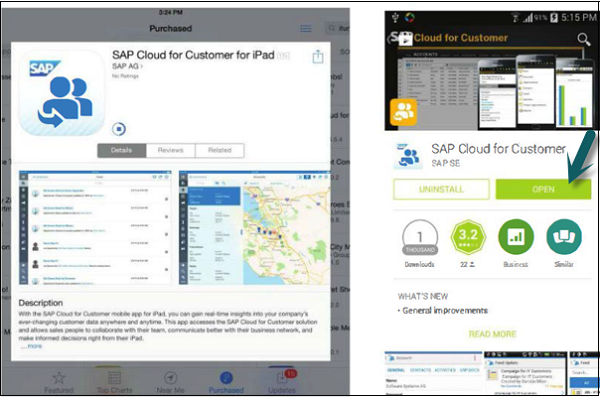
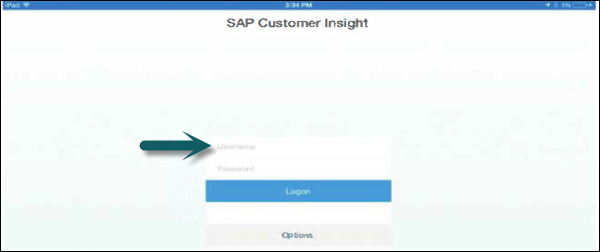
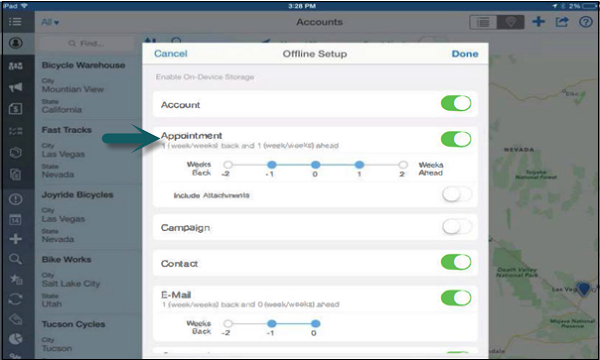
SAP C4C - Mobile
You can access SAP Cloud for Customer using native apps available for mobile devices. There are different native apps for C4C cloud platforms. Apart from the native app, you can also access cloud solution on HTML browser using client.
SAP C4C native app can be downloaded from the play store.
To set up the connection, you have to enter system URL under settings. Enter user name and password.
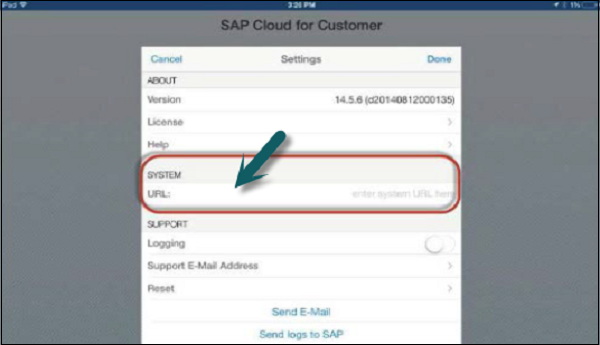
You can access different components- Appointment, Campaign, contact, email, etc.
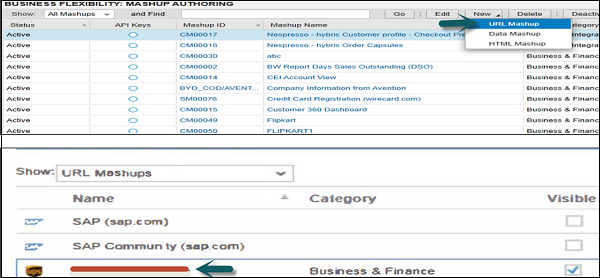
SAP C4C - Mashups
In SAP C4C, you can integrate data from applications and online web services using mashups. There are various preconfigured mashups in the system that can be used for data integration.
- URL Mashups
- HTML Mashups
- Data Mashups
- Custom Mashups
To create a mashup in C4C system, navigate to Administration → Business flexibility → Mashup authoring.
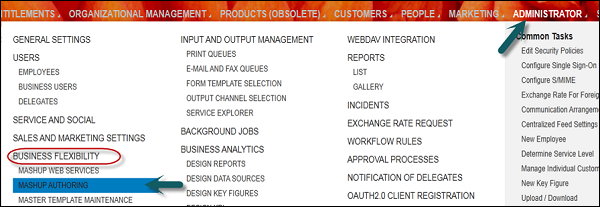
Click New, and select type of Mashup.
Enter the name of Mashup at the bottom, and active is selected. You need to enter the specific URL for tracking. Once you are done, click Save.
