- SAP C4C - Home
- SAP C4C - Introduction
- SAP C4C - Architecture
- SAP C4C - Public vs Private
- SAP C4C - User Interface
- SAP C4C - Work Centers
- Project Implementation & Scoping
- SAP C4C - Fine-Tuning
- Organizational Management
- SAP C4C - Personalization
- SAP C4C - Adaptation
- SAP C4C - Reporting
- SAP C4C - Creating a Custom Report
- SAP C4C - Data Sources
- SAP C4C - Service Level
- SAP C4C - Service Category
- SAP C4C - User Management
- SAP C4C - Business Roles
- SAP C4C - Work Distribution
- SAP C4C - Social
- Data Migration & Workflow
- SAP C4C - Pricing
- SAP C4C - Sales Cycle
- SAP C4C - Retail
- Integration with CRM & ERP
- SAP C4C - Integration with Outlook
- SAP C4C - Mobile
- SAP C4C - Mashups
- SAP C4C - Questions and Answers
- SAP C4C - Quick Guide
- SAP C4C - Useful Resources
- SAP C4C - Discussion
SAP C4C - Fine-Tuning
Before your project goes live, you need to perform fine-tuning in your project. This phase organizes all the mandatory configuration activities that you need to complete in a logical sequence.
This allows you to tailor the solution to your specific needs before going live by checking predefined settings and entering additional settings for your selected scope. You can also add optional configuration activities.
Example − You can maintain number range for different entities like product, customer etc. as per your business needs.
Fine-tune and Go Live
Follow the given steps to perform fine-tuning and go live in a new implementation project.
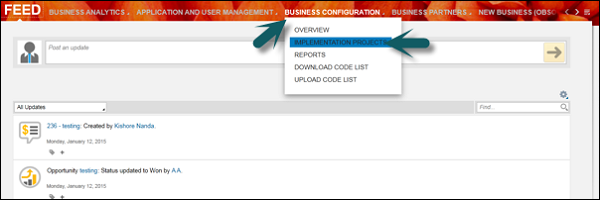
Step 1
Go to Business configuration -→ Implementation Project.
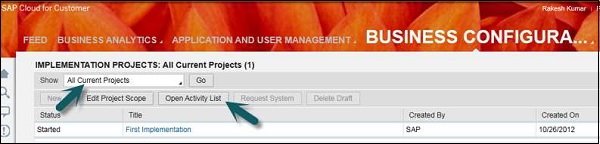
Step 2
In the new window, select All Current Projects from the drop down list and click Open Activity List.
This allows you to view all the preliminary activities you need to carry out to get your company ready to use the solution productively. The activities in this phase are mainly related to project management and include reviewing the project plan, confirming that scoping has been completed, and knowledge is transferred to the administrators. You can also create your own activities manually and add them to the activity list.
Step 3
Click the Prepare tab. Under the Prepare tab, you can see all the open activities of your current project.
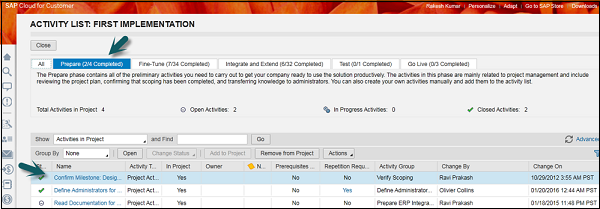
Click Total Activities under the Prepare tab. Here, you will see the count of Open Activities, In progress Activities, and Closed Activities.
Step 4
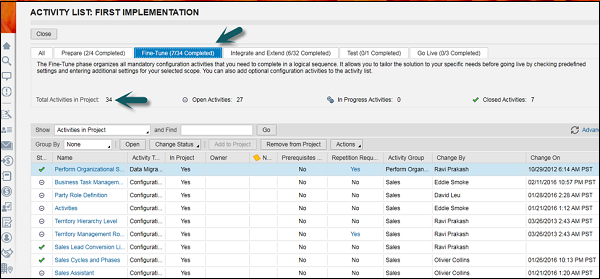
Click the Fine Tune tab. The Fine Tune phase organizes all the mandatory configuration activities that you need to complete in a logical sequence. Its allows you to tailor the solution to your specific needs before going live by checking the predefined settings and entering additional settings for your selected scope. You can also add optional configuration activities.
Step 5
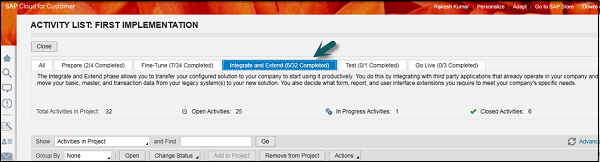
Click the Integrate and Extend tab. The Integrate and Extend phase allows you to transfer your configured solution to your company to start using it productively. You do this by integrating with third party applications that already operate in your company and move the basic, master, and transaction data from your legacy system(s) to your new solution. You also decide what form, report, and user interface extensions you require to meet your company's specific needs.
Step 6
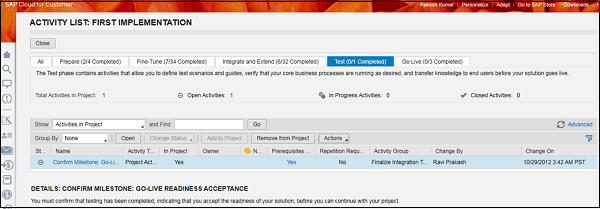
Click the Test tab. Perform unit, regression, data test, etc. under this tab. In addition, request of Production system (copy of Test should be performed). The Test phase contains activities that allow you to define test scenarios and guides, verify that your core business processes are running as desired, and transfer knowledge to the end-users before your solution goes live.
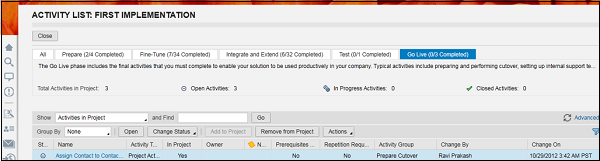
The Go-Live Phase
The Go Live phase includes the final activities that you must complete to enable your solution to be used productively in your company. Typical activities include preparing and performing cutover, setting up internal support teams, and confirming that you are ready to go live.
At the end of this phase, all mandatory and outstanding configuration issues are resolved, legacy data is migrated to the production system, knowledge transfer is complete, and the project is signed off and closed.
Step 7
Click the Launch/Go-Live tab.