- SAP C4C - Home
- SAP C4C - Introduction
- SAP C4C - Architecture
- SAP C4C - Public vs Private
- SAP C4C - User Interface
- SAP C4C - Work Centers
- Project Implementation & Scoping
- SAP C4C - Fine-Tuning
- Organizational Management
- SAP C4C - Personalization
- SAP C4C - Adaptation
- SAP C4C - Reporting
- SAP C4C - Creating a Custom Report
- SAP C4C - Data Sources
- SAP C4C - Service Level
- SAP C4C - Service Category
- SAP C4C - User Management
- SAP C4C - Business Roles
- SAP C4C - Work Distribution
- SAP C4C - Social
- Data Migration & Workflow
- SAP C4C - Pricing
- SAP C4C - Sales Cycle
- SAP C4C - Retail
- Integration with CRM & ERP
- SAP C4C - Integration with Outlook
- SAP C4C - Mobile
- SAP C4C - Mashups
- SAP C4C - Questions and Answers
- SAP C4C - Quick Guide
- SAP C4C - Useful Resources
- SAP C4C - Discussion
SAP C4C - Data Migration & Workflow
In SAP Cloud for Customer C4C, data migration feature enable you to transfer your legacy data using predefined templates. You can transfer your important data from one system to other.
Data Migration
Follow the steps given below −
Step 1
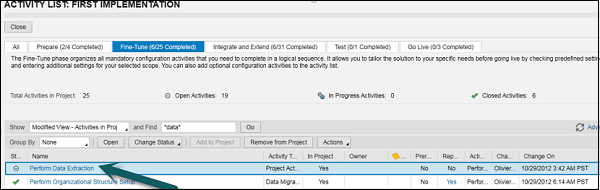
Navigate to Business Configuration → Open Activity List.
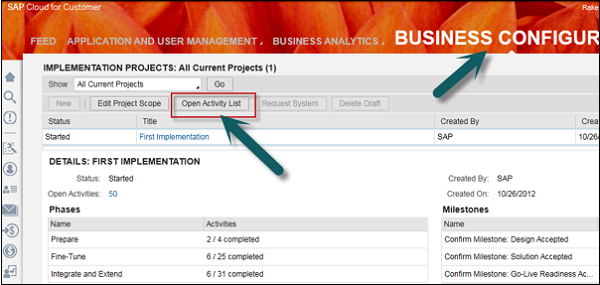
Step 2
Under the Fine tune tab, enter *data* in the find field. Click Go.
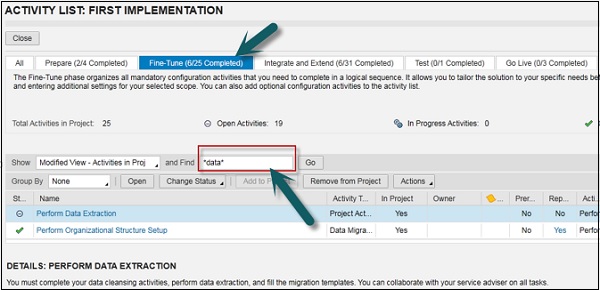
You have the following two options under Fine Tune −
- Perform data extraction.
- Download Migration template.
You can select download migration template. Migration templates are used to collect and prepare your legacy data for migration to your SAP cloud solution. There is a unique migration template for each migration activity.
To download single template, click Download. To download several templates, select the templates and click Download to ZIP File. Afterwards, carefully read the filling instructions in the migration template.
Work Flow
In SAP C4C, you can define and activate rules for updating the fields and set up notification automatically. When a condition is met, the field update automatically change the value of fields.
You can set the notifications to the users to inform that an item has been changed and a task has been completed successfully. If you set up email notifications, they can also be sent to customers.
Example − When a ticket status has been changed, you can configure a notification to user.
When you define workflow rules, you specify basic data for each rule, the conditions under which the rule is invoked, and a field is updated, or a notification is sent, and in the case of a notification, the list of recipients.
You can define workflow rules for automatic field updates for the following items −
- Accounts
- Contacts
- Opportunities
- Tickets
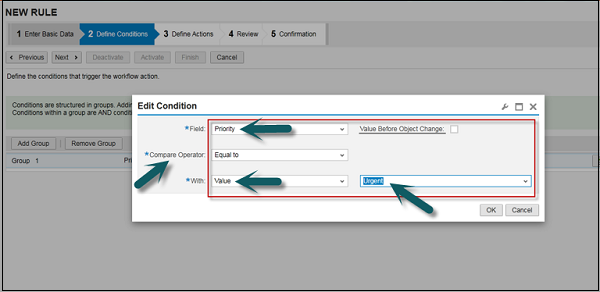
Example − Creating a rule for sending the notification to the agent responsible. The ticket is created with priority urgent in the system.
Creating Workflow Rules
Let us see how to create a rule for sending the notification to the agent responsible when a ticket is created with urgent priority in the system −
Step 1
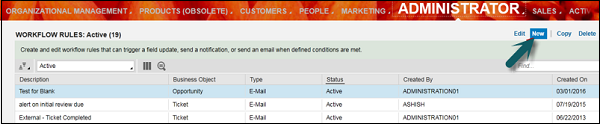
Navigate to Administration → Workflow Rules.
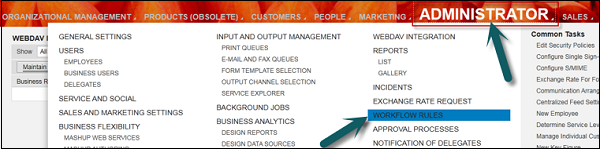
Step 2
To create a new rule, Click New.
Step 3
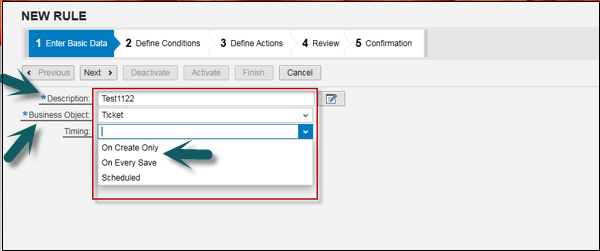
In the new window, enter the following details −
Enter Basis data − In this field, you maintain the basic data, maintain description, business object and timing.
Business Object − Select the business object, which is required for your objective.You can select Business object is Ticket, because you are creating a workflow rule for ticket.
Timing − Timing means when the workflow rule should execute. You can select from the following three options.
On Create only − If you select this option, at the time of ticket creation, workflow will work.
On Every Save − This means when you save the ticket, workflow will work.
Scheduled − This option allows you to schedule the time and at the scheduled time, workflow will work. Click Next.
Step 4
Click Add Group.
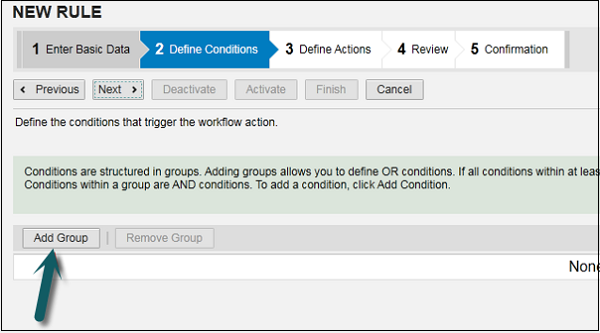
Step 5
Conditions are structured in groups. Adding groups allows you to define OR conditions. This means when all the conditions within at least one group are met, the overall condition is fulfilled.
Conditions within a group are AND conditions. To add a condition, click Add Condition. Maintain all field as per your need. You will set the condition on priority as urgent.
Once you define the condition, click Next.
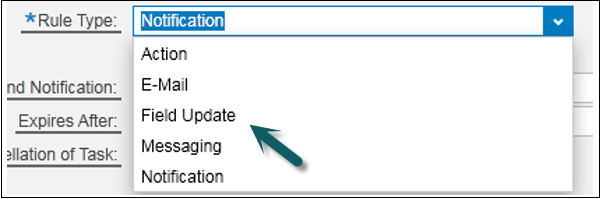
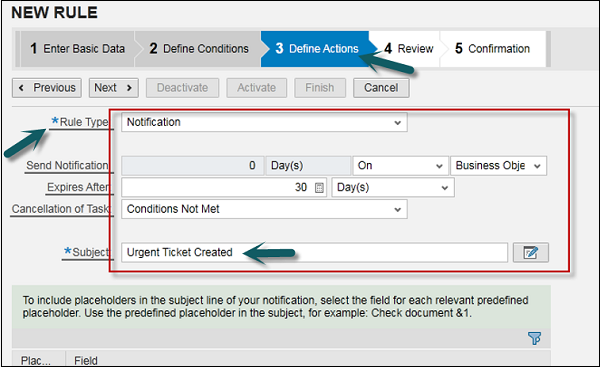
Step 6
In the next window, enter the action. You have multiple option of actions. You can select from the following actions −
- Field Update
- Messaging
- Notification
Step 7
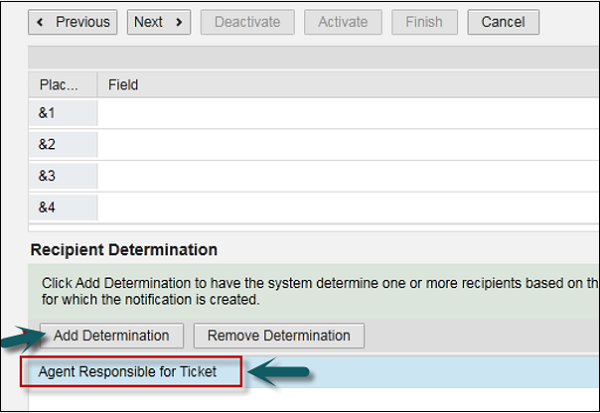
Click Add Determination to have the system determine one or more recipients based on the business object for which the notification is created.
Click Add Determination and Select Agent Responsible for ticket from the drop down list.
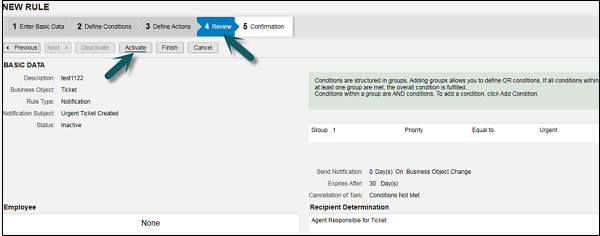
Step 8
Review the rule and click the Activate button as shown below −