- Mantis - Home
- Mantis - Introduction
- Mantis - Features
- Mantis - Installation
- Mantis - Trial Setup
- Mantis - Login
- Mantis - My View
- Mantis - Project Management
- Mantis - Manage Categories
- Mantis - Versions
- Mantis - Issue Lifecycle
- Mantis - Report an Issue
- Mantis - Import Issues
- Mantis - View Issues
- Mantis - Edit Issues
- Mantis - Clone an Issue
- Mantis - Advanced Features
- Mantis - Change Status
- Mantis - Issues Relationships
- Mantis - Move an Issue
- Mantis - Issue History
- Miscellaneous Functionalities
- Mantis - Search Issues
- Mantis - Change Log
- Mantis - Roadmap
- Mantis - Summary
- Mantis - Add Custom Fields
Mantis - View Issues
In the View Issues section, the user can view all the reported bugs for a project. The user can filter out to narrow down the search and export all issues and print reports. All of the major functionalities of Issues can be accessed through View Issues.
We will discuss all of these functionalities in different chapters. In this chapter, we will discuss about Filters, Export and Print Reports.
Filters
To use filters in View Issues, following steps should be performed −
Step 1 − Click View Issues from the left Menu.
In the first half, the filter section displays where the user can set various filters.
Step 2 − To set a filter, click Field name. For example: Reporter in this case. It will display the available dropdown list to select.
Step 3 − After the selection of other filters as well, click Apply Filter to search the result as shown in the following screenshot.
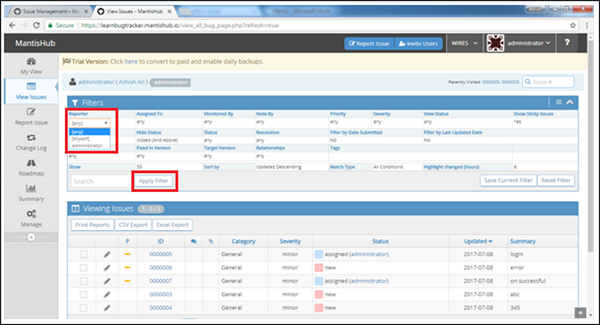
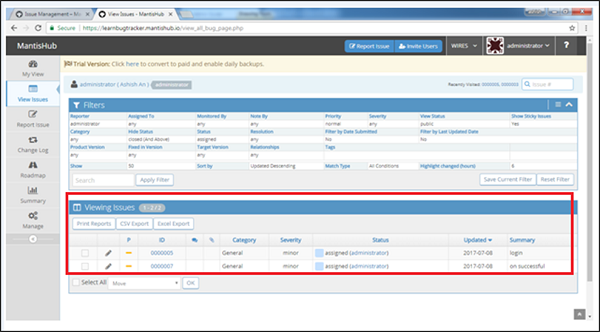
Step 4 − After clicking the Apply Filter button, Issues are displayed at the bottom of the screen in the Viewing Issues section as shown in the following screenshot.
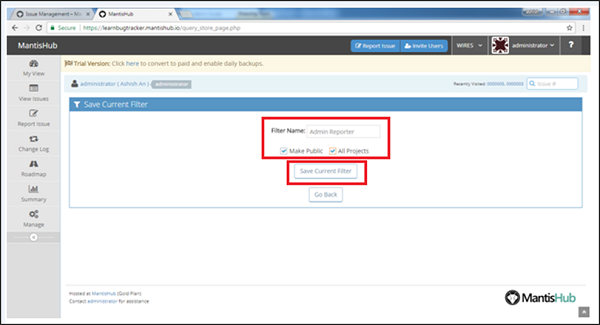
Step 5 − By clicking the Save Current Filter, the user can save the filter and use whenever required.
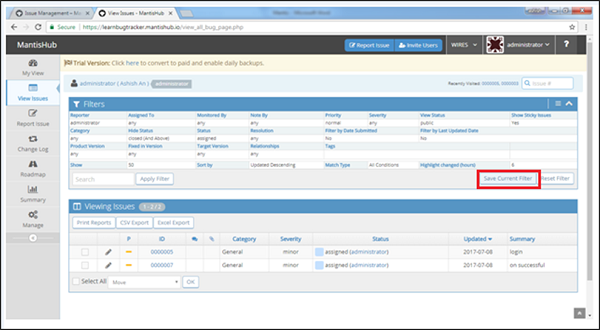
Step 6 − After clicking the Save Current Filter button, the following form opens to enter Filter Name. Enter the name and check Make Public, Apply for all projects. Click Save Current Filter.
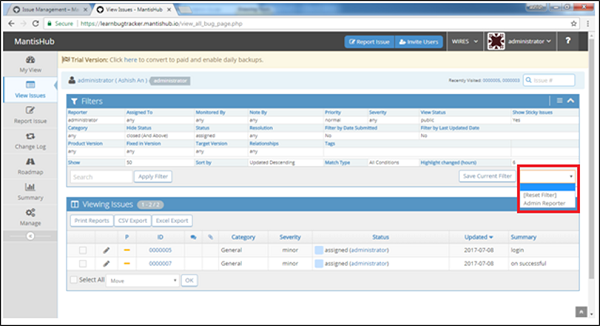
Step 7 − A dropdown will display beside the Save Filter button where the user can see currently saved filter name and select the filter from there. This dropdown list displays all available filter list as shown in the following screenshot.
Print Reports
In View Issues → Viewing Issue section, the user can print the records and basic details of issues. After filtering out the issues, the user can print these in different formats.
To Print the Reports, following steps should be performed −
Step 1 − Go to View Issues from the Menu, set the filters, and click Apply Filters.
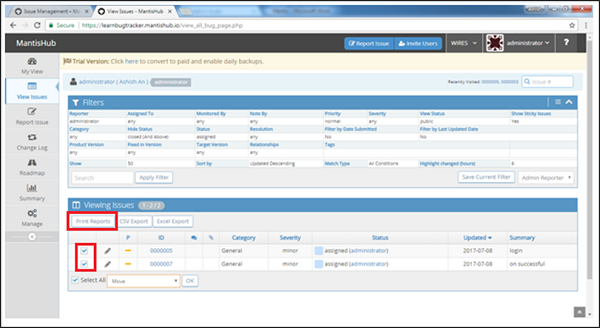
Step 2 − Now, go to Viewing Issues section and make sure the issues are displayed.
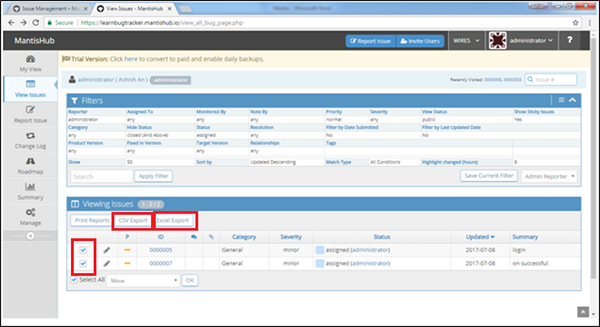
Step 3 − Select the issues to print and click Print Reports as shown in the following screenshot.
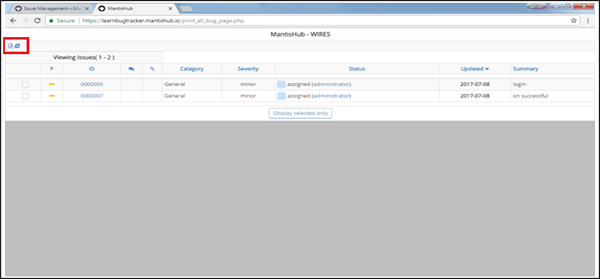
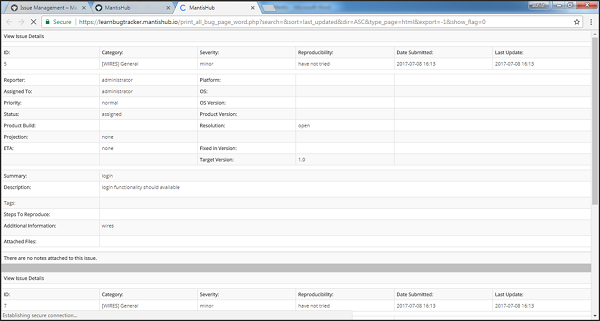
Issues are displayed as browser page and have Word and HTML (Internet Explorer) sign at the top left corner of the screen as shown in the following screenshot.
Step 4 − By clicking the Word symbol, it downloads the word file having the details of the bug. The sample word file will look like: The name of the file would be <project name>.doc and it contains complete details of each issue.

Step 5 − Click the HTML sign, a new browser opens that contains complete details of each issue as shown in the following screenshot.
CSV/Excel Export
To export as CSV/Excel file, following steps should be performed −
Step 1 − Go to View Issues from Menu, set the filters and click Apply Filters.
Step 2 − Go to Viewing Issues section at the bottom of the page and make sure the issues are displayed.
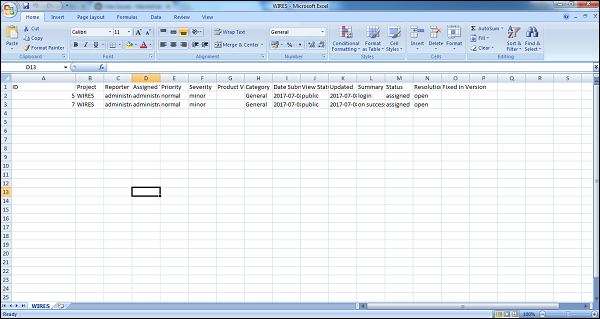
Step 3 − Select the issues to export and click CSV/Excel Export as shown in the following screenshot.
The respective files gets downloaded having the details of the bug.
The sample CSV file will look like as shown in the following screenshot.
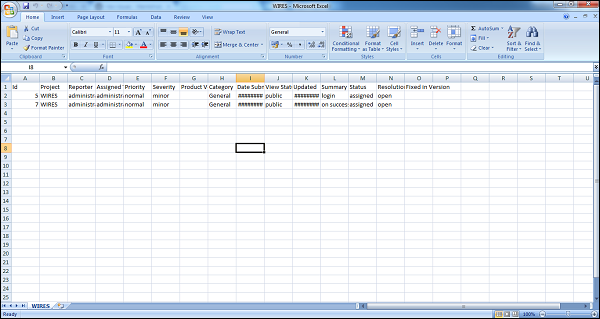
The sample Excel file will look like as shown in the following screenshot.