- Mantis - Home
- Mantis - Introduction
- Mantis - Features
- Mantis - Installation
- Mantis - Trial Setup
- Mantis - Login
- Mantis - My View
- Mantis - Project Management
- Mantis - Manage Categories
- Mantis - Versions
- Mantis - Issue Lifecycle
- Mantis - Report an Issue
- Mantis - Import Issues
- Mantis - View Issues
- Mantis - Edit Issues
- Mantis - Clone an Issue
- Mantis - Advanced Features
- Mantis - Change Status
- Mantis - Issues Relationships
- Mantis - Move an Issue
- Mantis - Issue History
- Miscellaneous Functionalities
- Mantis - Search Issues
- Mantis - Change Log
- Mantis - Roadmap
- Mantis - Summary
- Mantis - Add Custom Fields
Mantis - Quick Guide
Mantis - Introduction
Mantis Bug Tracker is an open source web-based application tool. It is used for Bug Tracking throughout Defect Lifecycle. Along with bug tracking, Mantis supports Release Features to manage various releases of a project or a software.
Mantis is also known as MantisBT, which stands for Mantis Bug Tracker. The name and logo of Mantis refers to Mantidae family of insects. In software, it is referred to as a bug.
Mantis provides Demo, Download (to set up your own Mantis) and Hosting version of the tool. It supports various features for Issue Tracking and life cycle along with Release Management.
The development of Mantis started in 2000 by Kenzaburo Ito. Later in 2002, other team members (Jeroen Latour, Victor Boctor and Julian Fitzell) joined. The basic version 1.0.0 of Mantis was released in February 2006.
In 2012, GitHub became the official repository for the Mantis project source code.
License and Free Trial
It is an open source software. License is not required to use its basic version.
It provides Demo and Hosting Version for free trails.
It supports Download feature to set up your own Mantis software. The user can sign up using email ID.
Mantis has different price quotes based on added features that can be seen at https://www.mantishub.com/pricing
Usage
To track all bugs/issue throughout Defect lifecycle.
To manage at Release level as well.
Supports Analytic and Reporting features.
Supports plug-in with other softwares and IDE to make it more strong and effective.
Specifications
| Sr.No. | Specification & Description |
|---|---|
| 1 | Application Copyright The copyright is taken by MANTIS System Limited Company (MANTIS SYSTEM) License is taken under GNU General Public License Version 2 |
| 2 | Tool Scope It can be used as a Bug Tracking System |
| 3 | Stable Release 2.1.0 Onwards. Latest release is 2.5.1 |
| 4 | Developed Language PHP as a coding language and SQL for database Tool supports 49 languages |
| 5 | Operating System Cross Platforms ( Platform Independent software) |
| 6 | System Requirements Web Server - Mantis is mainly tested with Microsoft IIS and Apache PHP - Mandatory extensions are mysqli, pgsql, oci8, sqlsrv, mbstring Database - MySQL, PostgreSQL |
| 7 | Client Requirements Firefox 45 and above IE 10 and above Chrome/Safari/Opera |
| 8 | User Interface Available API Desktop GUI Mobile UI |
Mantis - Features
Mantis supports a wide range of features to attract QAs and other stakeholders for bug tracking. Following are the core features of Mantis.
Core Features
| Sr.No. | Core Feature & Description |
|---|---|
| 1 | Collaboration and Hassle Free It makes collaboration with team members and client easy, fast, and professional. As many users can use the same domain and same set of data. It is available only for Licensed product. |
| 2 | Email Notification All users or set of team members can get email notification whenever there are any changes, updates, or resolutions on an issue. Email will be triggered for any action taken by any one among a group of users. Voting and watching features to keep an eye on the progress for stakeholders. Use @mention to get the attention of a specific team member for Comments/Description. |
| 3 | Access Control Admin can grant access to the users based on individual role. It can be applicable differently for each project. Thus, one person can have different level of access for two different projects. |
| 4 | Customization Mantis supports customization at each level. Users can customize fields for issue creation/view. Users can customize fields for issue workflow and notification as well. |
| 5 | Dashboard Dashboard displays assigned to me, unassigned, reported by me and many other standard filters to look at all the issues belonging to individual users. Timeline feature allow to keep an eye on what is happening across the project. It displays live stream on the latest actions taken by any team member. |
| 6 | Release Management Mantis helps to manage different releases. It supports Project Versions to track releases. Users can create future releases and mark issues for respective release as well. Issues and release information can also be summarized in a Roadmap page for better understanding. |
| 7 | Time Tracking Mantis supports its own in-built time tracking feature. Users can easily enter the time spent on a particular issue. It can help make a report on the spent hours for each issue as an individual or as a team. |
| 8 | Integration/Plug-in Mantis supports more than 100 add-ins to connect with different softwares to make the work easy. Wide range of add-ins make it universal across the globe - TestLodge, TestRail, TestCollab, Testuff, HipChat, Slack, etc. It also supports Eclipse IDE and JetBrains. |
| 9 | Common Features Using Slack and HipChat integration, the team can communicate with each other. Mantis provides SSO (single sign on) access to log into MantisHub using GitHub or BitBucket credentials. |
| 10 | Customer Support Mantis Helpdesk is a very popular feature. It allows integrating your support with your internal issue tracking. Using Grasshopper integration, users get direct voicemail line. |
Mantis - Installation
Mantis is a web application, provides a private website to individuals or set of requested users belonging to the same company/project.
Mantis can be run at the server side. It is a PHP-based application and supports all OS platforms such as Windows, Linux of different versions, MAC, etc. It supports mobile browsers as well in mobile views.
System Requirements
Since Mantis is a web-application, it follows the concept of client/server. This means, Mantis can be installed centrally on the server and users can interact with it through web-browsers using a website from any computer.
Web Server − Mantis is tested with Microsoft IIS and Apache. However, it can work with any latest web server software. Mantis only uses .php file. Configure the web server with .php extension only.
PHP − The web server should support PHP. It can be installed as CGI or any other integration technology.
Mandatory PHP Extensions − Extensions for RDBMS are mysqli, pgsql, oci8, sqlsrv mbstring is required for Unicode - UTF-8 support.
Optional Extensions − Curl, GD, Fileinfo.
Database − Mantis requires a database to store its data. MySQL and PostgreSQL are supported RDBMS.
Client Requirements − Firefox 45 and above, IE 10 and above, Chrome, Safari, and Opera.
Users can separately install all the requirements either manually or automatically to use Mantis.
Installation of System Requirements
If a user has adequate knowledge about the installation process, all the requirements can be installed one by one separately before proceeding to Mantis.
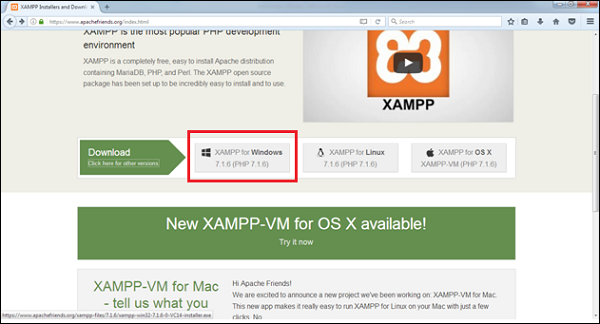
Alternatively, there are many all-in-one packages available, having all the requirements and can be automatically installed in the system by exe file. Here, we will take the help of XAMPP to install pre-requisites easily.
Step 1 − Go to https://www.apachefriends.org/index.html and click XAMPP for Windows as shown in the following screenshot.
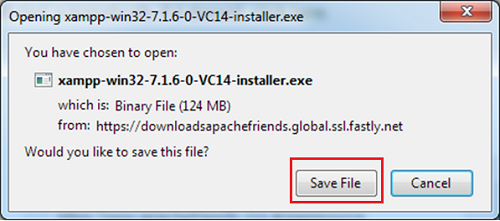
Step 2 − A pop-up will display to save the file. Click Save File. It will start downloading the file.
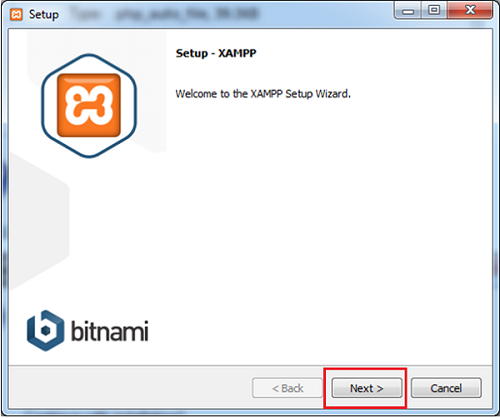
Step 3 − Run the .exe file to run the installation wizard. After clicking the .exe file, XAMPP Setup wizard displays. Click Next.
The following screenshot shows the XAMPP setup wizard.
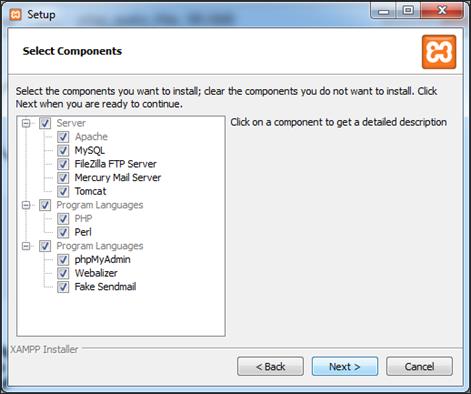
Step 4 − The next wizard displays all the component files that will install as shown in the following screenshot. Click Next after making a selection of components.
Step 5 − Provide a folder name where XAMPP will be installed and click Next.
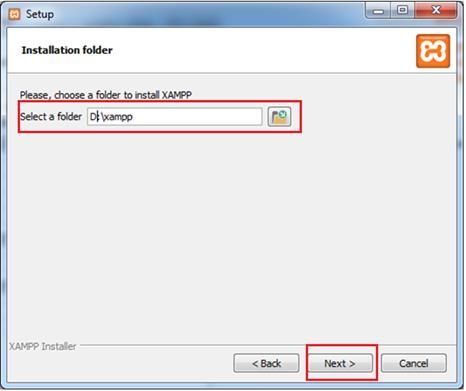
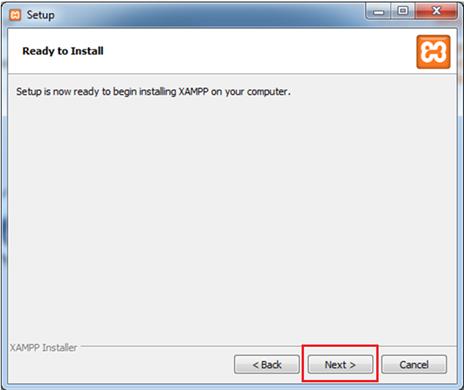
Ready to Install wizard is displayed.
Step 6 − Click Next to start the installation.
Step 7 − After successful installation, it will ask to start the control panel. Check the checkbox and click Finish. It will open the XAMPP control panel as displayed in the following screenshot.
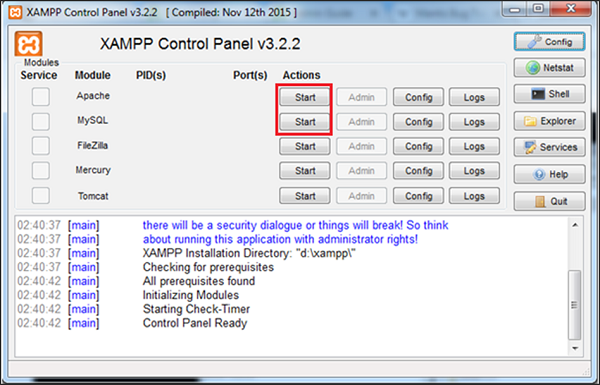
Step 8 − Click the Start button for Apache and MySQL, required for Mantis as shown in the above screenshot.
Step 9 − To verify whether all the pre-requisites such as Apache, PHP, and MySQL is installed properly, navigate to any of the browser, type http://localhost and press Enter. It will display the dashboard of XAMPP. Click phpAdmin at the right top corner as shown in the following screenshot.
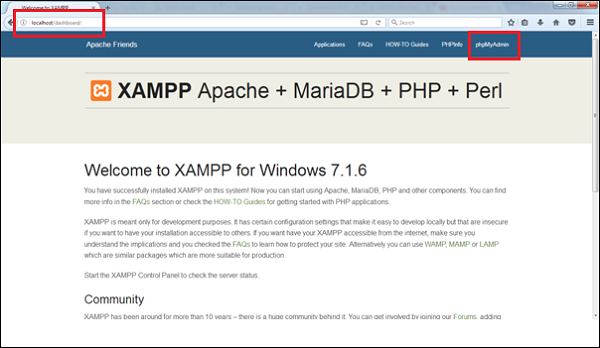
The next screenshot will display General Settings, Application Settings, Details of Database, Web Server, and phpMyAdmin.
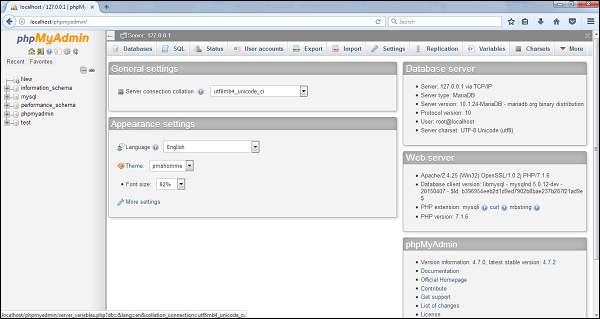
If the installation is not proper, this page wont be displayed. Till this point, all the pre-requisites are successfully installed in the system.
Install and Launch Mantis
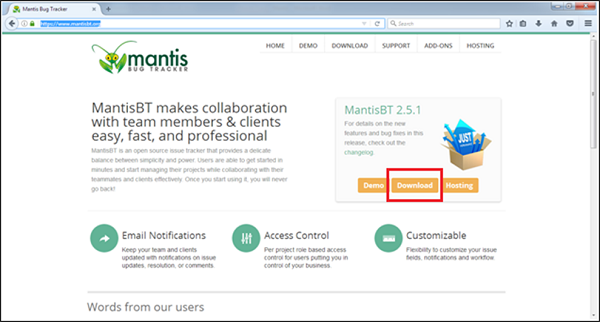
Step 1 − To download Mantis, go to https://www.mantisbt.org/ and click Download.
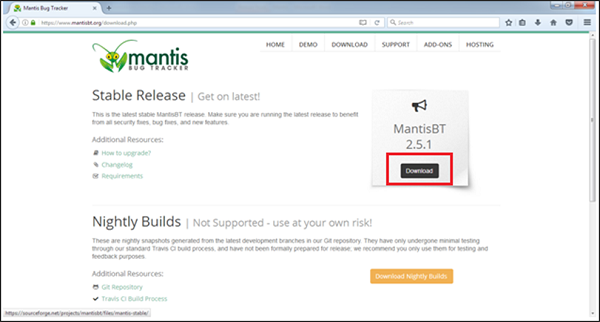
Step 2 − Click Download on the next page as shown in the following screenshot.
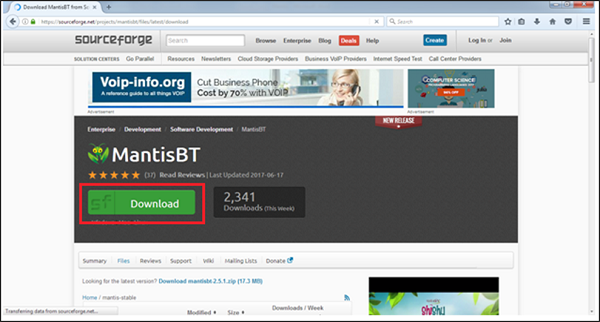
Step 3 − Again click Download as shown in the following screenshot and save the .zip file.
Step 4 − Go to XAMPP folder where it is installed and navigate to htdocs folder. Unzip the downloaded mantis and place it as shown in the following screenshot.
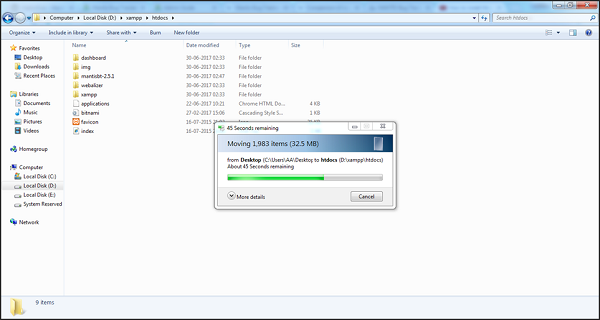
Step 5 − Rename the folder name mantis 2.5.1 as mantis for better URL.
Step 6 − Now open a browser and type http://localhost/mantis in the navigation bar and press Enter. It will display the index of mantis as shown in the following screenshot. Click mantis-2.5.1.
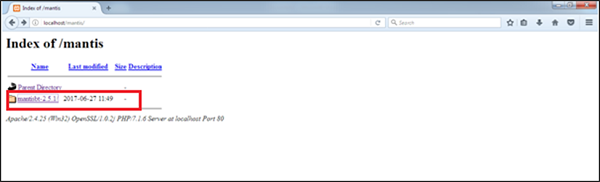
It will display the Pre-Installation page as shown in the following screenshot.
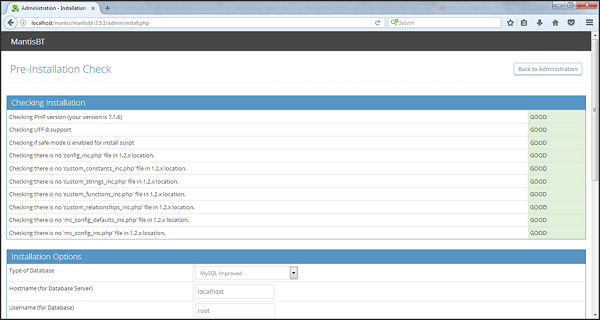
Step 7 − Go to the Installation section and make changes, if required. Then, click the Install/Upgrade Database button.
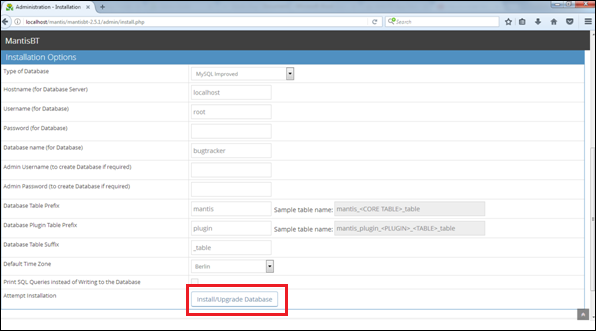
Once installation is complete, it will display the Check installation page and will be marked as Good, i.e. Mantis is installed properly.
Step 8 − To launch mantis, use the URL http://localhost/mantis and click mantis-2.5.1. It will display the Login page of Mantis as shown in the following screenshot.
Note − Make sure the Web server and the Database, both are running before using the URL, otherwise Problem Loading Page error will be displayed.
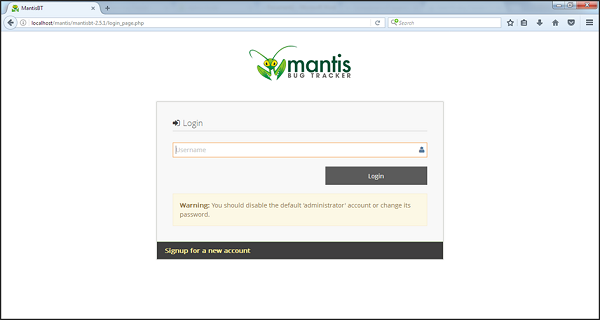
Step 9 − Provide the username as Administrator and click Login. It will ask to enter the password. Use root as password and click Login.

After successful Login, it will display the Dashboard of Mantis.
Mantis - Trial Setup
Mantis is an open source tool. However, Mantis supports demo and hosting versions where users can have hands-on experience before downloading the tool.
Setup for Demo Trial
Following are the steps to set up Demo trial.
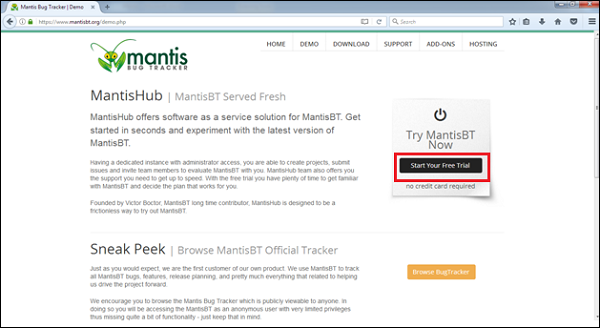
Step 1 − Go to https://www.mantisbt.org/ and click Demo as shown in the following screenshot.
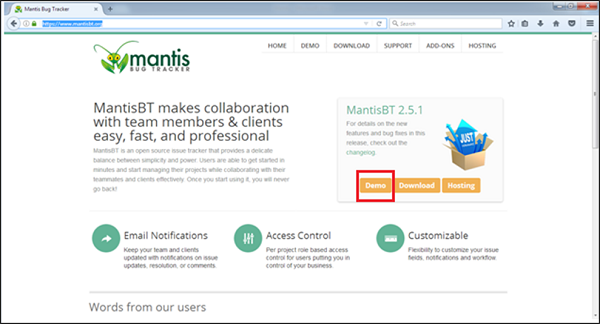
Step 2 − On the next page, click Start Your Free Trial.
Step 3 − Fill all the details in the sign-up page and click the Sign me up button as displayed in following screenshot.
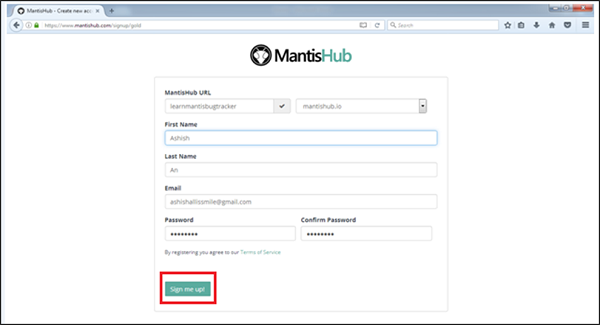
It takes 1-2 minutes to set up the URL and free trial for 30 days. After successful setup, the user will be able to see the Dashboard/My view page of Mantis.
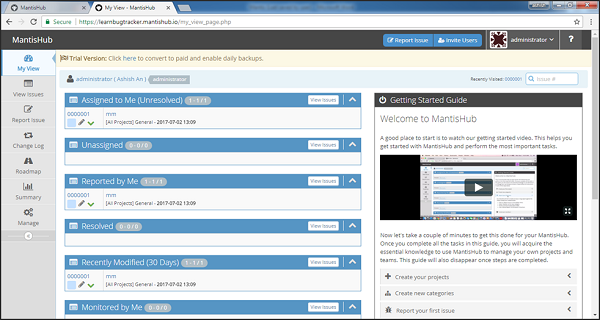
The following screenshot shows the My View page of Mantis.
Mantis - Login
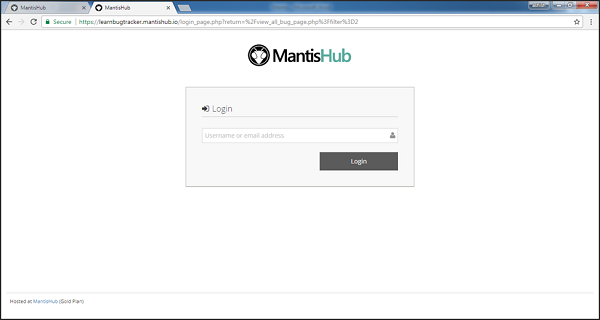
Step 1 − To login to Mantis, go to your sample demo website. It will open a login page.
Step 2 − Fill your registered email address/username and click Login.
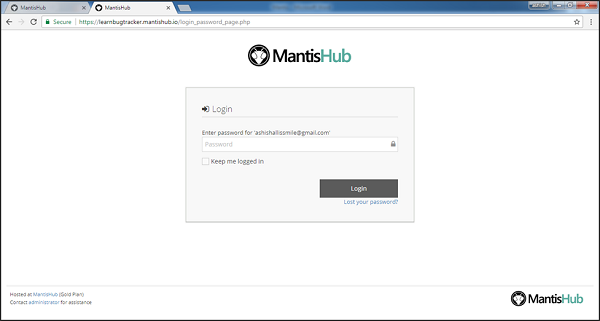
Step 3 − On successful validation of Username, it will ask for a Password. Enter the password and Click the Login button.
The following screenshot shows how to login to Mantis using credentials.
On Error
Due to unsuccessful login, an error page is displayed and the user will go back to the username page. Following screenshot shows the error message the user receives, if the password is incorrect.
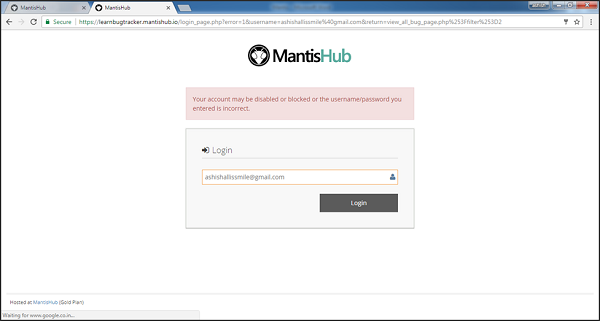
Click Lost your password?
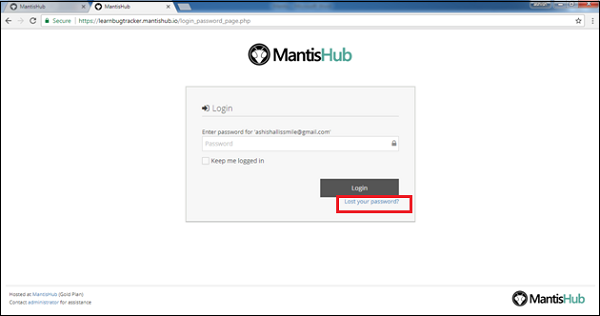
Provide username and email address to get the password reset link. Click Submit as shown in the following screenshot.

The user will get an email with the URL to reset the password.
On Successful Login
On successful login, the system dashboard will display if the account is associated with any project by admin or the user can create a sample project, which will be discussed in subsequent chapters.
The following screenshot displays the Dashboard/My View page of Mantis on successful login.
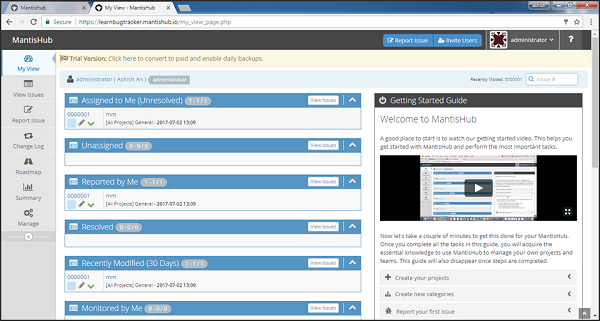
Mantis - My View
After logging into Mantis, My View is the first page that is displayed. My View is customized by Admin. Based on the roles, the admin can set the access to Mantis. Admin even has the right to change the logo, name, and access of information on role/individual basis.
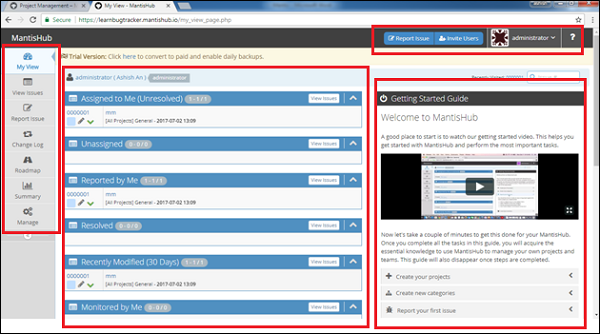
The navigation bar, present at the top of Mantis page, will be the same across all pages/screens of Mantis. Report Issues, Invite Users, Administrator and Help are the main links of the navigation bar.
There are several sections present on the Menu bar (top to bottom on the left side). These sections are the heart of Mantis and cover all major functionalities. Menu bar has the following sections − My View, View Issues, Report Issue, Change Log, Roadmap, Summary, and Manage.
Beside the Menu bar and down to Navigation bar, main informative section belongs to My View page. Except this section, all other part of the page is static and remains same through all the pages.
On the left side (after the menu bar), the user can view logged issues under different sections such as Assigned to Me, Unassigned, Reported by Me, Resolved, Recently Modified, and Monitored by Me.
The user can navigate to a particular issue by clicking the issue ID and name.
On the right side of the page, the user can see the getting started guide. Here, new users can learn about the basic functionalities to start with Mantis. There is a few minutes tutorial to familiarize the user about how to maintain the Project structure.
The following screenshot shows the overview of My View page of Mantis.
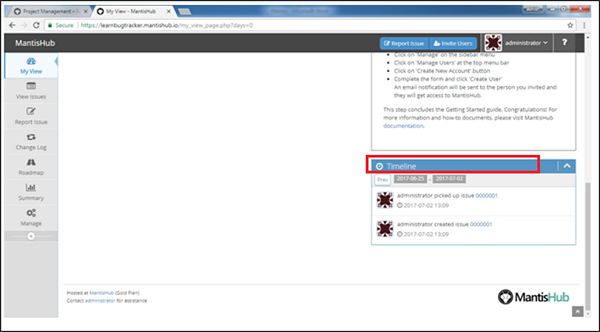
Below the Getting started section, there is another section name as Timeline.
Here, the user can see which activities are performed during a week or a given timeline such as who has created issues, how many issues are created, who recently picked which issue, etc.
The following screenshot displays the Timeline section of My View page.
Mantis - Project Management
To perform Project Management activities, the user should have Admin permission.
Create a Project
Following are the steps to create a project.
Step 1 − Login as Administrator.
Step 2 − Go to Manage section present at the left menu bar.
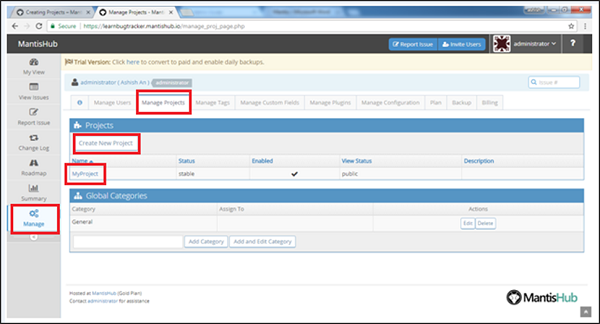
Step 3 − Click Manage Projects tab.
Step 4 − To create a new project, click the Create New Project button. To edit an existing project, click the Project Name. Here, My Project is the existing default project.
The following screenshot shows how to create a new project.
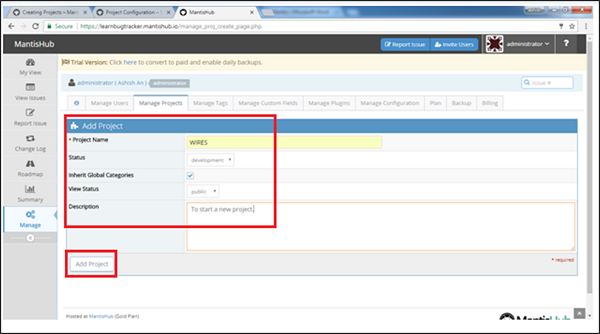
Step 5 − After clicking Create Project / Project Name, the Create Project form opens.
Step 6 − Enter the following fields before creation −
Name − Enter the project name.
Description − A brief description or summary of the project.
Status − The maturity or development status of the project. This is informational field and doesnt affect Mantis.
View Status − It determines who can access the project, whether the project can be viewed by all logged-in users in case of public projects. Private projects are only visible to users assigned to the project or to administrators.
Step 7 − Now, click the Add Project button.
The following screenshot shows the fields to enter/edit to add/update a new project.
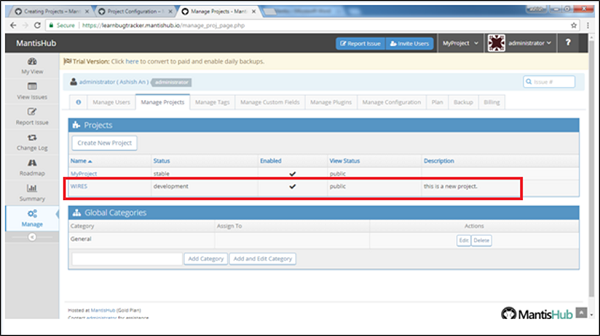
On successful creation of a project, the user can see a new entry in the project section as shown in the following screenshot.
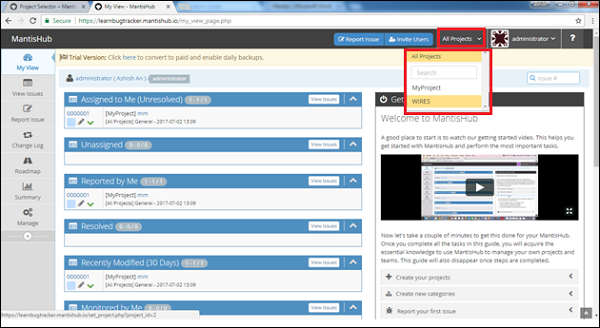
Select a Project
To select a project, the navigation feature is available at the top right corner of the page. To see this option, the user should be entitled to view at least 2 projects. The projects that the user is entitled to view, are listed under the All Projects option.
If the user selects All Projects option from the list, it will display all the listed projects that the user is entitled to view.
To view an individual project, the user should select the particular project from the list.
The following screenshot displays how to select Projects.
Archive a Project
If the user wants to hide a project from the list of projects as available, from the top dropdown list, archiving a project is the solution for it.
Once the project is archived, the user is not able to view issues from the respective projects.
Project can also be un-archived based on the requirements.
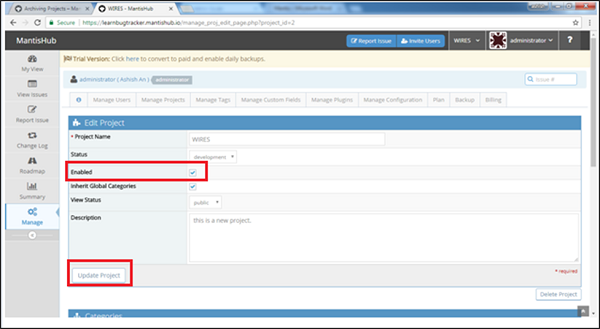
Step 1 − Go to Manage → Manage Projects.
Step 2 − Click the Project name that needs to be archived/un-archived.
Step 3 − Tick/Untick the enable field for un-archival/archival.
Step 4 − Click Update Project.
The following screenshot displays how to archive/un-archive a project.
Mantis - Manage Categories
After the creation of the project, the user should classify Categories. Categories allow dividing the issues into different areas such as 'user interface', 'backend', database', services, etc. It is based on the type of issues, feature areas of the software, or the expertise of various development teams.
The user can create categories specific to a project or define it globally across all projects. Mantis supports a pre-defined global category called 'General'. This is used as the default category while moving issues between projects, and there is no source category in the target project.
Create a Category
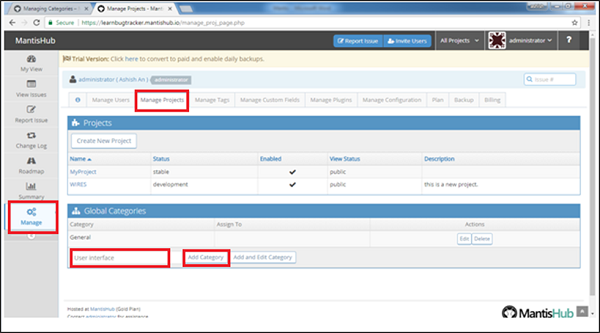
Step 1 − Go to Manage → Manage Projects tab.
Step 2 − Enter the Category name in the text box and click Add Category.
The following screenshot shows how to add a Global Category.
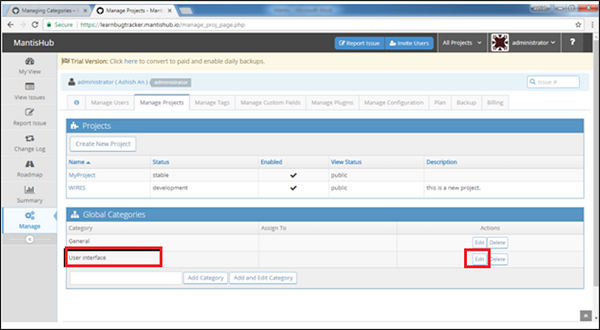
On successful addition, the user will be able to see the category name under Global Categories section. The user can edit the category anytime by clicking the Edit button present under Actions column.
The following screenshot shows added category and Edit button.
Configure Categories
Categories can be configured to a default assignee.
All issues logged under this category will automatically be assigned to a team member.
Step 1 − To configure the category, go to Manage → Manage Projects → Global Categories
Step 2 − Click Edit to configure a specific category as shown in the previous screenshot.
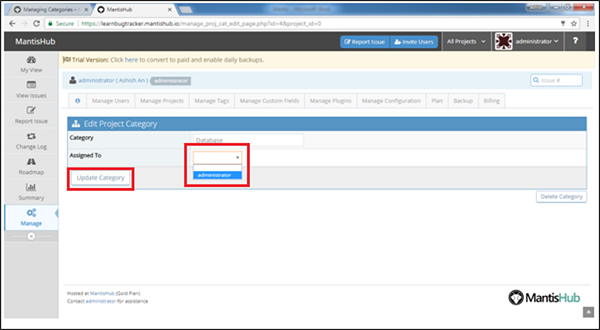
Step 3 − In the Edit Project Category, select Assigned to from the dropdown list.
Step 4 − Click Update Category.
Here, the user can edit the category name as well.
The following screenshot shows how to configure a category.
Delete a Category
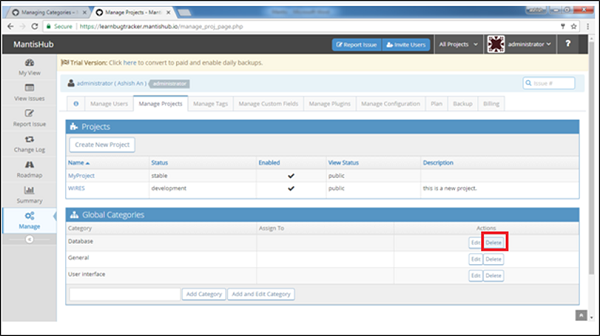
Step 1 − To delete a category, go to Manage → Manage Projects.
Step 2 − Click a specific category to delete. Then, click the Delete button from the Actions column as shown in the following screenshot.
Step 3 − After clicking Delete, Mantis displays a warning message and asks for confirmation, whether the user wants to delete a specific category or not. Click the Delete Category button as shown in the following screenshot.
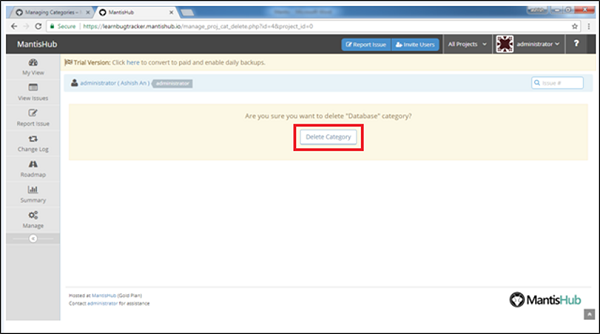
If the issues are listed under the deleted category, after deletion, the issues will be updated automatically and displayed as no category.
The user can manually filter the issues and update the categories for those.
Mantis - Versions
Versions are also known as Releases. They are set of targets to achieve/resolve issues. These can be maintained in versions.
Project updates and development are organized into several releases or versions. Versions can be named as 1.0, 1.1 or may be based on the release dates of functionalities as '20171020'.
Versions are used for all version-related fields in issues. Versions will appear in issues only when the project has a version. The user needs to create a version in the project to utilize this functionality.
In the issue form, there are 3 fields related to versions - Product Version, Target Version, and Fixed-in Version.
Product Version notes in which version the issue was discovered and logged by the users.
Target Version is a future or current version to display in which version the issue is scheduled to fix. This automatically populates the project Roadmap.
Fixed-in Version shows in which version the issue was actually fixed or implemented. This automatically populates the project Change log.
Update or Add Version
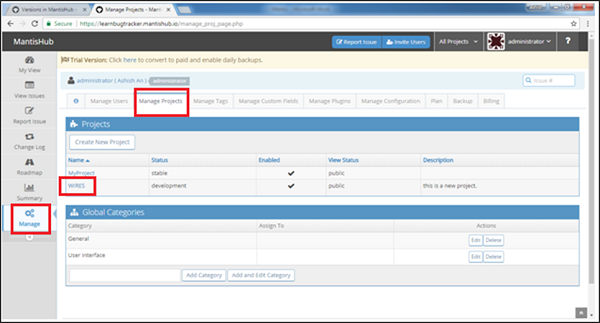
Step 1 − To add or update the version of a project, go to Manage → Manage Projects tab.
Step 2 − Click the Project name, where the version has to be added.
Step 3 − Scroll down to the Versions section.
The following screenshot shows how to navigate to Versions.
The following screenshot shows how to add Version by writing the Version Name and click Add Version.
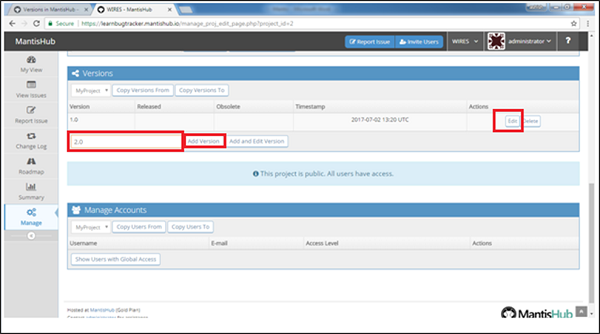
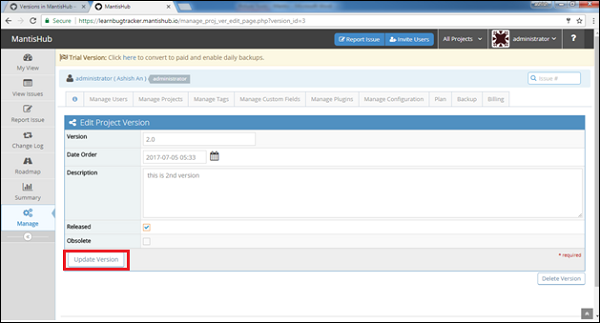
Step 4 − To update a Version, click the Edit button as shown above.
Step 5 − The user can update all the fields based on the requirement. Click Update Version as shown in the following screenshot.
Mantis - Issue Lifecycle
Lifecycle denotes different stages or status of issues. Lifecycle starts from reporting an issue and ends when the issue is resolved or closed. An issue mainly can have 3 stages − Open, Resolve, and Close. However, Mantis supports more status as is explained further.
Statuses
New − This is the first status for a new issue when the users report it. The next status may be feedback, acknowledged, confirmed, assigned or resolved.
Feedback − This status is used for reviewing purpose. Before assigning to a team member, a review process happens to decide the validity of issue and concern team. The next status may be new, assigned, or resolved.
Acknowledged − This status is used by the development team to send a confirmation about receiving an issue or to agree with the reporters concern. However, it is possible that they have not yet reproduced the issue. The next status is assigned or confirmed.
Confirmed − This status is typically used by the development team to reflect that they have confirmed and reproduced the issue. The next status is assigned.
Assigned − This status is used to reflect that the issue has been assigned to one of the team members and the team member is responsible to fix it and actively working on it. The next status is resolved.
Resolved − This status is used to reflect that the issue has been fixed or resolved. An issue can be resolved among any of the following resolutions. For example, an issue can be called as resolved for fixed, duplicate, wont fix, no change required, or other reasons. The next status is closed, or in case if the issue is being re-opened, then it would be feedback.
Closed − This status reflects that the issue is closed and successfully validated. No further actions are required on it. Once the issue gets closed, it hides the issue from the View Issues page.
Mantis - Report an Issue
Once Project and Categories are defined, the user can report an issue against the project under different categories to track down the progress.
Following are the steps to report an issue −
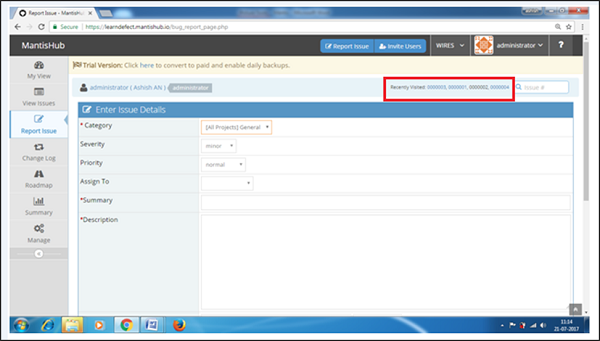
Step 1 − If the user has access to multiple projects, first select the project at the top right corner of the screen, where issues will be reported.
There are two ways to go on Report Issues form −
Step 2 − Click the Report Issue link present at the top beside the project filter OR click the Report Issue section from the left menu bar.
The following screenshot shows how to set a project filter and available options for Report Issues.

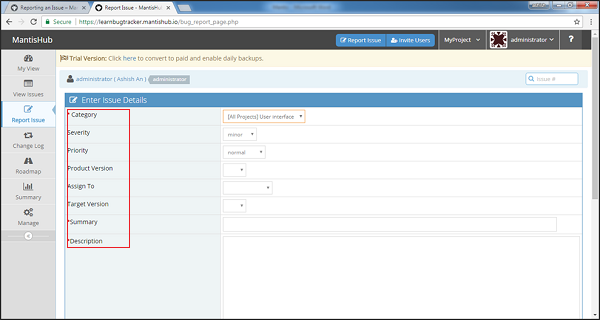
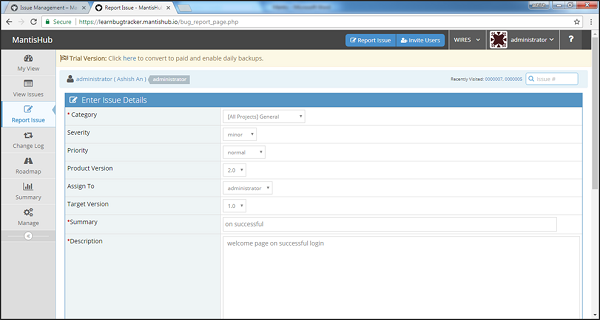
Step 3 − After clicking the Report Issue, it opens the Enter Issue Details page with mandatory and optional fields.
Step 4 − Enter all the details properly. These are the following fields −
Category − It defines under which area of project it belongs such as development, database, and services so that the concerned team can start looking into it.
Summary − A brief title of the issue that provides high level info about the issue.
Description − The detailed information of the issue. It should contain all relevant details minor to major, so the concerned team member analyzes all the aspects.
In addition to the mandatory fields, there are useful optional fields such as set severity, priority, tags and view status.
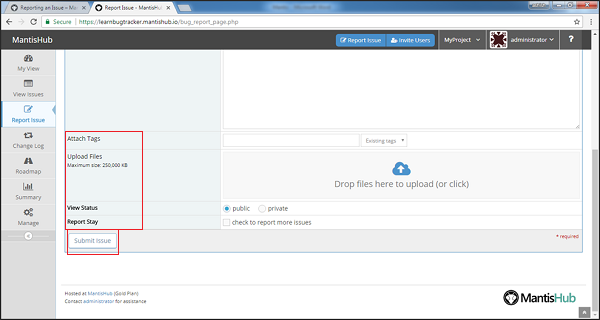
The user can also assign it to a specific user as well as upload a file as an attachment.
Step 5 − If the user wants to report more than one issue, check the Report Stay checkbox, which will return to the report issue page after the submission of an issue.
Step 6 − Now, click the Submit Issue button present at the bottom of the page.
The following screenshots display the different fields and the Submit button.
Step 7 − After successful creation, the user navigates to View Issue page, where the new reported issue can be seen.
Mantis - Import Issues
The user can create multiple issues at a time using CSV files. CSV files are comma separated file.
Rules for CSV File
While creating a CSV file, following points must be considered −
CSV file should be separate for each project.
CSV file should be saved as CSV (Comma Delimited).
The user should switch to the project before starting the CSV import steps.
All entries should be made in a Notebook application. Each entry should be separated by a comma ,.
Files should be saved as filename.csv and the file type as All files.
Dont map ID field with any field in CSV. The system will automatically generate an Issue ID.
For multiple lines \n can be used.
For timestamp fields such as issue submission and last update timestamps, it is recommended using ISO 8601. However, PHP accepts any method strtotime (). If an integer is provided as the value, then it will be treated as the number of seconds, since Unix Epoch (January 1 1970 00:00:00 GMT).
Sample file will look like the following −
| login | wires | General | login functionality should be available | Assigned to | administrator | 1.0 |
| error | wires | General | error message on wrong credential | new | 1.0 | |
| on successful | wires | General | welcome page on successful login | Assigned to | administrator | 1.0 |
Import CSV
To import a CSV file, the user should perform the following steps −
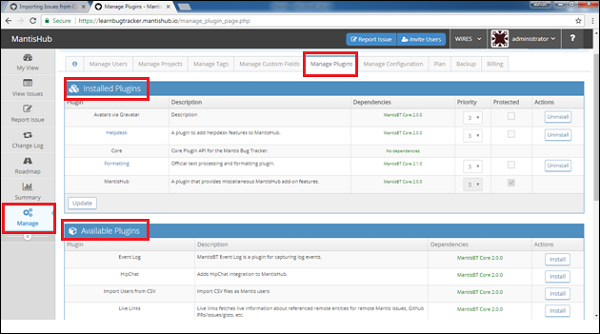
Step 1 − Go to Manage → Manage Plug-in.
Step 2 − Check whether the CSV Importer plug-in is installed or not.
Step 3 − If it is not installed, click Install as shown in the following screenshot.
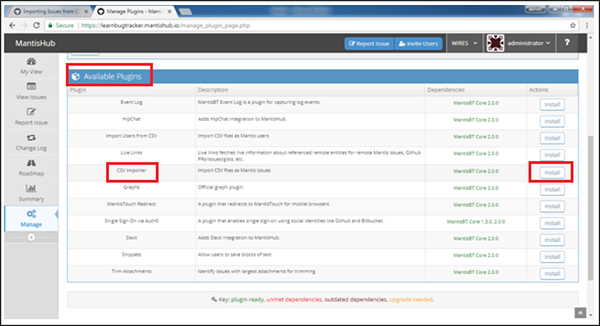
Step 4 − Since CSV Importer is not present in the Installed Plugins, go to Available Plugins section and find CSV Importer. Click Install as shown in the following screenshot.
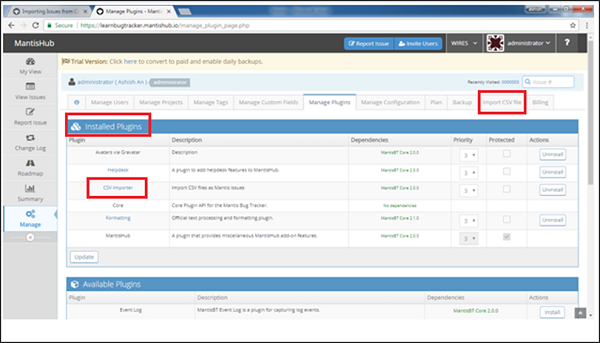
Step 5 − After installation, the user can see CSV Importer in the Installed Plug-in section. The Import CSV File section is also present. Click Import CSV File as shown in the following screenshot.
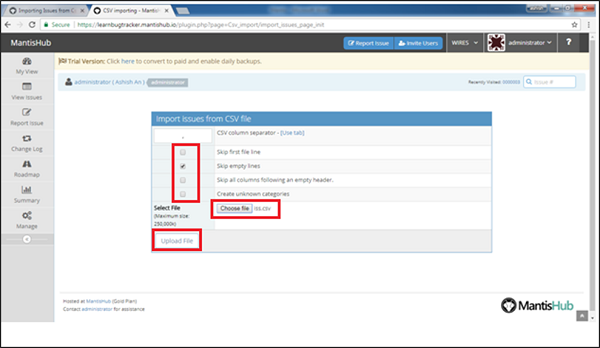
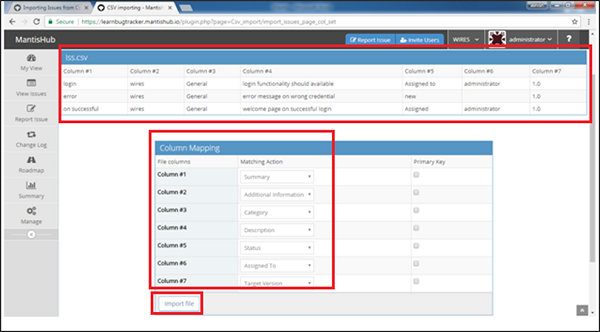
Step 6 − After clicking Import CSV file, import issues from the CSV file opens. Select various options based on the file and requirements as shown in the following screenshot. Later, click Choose File to browse the file and then click Upload file.
Step 7 − After successful upload, the user can see the data column wise. Below that, the user needs to map those columns with different fields of Issue form as shown in the following screenshot.
Step 8 − After mapping, click the Import File button.
After completion of import, the user can see counts of successful and unsuccessful entries.
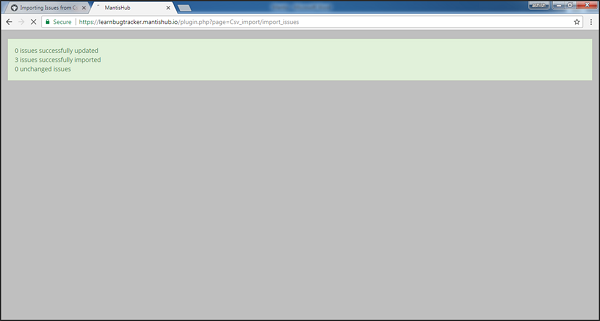
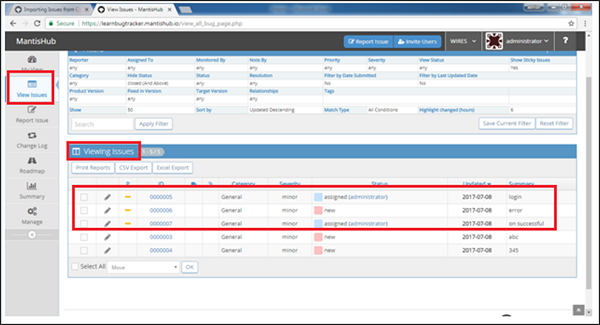
Automatically, the user navigates to View Issues tab at Viewing Issues section as shown in the following screenshot.
Mantis - View Issues
In the View Issues section, the user can view all the reported bugs for a project. The user can filter out to narrow down the search and export all issues and print reports. All of the major functionalities of Issues can be accessed through View Issues.
We will discuss all of these functionalities in different chapters. In this chapter, we will discuss about Filters, Export and Print Reports.
Filters
To use filters in View Issues, following steps should be performed −
Step 1 − Click View Issues from the left Menu.
In the first half, the filter section displays where the user can set various filters.
Step 2 − To set a filter, click Field name. For example: Reporter in this case. It will display the available dropdown list to select.
Step 3 − After the selection of other filters as well, click Apply Filter to search the result as shown in the following screenshot.
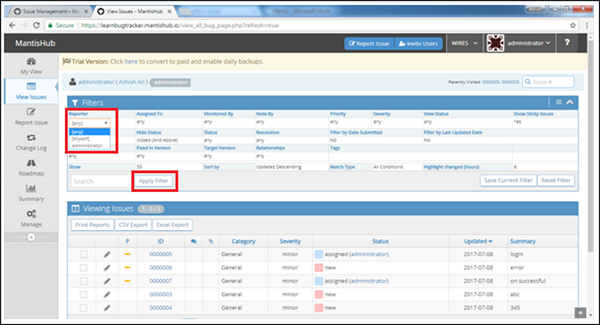
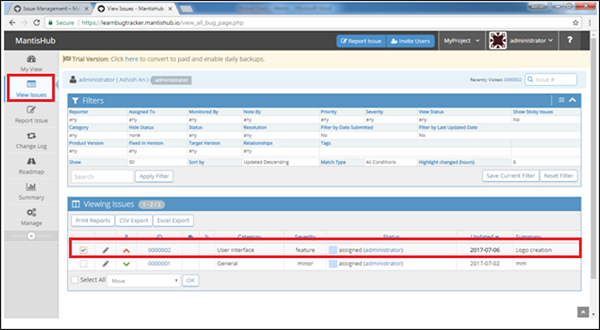
Step 4 − After clicking the Apply Filter button, Issues are displayed at the bottom of the screen in the Viewing Issues section as shown in the following screenshot.
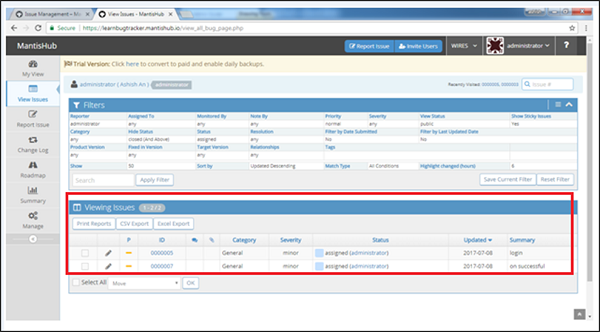
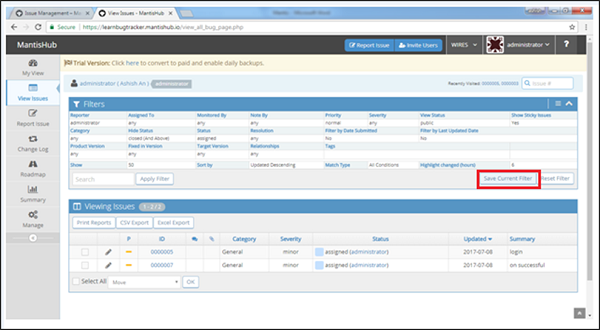
Step 5 − By clicking the Save Current Filter, the user can save the filter and use whenever required.
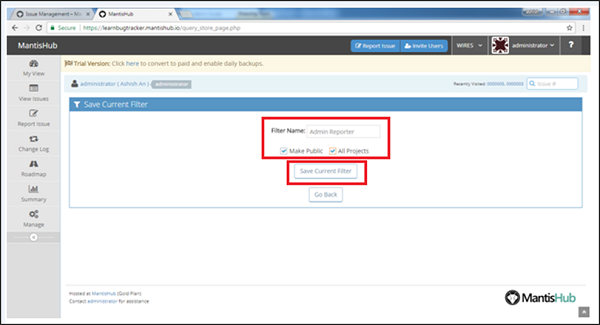
Step 6 − After clicking the Save Current Filter button, the following form opens to enter Filter Name. Enter the name and check Make Public, Apply for all projects. Click Save Current Filter.
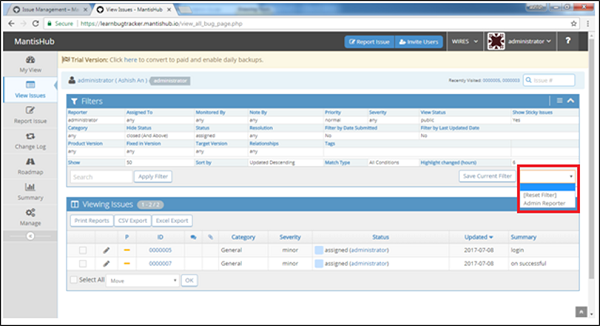
Step 7 − A dropdown will display beside the Save Filter button where the user can see currently saved filter name and select the filter from there. This dropdown list displays all available filter list as shown in the following screenshot.
Print Reports
In View Issues → Viewing Issue section, the user can print the records and basic details of issues. After filtering out the issues, the user can print these in different formats.
To Print the Reports, following steps should be performed −
Step 1 − Go to View Issues from the Menu, set the filters, and click Apply Filters.
Step 2 − Now, go to Viewing Issues section and make sure the issues are displayed.
Step 3 − Select the issues to print and click Print Reports as shown in the following screenshot.
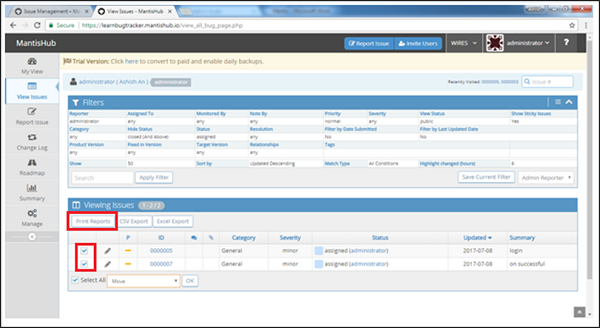
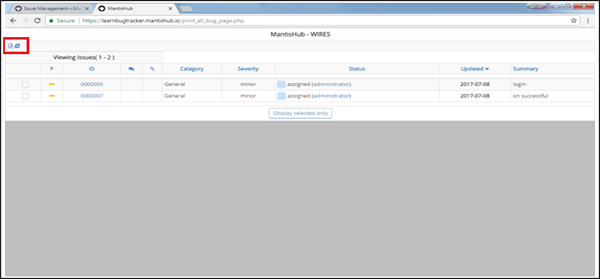
Issues are displayed as browser page and have Word and HTML (Internet Explorer) sign at the top left corner of the screen as shown in the following screenshot.
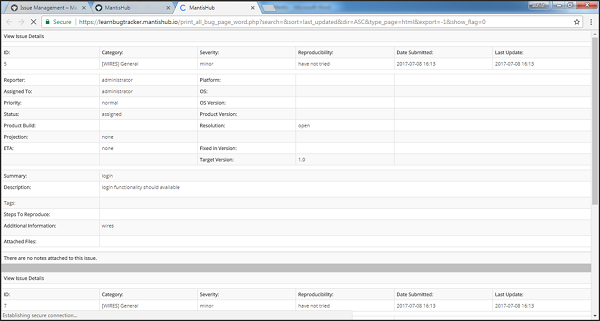
Step 4 − By clicking the Word symbol, it downloads the word file having the details of the bug. The sample word file will look like: The name of the file would be <project name>.doc and it contains complete details of each issue.

Step 5 − Click the HTML sign, a new browser opens that contains complete details of each issue as shown in the following screenshot.
CSV/Excel Export
To export as CSV/Excel file, following steps should be performed −
Step 1 − Go to View Issues from Menu, set the filters and click Apply Filters.
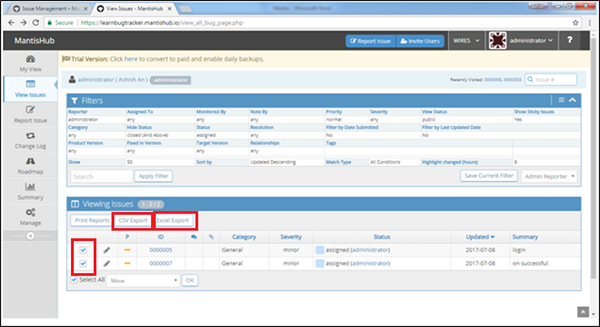
Step 2 − Go to Viewing Issues section at the bottom of the page and make sure the issues are displayed.
Step 3 − Select the issues to export and click CSV/Excel Export as shown in the following screenshot.
The respective files gets downloaded having the details of the bug.
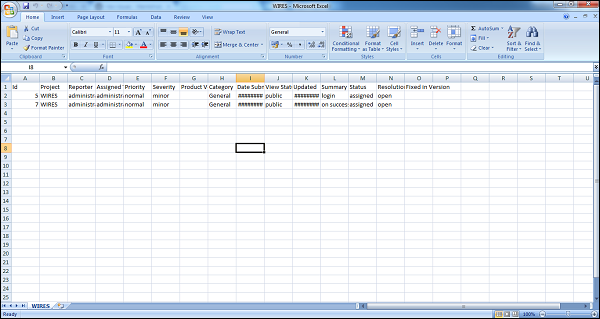
The sample CSV file will look like as shown in the following screenshot.
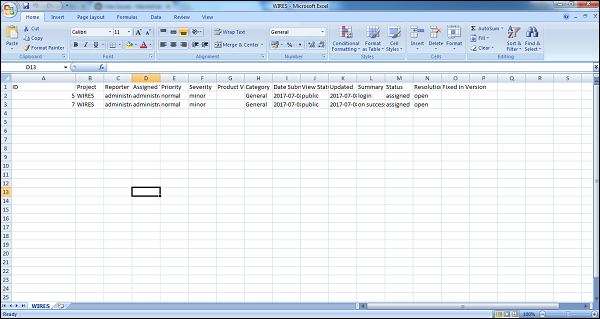
The sample Excel file will look like as shown in the following screenshot.
Mantis - Edit Issues
Users can edit the details of an issue any time. To edit an issue, the user should open an issue from any of the available options from My View Page or View Issue page from the left menu option.
Following steps should be performed while editing an issue.
Step 1 − Open the issue in View page by clicking on Issue ID.
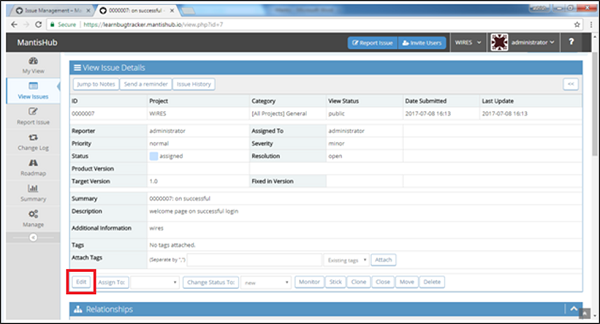
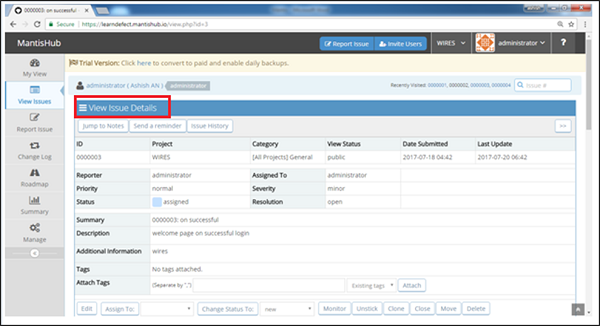
The user will be able to see various sections of the View Issue Details page −
- View Issue Details
- Relationship
- Users Monitoring this Issue
- Activities
- Add Note
- Issue History
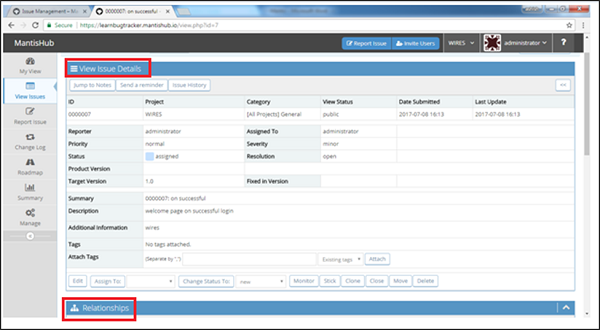
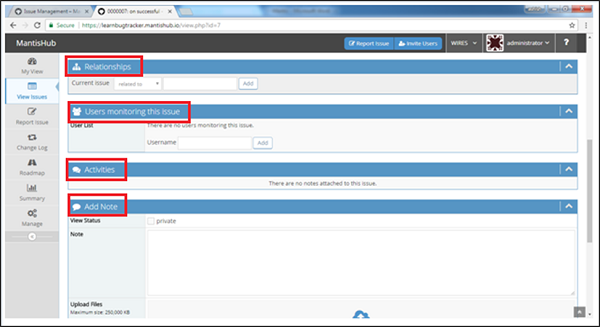
The following screenshot displays all the sections in the View Issue page.
Step 2 − After opening the View Issue Details page, click the Edit button as shown in the following screenshot.
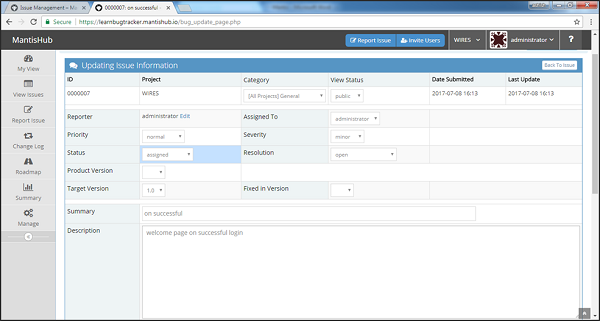
Updating Issue information page opens up showing the editable fields as depicted in the following screenshot.
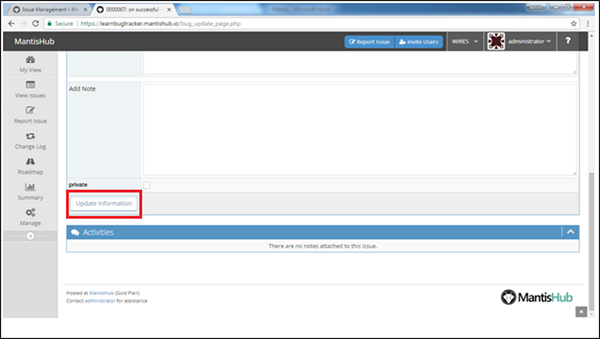
Step 3 − After editing the information, click the Update Information button as shown in the following screenshot.
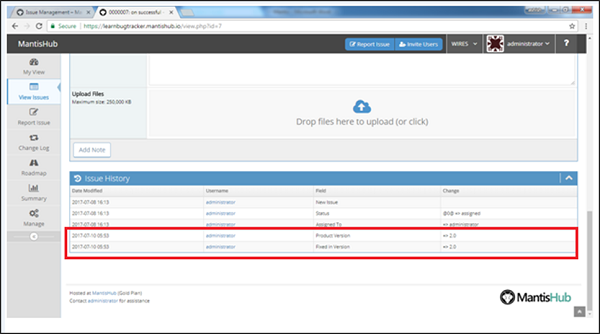
The updated information and log details can be seen in the Issue History section as seen in the following screenshot.
Mantis - Clone an Issue
Cloning refers to copying. To clone an issue means to quickly create a duplicate issue within the same project. Cloned issues can be treated as a new issue and edited like other issues.
A cloned issue is a completely separate issue from the original issue. Any action or operation taken at the original issue doesnt impact the clone issue and vice-versa. The only connection between the original and the clone is the link that is created.
Following information is carried from the original issue to the clone issue.
- Summary
- Description
- Assignee
- Environment
- Priority
- Category
- Version
- Reporter
- Target version
- Fix version
- Issue links
- Attachment
- Projects
- Content of custom fields
Following information is not cloned −
- Time tracking
- Comments
- Issue history
Following are the steps to clone an issue.
Step 1 − Open an issue in the View page by clicking the Issue ID.
Following sections of the View Issue Details page will be displayed.
- View Issue Details
- Relationship
- Users Monitoring this Issue
- Activities
- Add Note
- Issue History
Step 2 − After opening the View Issue Details page, click the Clone button as shown in the following screenshot.

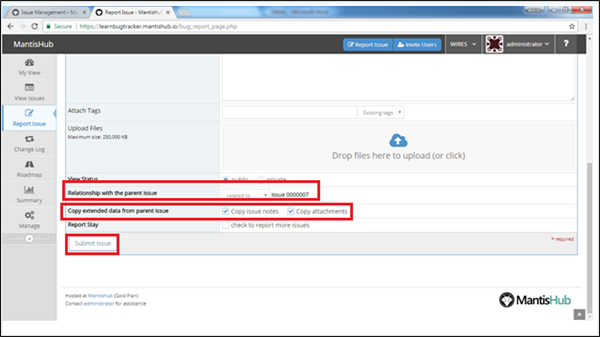
It opens the report page and all available details are copied in the respective fields as shown in the following screenshot.
Step 3 − At the bottom of the page, the original issue id is written for the field Relationship with the parent issue. Select the relationship of original and cloned issue as shown in the following screenshot.
Step 4 − The section, Copy extended data from parent issue. has 2 checkboxes − Copy Issue notes and Copy attachments. Check these if you want to copy the same. By default, these are unchecked.
Step 5 − After selection, click the Submit Issue button.
After successful submission, a new issue id generates and the view issue page opens.
Mantis - Advanced Features
While reporting an issue, along with some general information, there are advanced features supported by Mantis to make it more informational and useful. In this chapter, we will discuss about those advanced features.
@Mention - Notification
Mantis supports @mentions to gather user attentions and send notifications about an issue or note, even if they are not on the notified list.
It is a simple way to draw someone's attention. Simply reference a college in an issue note or description, and the note details with a link to the issue details will be emailed.
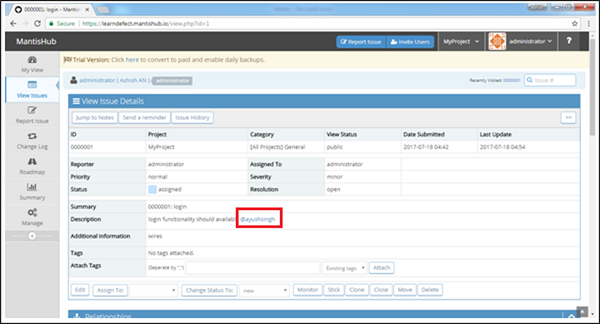
To mention a user in Description/Note section, first write @ and along with it write the name of user as shown in the following screenshot.
@mentions is hyperlinked to the user page and highlighted when notes/issues are formatted.
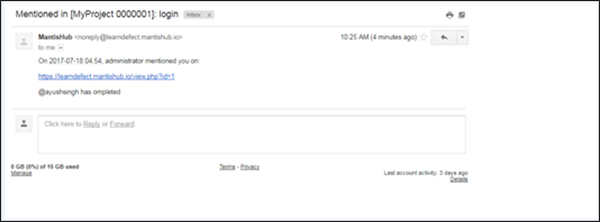
In this case, users receive both regular email notification as well as @mention notification. However, @mention notifications have a simplified format as well as a different subject.
The following screenshot displays the received email for @mention.
Send Reminder
Send Reminder is the alternate functionality of @mention. This feature is used to call the attention of a particular user. For example, the Product Owner sends a reminder to the team to update comments.
Mantis generally recommends to use @mention. However, it is an optional feature.
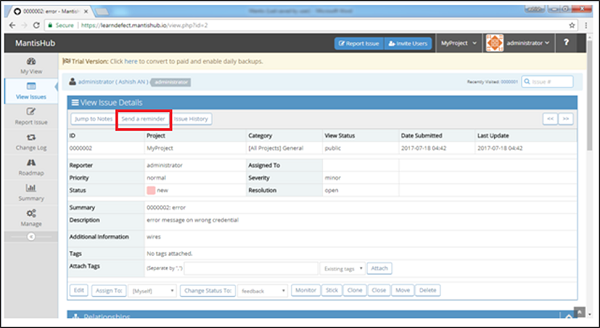
Go to the View Issue and click the Issue ID to open the View page.
At the top of the issue, the Send a Reminder button is displayed as shown in the following screenshot.
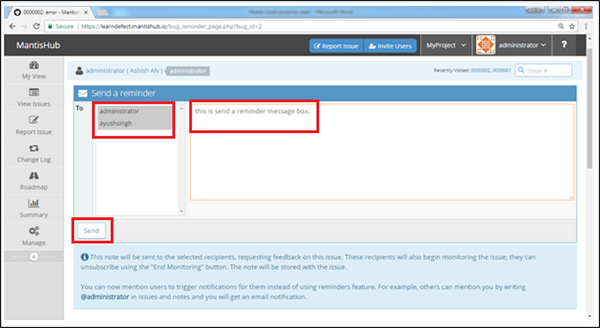
After clicking the Send a reminder button, a message box appears. On the left side, there is a list of users and on the right side messages can be typed. After selecting the user and writing the message, click the Send button at the bottom of the page.
The following screenshot shows how to send a reminder.
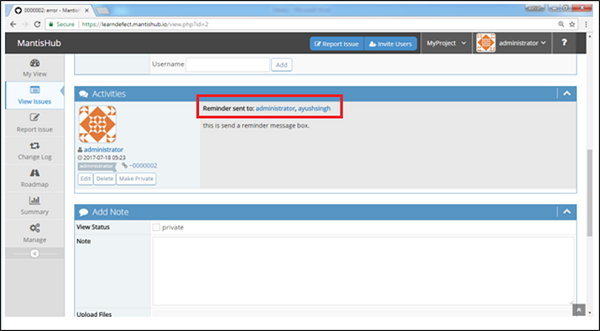
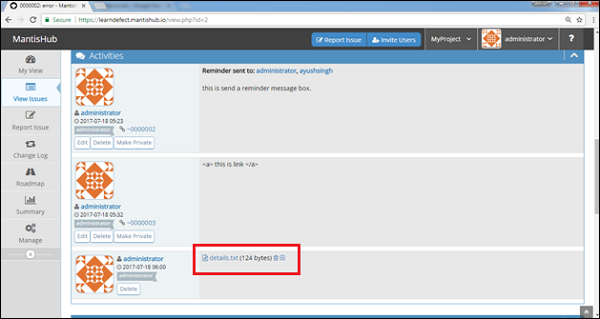
In the View Issue → Activities section, the Reminder information can be seen as shown in the following screenshot.
Text Formatting
As of now, Mantis supports the following HTML tags that can be used to format the tag in the description and notes field − p, li, ul, ol, br, pre, I, b, u, em, strong. However, Mantis doesnt encourage formatting the text.
The text emails will have raw tags rather than formatted text. Mantis has a plan to move towards Markdown for formatting, which will deprecate HTML tags.
In addition to Markdown support, Mantis is planning to support html emails. These features together will address the limitations of the existing solution. However, as of now, there is no specific timeline for Markdown or for HTML emails support.
Attach Files
Mantis supports attaching multiple files to an issue. A user can attach the file while reporting the issue by clicking the Choose File button. The file can also be attached from the View Issue by clicking the Upload File button. Alternative method, is to attach the file in Edit Issue mode.
The following screenshot displays how to attach a file in the View Issue module.
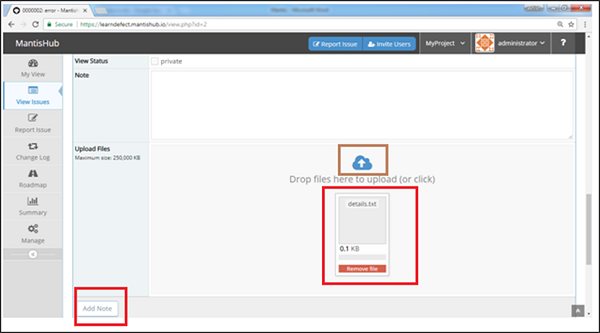
Click the above marked button and browse the file to upload. Files will be displayed below the button on successful upload.
Then, click Add Notes. The file will be get added in the Activities section as shown in the following screenshot.
Mantis - Change Status
Status is the property of an issue that helps to track the progress of an issue as well as provide the actual current status of an issue.
Mantis supports the following status - New, Feedback, Acknowledged, Confirmed, Closed, and Resolved. Users can change the status of an issue based on the work done.
Following steps should be taken to change the status.
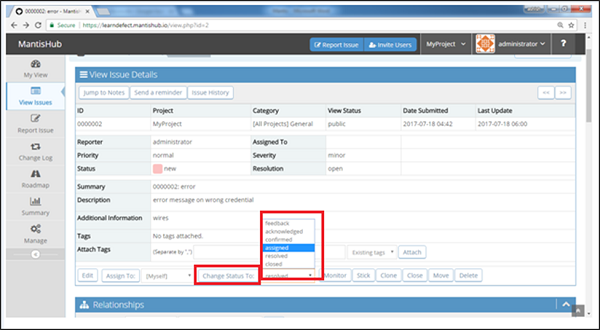
Step 1 − Go to the View issue section and click the Issue ID of the status that has to change.
Step 2 − Click the dropdown beside Change Status to and select one of the statuses.
Step 3 − After selection, click the button Change Status to present at the View Issue Details section as shown in the following screenshot.
Based on the status selection, the <Status> Issue page opens where the user can add a note, assign to and make it private if desired.
Step 4 − After that click the <Status> Issue button. For example: For feedback, the Request Feedback on Issue page opens.
The following screenshot shows the Feedback status page.
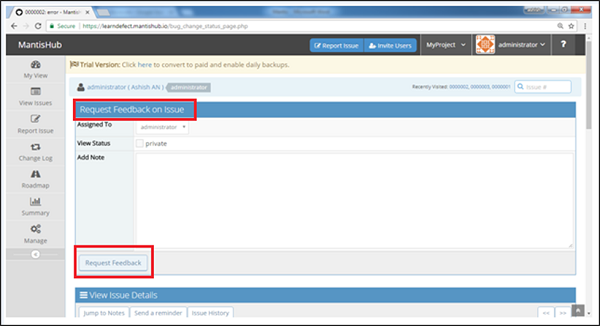
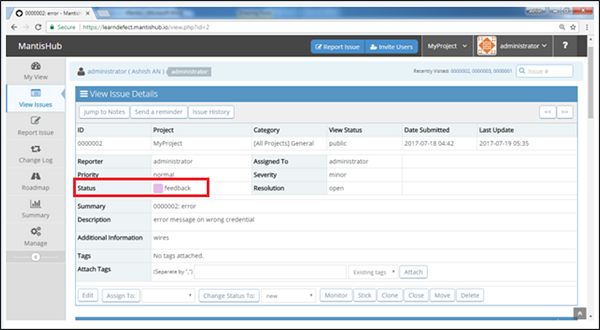
Step 5 − Click the Request Feedback button and the status of issue is changed to feedback as shown in the following screenshot.
Mantis - Issues Relationships
This feature is very useful when two issues have some type of dependency on each other, such as they are duplicates or are related to each other, upstream downstream dependency as parent/child issue.
Create a Link to Another Issue
Issues can be linked together at any point of time, while reporting an issue using the View Issue or Edit Issue page.
Step 1 − Click the view issue page.
Step 2 − Navigate to Relationships section.
Step 3 − Choose the relation of the issue with the linking issue. For example: the opened issue is parent/duplicate of another issue.
Step 4 − Now, type the issue id and click the Add button as shown in the following screenshot.

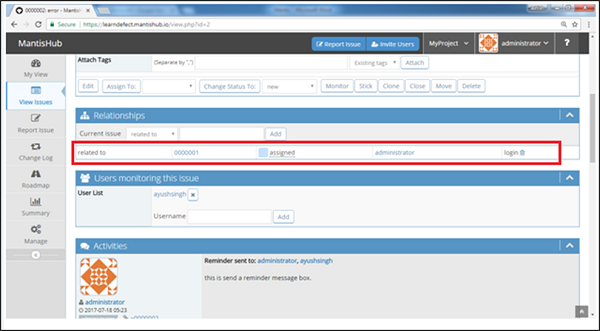
After addition, you can see the linked issues in the Relationships section. It is hyperlinked hence, it is also possible to navigate to the linked issue.
You can add a relationship for multiple issues at once using the '|' character in between issue IDs.
The following screenshot displays the linked issue.
Delete a Link
Step 1 − Go to View Issue Details page that contains the link to the issue.
Step 2 − Scroll down and go to the Relationships section.
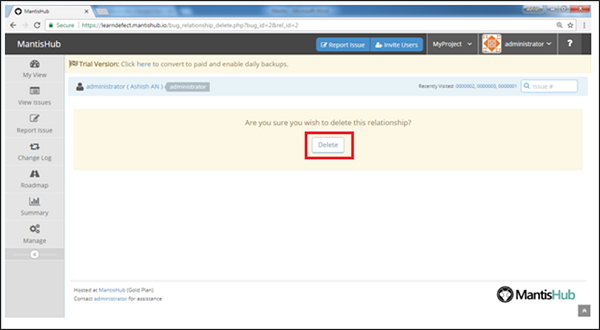
Step 3 − Click the Delete icon as shown in the following screenshot.
Step 4 − A confirmation pop-up will be displayed as shown in the following screenshot. Click the Delete button.
Mantis - Move an Issue
Mantis has a feature to move an issue from one project to another project.
One Issue At a Time
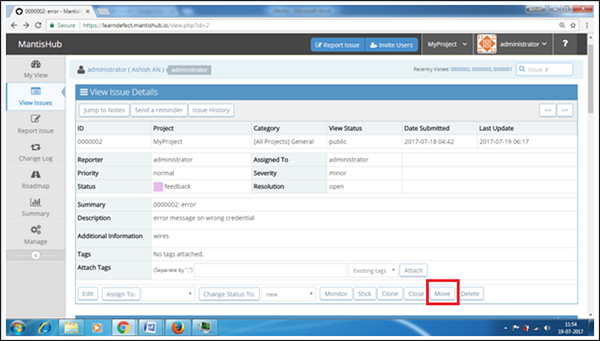
Step 1 − Go to the View Issue Details page that needs to move to another project.
Step 2 − Click Move as shown in the following screenshot.
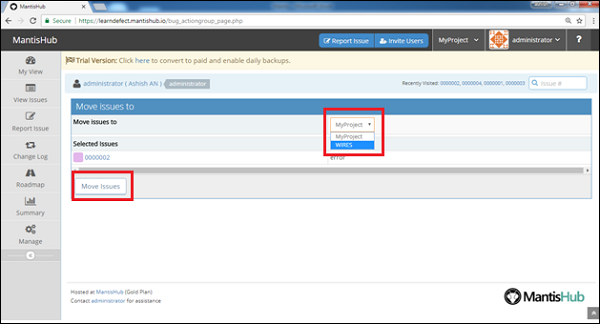
Step 3 − In the Move Issue page, select the new project where the issue will move and click the Move Issues button as shown in the following screenshot.
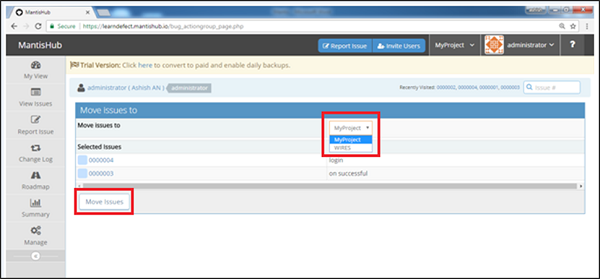
Multiple Issues at a Time
Step 1 − Go to the View Issue page.
Step 2 − Set the filter and navigate to the Viewing Issues section where you will find a list of issues.
Step 3 − Check the checkboxes for all issues that are required to be moved.
Step 4 − Select the Move option from the dropdown present at the bottom of the screen and then click OK.
The following screenshots display how to move multiple issues at a time.

Step 5 − In the Move Issues to page, select the new project, where the issue will move and click the Move Issue button as shown in the following screenshot.
Mantis - Issue History
A History is a record of all activities performed on issues such as −
- Creation of an issue
- Changes to an issue field
- Attachment of a file
- Deletion of comment/work log
- Addition/deletion of links
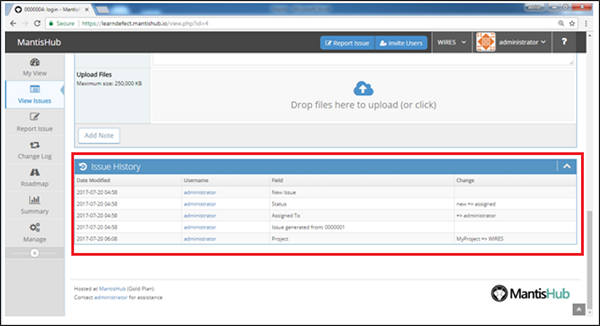
In a history record, the user can view the following information −
- Name of the user who made the changes
- Time while the changes was made
- If an issue field is changed, new and old values of the field
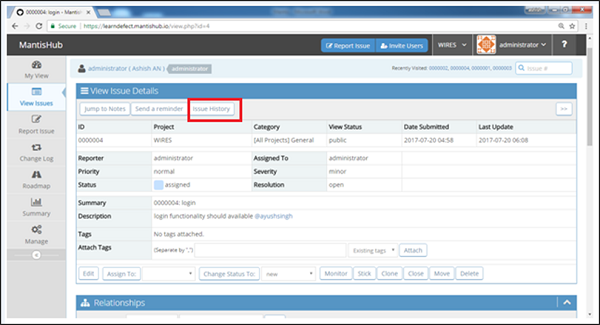
Following steps are to be performed to view the Issue History.
Step 1 − Go to View Issue → View Issue Details (by clicking any issue ID) Page to see the history.
Step 2 − Scroll down to the Issue History section OR click the Issue History button as shown in the following screenshot.
History records will be displayed as can be seen in the following screenshot.
Mantis - Miscellaneous Functionalities
There are other useful functionalities in the View Issue Page such as Monitor, Delete, Close or Stick an issue, which we will discuss in this chapter.
Monitor
Mantis has a feature called Monitor to receive notifications and observe the progress of an issue. A user who has marked the issue as Monitor will be notified whenever any changes are made on the issue by any other users.
Following are the steps to monitor an issue −
Step 1 − Go to View Issue → View Issue Details (by clicking any issue ID) Page to see the details.
Step 2 − Click the Monitor button present at the bottom of the screen as shown in the following screenshot.
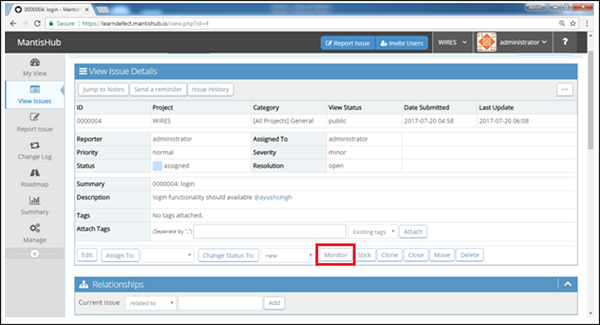
Once the user starts to monitor, the button changes to End Monitoring. The same can be confirmed from Issue History as well.
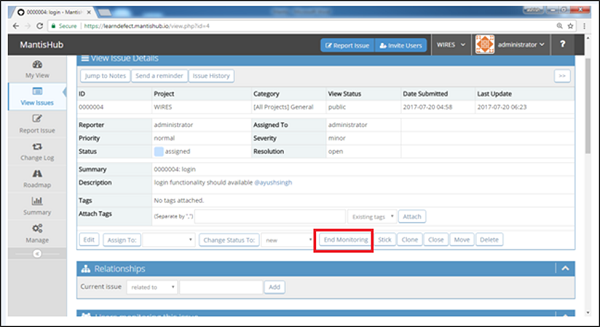
Step 3 − After a certain time period, when the monitoring is complete, click the End Monitoring button as shown in the above screenshot.
The button will again change to Monitor.
Stick
Mantis supports Stick functionality, i.e. an issue can be displayed as the first entry in the View Issue page → Viewing Issue section.
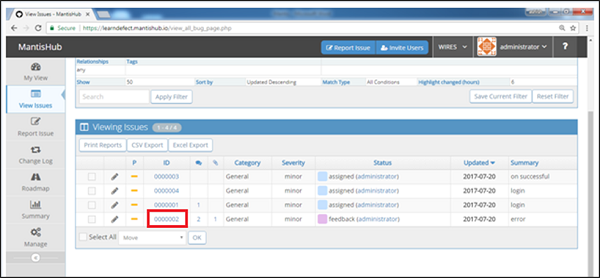
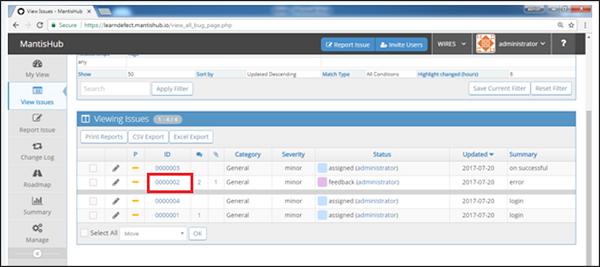
Step 1 − Go to View Issue → Viewing Issues section and choose any Issue that you want to display as the first entry in this table. Here, we choose Issue ID 02 as shown in the following screenshot.
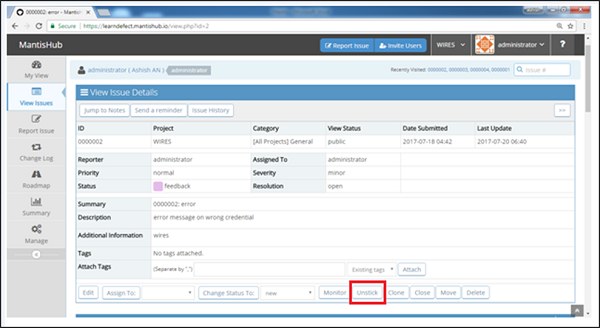
Step 2 − Click the Stick button at the bottom of the View Issue Details page.
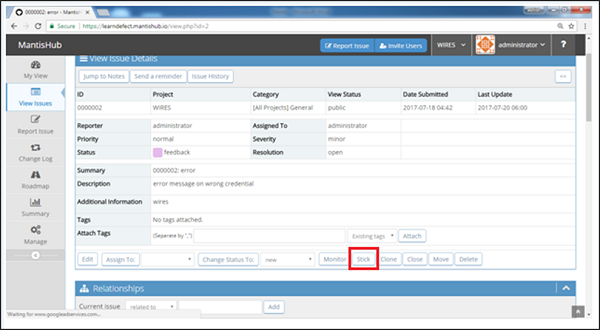
The button name changes to Unstick.
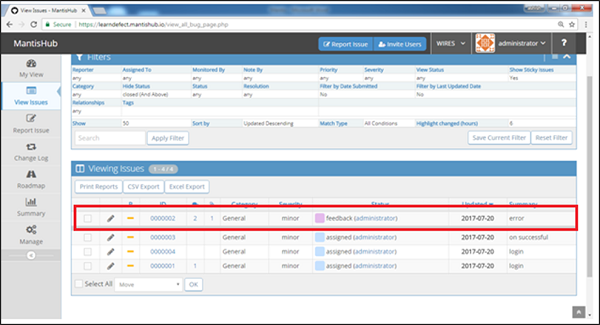
Step 3 − Go back to View Issue → Viewing Issues section and observe the location of Issue ID in the table. It will be displayed as the first entry as shown in the following screenshot.
Step 4 − To unstick it, go to View Issue Details page and click the Unstick button as shown in the following screenshot.
If more than one issues are marked as Stick, it follows LIFO (Last In First Out) concept. The latest one that was marked as Stick will be displayed as the first entry and will be followed by the second latest, and so on.
Close an Issue
Mantis supports the functionality to close an issue from any current status of the issue.
Following are the steps to close an issue.
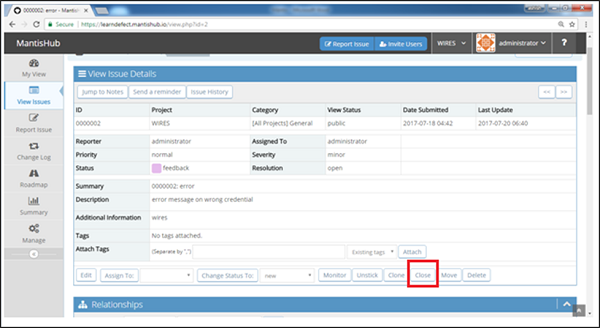
Step 1 − Go to View Issue → Viewing Issues section and choose any issue that is to be closed. Here, we choose Issue ID 02 as shown in the following screenshot.
Step 2 − Click the Close button on the View Issue Details page as shown in the following screenshot.
Step 3 − Select Resolution from the dropdown and Add Notes. Click the Close Issue button.
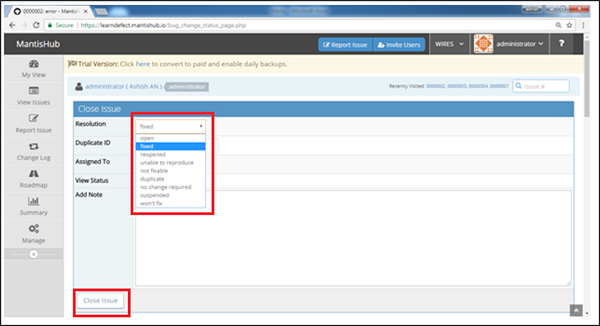
The status of issue changes to Reopen button instead of Close for this issue as seen in the following screenshot.
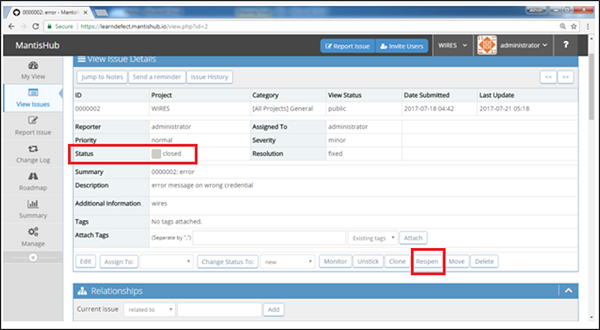
By clicking the Reopen button, you can open the issue any time again.
Delete an Issue
Mantis supports deletion functionality in case the user wants to delete any of the issues. The reason might be duplication, wrong entry, or no more useful.
Following are the steps to delete an issue.
Step 1 − Go to View Issue → Viewing Issue section and choose any issue that is to be deleted.
Step 2 − Click the Delete button on the View Issue Details page as shown in the following screenshot.
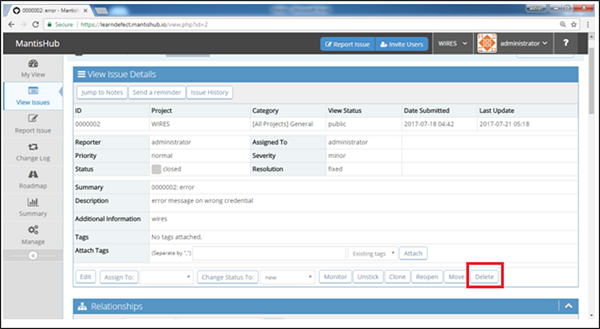
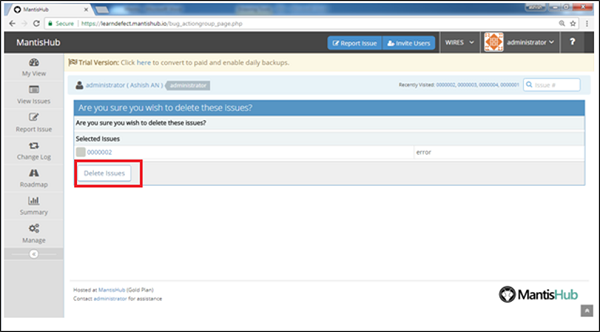
Step 3 − A confirmation page is displayed asking to perform the delete action on the selected issue. Click the Delete Issue button if sure as shown in the following screenshot.
Mantis - Search Issues
Mantis supports basic search functionality. Users can search issues across Projects using Issue#. Along with the Search textbox, Mantis provides the link of Recently Visited Issue# so that users can directly jump to a particular issue.
Search
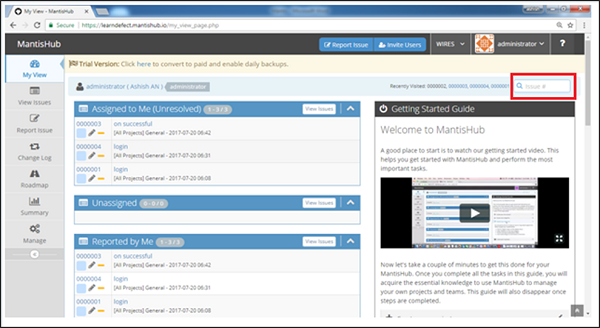
At the top right corner of the screen, there is a Search textbox present throughout all the pages with the text as Issue#.
The following screenshot displays the position of the Search textbox.
Enter the Issue ID and press Enter. It uses the wild search concept and finds the unique issue. Later, it opens the View Issue Details page as shown in the following screenshot.
Recently Visited
Beside the Search textbox, there is a Recently Visited field with a list of Issue IDs that are visited recently as a link.
The following screenshot displays the location of the Recently Visited field.
Click any Issue link to open the View Issue Details page. The Recently Visited field is static throughout all the pages and it is possible to jump to any Issue any time.
Mantis - Change Log
Mantis relates issues with Versions and this relation can be seen in Change Log. Based on the fix version in the issue, Change Log separates the issues and provides details in which the release/version functionalities are covered.
The Change Log information is used to include software release information. It helps users determine the specification in new releases. It answers usual questions such as: 'Whats new?', 'What has been fixed?' and 'Are there security fixes?'
Each project can have several versions. Users report issues against the released versions and the developers typically fix issues in the upcoming versions.
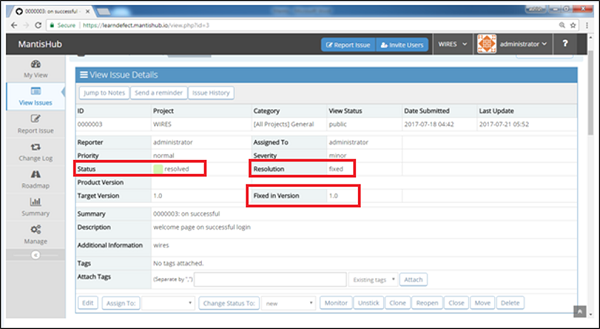
For an issue to get recorded in the Change Log, following criteria should be fulfilled. The issue must have −
- 'Resolved' or 'closed' status.
- 'Fixed' resolution.
- Version should be specified in the 'Fixed in Version' field.
The following screenshot shows the above criteria being fulfilled in the details page.
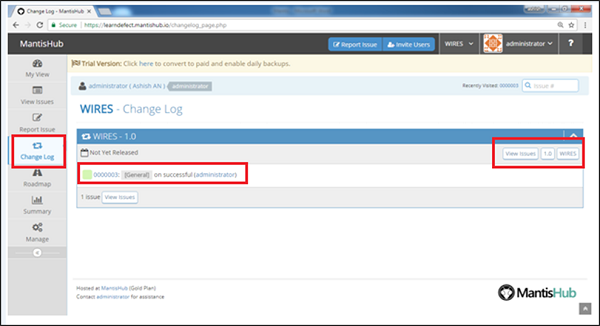
The following screenshot displays how the same issue appears in the Change Log section. At the right top corner of the screen, it displays the version and project name as well.
Click on View Issues will display the details of the issue.
Mantis - Roadmap
The Roadmap page has the information about the upcoming versions and the issues that are targeted to be fixed in these versions. This is very useful information to be provided to the team, the users, and other stakeholders.
It also helps prioritize an issue assignment. It keeps track of the progress of issues such as how many issues are resolved/closed, how many issues still need to be addressed, etc.
The Roadmap page gets automatically populated, once the issues are assigned into a "Target Version".
The following screenshot shows where the target version field is present in the Issue Details page.
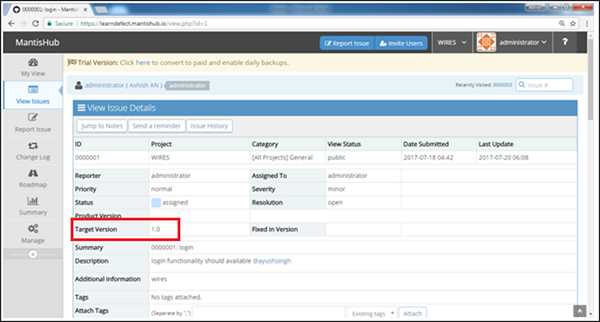
Once a Target Version is added into Issue, it appears in the Roadmap page. Roadmap information displays up-to-date progress of all issues.
Users can see the number of issues to be addressed, how many have been resolved/closed as well as the percentage in progress.
The following screenshot shows the Roadmap page with the percentage in progress and the list of issues.
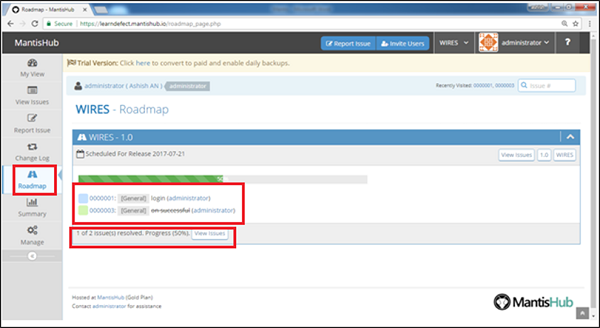
If the issues are not assigned to a target version, it will not appear in the Roadmap.
Resolved issues appear with a strikethrough.
If the "Fixed in Version" field is set, it will appear in the Change Log page as well.
Mantis - Summary
The Summary page is the heart of Mantis. It displays the tabular records of issues. Mantis supports the Summary page as a reporting document in a tabular form.
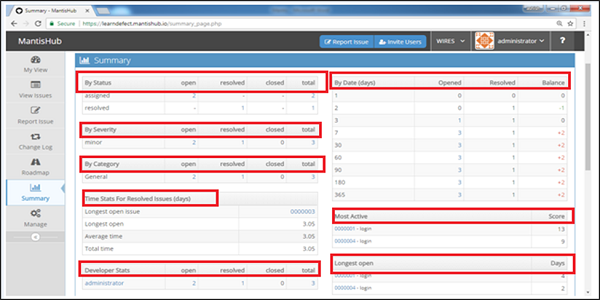
Summary page displays table records based on the following fields −
- By Status
- By Severity
- By Category
- Time Stats for Resolved Issues (days)
- Developer Status
- Reporter by Resolution
- Developer by Resolution
- By Date
- Most Active
- Longest Open
- By Resolution
- By Priority
- Reporter Status
- Reporter Effectiveness
In each section, it displays how many issues are in Open, Resolved, and Closed status. It also displays how many total issues are reported on a particular category.
The following screenshot displays the Summary page and its different categories.
Mantis - Add Custom Fields
The process of adding custom fields include first defining the custom field and then linking it to appropriate projects.
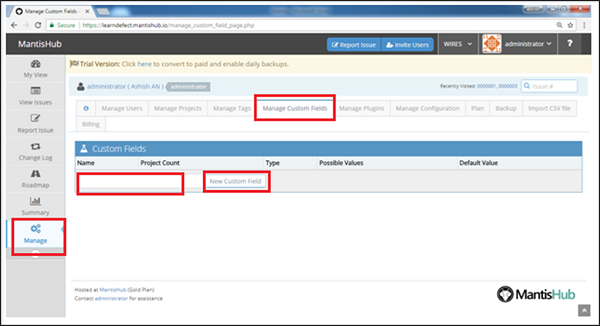
Step 1 − Go to Manage → Manage Custom Field section.
Step 2 − Enter the field name in the textbox.
Step 3 − Click the New Custom Field button as shown in the following screenshot.
Step 4 − After clicking the New Custom Field, the Edit Custom field page opens where the user has to define the custom field specification.
Step 5 − Select a Type for the field from the dropdown list (date, string, list, etc.).
For custom field types, you can write Possible Values. Use the | character to separate the different values. Custom field types that expect such lists include: enumeration, checkbox, list, multi-selection list, and radio buttons.
The 'Default Value' definition allows the custom field to have a default value based on the field type. In most cases, it is a simple value such as a string, a number, or a value from the list of possible values. However, for the Date type, the possible values can include values such as: {today}, {tomorrow}, {+3 days}, {-7 days}, {next week}, {15 December 2013}, etc.

Step 6 − Check the checkboxes specifying the pages on which the custom field should appear and is required.
After defining the custom field, it should be linked to the appropriate projects.
Step 7 − Scroll to the bottom of the 'Edit Custom Field' page to the 'Link custom field to projects' section. Select the projects from the displayed list and click 'Link Custom Field as shown in the following screenshot.
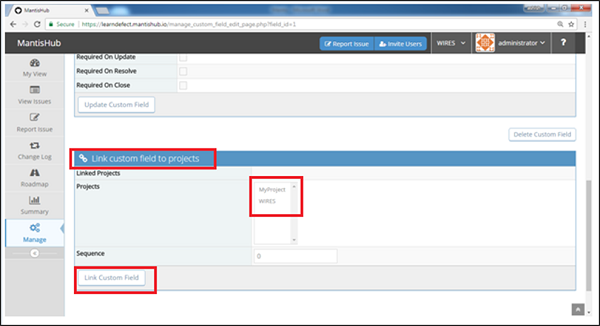
The sequence number is used to determine the relative order of custom fields to each other. Smaller sequence numbers are shown first.
