- Mantis - Home
- Mantis - Introduction
- Mantis - Features
- Mantis - Installation
- Mantis - Trial Setup
- Mantis - Login
- Mantis - My View
- Mantis - Project Management
- Mantis - Manage Categories
- Mantis - Versions
- Mantis - Issue Lifecycle
- Mantis - Report an Issue
- Mantis - Import Issues
- Mantis - View Issues
- Mantis - Edit Issues
- Mantis - Clone an Issue
- Mantis - Advanced Features
- Mantis - Change Status
- Mantis - Issues Relationships
- Mantis - Move an Issue
- Mantis - Issue History
- Miscellaneous Functionalities
- Mantis - Search Issues
- Mantis - Change Log
- Mantis - Roadmap
- Mantis - Summary
- Mantis - Add Custom Fields
Mantis - Add Custom Fields
The process of adding custom fields include first defining the custom field and then linking it to appropriate projects.
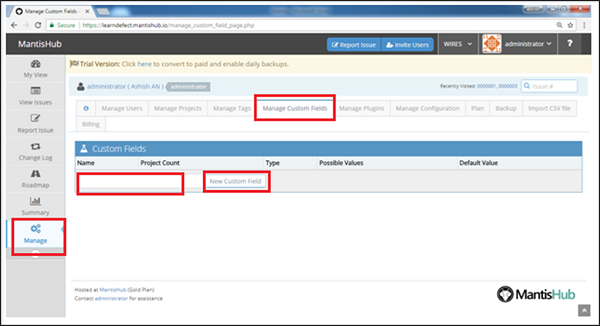
Step 1 − Go to Manage → Manage Custom Field section.
Step 2 − Enter the field name in the textbox.
Step 3 − Click the New Custom Field button as shown in the following screenshot.
Step 4 − After clicking the New Custom Field, the Edit Custom field page opens where the user has to define the custom field specification.
Step 5 − Select a Type for the field from the dropdown list (date, string, list, etc.).
For custom field types, you can write Possible Values. Use the | character to separate the different values. Custom field types that expect such lists include: enumeration, checkbox, list, multi-selection list, and radio buttons.
The 'Default Value' definition allows the custom field to have a default value based on the field type. In most cases, it is a simple value such as a string, a number, or a value from the list of possible values. However, for the Date type, the possible values can include values such as: {today}, {tomorrow}, {+3 days}, {-7 days}, {next week}, {15 December 2013}, etc.

Step 6 − Check the checkboxes specifying the pages on which the custom field should appear and is required.
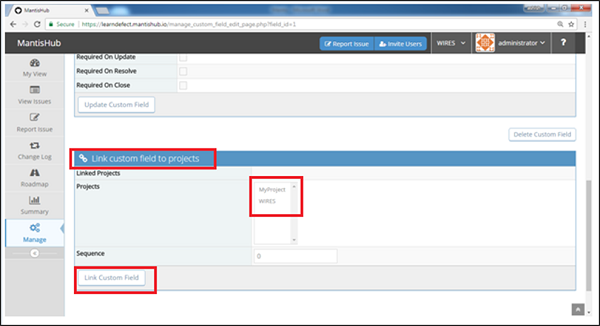
After defining the custom field, it should be linked to the appropriate projects.
Step 7 − Scroll to the bottom of the 'Edit Custom Field' page to the 'Link custom field to projects' section. Select the projects from the displayed list and click 'Link Custom Field as shown in the following screenshot.
The sequence number is used to determine the relative order of custom fields to each other. Smaller sequence numbers are shown first.
