- Java Data Structures Resources
- Java Data Structures - Quick Guide
- Java Data Structures - Resources
- Java Data Structures - Discussion
Java Data Structures - Quick Guide
Java Data Structures - Creating Arrays
In Java array is a data structure/container, which stores a fixed-size sequential collection of elements of the same type. An array is used to store a collection of data, but it is often more useful to think of an array as a collection of variables of the same type.
Element − Each item stored in an array is called an element.
Index − Each location of an element in an array has a numerical index, which is used to identify the element.
Creating Arrays
To create an array, you need to declare the particular array, by specifying its type, and the variable to reference it. Then, allot memory to the declared array using the new operator (specify the size of the array in the square braces [ ]).
Syntax
dataType[] arrayRefVar;
arrayRefVar = new dataType[arraySize];
(or)
dataType[] arrayRefVar = new dataType[arraySize];
Alternatively, you can create an array by directly specifying the elements separated by commas, within the flower braces { }.
dataType[] arrayRefVar = {value0, value1, ..., valuek};
The array elements are accessed through the index. Array indices are 0-based; that is, they start from 0 to arrayRefVar.length-1.
Example
Following statement declares an array variable of integer type, myArray, and allots memory to store of 10 elements of integer type and assigns its reference to myArray.
int[] myList = new int[10];
Populating the array
The above statement Just creates an empty array. You need populate this array by assigning values to each position using the index −
myList [0] = 1;
myList [1] = 10;
myList [2] = 20;
.
.
.
.
Example
Following is an Java example to create an integer. In this example we are trying to create an integer array of size 10, populate it, display the contents of it using loops.
public class CreatingArray {
   public static void main(String args[]) {
      int[] myArray = new int[10];
      myArray[0] = 1;
      myArray[1] = 10;
      myArray[2] = 20;
      myArray[3] = 30;
      myArray[4] = 40;
      myArray[5] = 50;
      myArray[6] = 60;
      myArray[7] = 70;
      myArray[8] = 80;
      myArray[9] = 90;
      System.out.println("Contents of the array ::");

      for(int i = 0; i<myArray.length; i++) {
        System.out.println("Element at the index "+i+" ::"+myArray[i]);
      }
   }
}
Output
Contents of the array ::
Element at the index 0 ::1
Element at the index 1 ::10
Element at the index 2 ::20
Element at the index 3 ::30
Element at the index 4 ::40
Element at the index 5 ::50
Element at the index 6 ::60
Element at the index 7 ::70
Element at the index 8 ::80
Element at the index 9 ::90
Example
Following is another Java example which creates and populates an array by taking inputs from user.
import java.util.Scanner;
public class CreatingArray {
   public static void main(String args[]) {
      // Instantiating the Scanner class
      Scanner sc = new Scanner(System.in);

      // Taking the size from user
      System.out.println("Enter the size of the array ::");
      int size = sc.nextInt();

      // creating an array of given size
      int[] myArray = new int[size];

      // Populating the array
      for(int i = 0 ;i<size; i++) {
         System.out.println("Enter the element at index "+i+" :");
         myArray[i] = sc.nextInt();
      }

      // Displaying the contents of the array
      System.out.println("Contents of the array ::");
      for(int i = 0; i<myArray.length; i++) {
         System.out.println("Element at the index "+i+" ::"+myArray[i]);
      }
   }
}
Output
Enter the size of the array ::
5
Enter the element at index 0 :
25
Enter the element at index 1 :
65
Enter the element at index 2 :
78
Enter the element at index 3 :
66
Enter the element at index 4 :
54
Contents of the array ::
Element at the index 0 ::25
Element at the index 1 ::65
Element at the index 2 ::78
Element at the index 3 ::66
Element at the index 4 ::54
Inserting Elements in an Array
Insert operation is to insert one or more data elements into an array. Based on the requirement, a new element can be added at the beginning, end, or any given index of array.
Algorithm
Let LA be a Linear Array (unordered) with N elements and K is a positive integer such that K<=N. Following is the algorithm where ITEM is inserted into the Kth position of LA −
Step 1 - Start
Step 2 - Set J = N
Step 3 - Set N = N+1
Step 4 - Repeat steps 5 and 6 while J >= K
Step 5 - Set LA[J+1] = LA[J]
Step 6 - Set J = J-1
Step 7 - Set LA[K] = ITEM
Step 8 - Stop
Example
Since the array size in Java is fixed after insertion operation excess elements of the array will not be displayed. Therefore, if you insert the element in the middle of the array in order to display the last element you need to create a new array with size n+1 (where n is the size of the current array) and insert elements to it, and display it or, print the last element in a separate statement after printing the contents of the array.
public class InsertingElements {
   public static void main(String args[]) {
      int[] myArray = {10, 20, 30, 45, 96, 66};
      int pos = 3;
      int data = 105;
      int j = myArray.length;
      int lastElement = myArray[j-1];

      for(int i = (j-2); i >= (pos-1); i--) {
    	  myArray[i+1] = myArray[i];
      }
      myArray[pos-1] = data;
      System.out.println("Contents of the array after insertion ::");

      for(int i = 0; i < myArray.length; i++) {
         System.out.print(myArray[i]+ ", ");
      }
      System.out.print(lastElement);
   }
}
Output
Contents of the array after insertion ::
10, 20, 105, 30, 45, 96, 66
The apache commons provides a library named org.apache.commons.lang3 and, following is the maven dependency to add library to your project.
<dependencies>
   <dependency>
      <groupId>org.apache.commons</groupId>
         <artifactId>commons-lang3</artifactId>
         <version>3.0</version>
   </dependency>
</dependencies>
This package provides a class named ArrayUtils. You can add an element at a particular position in an array using the add() method of this class.
Example
import java.util.Scanner;
import org.apache.commons.lang3.ArrayUtils;

public class InsertingElements {
   public static void main(String args[]) {
      Scanner sc = new Scanner(System.in);
      System.out.println("Enter the number of elements needed :");
      int n = sc.nextInt();
      int[] myArray = new int[n];
      System.out.println("Enter the elements ::");

      for(int i = 0; i < n; i++) {
         myArray[i] = sc.nextInt();
      }
      System.out.println("Enter the position to insert the element :");
      int pos = sc.nextInt();
      System.out.println("Enter the element:");
      int element = sc.nextInt();
      int [] result = ArrayUtils.add(myArray, pos, element);
      System.out.println("Contents of the array after insertion ::");

      for(int i = 0; i < result.length; i++) {
         System.out.print(result[i]+ " ");
      }
   }
}
Output
Enter the number of elements needed :
5
Enter the elements ::
55
45
25
66
45
Enter the position to insert the element :
3
Enter the element:
404
Contents of the array after insertion ::
55 45 25 404 66 45
Remove Elements from Arrays
To remove an existing element from an array you need to skip the element in the given position (say k) by replacing it with the next element (k+1) then, replace the element at k+1 with the element at k+2 continue this till the end of the array. Finally neglect the last element.
Algorithm
Consider LA is a linear array with N elements and K is a positive integer such that K<=N. Following is the algorithm to delete an element available at the Kth position of LA.
Step 1 - Start
Step 2 - Set J = K
Step 3 - Repeat steps 4 and 5 while J < N
Step 4 - Set LA[J] = LA[J + 1]
Step 5 - Set J = J+1
Step 6 - Set N = N-1
Step 7 - Stop
Example
public class RemovingElements {
   public static void main(String args[]) {
      int[] myArray = {10, 20, 30, 45, 96, 66};

      int pos = 3;
      int j = myArray.length;

      for(int i = pos; i < j-1; i++) {
         myArray[i] = myArray[i+1];
      }

      System.out.println("Contents of the array after deletion ::");
      for(int i = 0; i < myArray.length-1; i++) {
         System.out.print(myArray[i]+ ", ");
      }
   }
}
Output
Contents of the array after deletion ::
10, 20, 30, 96, 66,
The ArrayUtils class provide remove() method to delete an element from an array.
Example
import java.util.Scanner;
import org.apache.commons.lang3.ArrayUtils;

public class RemovingElements {
   public static void main(String args[]) {
      Scanner sc = new Scanner(System.in);
      System.out.println("Enter the number of elements needed :");
      int n = sc.nextInt();
      int[] myArray = new int[n];
      System.out.println("Enter the elements ::");

      for(int i = 0; i < n; i++) {
         myArray[i] = sc.nextInt();
      }

      System.out.println("Enter the position to delete the element :");
      int pos = sc.nextInt();

      int [] result = ArrayUtils.remove(myArray, pos);
      System.out.println("Contents of the array after deletion ::");

      for(int i = 0; i < result.length; i++) {
         System.out.print(result[i]+ " ");
      }
   }
}
Output
Enter the number of elements needed :
5
Enter the elements ::
44
55
62
45
55
Enter the position to delete the element :
3
Contents of the array after deletion ::
44 55 62 55
Java Data Structures - Joining two Arrays
One way of doing it is, create an array of length equals to the sum of lengths of the two arrays and, add elements of both arrays to it one by one.
Example
import java.util.Arrays;

public class JoiningTwoArrays {
   public static void main(String args[]) {
      String[] arr1 = {"JavaFX", "OpenNLP", "OpenCV", "Java"};
      String[] arr2 = {"Hadoop", "Sqoop", "HBase", "Hive" };
      String[] result = new String[arr1.length+arr2.length];
      int count = 0;

      for(int i = 0; i<arr1.length; i++ ) {
         result[i] = arr1[i];
         count++;
      }

      for(int i = 0; i<arr2.length; i++ ) {
         result[count++] = arr2[i];
      }

      System.out.println("Contents of the resultant array ::");
      System.out.println(Arrays.toString(result));
   }
}
Output
Contents of the resultant array ::
[JavaFX, OpenNLP, OpenCV, Java, Hadoop, Sqoop, HBase, Hive]
Sorting Array Elements
To sort an array follow the steps given below.
Compare the first two elements of the array
If the first element is greater than the second swap them.
Then, compare 2nd and 3rd elements if the second element is greater than the 3rd swap them.
Repeat this till the end of the array.
Swapping an array
Create a variable (temp), initialize it with 0.
Assign 1st number to temp.
Assign 2nd number to 1st number.
Assign temp to second number.
Example
import java.util.Arrays;
public class SortingArray {
   public static void main(String args[]) {

     // String[] myArray = {"JavaFX", "HBase", "OpenCV", "Java", "Hadoop", "Neo4j"};
      int[] myArray = {2014, 2545, 4236, 6521, 1254, 2455, 5756, 66406};

      int size = myArray.length;
      for(int i = 0; i<size-1; i++) {
         for (int j = i+1; j<size; j++) {
            if(myArray[i]>(myArray[j])) {
               int temp = myArray[i];
               myArray[i] = myArray[j];
               myArray[j] = temp;
            }
         }
      }
      System.out.println("Sorted array :"+Arrays.toString(myArray));
   }
}
Output
Sorted array :[1254, 2014, 2455, 2545, 4236, 5756, 6521, 66406]
Searching elements in an Array
You can search the elements of an array using several algorithms for this instance let us discuss linear search algorithm.
Linear Search is a very simple search algorithm. In this type of search, a sequential search is made over all items one by one. Every item is checked and if a match is found then that particular item is returned, otherwise the search continues till the end of the data collection.
Algorithm
Step 1 - Set i to 1.
Step 2 - if i > n then go to step 7.
Step 3 - if A[i] = x then go to step 6.
Step 4 - Set i to i + 1.
Step 5 - Go to Step 2.
Step 6 - Print Element x Found at index i and go to step 8.
Step 7 - Print element not found.
Program
public class LinearSearch {
   public static void main(String args[]) {
      int array[] =  {10, 20, 25, 63, 96, 57};
      int size = array.length;
      int value = 63;

      for (int i = 0 ; i < size-1; i++) {
         if(array[i]==value) {
            System.out.println("Index of the required element is :"+ i);
         }
      }
   }
}
Output
Index of the required element is :3
Two Dimensional Arrays
A two dimensional array in Java is represented as an array of one dimensional arrays of the same type. Mostly, it is used to represent a table of values with rows and columns −
Int[][] myArray = {{10, 20, 30}, {11, 21, 31}, {12, 22, 32} }
In short a two-dimensional array contains one dimensional arrays as elements. It is represented with two indices where, the first index denotes the position of the array and the second index represents the position of the element with in that particular array −
Example
public class Creating2DArray {
   public static void main(String args[]) {
      int[][] myArray = new int[3][3];
      myArray[0][0] = 21;
      myArray[0][1] = 22;
      myArray[0][2] = 23;
      myArray[1][0] = 24;
      myArray[1][1] = 25;
      myArray[1][2] = 26;
      myArray[2][0] = 27;
      myArray[2][1] = 28;
      myArray[2][2] = 29;

      for(int i = 0; i<myArray.length; i++ ) {
         for(int j = 0;j<myArray.length; j++) {
            System.out.print(myArray[i][j]+" ");
         }
         System.out.println();
      }
   }
}
Output
21 22 23
24 25 26
27 28 29
Java Data Structures - Loop through an array
To process array elements, we often use either for loop or for each loop because all of the elements in an array are of the same type and the size of the array is known. Suppose we have an array of 5 elements we can print all the elements of this array as −
Example
public class ProcessingArrays {
   public static void main(String args[]) {
      int myArray[] = {22, 23, 25, 27, 30};

      for(int i = 0; i<myArray.length; i++) {
         System.out.println(myArray[i]);
      }
   }
}
Output
22
23
25
27
30
Java Data Structures - Bitset Class
The BitSet class creates a special type of array that holds bit values. It can increase in size as needed this makes it similar to a vector of bits. The indices of a BitSet are represented by the non-negative values and Each index holds a boolean value.
The BitSet Class in Java
The BitSet class implements a group of bits or flags that can be set and cleared individually. This class is very useful in cases where you need to keep up with a set of Boolean values; you just assign a bit to each value and set or clear it as appropriate. The BitSet array can increase in size as needed. This makes it similar to a vector of bits.
The BitSet defines the following two constructors.
| Sr.No. | Constructor and Description |
|---|---|
| 1 | BitSet( ) This constructor creates a default object. |
| 2 | BitSet(int size) This constructor allows you to specify its initial size, i.e., the number of bits that it can hold. All bits are initialized to zero. |
BitSet implements the Cloneable interface and defines the methods listed in the following table
| Sr.No. | Method and Description |
|---|---|
| 1 | void and(BitSet bitSet) ANDs the contents of the invoking BitSet object with those specified by bitSet. The result is placed into the invoking object. |
| 2 | void andNot(BitSet bitSet) For each 1 bit in bitSet, the corresponding bit in the invoking BitSet is cleared. |
| 3 | int cardinality( ) Returns the number of set bits in the invoking object. |
| 4 | void clear( ) Zeros all bits. |
| 5 | void clear(int index) Zeros the bit specified by index. |
| 6 | void clear(int startIndex, int endIndex) Zeros the bits from startIndex to endIndex. |
| 7 | Object clone( ) Duplicates the invoking BitSet object. |
| 8 | boolean equals(Object bitSet) Returns true if the invoking bit set is equivalent to the one passed in bitSet. Otherwise, the method returns false. |
| 9 | void flip(int index) Reverses the bit specified by the index. |
| 10 | void flip(int startIndex, int endIndex) Reverses the bits from startIndex to endIndex. |
| 11 | boolean get(int index) Returns the current state of the bit at the specified index. |
| 12 | BitSet get(int startIndex, int endIndex) Returns a BitSet that consists of the bits from startIndex to endIndex. The invoking object is not changed. |
| 13 | int hashCode( ) Returns the hash code for the invoking object. |
| 14 | boolean intersects(BitSet bitSet) Returns true if at least one pair of corresponding bits within the invoking object and bitSet are 1. |
| 15 | boolean isEmpty( ) Returns true if all bits in the invoking object are zero. |
| 16 | int length( ) Returns the number of bits required to hold the contents of the invoking BitSet. This value is determined by the location of the last 1 bit. |
| 17 | int nextClearBit(int startIndex) Returns the index of the next cleared bit, (that is, the next zero bit), starting from the index specified by startIndex. |
| 18 | int nextSetBit(int startIndex) Returns the index of the next set bit (that is, the next 1 bit), starting from the index specified by startIndex. If no bit is set, -1 is returned. |
| 19 | void or(BitSet bitSet) ORs the contents of the invoking BitSet object with that specified by bitSet. The result is placed into the invoking object. |
| 20 | void set(int index) Sets the bit specified by index. |
| 21 | void set(int index, boolean v) Sets the bit specified by index to the value passed in v. True sets the bit, false clears the bit. |
| 22 | void set(int startIndex, int endIndex) Sets the bits from startIndex to endIndex. |
| 23 | void set(int startIndex, int endIndex, boolean v) Sets the bits from startIndex to endIndex, to the value passed in v. true sets the bits, false clears the bits. |
| 24 | int size( ) Returns the number of bits in the invoking BitSet object. |
| 25 | String toString( ) Returns the string equivalent of the invoking BitSet object. |
| 26 | void xor(BitSet bitSet) XORs the contents of the invoking BitSet object with that specified by bitSet. The result is placed into the invoking object. |
Example
The following program illustrates several of the methods supported by this data structure
import java.util.BitSet;
public class BitSetDemo {
   public static void main(String args[]) {
      BitSet bits1 = new BitSet(16);
      BitSet bits2 = new BitSet(16);

      // set some bits
      for(int i = 0; i < 16; i++) {
         if((i % 2) == 0) bits1.set(i);
         if((i % 5) != 0) bits2.set(i);
      }

      System.out.println("Initial pattern in bits1: ");
      System.out.println(bits1);
      System.out.println("\n Initial pattern in bits2: ");
      System.out.println(bits2);

      // AND bits
      bits2.and(bits1);
      System.out.println("\nbits2 AND bits1: ");
      System.out.println(bits2);

      // OR bits
      bits2.or(bits1);
      System.out.println("\nbits2 OR bits1: ");
      System.out.println(bits2);

      // XOR bits
      bits2.xor(bits1);
      System.out.println("\nbits2 XOR bits1: ");
      System.out.println(bits2);
   }
}
Output
Initial pattern in bits1:
{0, 2, 4, 6, 8, 10, 12, 14}

Initial pattern in bits2:
{1, 2, 3, 4, 6, 7, 8, 9, 11, 12, 13, 14}

bits2 AND bits1:
{2, 4, 6, 8, 12, 14}

bits2 OR bits1:
{0, 2, 4, 6, 8, 10, 12, 14}

bits2 XOR bits1:
{}
Java Data Structures - Creating a Bitset
You can create a BitSet by instantiating the BitSet class of the java.util package. One of the constructor of the BitSet class allows you to specify its initial size, i.e., the number of bits that it can hold.
Therefore, to create a bit set instantiate the BitSet class by passing the required number of bits to its constructor.
BitSet bitSet = new BitSet(5);
Example
import java.util.BitSet;
public class CreatingBitSet {
   public static void main(String args[]) {

      BitSet bitSet = new BitSet(5);
      bitSet.set(0);
      bitSet.set(2);
      bitSet.set(4);
      System.out.println(bitSet);
   }
}
Output
{0, 2, 4}
Adding values to the Bitset
BitSet class provides the set() method it is used to set the value of the specified bit to true. Set the required values of the created BitSet using the set() method.
Example
import java.util.BitSet;
public class CreatingBitSet {
   public static void main(String args[]) {

      BitSet bitSet = new BitSet(5);
      bitSet.set(0);
      bitSet.set(2);
      bitSet.set(4);
      System.out.println(bitSet);
   }
}
Output
{0, 2, 4}
Remove elements from a BitSet
You can clear the all the bits i.e. set all bits to false using the clear() method of the BitSet class. Similarly you can also clear the values at the required index by passing the index as a parameter to this method.
Example
Following is an example to remove the elements of a BitSet class. Here, we are trying to sets the elements at the indices with even values (up to 25) to true. Later we will clear the elements at the indices with values divisible by 5.
import java.util.BitSet;
public class RemovingelementsOfBitSet {
   public static void main(String args[]) {
      BitSet bitSet = new BitSet(10);

      for (int i = 1; i<25; i++) {
         if(i%2==0) {
            bitSet.set(i);
         }
      }
      System.out.println(bitSet);
      System.out.println("After clearing the contents ::");

      for (int i = 0; i<25; i++) {
         if(i%5==0) {
            bitSet.clear(i);
         }
      }
      System.out.println(bitSet);
   }
}
Output
{2, 4, 6, 8, 10, 12, 14, 16, 18, 20, 22, 24}
After clearing the contents ::
{2, 4, 6, 8, 12, 14, 16, 18, 22, 24}
Verifying if the BitSet is empty
A bit set is considered as empty when all the values in it are false. The BitSet class provides the isEmpty() method. This method returns a boolean value, which is false when the current BitSet is empty and true when it is not empty.
You can verify whether a particular BitSet is empty using the isEmpty() method.
Example
import java.util.BitSet;
public class isEmpty {
   public static void main(String args[]) {
      BitSet bitSet = new BitSet(10);

      for (int i = 1; i<25; i++) {
         if(i%2==0) {
            bitSet.set(i);
         }
      }

      if (bitSet.isEmpty()) {
         System.out.println("This BitSet is empty");
      } else {
         System.out.println("This BitSet is not empty");
         System.out.println("The contents of it are : "+bitSet);
      }
      bitSet.clear();

      if (bitSet.isEmpty()) {
         System.out.println("This BitSet is empty");
      } else {
         System.out.println("This BitSet is not empty");
         System.out.println("The contents of it are : "+bitSet);
      }
   }
}
Output
This BitSet is not empty
The contents of it are : {2, 4, 6, 8, 10, 12, 14, 16, 18, 20, 22, 24}
This BitSet is empty
Printing the elements of the BitSet
The get() method of the BitSet class returns the current state/value of the bit at the specified index. Using this You can print the contents of the BitSet.
Example
import java.util.BitSet;
public class PrintingElements {
   public static void main(String args[]) {
      BitSet bitSet = new BitSet(10);

      for (int i = 1; i<25; i++) {
         if(i%2==0) {
            bitSet.set(i);
         }
      }
      System.out.println("After clearing the contents ::");

      for (int i = 1; i<=25; i++) {
         System.out.println(i+": "+bitSet.get(i));
      }
   }
}
Output
After clearing the contents ::
1: false
2: true
3: false
4: true
5: false
6: true
7: false
8: true
9: false
10: true
11: false
12: true
13: false
14: true
15: false
16: true
17: false
18: true
19: false
20: true
21: false
22: true
23: false
24: true
25: false
Or, you can directly print the contents of the bit set using the println() method.
System.out.println(bitSet);
Java Data Structures - Vector Class
The Vector is a data structure which is similar to an array. Like Arrays it allocates contiguous memory. Unlike stack vector is of flexible size.
Vector Class
The java.util.Vector class implements a growable array of objects. Similar to an Array, it contains components that can be accessed using an integer index. Following are the important points about Vector −
The size of a Vector can grow or shrink as needed to accommodate adding and removing items.
Each vector tries to optimize storage management by maintaining a capacity and a capacity Increment.
As of the Java 2 platform v1.2, this class was retrofitted to implement the List interface.
Unlike the new collection implementations, Vector is synchronized.
This class is a member of the Java Collections Framework.
Class declaration
Following is the declaration for java.util.Vector class −
public class Vector<E>
   extends AbstractList<E>
   implements List<E>, RandomAccess, Cloneable, Serializable
Here <E> represents an Element, which could be any class. For example, if you're building an array list of Integers then you'd initialize it as follows −
ArrayList<Integer> list = new ArrayList<Integer>();
Class constructors
| Sr.No. | Constructor and Description |
|---|---|
| 1 | Vector() This constructor is used to create an empty vector so that its internal data array has size 10 and its standard capacity increment is zero. |
| 2 | Vector(Collection<? extends E> c) This constructor is used to create a vector containing the elements of the specified collection, in the order they are returned by the collection's iterator. |
| 3 | Vector(int initialCapacity) This constructor is used to create an empty vector with the specified initial capacity and with its capacity increment equal to zero. |
| 4 | Vector(int initialCapacity, int capacityIncrement) This constructor is used to create an empty vector with the specified initial capacity and capacity increment. |
Class methods
| Sr.No. | Method and Description |
|---|---|
| 1 | boolean add(E e) This method appends the specified element to the end of this Vector. |
| 2 | void add(int index, E element) This method inserts the specified element at the specified position in this Vector. |
| 3 | boolean addAll(Collection<? extends E> c) This method appends all of the elements in the specified Collection to the end of this Vector. |
| 4 | boolean addAll(int index, Collection<? extends E> c) This method inserts all of the elements in the specified Collection into this Vector at the specified position. |
| 5 | void addElement(E obj) This method adds the specified component to the end of this vector, increasing its size by one. |
| 6 | int capacity() This method returns the current capacity of this vector. |
| 7 | void clear() This method removes all of the elements from this vector. |
| 8 | clone clone() This method returns a clone of this vector. |
| 9 | boolean contains(Object o) This method returns true if this vector contains the specified element. |
| 10 | boolean containsAll(Collection<?> c) This method returns true if this Vector contains all of the elements in the specified Collection. |
| 11 | void copyInto(Object[ ] anArray) This method copies the components of this vector into the specified array. |
| 12 | E elementAt(int index) This method returns the component at the specified index. |
| 13 | Enumeration<E> elements() This method returns an enumeration of the components of this vector. |
| 14 | void ensureCapacity(int minCapacity) This method increases the capacity of this vector, if necessary, to ensure that it can hold at least the number of components specified by the minimum capacity argument. |
| 15 | boolean equals(Object o) This method compares the specified Object with this Vector for equality. |
| 16 | E firstElement() This method returns the first component (the item at index 0) of this vector. |
| 17 | E get(int index) This method returns the element at the specified position in this Vector. |
| 18 | int hashCode() This method returns the hash code value for this Vector. |
| 19 | int indexOf(Object o) This method returns the index of the first occurrence of the specified element in this vector, or -1 if this vector does not contain the element. |
| 20 | int indexOf(Object o, int index) This method returns the index of the first occurrence of the specified element in this vector, searching forwards from index, or returns -1 if the element is not found. |
| 21 | void insertElementAt(E obj, int index) This method inserts the specified object as a component in this vector at the specified index. |
| 22 | boolean isEmpty() This method tests if this vector has no components. |
| 23 | E lastElement() This method returns the last component of the vector. |
| 24 | int lastIndexOf(Object o) This method returns the index of the last occurrence of the specified element in this vector, or -1 if this vector does not contain the element. |
| 25 | int lastIndexOf(Object o, int index) This method returns the index of the last occurrence of the specified element in this vector, searching backwards from index, or returns -1 if the element is not found. |
| 26 | E remove(int index) This method removes the element at the specified position in this Vector. |
| 27 | boolean remove(Object o) This method removes the first occurrence of the specified element in this Vector If the Vector does not contain the element, it is unchanged. |
| 28 | boolean removeAll(Collection<?> c) This method removes from this Vector all of its elements that are contained in the specified Collection. |
| 29 | void removeAllElements() This method removes all components from this vector and sets its size to zero. |
| 30 | boolean removeElement(Object obj) This method removes the first occurrence of the argument from this vector. |
| 31 | void removeElementAt(int index) This method deletes the component at the specified index. |
| 32 | protected void removeRange(int fromIndex, int toIndex) This method removes from this List all of the elements whose index is between fromIndex, inclusive and toIndex, exclusive. |
| 33 | boolean retainAll(Collection<?> c) This method retains only the elements in this Vector that are contained in the specified Collection. |
| 34 | E set(int index, E element) This method replaces the element at the specified position in this Vector with the specified element. |
| 35 | void setElementAt(E obj, int index) This method sets the component at the specified index of this vector to be the specified object. |
| 36 | void setSize(int newSize) This method sets the size of this vector. |
| 37 | int size() This method returns the number of components in this vector. |
| 38 | List <E> subList(int fromIndex, int toIndex) This method returns a view of the portion of this List between fromIndex, inclusive, and toIndex, exclusive. |
| 39 | object[ ] toArray() This method returns an array containing all of the elements in this Vector in the correct order. |
| 40 | <T> T[ ] toArray(T[ ] a) This method returns an array containing all of the elements in this Vector in the correct order; the runtime type of the returned array is that of the specified array. |
| 41 | String toString() This method returns a string representation of this Vector, containing the String representation of each element. |
| 42 | void trimToSize() This method trims the capacity of this vector to be the vector's current size. |
Java Data Structures - Creating a Vector
The Vector class of the java.util class implements a dynamic array. It is similar to ArrayList, but with two differences where a Vector is synchronized and, it contains many legacy methods that are not part of the collections framework.
You can create a vector by instantiating the Vector class of the java.util package.
Vector vect = new Vector();
Example
import java.util.Vector;
public class CreatingVector {
   public static void main(String args[]) {
      Vector vect = new Vector();
      vect.addElement("Java");
      vect.addElement("JavaFX");
      vect.addElement("HBase");
      vect.addElement("Neo4j");
      vect.addElement("Apache Flume");
      System.out.println(vect);
   }
}
Output
[Java, JavaFX, HBase, Neo4j, Apache Flume]
Adding elements to a Vector
The Vector class provides addElement() method it accepts an object and adds the specified object/element to the current Vector.
You can add an element to a Vector object using the addElement() method by passing the element/object that is to be added as a parameter to this method.
vect.addElement("Java");
Example
import java.util.Vector;
public class CreatingVector {
   public static void main(String args[]) {
      Vector vect = new Vector();
      vect.addElement("Java");
      vect.addElement("JavaFX");
      vect.addElement("HBase");
      vect.addElement("Neo4j");
      vect.addElement("Apache Flume");
      System.out.println(vect);
   }
}
Output
[Java, JavaFX, HBase, Neo4j, Apache Flume]
Removing elements from a Vector
The Vector class provides removeElement() method it accepts an object and removes the specified object/element from the current Vector.
You can remove an element of Vector object using the removeElement() method by passing the index of the element that is to be removed as a parameter to this method.
Example
import java.util.Vector;

public class RemovingElements {
   public static void main(String args[]) {

      Vector vect = new Vector();
      vect.addElement("Java");
      vect.addElement("JavaFX");
      vect.addElement("HBase");
      vect.addElement("Neo4j");
      vect.addElement("Apache Flume");
      System.out.println("Contents of the vector :"+vect);
      vect.removeElement(3);
      System.out.println("Contents of the vector after removing elements:"+vect);
   }
}
Output
Contents of the vector :[Java, JavaFX, HBase, Neo4j, Apache Flume]
Contents of the vector after removing elements:[Java, JavaFX, HBase, Neo4j, Apache Flume]
Verifying if the Vector is empty
The Vector class of the java.util package provides a isEmpty() method. This method verifies whether the current vector is empty or not. If the given vector is empty this method returns true else it returns false.
Example
import java.util.Vector;

public class Vector_IsEmpty {
   public static void main(String args[]) {
      Vector vect = new Vector();
      vect.addElement("Java");
      vect.addElement("JavaFX");
      vect.addElement("HBase");
      vect.addElement("Neo4j");
      vect.addElement("Apache Flume");
      System.out.println("Elements of the vector :"+vect);
      boolean bool1 = vect.isEmpty();

      if(bool1==true) {
         System.out.println("Given vector is empty");
      } else {
         System.out.println("Given vector is not empty");
      }
      vect.clear();
      boolean bool2 = vect.isEmpty();
      System.out.println("cleared the contents of the vector");

      if(bool2==true) {
         System.out.println("Given vector is empty");
      } else {
         System.out.println("Given vector is not empty");
      }
   }
}
Output
Elements of the vector :[Java, JavaFX, HBase, Neo4j, Apache Flume]
Given vector is not empty
cleared the contents of the vector
Given vector is empty
Clearing the elements of the Vector
You can remove all the elements in the given vector using the clear() method.
Example
import java.util.Vector;

public class ClearingElements {
   public static void main(String args[]) {
      Vector vect = new Vector();
      vect.addElement("Java");
      vect.addElement("JavaFX");
      vect.addElement("HBase");
      vect.addElement("Neo4j");
      vect.addElement("Apache Flume");

      System.out.println("Elements of the vector :"+vect);
      vect.clear();
      System.out.println("Elements of the vector after clearing it :"+vect);
   }
}
Output
Elements of the vector :[Java, JavaFX, HBase, Neo4j, Apache Flume]
Elements of the vector after clearing it :[]
Printing the elements of the Vector
You can print all the elements of a vector using the println statement directly.
System.out.println(vect);
Or, you can prints its elements one by one using the methods hasMoreElements() and nextElement().
Example
import java.util.*;
public class VectorPrintingElements {
   public static void main(String args[]) {

      // initial size is 3, increment is 2
      Vector v = new Vector();

      v.addElement(new Integer(1));
      v.addElement(new Integer(2));
      v.addElement(new Integer(3));
      v.addElement(new Integer(4));
      System.out.println("Capacity after four additions: " + v.capacity());

      // enumerate the elements in the vector.
      Enumeration vEnum = v.elements();
      System.out.println("\nElements in vector:");

      while(vEnum.hasMoreElements())
      System.out.print(vEnum.nextElement() + " ");
      System.out.println();
   }
}
Output
Capacity after four additions: 10

Elements in vector:
1 2 3 4
Java Data Structures - Stack Class
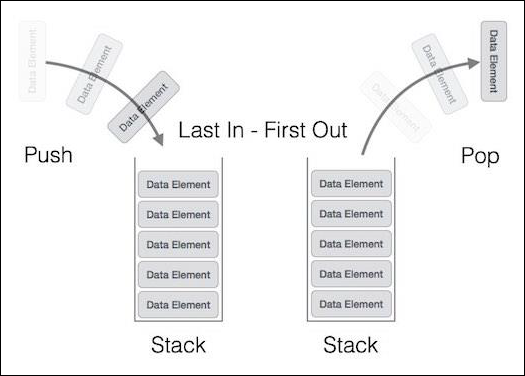
A stack is an Abstract Data Type (ADT), commonly used in most programming languages. It is named stack as it behaves like a real-world stack, for example a deck of cards or a pile of plates, etc.

A real-world stack allows operations at one end only. For example, we can place or remove a card or plate from the top of the stack only. Likewise, Stack ADT allows all data operations at one end only. At any given time, we can only access the top element of a stack.
This feature makes it LIFO data structure. LIFO stands for Last-in-first-out. Here, the element which is placed (inserted or added) last, is accessed first. In stack terminology, insertion operation is called PUSH operation and removal operation is called POP operation.
Stack Representation
The following diagram depicts a stack and its operations −
A stack can be implemented by means of Array, Structure, Pointer, and Linked List. Stack can either be a fixed size one or it may have a sense of dynamic resizing. Here, we are going to implement stack using arrays, which makes it a fixed size stack implementation.
The Stack Class
Stack is a subclass of Vector that implements a standard last-in, first-out stack.
Stack only defines the default constructor, which creates an empty stack. Stack includes all the methods defined by Vector, and adds several of its own.
Stack( )
Apart from the methods inherited from its parent class Vector, Stack defines the following methods −
| Sr.No. | Method and Description |
|---|---|
| 1 | boolean empty() Tests if this stack is empty. Returns true if the stack is empty, and returns false if the stack contains elements. |
| 2 | Object peek( ) Returns the element on the top of the stack, but does not remove it. |
| 3 | Object pop( ) Returns the element on the top of the stack, removing it in the process. |
| 4 | Object push(Object element) Pushes the element onto the stack. Element is also returned. |
| 5 | int search(Object element) Searches for element in the stack. If found, its offset from the top of the stack is returned. Otherwise, .1 is returned. |
Example
The following program illustrates several of the methods supported by this collection −
import java.util.*;
public class StackDemo {
   static void showpush(Stack st, int a) {
      st.push(new Integer(a));
      System.out.println("push(" + a + ")");
      System.out.println("stack: " + st);
   }

   static void showpop(Stack st) {
      System.out.print("pop -> ");
      Integer a = (Integer) st.pop();
      System.out.println(a);
      System.out.println("stack: " + st);
   }

   public static void main(String args[]) {
      Stack st = new Stack();
      System.out.println("stack: " + st);
      showpush(st, 42);
      showpush(st, 66);
      showpush(st, 99);
      showpop(st);
      showpop(st);
      showpop(st);

      try {
         showpop(st);
      } catch (EmptyStackException e) {
         System.out.println("empty stack");
      }
   }
}
Output
stack: [ ]
push(42)
stack: [42]
push(66)
stack: [42, 66]
push(99)
stack: [42, 66, 99]
pop -> 99
stack: [42, 66]
pop -> 66
stack: [42]
pop -> 42
stack: [ ]
pop -> empty stack
Java Data Structures - Creating a Stack
The stack is represented by the Stack class of the java.util package. You can create a Stack by instantiating this class.
Stack stack = new Stack();
After creating the stack you can add elements to it using the addElement() method.
stack.addElement("Java");
Example
Following is an example which demonstrates how to create a stack, add elements to it and, display its contents.
import java.util.Stack;
public class CreatingStack {
   public static void main(String args[]) {
      Stack stack = new Stack();
      stack.addElement("Java");
      stack.addElement("JavaFX");
      stack.addElement("HBase");
      stack.addElement("Flume");
      stack.addElement("Java");
      System.out.println(stack);
   }
}
Output
Contents of the stack :[Java, JavaFX, HBase, Flume, Java]
Pushing elements to a Stack
Push operation in the a stack involves inserting elements to it. If you push a particular element to a stack it will be added to the top of the stack. i.e. the first inserted element in the stack is the last one to be popped out. (First in last out)
You can push an element into Java stack using the push() method.
Example
import java.util.Stack;

public class PushingElements {
   public static void main(String args[]) {
      Stack stack = new Stack();
      stack.push(455);
      stack.push(555);
      stack.push(655);
      stack.push(755);
      stack.push(855);
      stack.push(955);
      System.out.println(stack);
   }
}
Output
[455, 555, 655, 755, 855, 955]
Popping elements from a Stack
The pop operation in a Stack refers to the removal of the elements from the stack. On performing this operation on the stack the element at the top of the stack will be removed i.e. the element inserted at last into the stack will be popped at first. (Last in first out)
Example
import java.util.Stack;

public class PoppingElements {
   public static void main(String args[]) {
      Stack stack = new Stack();
      stack.push(455);
      stack.push(555);
      stack.push(655);
      stack.push(755);
      stack.push(855);
      stack.push(955);

      System.out.println("Elements of the stack are :"+stack.pop());
      System.out.println("Contents of the stack after popping the element :"+stack);
   }
}
Output
Elements of the stack are :955
Contents of the stack after popping the element :[455, 555, 655, 755, 855]
Verifying if a Stack is empty
The Stack class of the java.util package provides a isEmpty() method. This method verifies whether the current Stack is empty or not. If the given vector is empty this method returns true else it returns false.
Example
import java.util.Stack;
public class StackIsEmpty {
   public static void main(String args[]) {
      Stack stack = new Stack();
      stack.push(455);
      stack.push(555);
      stack.push(655);
      stack.push(755);
      stack.push(855);
      stack.push(955);
      System.out.println("Contents of the stack :"+stack);
      stack.clear();
      System.out.println("Contents of the stack after clearing the elements :"+stack);

      if(stack.isEmpty()) {
         System.out.println("Given stack is empty");
      } else {
         System.out.println("Given stack is not empty");
      }
   }
}
Output
Contents of the stack :[455, 555, 655, 755, 855, 955]
Contents of the stack after clearing the elements :[]
Given stack is empty
Clearing the elements of a Stack
The clear() method of the Stack class is used to clear the contents of the current stack.
Example
import java.util.Stack;

public class ClearingElements {
   public static void main(String[] args) {
      Stack stack = new Stack();
      stack.push(455);
      stack.push(555);
      stack.push(655);
      stack.push(755);
      stack.push(855);
      stack.push(955);
      System.out.println("Contents of the stack :"+stack);
      stack.clear();
      System.out.println("Contents of the stack after clearing the elements :"+stack);
   }
}
Output
Contents of the stack :[455, 555, 655, 755, 855, 955]
Contents of the stack after clearing the elements :[]
Printing the elements of a Stack
You can print the contents of the stack directly, using the println() method.
System.out.println(stack)
The Stack class also provides iterator() method. This method returns the iterator of the current Stack. Using this you can print the contents of the stack one by one.
Example
import java.util.Iterator;
import java.util.Stack;

public class PrintingElements {
   public static void main(String args[]) {
      Stack stack = new Stack();
      stack.push(455);
      stack.push(555);
      stack.push(655);
      stack.push(755);
      stack.push(855);
      stack.push(955);
      System.out.println("Contents of the stack :");
      Iterator it = stack.iterator();

      while(it.hasNext()) {
         System.out.println(it.next());
      }
   }
}
Output
Contents of the stack :
455
555
655
755
855
955
Java Data Structures - Priority Queue class
Queue is an abstract data structure, somewhat similar to Stacks. Unlike stacks, a queue is open at both its ends. One end is always used to insert data (en-queue) and the other is used to remove data (de-queue). Queue follows First-In-First-Out methodology, i.e., the data item stored first will be accessed first.
Queue Representation
As we now understand that in queue, we access both ends for different reasons. The following diagram given below tries to explain queue representation as data structure −
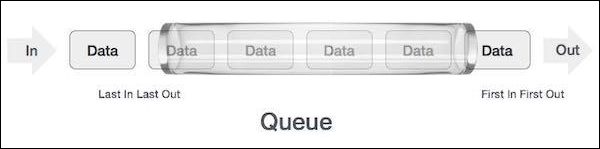
As in stacks, a queue can also be implemented using Arrays, Linked-lists, Pointers and Structures. For the sake of simplicity, we shall implement queues using one-dimensional array.
The Priority Queue class
The java.util.PriorityQueue class is an unbounded priority queue based on a priority heap. Following are the important points about PriorityQueue −
The elements of the priority queue are ordered according to their natural ordering, or by a Comparator provided at queue construction time, depending on which constructor is used.
A priority queue does not permit null elements.
A priority queue relying on natural ordering also does not permit insertion of non-comparable objects.
Class declaration
Following is the declaration for java.util.PriorityQueue class −
public class PriorityQueue<E>
   extends AbstractQueue<E>
   implements Serializable
Parameters
Following is the parameter for java.util.PriorityQueue class −
E − This is the type of elements held in this collection.
Class constructors
| Sr.No. | Constructor and Description |
|---|---|
| 1 | PriorityQueue() This creates a PriorityQueue with the default initial capacity (11) that orders its elements according to their natural ordering. |
| 2 | PriorityQueue(Collection<? extends E> c) This creates a PriorityQueue containing the elements in the specified collection. |
| 3 | PriorityQueue(int initialCapacity) This creates a PriorityQueue with the specified initial capacity that orders its elements according to their natural ordering. |
| 4 | PriorityQueue(int initialCapacity, Comparator<? super E> comparator) This creates a PriorityQueue with the specified initial capacity that orders its elements according to the specified comparator. |
| 5 | PriorityQueue(PriorityQueue<? extends E> c) This creates a PriorityQueue containing the elements in the specified priority queue. |
| 6 | PriorityQueue(SortedSet<? extends E> c) This creates a PriorityQueue containing the elements in the specified sorted set. |
Class methods
| Sr.No. | Method and Description |
|---|---|
| 1 | boolean add(E e) This method inserts the specified element into this priority queue. |
| 2 | void clear() This method removes all of the elements from this priority queue. |
| 3 | Comparator<? super E> comparator() This method returns the comparator used to order the elements in this queue, or null if this queue is sorted according to the natural ordering of its elements. |
| 4 | boolean contains(Object o) This method returns true if this queue contains the specified element. |
| 5 | Iterator<E> iterator() This method returns an iterator over the elements in this queue. |
| 6 | boolean offer(E e) This method inserts the specified element into this priority queue. |
| 7 | E peek() This method retrieves, but does not remove, the head of this queue, or returns null if this queue is empty. |
| 8 | E poll() This method retrieves and removes the head of this queue, or returns null if this queue is empty. |
| 9 | boolean remove(Object o) This method removes a single instance of the specified element from this queue, if it is present. |
| 10 | int size() This method returns the number of elements in this collection. |
| 11 | Object[] toArray() This method returns an array containing all of the elements in this queue. |
| 12 | <T> T[] toArray(T[] a) This method returns an array containing all of the elements in this queue; the runtime type of the returned array is that of the specified array. |
Java Data Structures - Creating a Queue
Java provides an interface known as Queue which represents the queue data structure. This interface have various subclasses such as ArrayBlockingQueue, ArrayDeque, ConcurrentLinkedDeque, ConcurrentLinkedQueue, DelayQueue, LinkedBlockingDeque, LinkedBlockingQueue, LinkedList, LinkedTransferQueue, PriorityBlockingQueue, PriorityQueue, SynchronousQueue.
You can create a queue in Java by instantiating any of these classes. Here in our examples we will try to create a queue by instantiating the PriorityQueue class.
It is an unbounded priority queue based on a priority heap.
The elements of it are ordered according to their natural ordering, or by a Comparator provided at queue construction time, depending on which constructor is used.
It does not permit null elements.
It relies on natural ordering also does not permit insertion of non-comparable objects.
Example
import java.util.PriorityQueue;
import java.util.Queue;

public class CreatingQueue {
   public static void main(String args[]) {
      //Create priority queue
      Queue <String>  prQueue = new PriorityQueue <String> () ;

      //Adding elements
      prQueue.add("JavaFX");
      prQueue.add("Java");
      prQueue.add("HBase");
      prQueue.add("Flume");
      prQueue.add("Neo4J");

      System.out.println("Priority queue values are: " + prQueue) ;
   }
}
Output
Priority queue values are: [Flume, HBase, Java, JavaFX, Neo4J]
Adding elements to a Queue
The add() method of the queue interface accepts an element as parameters and, adds it to the current queue.
To add elements to a queue instantiate any of the subclasses of the queue interface and add elements using the add() method.
Example
import java.util.PriorityQueue;
import java.util.Queue;

public class CreatingQueue {
   public static void main(String args[]) {

      //Create priority queue
      Queue <String>  prQueue = new PriorityQueue <String> ();

      //Adding elements
      prQueue.add("JavaFX");
      prQueue.add("Java");
      prQueue.add("HBase");
      prQueue.add("Flume");
      prQueue.add("Neo4J");
      System.out.println("Priority queue values are: " + prQueue) ;
   }
}
Output
Priority queue values are: [Flume, HBase, Java, JavaFX, Neo4J]
Remove elements from a queue
Similar to the add() method the Queue interface provides the remove() method. This method accepts an element as parameter and removes it from the queue.
Using this you can remove an element from a queue.
Example
import java.util.PriorityQueue;
import java.util.Queue;
import java.util.Scanner;

public class RemovingElements {
   public static void main(String args[]) {

      //Create priority queue
      Queue <String>  prQueue = new PriorityQueue <String> () ;

      //Adding elements
      prQueue.add("JavaFX");
      prQueue.add("Java");
      prQueue.add("HBase");
      prQueue.add("Flume");
      prQueue.add("Neo4J");

      System.out.println("Enter the element to be deleted");
      Scanner sc = new Scanner(System.in);
      String element = sc.next();

      System.out.println("Contents of the queue : " + prQueue) ;
      prQueue.remove(element);
      System.out.println("Contents of the queue after deleting sepcified element: " + prQueue) ;
   }
}
Clearing the elements of the Queue
The Queue interface provides a method known as clear(). This method is used to remove all the elements from the current queue.
Example
import java.util.PriorityQueue;
import java.util.Queue;
import java.util.Scanner;

public class ClearingElements {
   public static void main(String args[]) {

      //Create priority queue
      Queue <String>  prQueue = new PriorityQueue <String> () ;

      //Adding elements
      prQueue.add("JavaFX");
      prQueue.add("Java");
      prQueue.add("HBase");
      prQueue.add("Flume");
      prQueue.add("Neo4J");

      System.out.println("Contents of the queue : " + prQueue) ;
      prQueue.clear();
      System.out.println("Contents of the queue after deleting specified element: " + prQueue) ;
   }
}
Output
Contents of the queue : [Flume, HBase, Java, JavaFX, Neo4J]
Contents of the queue after deleting specified element: []
Printing the elements of the Queue
You can print the contents of the queue directly, using the println() method.
System.out.println(queue)
Besides that, the Queue also provides iterator() method which returns the iterator of the current queue. Using this you can print the contents of the it one by one.
Example
import java.util.Iterator;
import java.util.PriorityQueue;
import java.util.Queue;

public class PrintingElements {
   public static void main(String args[]) {

      // Create priority queue
      Queue <String>  prQueue = new PriorityQueue <String> () ;

      // Adding elements
      prQueue.add("JavaFX");
      prQueue.add("Java");
      prQueue.add("HBase");
      prQueue.add("Flume");
      prQueue.add("Neo4J");

      Iterator iT = prQueue.iterator();
      System.out.println("Contents of the queue are :");

      while(iT.hasNext()) {
         System.out.println(iT.next());
      }
   }
}
Output
Contents of the queue are :
Flume
HBase
Java
JavaFX
Neo4J
Java Data Structures - Linked List Class
Introduction
The java.util.LinkedList class operations perform we can expect for a doubly-linked list. Operations that index into the list will traverse the list from the beginning or the end, whichever is closer to the specified index.
Class declaration
Following is the declaration for java.util.LinkedList class −
public class LinkedList<E>
   extends AbstractSequentialList<E>
   implements List<E>, Deque<E>, Cloneable, Serializable
Parameters
Following is the parameter for java.util.LinkedList class −
E − This is the type of elements held in this collection.
Field
Fields inherited from class java.util.AbstractList.
Class constructors
| Sr.No. | Constructor & Description |
|---|---|
| 1 | LinkedList() This constructs constructs an empty list. |
| 2 | LinkedList(Collection<? extends E> c) This constructs a list containing the elements of the specified collection, in the order they are returned by the collection's iterator. |
Class methods
| Sr.No. | Method & Description |
|---|---|
| 1 | boolean add(E e) This method appends the specified element to the end of this list. |
| 2 | void add(int index, E element) This method inserts the specified element at the specified position in this list. |
| 3 | boolean addAll(Collection<? extends E> c) This method appends all of the elements in the specified collection to the end of this list, in the order that they are returned by the specified collection's iterator. |
| 4 | boolean addAll(int index, Collection<? extends E> c) This method inserts all of the elements in the specified collection into this list, starting at the specified position. |
| 5 | void addFirst(E e) This method returns inserts the specified element at the beginning of this list.. |
| 6 | void addLast(E e) This method returns appends the specified element to the end of this list. |
| 7 | void clear() This method removes all of the elements from this list. |
| 8 | Object clone() This method returns returns a shallow copy of this LinkedList. |
| 9 | boolean contains(Object o) This method returns true if this list contains the specified element. |
| 10 | Iterator<E> descendingIterator() This method returns an iterator over the elements in this deque in reverse sequential order. |
Example
package com.tutorialspoint;

import java.util.*;

public class LinkedListDemo {
   public static void main(String[] args) {

      // create a LinkedList
      LinkedList list = new LinkedList();

      // add some elements
      list.add("Hello");
      list.add(2);
      list.add("Chocolate");
      list.add("10");

      // print the list
      System.out.println("LinkedList:" + list);

      // add a new element at the end of the list
      list.add("Element");

      // print the updated list
      System.out.println("LinkedList:" + list);
   }
}
Output
LinkedList:[Hello, 2, Chocolate, 10]
LinkedList:[Hello, 2, Chocolate, 10, Element]
Linked List is a sequence of links which contains items. Each link contains a connection to another link. Linked list is the second most-used data structure after array.
Linked List Representation
Linked list can be visualized as a chain of nodes, where every node points to the next node.
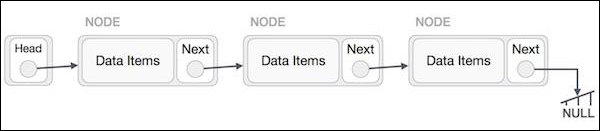
Each linked list contains head and a node.
Each node stores the data and the address of the next element.
Last element of the list is null marking the end of the list.
A linked list is of three types
Simple Linked List − Item navigation is forward only.
Doubly Linked List − Items can be navigated forward and backward.
Circular Linked List − Last item contains link of the first element as next and the first element has a link to the last element as previous.
Java Data Structures - Creating a linked list
The LinkedList class of the java.util package represents the simple linked list in Java. You can create a linked list by instantiating this class.
LinkedList linkedLlist = new LinkedList();
Example
import java.util.LinkedList;
public class CreatingLinkedList {
   public static void main(String args[]) {
      LinkedList linkedList = new LinkedList();
      linkedList.add("Mangoes");
      linkedList.add("Grapes");
      linkedList.add("Bananas");
      linkedList.add("Oranges");
      linkedList.add("Pineapples");

      System.out.println("Contents of the linked list :"+linkedList);
   }
}
Output
Contents of the linked list :[Mangoes, Grapes, Bananas, Oranges, Pineapples]
Adding elements to a linked list
The linked list class provides a method known as add(). This method accepts an element as parameter and appends it to the end of the list.
You can add elements to a linked list using this method.
Example
import java.util.LinkedList;
public class CreatingLinkedList {
   public static void main(String args[]) {
      LinkedList linkedList = new LinkedList();
      linkedList.add("Mangoes");
      linkedList.add("Grapes");
      linkedList.add("Bananas");
      linkedList.add("Oranges");
      linkedList.add("Pineapples");

      System.out.println("Contents of the linked list :"+linkedList);
   }
}
Output
Contents of the linked list :[Mangoes, Grapes, Bananas, Oranges, Pineapples]
Remove elements from a linked list
The remove() method of the LinkedList class accepts an element as a parameter and removes it from the current linked list.
You can use this method to remove elements from a linked list.
Example
import java.util.LinkedList;

public class RemovingElements {
   public static void main(String[] args) {
      LinkedList linkedList = new LinkedList();
      linkedList.add("Mangoes");
      linkedList.add("Grapes");
      linkedList.add("Bananas");
      linkedList.add("Oranges");
      linkedList.add("Pineapples");

      System.out.println("Contents of the linked list :"+linkedList);
      linkedList.remove("Grapes");

      System.out.println("Contents of the linked list after removing the specified element :"+linkedList);
   }
}
Output
Contents of the linked list :[Mangoes, Grapes, Bananas, Oranges, Pineapples]
Contents of the linked list after removing the specified element :[Mangoes, Bananas, Oranges, Pineapples]
Java Data Structures - Doubly linked lists
Doubly Linked List is a variation of Linked list in which navigation is possible in both ways, either forward and backward easily as compared to Single Linked List. Following are the important terms to understand the concept of doubly linked list.
Link − Each link of a linked list can store a data called an element.
Next − Each link of a linked list contains a link to the next link called Next.
Prev − Each link of a linked list contains a link to the previous link called Prev.
LinkedList − A Linked List contains the connection link to the first link called First and to the last link called Last.
Doubly Linked List Representation

- Doubly Linked List contains a link element called first and last.
- Each link carries a data field(s) and two link fields called next and prev.
- Each link is linked with its next link using its next link.
- Each link is linked with its previous link using its previous link.
- The last link carries a link as null to mark the end of the list.
Example
class Node{
   int data;
   Node preNode, nextNode, CurrentNode;
   Node() {
      preNode = null;
      nextNode = null;
   }
   Node(int data) {
      this.data = data;
   }
}

public class DoublyLinked {
   Node head, tail;
   int size;
   public void printData() {
      System.out.println("         ");
      Node node = head;
      while(node !=null) {
         System.out.println(node.data);
         node = node.nextNode;
      }
      System.out.println( );
   }
   public void insertStart(int data) {
      Node node = new Node();
      node.data = data;
      node.nextNode = head;
      node.preNode = null;
      if(head!=null) {
         head.preNode = node;
      }
      head = node;
      if(tail == null) {
         tail = node;
      }
      size++;
   }
   public void insertEnd(int data) {
      Node node = new Node();
      node.data = data;
      node.nextNode = null;
      node.preNode = tail;

      if(tail!=null) {
         tail.preNode = node;
      }
      tail = node;
      if(head == null) {
         head = node;
      }
      size++;
   }
   public static void main(String args[]) {
      DoublyLinked dl = new DoublyLinked();
      dl.insertStart(10);
      dl.insertStart(20);
      dl.insertStart(30);
      dl.insertStart(1);
      dl.insertStart(56);
      dl.insertStart(40);
      dl.printData();
   }
}
Output
40
56
1
30
20
10
Java Data Structures - Circular linked lists
Circular Linked List is a variation of Linked list in which the first element points to the last element and the last element points to the first element. Both Singly Linked List and Doubly Linked List can be made into a circular linked list.
Singly Linked List as Circular
In singly linked list, the next pointer of the last node points to the first node.

Doubly Linked List as Circular
In doubly linked list, the next pointer of the last node points to the first node and the previous pointer of the first node points to the last node making the circular in both directions.

As per the above illustration, following are the important points to be considered.
The last link's next points to the first link of the list in both cases of singly as well as doubly linked list.
The first link's previous points to the last of the list in case of doubly linked list.
Example
class Node{
   int data;
   Node preNode, nextNode, CurrentNode;
   Node() {
      preNode = null;
      nextNode = null;
   }
   Node(int data) {
      this.data = data;
   }
}
public class CircularLinked {
   Node head, tail;
   int size;

   public void printData() {
      Node node = head;
      if(size<=0) {
         System.out.print("List is empty");
      } else {
         do {
            System.out.print(" " + node.data);
            node = node.nextNode;
         }
         while(node!=head);
      }
   }
   public void insertStart(int data) {
      Node node = new Node();
      node.data = data;
      node.nextNode = head;
      node.preNode = null;

      if(size==0) {
         head = node;
         tail = node;
         node.nextNode = head;
      } else {
         Node tempNode = head;
         node.nextNode = tempNode;
         head = node;
         tail.nextNode = node;
      }
      size++;
   }
   public void insertEnd(int data) {
      if(size==0) {
         insertStart(data);
      } else {
         Node node = new Node();
         tail.nextNode =node;
         tail = node;
         tail.nextNode = head;
         size++;
      }
   }
	public static void main(String args[]) {
      CircularLinked dl = new CircularLinked();
      dl.insertStart(10);
      dl.insertStart(20);
      dl.insertStart(30);
      dl.insertStart(1);
      dl.insertStart(56);
      dl.insertStart(40);
      dl.printData();
   }
}
Output
40 56 1 30 20 10
Java Data Structures - Set Interface
A Set is an unordered Collection which doesnt allow duplicate elements. It models the mathematical set abstraction. It grows dynamically while we add elements to it. A set is similar to an array.
The Set Interface
A Set is a Collection that cannot contain duplicate elements. It models the mathematical set abstraction.
The Set interface contains only methods inherited from Collection and adds the restriction that duplicate elements are prohibited.
Set also adds a stronger contract on the behavior of the equals and hashCode operations, allowing Set instances to be compared meaningfully even if their implementation types differ.
The methods declared by Set are summarized in the following table −
| Sr.No. | Method and Description |
|---|---|
| 1 | add( ) Adds an object to the collection. |
| 2 | clear( ) Removes all objects from the collection. |
| 3 | contains( ) Returns true if a specified object is an element within the collection. |
| 4 | isEmpty( ) Returns true if the collection has no elements. |
| 5 | iterator( ) Returns an Iterator object for the collection, which may be used to retrieve an object. |
| 6 | remove( ) Removes a specified object from the collection. |
| 7 | size( ) Returns the number of elements in the collection. |
Example
Set has its implementation in various classes like HashSet, TreeSet, LinkedHashSet. Following is an example to explain Set functionality −
import java.util.*;
public class SetDemo {

   public static void main(String args[]) {
      int count[] = {34, 22,10,60,30,22};
      Set<Integer> set = new HashSet<Integer>();
      try {
         for(int i = 0; i < 5; i++) {
            set.add(count[i]);
         }
         System.out.println(set);

         TreeSet sortedSet = new TreeSet<Integer>(set);
         System.out.println("The sorted list is:");
         System.out.println(sortedSet);

         System.out.println("The First element of the set is: "+ (Integer)sortedSet.first());
         System.out.println("The last element of the set is: "+ (Integer)sortedSet.last());
      }
      catch(Exception e) {}
   }
}
Output
[34, 22, 10, 60, 30]
The sorted list is:
[10, 22, 30, 34, 60]
The First element of the set is: 10
The last element of the set is: 60
Java Data Structures - Creating a Set
The interface Set of the java.util package represents the set in Java. The classes HashSet and LinkedHashSet implements this interface.
To create a set (object) you need to instantiate either of these classes.
Set set = new HashSet();
Example
import java.util.HashSet;
import java.util.Set;

public class CreatingSet {
   public static void main(String args[]) {
      Set set = new HashSet();
      set.add(100);
      set.add(501);
      set.add(302);
      set.add(420);
      System.out.println("Contents of the set are: "+set);
   }
}
Output
Contents of the set are: [100, 420, 501, 302]
Adding elements to a Set
You can add elements to the set using the add() method of the Set interface. This method accepts an element as parameter and appends the given element/object to the set.
Example
import java.util.HashSet;
import java.util.Set;

public class CreatingSet {
   public static void main(String args[]) {
      Set set = new HashSet();
      set.add(100);
      set.add(501);
      set.add(302);
      set.add(420);
      System.out.println("Contents of the set are: "+set);
   }
}
Output
Contents of the set are: [100, 420, 501, 302]
Remove elements from a Set
The remove() method of the set interface accepts an element as parameter and deletes it from the current set collection.
You can remove an element from a set using this method.
Example
import java.util.HashSet;
import java.util.Set;

public class RemovingElements {
   public static void main(String args[]) {
      Set set = new HashSet();
      set.add(100);
      set.add(501);
      set.add(302);
      set.add(420);
      System.out.println("Contents of the set are: "+set);

      set.remove(100);
      System.out.println("Contents of the set after removing one element : "+set);
   }
}
Output
Contents of the set are: [100, 420, 501, 302]
Contents of the set after removing one element : [420, 501, 302]
Java Data Structures - Loop through a Set
The Set interface inherits the Iterator interface therefore it provides the iterator() method. This method returns the iterator object of the current set.
The iterator object allows you can invoke two methods namely
hasNext() − This method verifies whether the current object contains more elements if so it returns true.
next() − This method returns the next element of the current object.
Using these two methods you can you can loop through a set in Java.
Example
import java.util.HashSet;
import java.util.Iterator;
import java.util.Set;

public class LoopThroughSet {
   public static void main(String args[]) {
      Set set = new HashSet();
      set.add(100);
      set.add(501);
      set.add(302);
      set.add(420);
      System.out.println("Contents of the set are: ");
      Iterator iT = set.iterator();

      while( iT.hasNext()) {
         System.out.println(iT.next());
      }
   }
}
Output
Contents of the set are:
100
420
501
302
Java Data Structures - Adding two Sets
The Set interface provides a method named addAll() (inherited from Collection interface) using this method you can add the contents of one set to another set.
Example
import java.util.HashSet;
import java.util.Iterator;
import java.util.Set;

public class AddingTwoSets {
   public static void main(String args[]) {
      Set set1 = new HashSet();
      set1.add(100);
      set1.add(501);
      set1.add(302);
      set1.add(420);
      System.out.println("Contents of set1 are: ");
      System.out.println(set1);

      Set set2 = new HashSet();
      set2.add(200);
      set2.add(630);
      set2.add(987);
      set2.add(665);
      System.out.println("Contents of set2 are: ");
      System.out.println(set2);

      set1.addAll(set2);
      System.out.println("Contents of set1 after addition: ");
      System.out.println(set1);
   }
}
Output
Contents of set1 are:
[100, 420, 501, 302]
Contents of set2 are:
[630, 200, 665, 987]
Contents of set1 after addition:
[100, 420, 501, 630, 200, 665, 987, 302]
Java Data Structures - Subtract two Sets
Suppose we have formed/created a set object by adding the contents two sets (or more) and when you need to remove the contents of a particular set altogether from this you can do it using the removeAll() method.
This method belongs to set interface and it is inherited from the collection interface. It accepts a collection objects and removes the contents of it from the current Set (object) altogether at once.
Example
import java.util.HashSet;
import java.util.Set;

public class SubtractingTwoSets {
   public static void main(String args[]) {
      Set set1 = new HashSet();
      set1.add(100);
      set1.add(501);
      set1.add(302);
      set1.add(420);
      System.out.println("Contents of set1 are: ");
      System.out.println(set1);

      Set set2 = new HashSet();
      set2.add(200);
      set2.add(630);
      set2.add(987);
      set2.add(665);
      System.out.println("Contents of set2 are: ");
      System.out.println(set2);

      set1.addAll(set2);
      System.out.println("Contents of set1 after addition: ");
      System.out.println(set1);

      set1.removeAll(set2);
      System.out.println("Contents of set1 after removal");
      System.out.println(set1);
   }
}
Output
Contents of set1 are:
[100, 420, 501, 302]
Contents of set2 are:
[630, 200, 665, 987]
Contents of set1 after addition:
[100, 420, 501, 630, 200, 665, 987, 302]
Contents of set1 after removal
[100, 420, 501, 302]
Java Data Structures - Dictionary class
The Dictionary class is an abstract class and it represents a data structure which stores key- value pairs. Each key in this is associated with a value and you can retrieve these values using their respective keys.
Thus, like a map, a dictionary is also could be understood (considered) as a list of key/value pairs.
The Dictionary class in Java
Dictionary is an abstract class that represents a key/value storage repository and operates much like Map.
Given a key and value, you can store the value in a Dictionary object. Once the value is stored, you can retrieve it by using its key. Thus, like a map, a dictionary can be thought of as a list of key/value pairs.
The abstract methods defined by Dictionary are listed below −
| Sr.No. | Method and Description |
|---|---|
| 1 | Enumeration elements( ) Returns an enumeration of the values contained in the dictionary. |
| 2 | Object get(Object key) Returns the object that contains the value associated with the key. If the key is not in the dictionary, a null object is returned. |
| 3 | boolean isEmpty( ) Returns true if the dictionary is empty, and returns false if it contains at least one key. |
| 4 | Enumeration keys( ) Returns an enumeration of the keys contained in the dictionary. |
| 5 | Object put(Object key, Object value) Inserts a key and its value into the dictionary. Returns null if the key is not already in the dictionary; returns the previous value associated with the key if the key is already in the dictionary. |
| 6 | Object remove(Object key) Removes the key and its value. Returns the value associated with the key. If the key is not in the dictionary, a null is returned. |
| 7 | int size( ) Returns the number of entries in the dictionary. |
The Dictionary class is obsolete. You should implement the Map interface to obtain key/value storage functionality.
Example
package com.tutorialspoint;

import java.util.*;

public class DictionaryDemo {
   public static void main(String[] args) {

      // create a new hasthtable
      Dictionary d = new Hashtable();

      // put some elements
      d.put("1", "Chocolate");
      d.put("2", "Cocoa");
      d.put("5", "Coffee");

      // print how many times put was called
     System.out.println("Number of times put was called:" + d.size());
   }
}
Output
Number of times put was called:3
Java Data Structures - Creating Dictionary
Since Dictionary is an abstract class you cannot instantiate it directly. The HashTable class is the sub class of the class Dictionary. Therefore, You can create a dictionary object by instantiating this class.
Dictionary dic = new Hashtable();
Example
import java.util.Hashtable;
import java.util.Dictionary;

public class CreatingDictionary {
   public static void main(String args[]) {
      Dictionary dic = new Hashtable();
      dic.put("Ram", 94.6);
      dic.put("Rahim", 92);
      dic.put("Robert", 85);
      dic.put("Roja", 93);
      dic.put("Raja", 75);
      System.out.println(dic);
   }
}
Output
{Rahim = 92, Roja = 93, Raja = 75, Ram = 94.6, Robert = 85}
Adding elements to a Dictionary
The Dictionary class provides a method named put() this method accepts key-value pairs (objects) as parameters and adds them to a dictionary.
You can add elements to a dictionary using this method.
Example
import java.util.Hashtable;
import java.util.Dictionary;

public class CreatingDictionary {
   public static void main(String args[]) {
      Dictionary dic = new Hashtable();
      dic.put("Ram", 94.6);
      dic.put("Rahim", 92);
      dic.put("Robert", 85);
      dic.put("Roja", 93);
      dic.put("Raja", 75);
      System.out.println(dic);
   }
}
Output
{Rahim = 92, Roja = 93, Raja = 75, Ram = 94.6, Robert = 85}
Remove elements from a Dictionary
You can remove elements of the dictionary using the remove() method of the dictionary class. This method accepts key or key-value pair and deletes the respective element.
dic.remove("Ram");
or
dic.remove("Ram", 94.6);
Example
import java.util.Hashtable;
import java.util.Dictionary;

public class RemovingElements {
   public static void main(String args[]) {
      Dictionary dic = new Hashtable();
      dic.put("Ram", 94.6);
      dic.put("Rahim", 92);
      dic.put("Robert", 85);
      dic.put("Roja", 93);
      dic.put("Raja", 75);

      System.out.println("Contents of the hash table :"+dic);
      dic.remove("Ram");
      System.out.println("Contents of the hash table after deleting specified elements :"+dic);
   }
}
Output
Contents of the hash table :{Rahim = 92, Roja = 93, Raja = 75, Ram = 94.6, Robert = 85}
Contents of the hash table after deleting specified elements :{Rahim = 92, Roja = 93, Raja = 75, Robert = 85}
Retrieving values in a Dictionary
You can retrieve the value of a particular key using the get() method of the Dictionary class. If you pass the key of a particular element as a parameter of this method, it returns the value of the specified key (as an object). If the dictionary doesnt contain any element under the specified key it returns null.
You can retrieve the values in a dictionary using this method.
Example
import java.util.Hashtable;
import java.util.Dictionary;

public class RetrievingElements {
   public static void main(String args[]) {
      Dictionary dic = new Hashtable();
      dic.put("Ram", 94.6);
      dic.put("Rahim", 92);
      dic.put("Robert", 85);
      dic.put("Roja", 93);
      dic.put("Raja", 75);
      Object ob = dic.get("Ram");
      System.out.println("Value of the specified key :"+ ob);
   }
}
Output
Value of the specified key :94.6
Loop through a Dictionary
The Dictionary class provides a method named keys() which returns an enumeration object holding the all keys in the hash table.
Using this method get the keys and retrieve the value of each key using the get() method.
The hasMoreElements() method of the Enumeration (interface) returns true if the enumeration object has more elements. You can use this method to run the loop.
Example
import java.util.Enumeration;
import java.util.Hashtable;
import java.util.Dictionary;

public class Loopthrough {
   public static void main(String args[]) {
      String str;
      Dictionary dic = new Hashtable();
      dic.put("Ram", 94.6);
      dic.put("Rahim", 92);
      dic.put("Robert", 85);
      dic.put("Roja", 93);
      dic.put("Raja", 75);

      Enumeration keys = dic.keys();
      System.out.println("Contents of the hash table are :");

      while(keys.hasMoreElements()) {
         str = (String) keys.nextElement();
         System.out.println(str + ": " + dic.get(str));
      }
   }
}
Output
Contents of the hash table are :
Rahim: 92
Roja: 93
Raja: 75
Ram: 94.6
Robert: 85
Java Data Structures - HashTable Class
Hash Table is a data structure which stores data in an associative manner. In a hash table, data is stored in an array format, where each data value has its own unique index value. Access of data becomes very fast if we know the index of the desired data.
Thus, it becomes a data structure in which insertion and search operations are very fast irrespective of the size of the data. Hash Table uses an array as a storage medium and uses hash technique to generate an index where an element is to be inserted or is to be located from.
The HashTable Class Java
Hashtable was part of the original java.util and is a concrete implementation of a Dictionary.
However, Java 2 re-engineered Hashtable so that it also implements the Map interface. Thus, Hashtable is now integrated into the collections framework. It is similar to HashMap, but is synchronized.
Like HashMap, Hashtable stores key/value pairs in a hash table. When using a Hashtable, you specify an object that is used as a key, and the value that you want linked to that key. The key is then hashed, and the resulting hash code is used as the index at which the value is stored within the table.
Following is the list of constructors provided by the HashTable class.
| Sr.No. | Constructor and Description |
|---|---|
| 1 | Hashtable( ) This is the default constructor of the hash table it instantiates the Hashtable class. |
| 2 | Hashtable(int size) This constructor accepts an integer parameter and creates a hash table that has an initial size specified by integer value size. |
| 3 | Hashtable(int size, float fillRatio) This creates a hash table that has an initial size specified by size and a fill ratio specified by fillRatio. This ratio must be between 0.0 and 1.0, and it determines how full the hash table can be before it is resized upward. |
| 4 | Hashtable(Map < ? extends K, ? extends V > t) This constructs a Hashtable with the given mappings. |
Apart from the methods defined by Map interface, Hashtable defines the following methods
| Sr.No | Method and Description |
|---|---|
| 1 | void clear( ) Resets and empties the hash table. |
| 2 | Object clone( ) Returns a duplicate of the invoking object. |
| 3 | boolean contains(Object value) Returns true if some value equal to the value exists within the hash table. Returns false if the value isn't found. |
| 4 | boolean containsKey(Object key) Returns true if some key equal to the key exists within the hash table. Returns false if the key isn't found. |
| 5 | boolean containsValue(Object value) Returns true if some value equal to the value exists within the hash table. Returns false if the value isn't found. |
| 6 | Enumeration elements( ) Returns an enumeration of the values contained in the hash table. |
| 7 | Object get(Object key) Returns the object that contains the value associated with the key. If the key is not in the hash table, a null object is returned. |
| 8 | boolean isEmpty( ) Returns true if the hash table is empty; returns false if it contains at least one key. |
| 9 | Enumeration keys( ) Returns an enumeration of the keys contained in the hash table. |
| 10 | Object put(Object key, Object value) Inserts a key and a value into the hash table. Returns null if the key isn't already in the hash table; returns the previous value associated with the key if the key is already in the hash table. |
| 11 | void rehash( ) Increases the size of the hash table and rehashes all of its keys. |
| 12 | Object remove(Object key) Removes the key and its value. Returns the value associated with the key. If the key is not in the hash table, a null object is returned. |
| 13 | int size( ) Returns the number of entries in the hash table. |
| 14 | String toString( ) Returns the string equivalent of a hash table. |
Example
The following program illustrates several of the methods supported by this data structure
import java.util.*;
public class HashTableDemo {
   public static void main(String args[]) {

      // Create a hash map
      Hashtable balance = new Hashtable();
      Enumeration names;
      String str;
      double bal;

      balance.put("Zara", new Double(3434.34));
      balance.put("Mahnaz", new Double(123.22));
      balance.put("Ayan", new Double(1378.00));
      balance.put("Daisy", new Double(99.22));
      balance.put("Qadir", new Double(-19.08));

      // Show all balances in hash table.
      names = balance.keys();

      while(names.hasMoreElements()) {
         str = (String) names.nextElement();
         System.out.println(str + ": " + balance.get(str));
      }
      System.out.println();

      // Deposit 1,000 into Zara's account
      bal = ((Double)balance.get("Zara")).doubleValue();
      balance.put("Zara", new Double(bal + 1000));
      System.out.println("Zara's new balance: " + balance.get("Zara"));
   }
}
Output
Qadir: -19.08
Zara: 3434.34
Mahnaz: 123.22
Daisy: 99.22
Ayan: 1378.0

Zara's new balance: 4434.34
Java Data Structures - Creating a hash table
The Java package java.util provides a class named HashTable which represents the hash table. This stores key/value pairs while using a Hashtable, you specify an object that is used as a key, and the value that you want linked to that key. The key is then hashed, and the resulting hash code is used as the index at which the value is stored within the table.
You can create a hash table by instantiating the HashTable class.
HashTable hashTable = new HashTable();
Example
import java.util.Hashtable;

public class CreatingHashTable {
   public static void main(String args[]) {
      Hashtable hashTable = new Hashtable();
      hashTable.put("Ram", 94.6);
      hashTable.put("Rahim", 92);
      hashTable.put("Robert", 85);
      hashTable.put("Roja", 93);
      hashTable.put("Raja", 75);
      System.out.println(hashTable);
   }
}
Output
{Rahim = 92, Roja = 93, Raja = 75, Ram = 94.6, Robert = 85}
Adding elements to a hash table
The HashTable class provides a method named put() this method accepts key value pairs (objects) as parameters and adds them to the current hash table.
You can add a key-value pair to the current hash table using this method.
Example
import java.util.Hashtable;

public class CreatingHashTable {
   public static void main(String args[]) {
      Hashtable hashTable = new Hashtable();
      hashTable.put("Ram", 94.6);
      hashTable.put("Rahim", 92);
      hashTable.put("Robert", 85);
      hashTable.put("Roja", 93);
      hashTable.put("Raja", 75);
      System.out.println(hashTable);
   }
}
Output
{Rahim = 92, Roja = 93, Raja = 75, Ram = 94.6, Robert = 85}
Remove elements from a hash table
You can remove elements of the hash table you can use the remove() method of the HashTable class.
To this method you need to pass either key or key-value pair to delete the required element.
hashTable.remove("Ram");
or
hashTable.remove("Ram", 94.6);
Example
import java.util.Hashtable;

public class RemovingElements {
   public static void main(String args[]) {
      Hashtable hashTable = new Hashtable();
      hashTable.put("Ram", 94.6);
      hashTable.put("Rahim", 92);
      hashTable.put("Robert", 85);
      hashTable.put("Roja", 93);
      hashTable.put("Raja", 75);

      System.out.println("Contents of the hash table :"+hashTable);
      hashTable.remove("Ram");
      System.out.println("Contents of the hash table after deleting the specified elements :"+hashTable);
   }
}
Output
Contents of the hash table :{Rahim = 92, Roja = 93, Raja = 75, Ram = 94.6, Robert = 85}
Contents of the hash table after deleting the specified elements :{Rahim = 92, Roja = 93, Raja = 75, Robert = 85}
Retrieving values in a hash table
You can retrieve the value of a particular key using the get() method. If you pass the key of a particular element as a parameter of this method, it returns the value of the specified key (as an object). If the hash table doesnt contain any element under the specified key it returns null.
You can retrieve the values in a hash table using this method.
Example
import java.util.Hashtable;
public class RetrievingElements {
   public static void main(String args[]) {
      Hashtable hashTable = new Hashtable();
      hashTable.put("Ram", 94.6);
      hashTable.put("Rahim", 92);
      hashTable.put("Robert", 85);
      hashTable.put("Roja", 93);
      hashTable.put("Raja", 75);

      Object ob = hashTable.get("Ram");
      System.out.println("Value of the specified key :"+ ob);
   }
}
Output
Value of the specified key :94.6
Loop through a hash table
The HashTable class provides a method named keys() which returns an enumeration object holding the all keys in the hash table.
Using this method get the keys and retrieve the value of each key using the get() method.
The hasMoreElements() method of the Enumeration (interface) returns true if the enumeration object has more elements. You can use this method to run the loop.
Example
import java.util.Enumeration;
import java.util.Hashtable;

public class Loopthrough {
   public static void main(String args[]) {
      String str;
      Hashtable hashTable = new Hashtable();
      hashTable.put("Ram", 94.6);
      hashTable.put("Rahim", 92);
      hashTable.put("Robert", 85);
      hashTable.put("Roja", 93);
      hashTable.put("Raja", 75);

      Enumeration keys = hashTable.keys();
      System.out.println("Contents of the hash table are :");

      while(keys.hasMoreElements()) {
         str = (String) keys.nextElement();
         System.out.println(str + ": " + hashTable.get(str));
      }
   }
}
Output
Contents of the hash table are :
Rahim: 92
Roja: 93
Raja: 75
Ram: 94.6
Robert: 85
Joining two hash tables
The putAll() method of the HashTable class accepts a map object as a parameter adds all its contents to the current hash table and returns the result.
Using this method you can join the contents of two hash tables.
Example
import java.util.Hashtable;

public class JoiningTwoHashTables {
   public static void main(String args[]) {
      String str;
      Hashtable hashTable1 = new Hashtable();
      hashTable1.put("Ram", 94.6);
      hashTable1.put("Rahim", 92);
      hashTable1.put("Robert", 85);
      hashTable1.put("Roja", 93);
      hashTable1.put("Raja", 75);

      System.out.println("Contents of the 1st hash table :"+hashTable1);

      Hashtable hashTable2 = new Hashtable();
      hashTable2.put("Sita", 84.6);
      hashTable2.put("Gita", 89);
      hashTable2.put("Ramya", 86);
      hashTable2.put("Soumaya", 96);
      hashTable2.put("Sarmista", 92);
      System.out.println("Contents of the 2nd hash table :"+hashTable2);
      hashTable1.putAll(hashTable2);
      System.out.println("Contents after joining the two hash tables: "+hashTable1);
   }
}
Output
Contents of the 1st hash table :{Rahim = 92, Roja = 93, Raja = 75, Ram = 94.6, Robert = 85}
Contents of the 2nd hash table :{Sarmista = 92, Soumaya = 96, Sita = 84.6, Gita = 89, Ramya = 86}
Contents after joining the two hash tables: {Soumaya = 96, Robert = 85, Ram = 94.6, Sarmista = 92,
   Raja = 75, Sita = 84.6, Roja = 93, Gita = 89, Rahim = 92, Ramya = 86}
Creating a Binary Tree
A tree is a data structure with elements/nodes connected to each other similar to linked list. But, unlike linked list a tree is a nonlinear data structure where each element/node in a tree is connected to multiple nodes (in hierarchical manner).
In a tree the node without any preceding elements i.e. node at the top of the tree, is known as the root node. Each tree contains only one root node.
Any node except the root node has one edge upward to a node called parent.
The node below a given node connected by its edge downward is called its child node.
The node which does not have any child node is called the leaf node.
A tree where each node have 0 or, 1 or 2 children maximum 2 is known as a binary tree. A binary tree has the benefits of both an ordered array and a linked list as search is as quick as in a sorted array and insertion or deletion operation are as fast as in linked list.
Creating the Binary Tree in Java
To create/implement a binary tree create a Node class that will store int values and keep a reference to each child create three variables.
Two variables of Node type to store left and right nodes and one is of integer type to store data. Then from another class try creating nodes such that no node should have more than 2 child nodes in a hierarchical manner.
Example
Following is an example of creating a binary tree here we have created a Node class with variables for data, left and, right nodes including setter and getter methods to set and retrieve values of them.
import java.util.LinkedList;
import java.util.Queue;

class Node{
   int data;
   Node leftNode, rightNode;

   Node() {
      leftNode = null;
      rightNode = null;
      this.data = data;
   }
   Node(int data) {
      leftNode = null;
      rightNode = null;
      this.data = data;
   }
   int getData() {
      return this.data;
   }
   Node getleftNode() {
      return this.leftNode;
   }
   Node getRightNode() {
      return this.leftNode;
   }
   void setData(int data) {
      this.data = data;
   }
   void setleftNode(Node leftNode) {
      this.leftNode = leftNode;
   }
   void setRightNode(Node rightNode) {
      this.leftNode = rightNode;
   }
}
public class CreatingBinaryTree {
   public static void main(String[] args){
      Node node = new Node(50);
      node.leftNode = new Node(60);
      node.leftNode.leftNode = new Node(45);
      node.leftNode.rightNode = new Node(64);

      node.rightNode = new Node(60);
      node.rightNode.leftNode = new Node(45);
      node.rightNode.rightNode = new Node(64);
      System.out.println("Binary Tree Created Pre-order of its elements is: ");
      preOrder(node);
   }
   public static void preOrder(Node root){
      if(root !=null){
         System.out.println(root.data);
         preOrder(root.leftNode);
         preOrder(root.rightNode);
      }
   }
}
Output
Binary Tree Created Pre-order of its elements is:
50
60
45
64
60
45
64
Inserting a key into a tree
There is no particular rule to insert elements in to a binary tree you can insert nodes where ever you need.
The only point you should keep in mind while inserting nodes is that in a binary tree every node can have only two children at max.
Therefore, to insert a node into a tree,
Traverse through each node level by level check whether it has left node and right node.
If any node have both left and right nodes you cannot insert another node because a node in a binary tree can have only two child nodes at max, add these values to the queue and move on.
If any node doesnt have left node or right node then create a new node and add it there.
In short, insert node to a parent which has no left sub tree or, right sub tree or, both.
Example
import java.util.LinkedList;
import java.util.Queue;

class Node{
   int data;
   Node leftNode, rightNode;

   Node() {
      leftNode = null;
      rightNode = null;
      this.data = data;
   }
   Node(int data) {
      leftNode = null;
      rightNode = null;
      this.data = data;
   }
   int getData() {
      return this.data;
   }
   Node getleftNode() {
      return this.leftNode;
   }
   Node getRightNode() {
      return this.leftNode;
   }
   void setData(int data) {
      this.data = data;
   }
   void setleftNode(Node leftNode) {
      this.leftNode = leftNode;
   }
   void setRightNode(Node rightNode) {
      this.leftNode = rightNode;
   }
}
public class InsertingElements {
   public static int[] insertElement(int[] myArray, int pos, int data) {
      int j = myArray.length;
      int lastElement = myArray[j-1];

      for(int i = (j-2); i >= (pos-1); i--) {
         myArray[i+1] = myArray[i];
      }
      myArray[pos-1] = data;

      int[] resultArray = new int[j+1];
      for(int i = 0; i < myArray.length; i++) {
         resultArray[i] = myArray[i];
      }
      resultArray[resultArray.length-1] = lastElement;
      return resultArray;
	}
	public static void main(String args[]){
      int[] myArray = {10, 20, 30, 45, 96, 66};
      int pos = 3;
      int data = 10005;
      int[] result = insertElement(myArray, pos, data);

      for(int i = 0; i < result.length; i++){
         System.out.println(result[i]);
      }
   }
}
Output
10
20
10005
30
45
96
66
In-order traversal in a tree
In this traversal method, the left subtree is visited first, then the root and later the right sub-tree. We should always remember that every node may represent a subtree itself.
If a binary tree is traversed in-order, the output will produce sorted key values in an ascending order.
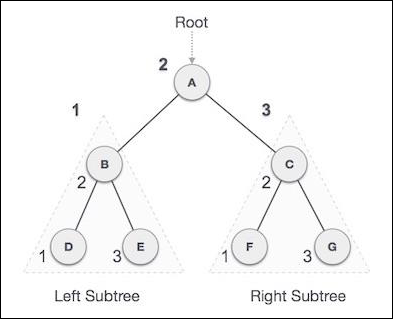
We start from A, and following in-order traversal, we move to its left subtree B. B is also traversed in-order. The process goes on until all the nodes are visited. The output of in-order traversal of this tree will be −
D → B → E → A → F → C → G
Algorithm
Until all nodes are traversed −
Step 1: Recursively traverse left subtree.
Step 2: Visit root node.
Step 3: Recursively traverse right subtree.
Example
class Node{
   int data;
   Node leftNode, rightNode;

   Node() {
      leftNode = null;
      rightNode = null;
      this.data = data;
   }
   Node(int data) {
      leftNode = null;
      rightNode = null;
      this.data = data;
   }
   int getData() {
      return this.data;
   }
   Node getleftNode() {
      return this.leftNode;
   }
   Node getRightNode() {
      return this.leftNode;
   }
   void setData(int data) {
      this.data = data;
   }
   void setleftNode(Node leftNode) {
      this.leftNode = leftNode;
   }
   void setRightNode(Node rightNode) {
      this.leftNode = rightNode;
   }
}
public class InOrderBinaryTree {
   public static void main(String[] args) {
      Node node = new Node(50);
      node.leftNode = new Node(60);
      node.leftNode.leftNode = new Node(45);
      node.leftNode.rightNode = new Node(64);

      node.rightNode = new Node(60);
      node.rightNode.leftNode = new Node(45);
      node.rightNode.rightNode = new Node(64);
      System.out.println("inorder arrangement of given elements: ");
      inOrder(node);
   }
   public static void inOrder(Node root) {
      if(root !=null) {
         inOrder(root.leftNode);
         System.out.println(root.data);
         inOrder(root.rightNode);
      }
   }
}
Output
inorder arrangement of given elements:
45
60
64
50
45
60
64
Pre-order traversal in a tree
In this traversal method, the root node is visited first, then the left subtree and finally the right subtree.

We start from A, and following pre-order traversal, we first visit A itself and then move to its left subtree B. B is also traversed pre-order. The process goes on until all the nodes are visited. The output of pre-order traversal of this tree will be −
A → B → D → E → C → F → G
Algorithm
Until all nodes are traversed −
Step 1: Visit root node.
Step 2: Recursively traverse left subtree.
Step 3: Recursively traverse right subtree.
Example
class Node{
   int data;
   Node leftNode, rightNode;

   Node() {
      leftNode = null;
      rightNode = null;
      this.data = data;
   }
   Node(int data) {
      leftNode = null;
      rightNode = null;
      this.data = data;
   }
   int getData() {
      return this.data;
   }
   Node getleftNode() {
      return this.leftNode;
   }
   Node getRightNode() {
      return this.leftNode;
   }
   void setData(int data) {
      this.data = data;
   }
   void setleftNode(Node leftNode) {
      this.leftNode = leftNode;
   }
   void setRightNode(Node rightNode) {
      this.leftNode = rightNode;
   }
}
public class PreOrderBinaryTree {
   public static void main(String[] args) {
      Node node = new Node(50);
      node.leftNode = new Node(60);
      node.leftNode.leftNode = new Node(45);
      node.leftNode.rightNode = new Node(64);

      node.rightNode = new Node(60);
      node.rightNode.leftNode = new Node(45);
      node.rightNode.rightNode = new Node(64);
      System.out.println("pre-order arrangement of given elements: ");
      preOrder(node);
   }
   public static void preOrder(Node root) {
      if(root !=null) {
         System.out.println(root.data);
         preOrder(root.leftNode);
         preOrder(root.rightNode);
      }
   }
}
Output
pre-order arrangement of given elements:
50
60
45
64
60
45
64
Post-order traversal in a tree
In this traversal method, the root node is visited last, hence the name. First we traverse the left subtree, then the right subtree and finally the root node.
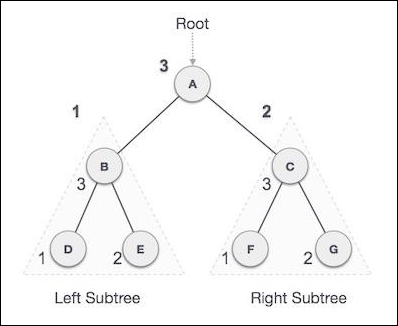
We start from A, and following Post-order traversal, we first visit the left subtree B. B is also traversed post-order. The process goes on until all the nodes are visited. The output of post-order traversal of this tree will be −
D → E → B → F → G → C → A
Algorithm
Until all nodes are traversed −
Step 1  Recursively traverse left subtree.
Step 2  Recursively traverse right subtree.
Step 3  Visit root node.
Example
class Node{
   int data;
   Node leftNode, rightNode;
   Node() {
      leftNode = null;
      rightNode = null;
      this.data = data;
   }
   Node(int data) {
      leftNode = null;
      rightNode = null;
      this.data = data;
   }
   int getData() {
      return this.data;
   }
   Node getleftNode() {
      return this.leftNode;
   }
   Node getRightNode() {
      return this.leftNode;
   }
   void setData(int data) {
      this.data = data;
   }
   void setleftNode(Node leftNode) {
      this.leftNode = leftNode;
   }
   void setRightNode(Node rightNode) {
      this.leftNode = rightNode;
   }
}
public class PostOrderBinaryTree {
   public static void main(String[] args) {
      Node node = new Node(50);
      node.leftNode = new Node(60);
      node.leftNode.leftNode = new Node(45);
      node.leftNode.rightNode = new Node(64);

      node.rightNode = new Node(60);
      node.rightNode.leftNode = new Node(45);
      node.rightNode.rightNode = new Node(64);

      System.out.println("post-order arrangement of given elements: ");
      postOrder(node);
   }
   public static void postOrder(Node root) {
      if(root !=null) {
         postOrder(root.leftNode);
         postOrder(root.rightNode);
         System.out.println(root.data);
      }
   }
}
Output
post-order arrangement of given elements:
45
64
60
45
64
60
50
Searching for minimum value in a tree
To find the minimum value of a tree (without child nodes) compare the left node and right node and get the larger value (store it in max) then, compare it with the value of the root
If the result (min) is smaller then, it is the minimum value else, the root is the minimum value of the tree.
To get the minimum value of a whole binary tree get the minimum value of the left subtree, the minimum value of the right subtree and, the root. Now compare three of them smaller value among these three is the minimum value of the tree.
Example
class Node{
   int data;
   Node leftNode, rightNode;

   Node() {
      leftNode = null;
      rightNode = null;
      this.data = data;
   }
   Node(int data) {
      leftNode = null;
      rightNode = null;
      this.data = data;
   }
   int getData() {
      return this.data;
   }
   Node getleftNode() {
      return this.leftNode;
   }
   Node getRightNode() {
      return this.leftNode;
   }
   void setData(int data) {
      this.data = data;
   }
   void setleftNode(Node leftNode) {
      this.leftNode = leftNode;
   }
   void setRightNode(Node rightNode) {
      this.leftNode = rightNode;
   }
}
public class MinValueInBinaryTree {
   public static void main(String[] args) {
      Node node = new Node(50);
      node.leftNode = new Node(60);
      node.leftNode.leftNode = new Node(45);
      node.leftNode.rightNode = new Node(64);

      node.rightNode = new Node(60);
      node.rightNode.leftNode = new Node(45);
      node.rightNode.rightNode = new Node(64);

      System.out.println("Minimum value is "+minimumValue(node));
   }
   public static int minimumValue(Node root) {
      int min = 10000;

      if(root!=null) {
         int lMin = minimumValue(root.leftNode);
         int rMin = minimumValue(root.rightNode);;

         if(lMin>rMin) {
            min = lMin;
         } else {
            min = rMin;
         }

         if(root.data<min) {
            min = root.data;
         }
      }
      return min;
   }
}
Output
Minimum value is 50
Searching for maximum value in a tree
To find the maximum value of a tree (without child nodes) compare the left node and right node and get the larger value (store it in max) then, compare it with the value of the root
If the result (max) is greater then, it is the maximum value of the tree else the root is the maximum value of the tree.
To get the maximum value of a whole binary tree get the maximum value of the left subtree, the maximum value of the right subtree and, the root. Now compare three of them larger value among these three is the maximum value of the tree.
Example
class Node{
   int data;
   Node leftNode, rightNode;

   Node() {
      leftNode = null;
      rightNode = null;
      this.data = data;
   }
   Node(int data) {
      leftNode = null;
      rightNode = null;
      this.data = data;
   }
   int getData() {
      return this.data;
   }
   Node getleftNode() {
      return this.leftNode;
   }
   Node getRightNode() {
      return this.leftNode;
   }
   void setData(int data) {
      this.data = data;
   }
   void setleftNode(Node leftNode) {
      this.leftNode = leftNode;
   }
   void setRightNode(Node rightNode) {
      this.leftNode = rightNode;
   }
}
public class MaxValueInBinaryTree {
   public static void main(String[] args){
      Node node = new Node(50);
      node.leftNode = new Node(60);
      node.leftNode.leftNode = new Node(45);
      node.leftNode.rightNode = new Node(64);

      node.rightNode = new Node(60);
      node.rightNode.leftNode = new Node(45);
      node.rightNode.rightNode = new Node(64);

      System.out.println("Maximum value is "+maximumValue(node));
   }
   public static int maximumValue(Node root) {
      int max = 0;

      if(root!=null) {
         int lMax = maximumValue(root.leftNode);
         int rMax = maximumValue(root.rightNode);;

         if(lMax>rMax){
            max = lMax;
         } else {
            max = rMax;
         }

         if(root.data>max) {
            max = root.data;
         }
      }
      return max;
   }
}
Output
Maximum value is 64
Searching for values in a tree
To search whether the given tree contains a particular element. Compare it with every element down the tree if found display a message saying element found.
Example
class Node{
   int data;
   Node leftNode, rightNode;

   Node() {
      leftNode = null;
      rightNode = null;
      this.data = data;
   }
   Node(int data) {
      leftNode = null;
      rightNode = null;
      this.data = data;
   }
   int getData() {
      return this.data;
   }
   Node getleftNode() {
      return this.leftNode;
   }
   Node getRightNode() {
      return this.leftNode;
   }
   void setData(int data) {
      this.data = data;
   }
   void setleftNode(Node leftNode) {
      this.leftNode = leftNode;
   }
   void setRightNode(Node rightNode) {
      this.leftNode = rightNode;
   }
}
public class SeachingValue {
   public static void main(String[] args) {
      Node node = new Node(50);
      node.leftNode = new Node(60);
      node.leftNode.leftNode = new Node(45);
      node.leftNode.rightNode = new Node(64);

      node.rightNode = new Node(60);
      node.rightNode.leftNode = new Node(45);
      node.rightNode.rightNode = new Node(64);

      System.out.println("Pre order of the above created tree :");
      preOrder(node);
      System.out.println();
      int data = 60;
      boolean b = find(node, data);

      if(b) {
         System.out.println("Element found");
      } else {
         System.out.println("Element not found");
      }
   }
   public static void preOrder(Node root) {
      if(root !=null) {
         System.out.print(root.data+" ");
         preOrder(root.leftNode);
         preOrder(root.rightNode);
      }
   }
   public static boolean find(Node root, int data) {
      if(root == null) {
         return false;
      }
      if(root.getData() == data) {
         return true;
      }
      return find(root.getleftNode(), data)||find(root.getRightNode(), data);
   }
}
Output
Pre order of the above created tree :
50 60 45 64 60 45 64
Element found
Removing a leaf node in a tree
Traverse through each node in the tree verify whether it has left child or, right or, both. If it does not have any child nodes remove that particular node.
Example
class Node{
   int data;
   Node leftNode, rightNode;

   Node() {
      leftNode = null;
      rightNode = null;
      this.data = data;
   }
   Node(int data) {
      leftNode = null;
      rightNode = null;
      this.data = data;
   }
   int getData() {
      return this.data;
   }
   Node getleftNode() {
      return this.leftNode;
   }
   Node getRightNode() {
      return this.leftNode;
   }
   void setData(int data) {
      this.data = data;
   }
   void setleftNode(Node leftNode) {
      this.leftNode = leftNode;
   }
   void setRightNode(Node rightNode) {
      this.leftNode = rightNode;
   }
}
public class RemovingLeaf {
   public static void main(String[] args) {
      Node node = new Node(50);
      node.leftNode = new Node(60);
      node.leftNode.leftNode = new Node(45);
      node.leftNode.rightNode = new Node(64);

      node.rightNode = new Node(60);
      node.rightNode.leftNode = new Node(45);
      node.rightNode.rightNode = new Node(64);

      node.leftNode.leftNode.leftNode = new Node(96);
      System.out.println("Contents of the tree:");
      preOrder(node);
      removeLeaves(node);
      System.out.println();
      System.out.println("Contents of the tree after removing leafs:");
      preOrder(node);
   }
   public static void removeLeaves(Node node) {
      if (node.leftNode != null) { // tests left root
         if (node.leftNode.leftNode == null && node.leftNode.rightNode == null) {
            node.leftNode = null; // delete
         } else {
            removeLeaves(node.leftNode);
         }
      }
   }
   public static void preOrder(Node root) {
      if(root !=null) {
         System.out.print(root.data+" ");
         preOrder(root.leftNode);
         preOrder(root.rightNode);
      }
   }
}
Output
Contents of the tree:
50 60 45 96 64 60 45 64
Contents of the tree after removing leafs:
50 60 45 64 60 45 64
Java Data Structures - AVL tree
What if the input to binary search tree comes in a sorted (ascending or descending) manner? It will then look like this −
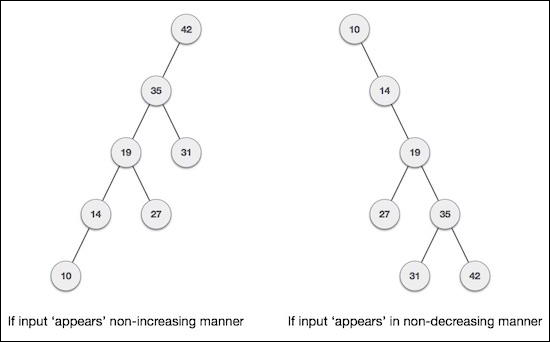
It is observed that BST's worst-case performance is closest to linear search algorithms, that is (n). In real-time data, we cannot predict data pattern and their frequencies. So, a need arises to balance out the existing BST.
Named after their inventor Adelson, Velski & Landis, AVL trees are height balancing binary search tree. AVL tree checks the height of the left and the right sub-trees and assures that the difference is not more than 1. This difference is called the Balance Factor.
Here we see that the first tree is balanced and the next two trees are not balanced −
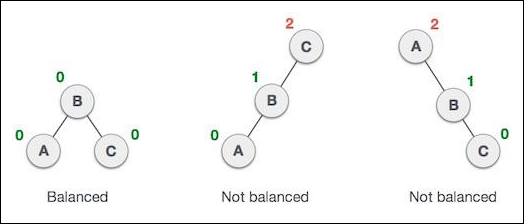
In the second tree, the left subtree of C has height 2 and the right subtree has height 0, so the difference is 2. In the third tree, the right subtree of A has height 2 and the left is missing, so it is 0, and the difference is 2 again. AVL tree permits difference (balance factor) to be only 1.
BalanceFactor = height(left-sutree) height(right-sutree)
If the difference in the height of left and right sub-trees is more than 1, the tree is balanced using some rotation techniques.
AVL Rotations Java
To balance itself, an AVL tree may perform the following four kinds of rotations −
- Left rotation
- Right rotation
- Left-Right rotation
- Right-Left rotation
The first two rotations are single rotations and the next two rotations are double rotations. To have an unbalanced tree, we at least need a tree of height 2. With this simple tree, let's understand them one by one.
Left Rotation
If a tree becomes unbalanced, when a node is inserted into the right subtree of the right subtree, then we perform a single left rotation −
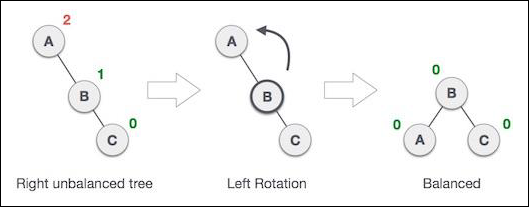
In our example, node A has become unbalanced as a node is inserted in the right subtree of A's right subtree. We perform the left rotation by making A the left-subtree of B.
Right Rotation
AVL tree may become unbalanced, if a node is inserted in the left subtree of the left subtree. The tree then needs a right rotation.
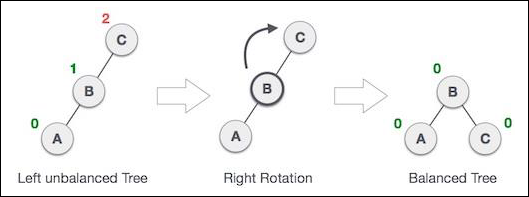
As depicted, the unbalanced node becomes the right child of its left child by performing a right rotation.
Left-Right Rotation
Double rotations are slightly complex version of already explained versions of rotations. To understand them better, we should take note of each action performed while rotation. Let's first check how to perform Left-Right rotation. A left-right rotation is a combination of left rotation followed by right rotation.
| State | Action |
|---|---|
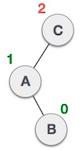 |
A node has been inserted into the right subtree of the left subtree. This makes C an unbalanced node. These scenarios cause AVL tree to perform left-right rotation. |
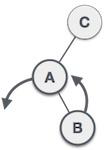 |
We first perform the left rotation on the left subtree of C. This makes A, the left subtree of B. |
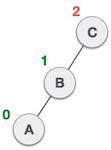 |
Node C is still unbalanced, however now, it is because of the left-subtree of the left-subtree. |
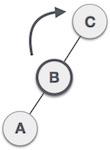 |
We shall now right-rotate the tree, making B the new root node of this subtree. C now becomes the right subtree of its own left subtree. |
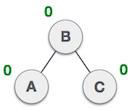 |
The tree is now balanced. |
Right-Left Rotation
The second type of double rotation is Right-Left Rotation. It is a combination of right rotation followed by left rotation.
| State | Action |
|---|---|
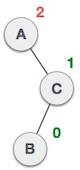 |
A node has been inserted into the left subtree of the right subtree. This makes A, an unbalanced node with balance factor 2. |
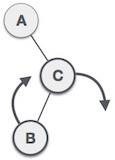 |
First, we perform the right rotation along C node, making C the right subtree of its own left subtree B. Now, B becomes the right subtree of A. |
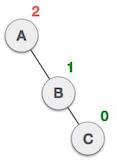 |
Node A is still unbalanced because of the right subtree of its right subtree and requires a left rotation. |
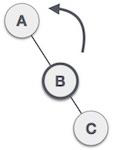 |
A left rotation is performed by making B the new root node of the subtree. A becomes the left subtree of its right subtree B. |
 |
The tree is now balanced. |
Breadth-first search (BFS)
A graph is a pictorial representation of a set of objects where some pairs of objects are connected by links. The interconnected objects are represented by points termed as vertices, and the links that connect the vertices are called edges.
Formally, a graph is a pair of sets (V, E), where V is the set of vertices and E is the set of edges, connecting the pairs of vertices. Take a look at the following graph −
In the above graph,
V = {a, b, c, d, e}
E = {ab, ac, bd, cd, de}
Breadth-first search (BFS)
Breadth First Search (BFS) algorithm traverses a graph in a breadth ward motion and uses a queue to remember to get the next vertex to start a search, when a dead end occurs in any iteration.
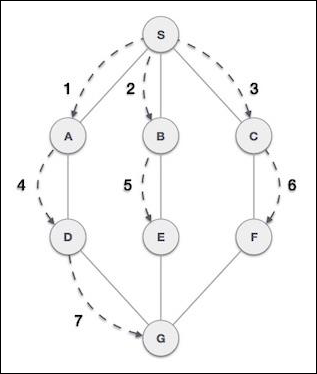
As in the example given above, BFS algorithm traverses from A to B to E to F first then to C and G lastly to D. It employs the following rules.
Rule 1 − Visit the adjacent unvisited vertex. Mark it as visited. Display it. Insert it in a queue.
Rule 2 − If no adjacent vertex is found, remove the first vertex from the queue.
Rule 3 − Repeat Rule 1 and Rule 2 until the queue is empty.
| Step | Traversal | Description |
|---|---|---|
| 1 |  |
Initialize the queue. |
| 2 | 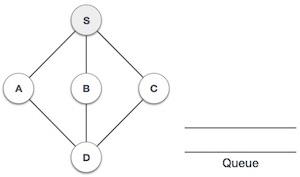 |
We start from visiting S (starting node), and mark it as visited. |
| 3 |  |
We then see an unvisited adjacent node from S. In this example, we have three nodes but alphabetically we choose A, mark it as visited and enqueue it. |
| 4 | 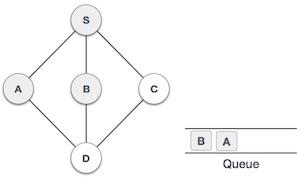 |
Next, the unvisited adjacent node from S is B. We mark it as visited and enqueue it. |
| 5 | 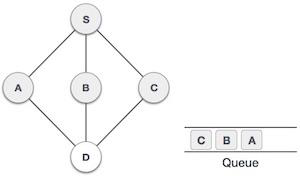 |
Next, the unvisited adjacent node from S is C. We mark it as visited and enqueue it. |
| 6 | 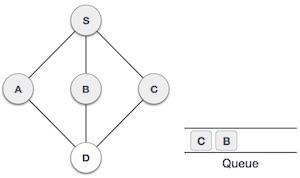 |
Now, S is left with no unvisited adjacent nodes. So, we dequeue and find A. |
| 7 |  |
From A we have D as unvisited adjacent node. We mark it as visited and enqueue it. |
At this stage, we are left with no unmarked (unvisited) nodes. But as per the algorithm we keep on de-queuing in order to get all unvisited nodes. When the queue gets emptied, the program is over.
Depth-first search (DFS)
Depth First Search (DFS) algorithm traverses a graph in a depth ward motion and uses a stack to remember to get the next vertex to start a search, when a dead end occurs in any iteration.
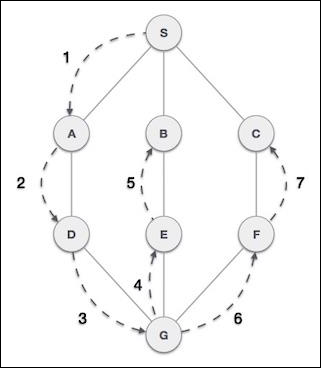
As in the example given above, DFS algorithm traverses from S to A to D to G to E to B first, then to F and lastly to C. It employs the following rules.
Rule 1 − Visit the adjacent unvisited vertex. Mark it as visited. Display it. Push it in a stack.
Rule 2 − If no adjacent vertex is found, pop up a vertex from the stack. (It will pop up all the vertices from the stack, which do not have adjacent vertices.)
Rule 3 − Repeat Rule 1 and Rule 2 until the stack is empty.
| Step | Traversal | Description |
|---|---|---|
| 1 | 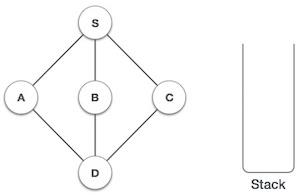 |
Initialize the stack. |
| 2 | 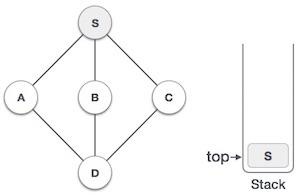 |
Mark S as visited and put it onto the stack. Explore any unvisited adjacent node from S. We have three nodes and we can pick any of them. For this example, we shall take the node in an alphabetical order. |
| 3 | 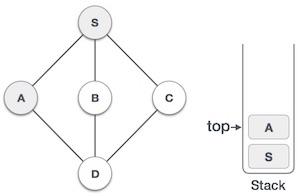 |
Mark A as visited and put it onto the stack. Explore any unvisited adjacent node from A. Both S and D are adjacent to A but we are concerned for unvisited nodes only. |
| 4 | 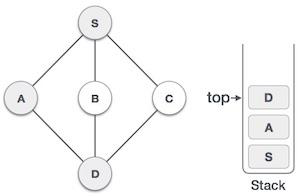 |
Visit D and mark it as visited and put onto the stack. Here, we have B and C nodes, which are adjacent to D and both are unvisited. However, we shall again choose in an alphabetical order. |
| 5 | 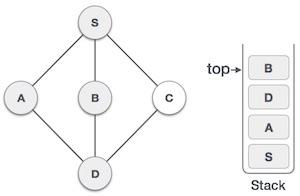 |
We choose B, mark it as visited and put onto the stack. Here B does not have any unvisited adjacent node. So, we pop B from the stack. |
| 6 | 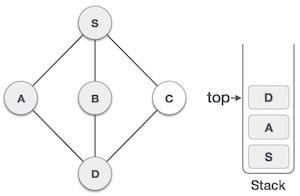 |
We check the stack top for return to the previous node and check if it has any unvisited nodes. Here, we find D to be on the top of the stack. |
| 7 | 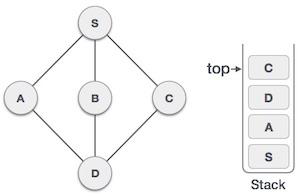 |
Only unvisited adjacent node is from D is C now. So we visit C, mark it as visited and put it onto the stack. |
Shortest path algorithms
Shortest Path algorithm is a method of finding the least cost path from the source node(S) to the destination node (D). Here, we will discuss Moores algorithm, also known as Breadth First Search Algorithm.
Moores algorithm
Label the source vertex, S and label it i and set i = 0.
Find all unlabeled vertices adjacent to the vertex labeled i. If no vertices are connected to the vertex, S, then vertex, D, is not connected to S. If there are vertices connected to S, label them i+1.
If D is labeled, then go to step 4, else go to step 2 to increase i = i+1.
Stop after the length of the shortest path is found.
Dijkstra's algorithm
Dijkstras algorithm solves the single-source shortest-paths problem on a directed weighted graph G = (V, E), where all the edges are non-negative (i.e., w(u, v) 0 for each edge (u, v) E).
In the following algorithm, we will use one function Extract-Min(), which extracts the node with the smallest key.
Algorithm: Dijkstras-Algorithm (G, w, s)
for each vertex v  G.V
   v.d :=
   v. := NIL
s.d := 0
S :=
Q := G.V
while Q
   u := Extract-Min (Q)
   S := S U {u}

   for each vertex v  G.adj[u]
      if v.d > u.d + w(u, v)
         v.d := u.d + w(u, v)
         v. := u
Analysis
The complexity of this algorithm is fully dependent on the implementation of Extract-Min function. If extract min function is implemented using linear search, the complexity of this algorithm is O(V2 + E).
In this algorithm, if we use min-heap on which Extract-Min() function works to return the node from Q with the smallest key, the complexity of this algorithm can be reduced further.
Example
Let us consider vertex 1 and 9 as the start and destination vertex respectively. Initially, all the vertices except the start vertex are marked by and the start vertex is marked by 0.
| Vertex | Initial | Step1 V1 | Step2 V3 | Step3 V2 | Step4 V4 | Step5 V5 | Step6 V7 | Step7 V8 | Step8 V6 |
|---|---|---|---|---|---|---|---|---|---|
| 1 | 0 | 0 | 0 | 0 | 0 | 0 | 0 | 0 | 0 |
| 2 | 5 | 4 | 4 | 4 | 4 | 4 | 4 | 4 | |
| 3 | 2 | 2 | 2 | 2 | 2 | 2 | 2 | 2 | |
| 4 | 7 | 7 | 7 | 7 | 7 | 7 | |||
| 5 | 11 | 9 | 9 | 9 | 9 | 9 | |||
| 6 | 17 | 17 | 16 | 16 | |||||
| 7 | 11 | 11 | 11 | 11 | 11 | 11 | 11 | ||
| 8 | 16 | 13 | 13 | 13 | |||||
| 9 | 20 |
Hence, the minimum distance of vertex 9 from vertex 1 is 20. And the path is
1 → 3 → 7 → 8 → 6 → 9
This path is determined based on predecessor information.
Bellman Ford Algorithm
This algorithm solves the single source shortest path problem of a directed graph G = (V, E) in which the edge weights may be negative. Moreover, this algorithm can be applied to find the shortest path, if there does not exist any negative weighted cycle.
Algorithm: Bellman-Ford-Algorithm (G, w, s)
for each vertex v  G.V
   v.d :=
   v. := NIL
s.d := 0

for i = 1 to |G.V| - 1
   for each edge (u, v)  G.E
      if v.d > u.d + w(u, v)
         v.d := u.d +w(u, v)
         v. := u
for each edge (u, v)  G.E
   if v.d > u.d + w(u, v)
      return FALSE
return TRUE
Analysis
The first for loop is used for initialization, which runs in O(V) times. The next for loop runs |V - 1| passes over the edges, which takes O(E) times.
Hence, Bellman-Ford algorithm runs in O(V, E) time.
Example
The following example shows how Bellman-Ford algorithm works step by step. This graph has a negative edge but does not have any negative cycle, hence the problem can be solved using this technique.
At the time of initialization, all the vertices except the source are marked by and the source is marked by 0.
In the first step, all the vertices which are reachable from the source are updated by minimum cost. Hence, vertices a and h are updated.
In the next step, vertices a, b, f and e are updated.
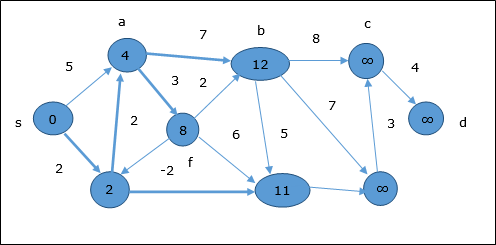
Following the same logic, in this step vertices b, f, c and g are updated.
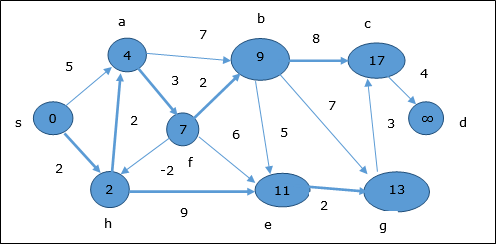
Here, vertices c and d are updated.
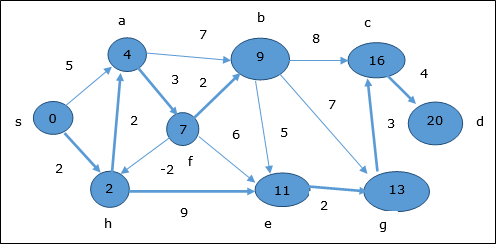
Hence, the minimum distance between vertex s and vertex d is 20.
Based on the predecessor information, the path is s → h → e → g → c → d
Minimum spanning tree (MST)
In a weighted graph, a minimum spanning tree is a spanning tree that has minimum weight than all other spanning trees of the same graph. In real-world situations, this weight can be measured as distance, congestion, traffic load or any arbitrary value denoted to the edges.
Prim's algorithm in Java
Prim's algorithm to find minimum cost spanning tree (as Kruskal's algorithm) uses the greedy approach. Prim's algorithm shares a similarity with the shortest path first algorithms.
Prim's algorithm, in contrast with Kruskal's algorithm, treats the nodes as a single tree and keeps on adding new nodes to the spanning tree from the given graph.
To contrast with Kruskal's algorithm and to understand Prim's algorithm better, we shall use the same example −
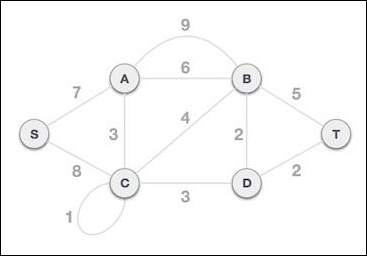
Step 1 - Remove all loops and parallel edges
Remove all loops and parallel edges from the given graph. In case of parallel edges, keep the one which has the least cost associated and remove all others.
Step 2 - Choose any arbitrary node as root node
In this case, we choose S node as the root node of Prim's spanning tree. This node is arbitrarily chosen, so any node can be the root node. One may wonder why any video can be a root node. So the answer is, in the spanning tree all the nodes of a graph are included and because it is connected then there must be at least one edge, which will join it to the rest of the tree.
Step 3 - Check outgoing edges and select the one with less cost
After choosing the root node S, we see that S,A and S,C are two edges with weight 7 and 8, respectively. We choose the edge S,A as it is lesser than the other.
Now, the tree S-7-A is treated as one node and we check for all edges going out from it. We select the one which has the lowest cost and include it in the tree.
After this step, S-7-A-3-C tree is formed. Now we'll again treat it as a node and will check all the edges again. However, we will choose only the least cost edge. In this case, C-3-D is the new edge, which is less than other edges' cost 8, 6, 4, etc.
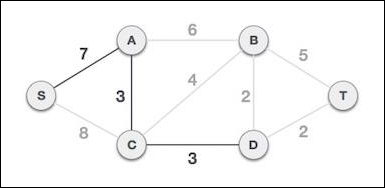
After adding node D to the spanning tree, we now have two edges going out of it having the same cost, i.e. D-2-T and D-2-B. Thus, we can add either one. But the next step will again yield edge 2 as the least cost. Hence, we are showing a spanning tree with both edges included.
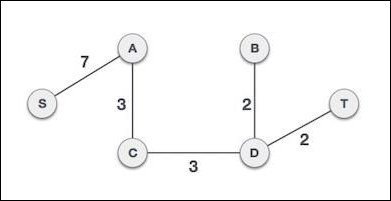
We may find that the output spanning tree of the same graph using two different algorithms is same.
Java Data Structures - Kruskal's algorithm
Kruskal's algorithm to find the minimum cost spanning tree uses the greedy approach. This algorithm treats the graph as a forest and every node it has as an individual tree. A tree connects to another only and only if, it has the least cost among all available options and does not violate MST properties.
To understand Kruskal's algorithm let us consider the following example −
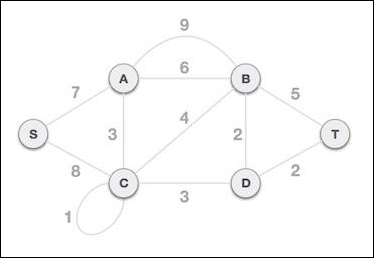
Step 1 - Remove all loops and Parallel Edges
Remove all loops and parallel edges from the given graph.
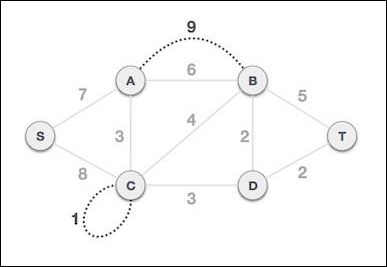
In case of parallel edges, keep the one which has the least cost associated and remove all others.
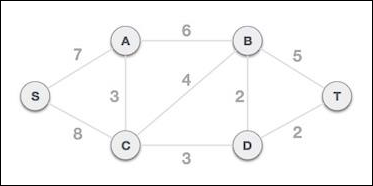
Step 2 - Arrange all edges in their increasing order of weight
The next step is to create a set of edges and weight, and arrange them in an ascending order of weightage (cost).
| B,D | D,T | A,C | C,D | C,B | B,T | A,B | S,A | S,C |
|---|---|---|---|---|---|---|---|---|
| 2 | 2 | 3 | 3 | 4 | 5 | 6 | 7 | 8 |
Step 3 - Add the edge which has the least weightage
Now we start adding edges to the graph beginning from the one which has the least weight. Throughout, we shall keep checking that the spanning properties remain intact. In case, by adding one edge, the spanning tree property does not hold then we shall consider not to include the edge in the graph.
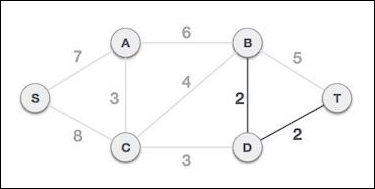
The least cost is 2 and edges involved are B,D and D,T. We add them. Adding them does not violate spanning tree properties, so we continue to our next edge selection.
Next cost is 3, and associated edges are A,C and C,D. We add them again −
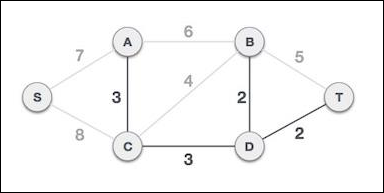
Next cost in the table is 4, and we observe that adding it will create a circuit in the graph.
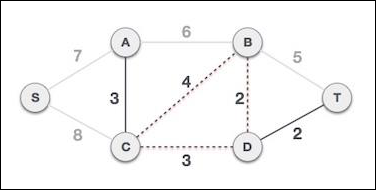
We ignore it. In the process we shall ignore/avoid all edges that create a circuit.
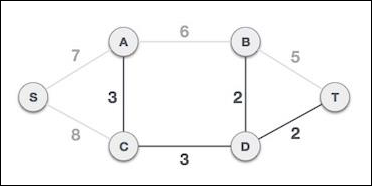
We observe that edges with cost 5 and 6 also create circuits. We ignore them and move on.
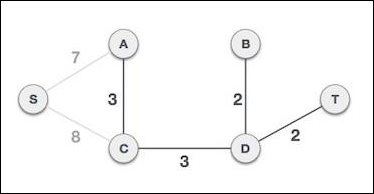
Now we are left with only one node to be added. Between the two least cost edges available 7 and 8, we shall add the edge with cost 7.
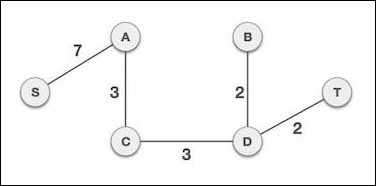
By adding edge S,A we have included all the nodes of the graph and we now have minimum cost spanning tree.
Java Data Structures - Bubble Sort
Sorting refers to arranging data in a particular format. Sorting algorithm specifies the way to arrange data in a particular order. Most common orders are in numerical or lexicographical order.
The importance of sorting lies in the fact that data searching can be optimized to a very high level, if data is stored in a sorted manner. Sorting is also used to represent data in more readable formats. Following are some of the examples of sorting in real-life scenarios.
Telephone Directory − The telephone directory stores the telephone numbers of people sorted by their names, so that the names can be searched easily.
Dictionary − The dictionary stores words in an alphabetical order so that searching of any word becomes easy.
In-place Sorting and Not-in-place Sorting
Sorting algorithms may require some extra space for comparison and temporary storage of few data elements. These algorithms do not require any extra space and sorting is said to happen in-place, or for example, within the array itself. This is called in-place sorting. Bubble sort is an example of in-place sorting.
However, in some sorting algorithms, the program requires space which is more than or equal to the elements being sorted. Sorting which uses equal or more space is called not-in-place sorting. Merge-sort is an example of not-in-place sorting.
The Bubble Sort in Java
Bubble sort is a simple sorting algorithm. This sorting algorithm is comparison-based algorithm in which each pair of adjacent elements is compared and the elements are swapped if they are not in order. This algorithm is not suitable for large data sets as its average and worst case complexity are of (n2) where n is the number of items.
Algorithm
We assume list is an array of n elements. We further assume that swap() function swaps the values of the given array elements.
Step 1: Assume i is the first element of the list then, compare the elements i and i+1. (first two elements of the array)
Step 2: If the i (first element) is greater than the second (i+1) swap them.
Step 3: Now, increment the i value and repeat the same.(for 2nd and 3rd elements)
Step 4: Repeat this till the end of the array.
Example
import java.util.Arrays;
public class BubbleSort {
   public static void main(String args[]) {
      int[] myArray = {10, 20, 65, 96, 56};
      System.out.println("Contents of the array before sorting : ");
      System.out.println(Arrays.toString(myArray));

      int n = myArray.length;
      int temp = 0;

      for(int i = 0; i<n-1; i++) {
         for(int j = 0; j<n-1; j++) {
            if (myArray[j] > myArray[j+1]) {
               temp = myArray[i];
               myArray[j] = myArray[j+1];
               myArray[j+1] = temp;
            }
         }
      }
      System.out.println("Contents of the array after sorting : ");
      System.out.println(Arrays.toString(myArray));
   }
}
Output
Contents of the array before sorting :
[10, 20, 65, 96, 56]
Contents of the array after sorting :
[10, 10, 20, 10, 20]
Java Data Structures - Selection Sort
Selection sort is a simple sorting algorithm. This sorting algorithm is an in-place comparison-based algorithm in which the list is divided into two parts, the sorted part at the left end and the unsorted part at the right end. Initially, the sorted part is empty and the unsorted part is the entire list.
The smallest element is selected from the unsorted array and swapped with the leftmost element, and that element becomes a part of the sorted array. This process continues moving unsorted array boundary by one element to the right.
This algorithm is not suitable for large data sets as its average and worst case complexities are of (n2), where n is the number of items.
Algorithm
Step 1: Set MIN to location 0 in the array.
Step 2: Search the minimum element in the list.
Step 3: Swap with value at location MIN.
Step 4: Increment MIN to point to next element.
Step 5: Repeat until list is sorted.
Example
import java.util.Arrays;

public class SelectionSort {
   public static void main(String args[]) {
      int myArray[] =  {10, 20, 25, 63, 96, 57};
      int n = myArray.length;

      System.out.println("Contents of the array before sorting : ");
      System.out.println(Arrays.toString(myArray));

      for (int i=0 ;i< n-1; i++) {
         int min = i;
         for (int j = i+1; j<n; j++) {
            if (myArray[j] < myArray[min]) {
               min = j;
            }
         }
         int temp = myArray[min];
         myArray[min] = myArray[i];
         myArray[i] = temp;
      }
      System.out.println("Contents of the array after sorting : ");
      System.out.println(Arrays.toString(myArray));
   }
}
Output
Contents of the array before sorting :
[10, 20, 25, 63, 96, 57]
Contents of the array after sorting :
[10, 20, 25, 57, 63, 96]
Java Data Structures - Insertion Sort
This is an in-place comparison-based sorting algorithm. Here, a sub-list is maintained which is always sorted. For example, the lower part of an array is maintained to be sorted. An element which is to be inserted in this sorted sub-list, has to find its appropriate place and then it has to be inserted there. Hence the name, insertion sort.
The array is searched sequentially and unsorted items are moved and inserted into the sorted sub-list (in the same array). This algorithm is not suitable for large data sets as its average and worst case complexity are of (n2), where n is the number of items.
Algorithm
Step 1: If it is the first element, it is already sorted. return 1;
Step 2: Pick next element.
Step 3: Compare with all elements in the sorted sub-list.
Step 4: Shift all the elements in the sorted sub-list that is greater than the value to be sorted.
Step 5: Insert the value.
Step 6: Repeat until list is sorted.
Example
import java.util.Arrays;

public class InsertionSort {
   public static void main(String args[]) {
      int myArray[] =  {10, 20, 25, 63, 96, 57};
      int size = myArray.length;
      System.out.println("Contents of the array before sorting : ");
      System.out.println(Arrays.toString(myArray));

      for (int i = 1 ;i< size; i++) {
         int val = myArray[i];
         int pos = i;

         while(myArray[pos-1]>val && pos>0) {
            myArray[pos] = myArray[pos-1];
            pos = pos-1;
         }
         myArray[pos] = val;
      }
      System.out.println("Contents of the array after sorting : ");
      System.out.println(Arrays.toString(myArray));
   }
}
Output
Contents of the array before sorting :
[10, 20, 25, 63, 96, 57]
Contents of the array after sorting :
[10, 20, 25, 57, 63, 96]
Java Data Structures - Merge Sort
Merge sort is a sorting technique based on divide and conquer technique. With worst-case time complexity being (n log n), it is one of the most respected algorithms.
Merge sort first divides the array into equal halves and then combines them in a sorted manner.
Algorithm
Merge sort keeps on dividing the list into equal halves until it can no more be divided. By definition, if it is only one element in the list, it is sorted. Then, merge sort combines the smaller sorted lists keeping the new list sorted too.
Step 1: if it is only one element in the list it is already sorted, return.
Step 2: divide the list recursively into two halves until it can no more be divided.
Step 3: merge the smaller lists into new list in sorted order.
Example
import java.util.Arrays;

public class MergeSort {
   int[] array = { 10, 14, 19, 26, 27, 31, 33, 35, 42, 44, 0 };

   public void merge(int low, int mid, int high) {
      int l1, l2, i, b[] = new int[array.length];

      for(l1 = low, l2 = mid + 1, i = low; l1 <= mid && l2 <= high; i++) {
         if(array[l1] <= array[l2]) {
         b[i] = array[l1++];
      } else
         b[i] = array[l2++];
      }

      while(l1 <= mid) {
         b[i++] = array[l1++];
      }
      while(l2 <= high) {
         b[i++] = array[l2++];
      }
         for(i = low; i <= high; i++) {
         array[i] = b[i];
      }
   }
   public void sort(int low, int high) {
      int mid;

      if(low < high) {
         mid = (low + high) / 2;
         sort(low, mid);
         sort(mid+1, high);
         merge(low, mid, high);
      } else {
         return;
      }
   }
   public static void main(String args[]) {
      MergeSort obj = new MergeSort();
      int max = obj.array.length-1;
      System.out.println("Contents of the array before sorting : ");
      System.out.println(Arrays.toString(obj.array));
      obj.sort(0, max);

      System.out.println("Contents of the array after sorting : ");
      System.out.println(Arrays.toString(obj.array));
   }
}
Output
[10, 14, 19, 26, 27, 31, 33, 35, 42, 44, 0]
Contents of the array after sorting :
[0, 10, 14, 19, 26, 27, 31, 33, 35, 42, 44]
Java Data Structures - Quick Sort
Quick sort is a highly efficient sorting algorithm and is based on partitioning of array of data into smaller arrays. A large array is partitioned into two arrays one of which holds values smaller than the specified value, say pivot, based on which the partition is made and another array holds values greater than the pivot value.
Quick sort partitions an array and then calls itself recursively twice to sort the two resulting subarrays. This algorithm is quite efficient for large-sized data sets as its average and worst case complexity are of (n2), where n is the number of items.
Algorithm
Based on our understanding of partitioning in quick sort, we will now try to write an algorithm for it, which is as follows −
Step 1: Choose the highest index value has pivot.
Step 2: Take two variables to point left and right of the list excluding pivot.
Step 3: left points to the low index.
Step 4: right points to the high.
Step 5: while value at left is less than pivot move right.
Step 6: while value at right is greater than pivot move left.
Step 7: if both step 5 and step 6 does not match swap left and right.
Step 8: if left  right, the point where they met is new pivot.
Quick Sort Algorithm
Using pivot algorithm recursively, we end up with smaller possible partitions. Each partition is then processed for quick sort. We define recursive algorithm for quicksort as follows −
Step 1: Make the right-most index value pivot.
Step 2: partition the array using pivot value.
Step 3: quicksort left partition recursively.
Step 4: quicksort right partition recursively.
Example
import java.util.Arrays;

public class QuickSortExample {
   int[] intArray = {4,6,3,2,1,9,7};

   void swap(int num1, int num2) {
      int temp = intArray[num1];
      intArray[num1] = intArray[num2];
      intArray[num2] = temp;
   }
   int partition(int left, int right, int pivot) {
      int leftPointer = left -1;
      int rightPointer = right;

      while(true) {
         while(intArray[++leftPointer] < pivot) {
            // do nothing
         }
         while(rightPointer > 0 && intArray[--rightPointer] > pivot) {
            // do nothing
         }

         if(leftPointer >= rightPointer) {
            break;
         } else {
            swap(leftPointer,rightPointer);
         }
      }
      swap(leftPointer,right);

      // System.out.println("Updated Array: ");
      return leftPointer;
   }
   void quickSort(int left, int right) {
      if(right-left <= 0) {
         return;
      } else {
         int pivot = intArray[right];
         int partitionPoint = partition(left, right, pivot);
         quickSort(left,partitionPoint-1);
         quickSort(partitionPoint+1,right);
      }
   }
   public static void main(String[] args) {
      QuickSortExample sort = new QuickSortExample();
      int max = sort.intArray.length;
      System.out.println("Contents of the array :");
      System.out.println(Arrays.toString(sort.intArray));

      sort.quickSort(0, max-1);
      System.out.println("Contents of the array after sorting :");
      System.out.println(Arrays.toString(sort.intArray));
   }
}
Output
Contents of the array :
[4, 6, 3, 2, 1, 9, 7]
Contents of the array after sorting :
[1, 2, 3, 4, 6, 7, 9]
Java Data Structures - Heap Sort
Heap is a tree with a specific condition that is the value of the node is greater than (or less than) its child nodes. Heap sort is a sorting where we use binary heap to sort the elements of an array.
Algorithm
Step 1: Create a new node at the end of heap.
Step 2: Assign new value to the node.
Step 3: Compare the value of this child node with its parent.
Step 4: If value of parent is less than child, then swap them.
Step 5: Repeat step 3 & 4 until Heap property holds.
Example
import java.util.Arrays;
import java.util.Scanner;

public class Heapsort {
   public static void heapSort(int[] myArray, int length) {
      int temp;
      int size = length-1;

      for (int i = (length / 2); i >= 0; i--) {
         heapify(myArray, i, size);
      }
      for(int i = size; i>=0; i--) {
         temp = myArray[0];
         myArray[0] = myArray[size];
         myArray[size] = temp;
         size--;
         heapify(myArray, 0, size);
      }
	   System.out.println(Arrays.toString(myArray));
   }
   public static void heapify (int [] myArray, int i, int heapSize) {
      int a = 2*i;
      int b = 2*i+1;
      int largestElement;

      if (a<= heapSize && myArray[a] > myArray[i]) {
         largestElement = a;
      } else {
         largestElement = i;
      }
      if (b <= heapSize && myArray[b] > myArray[largestElement]) {
         largestElement = b;
      }
      if (largestElement != i) {
         int temp = myArray[i];
         myArray[i] = myArray[largestElement];
         myArray[largestElement] = temp;
         heapify(myArray, largestElement, heapSize);
      }
   }
   public static void main(String args[]) {
      Scanner scanner = new Scanner(System.in);
      System.out.println("Enter the size of the array :: ");
      int size = scanner.nextInt();
      System.out.println("Enter the elements of the array :: ");
      int[] myArray = new int[size];

      for(int i = 0; i<size; i++) {
         myArray[i] = scanner.nextInt();
      }
      heapSort(myArray, size);
   }
}
Output
Enter the size of the array ::
5
Enter the elements of the array ::
45
125
44
78
1
[1, 44, 45, 78, 125]
Java Data Structures - Linear Search
Linear search is a very simple search algorithm. In this type of search, a sequential search is made over all items one by one. Every item is checked and if a match is found then that particular item is returned, otherwise the search continues till the end of the data collection.
Algorithm
Linear Search. ( Array A, Value x)
Step 1: Get the array and the element to search.
Step 2: Compare value of the each element  in the array to the required value.
Step 3: In case of match print element found.
Example
public class LinearSearch {
   public static void main(String args[]) {
      int array[] =  {10, 20, 25, 63, 96, 57};
      int size = array.length;
      int value = 63;

      for (int i=0 ;i< size-1; i++) {
         if(array[i]==value) {
            System.out.println("Index of the required element is :"+ i);
         }
      }
   }
}
Output
Index of the required element is :3
Java Data Structures - Binary Search
Binary search is a fast search algorithm with run-time complexity of (log n). This search algorithm works on the principle of divide and conquer. For this algorithm to work properly, the data collection should be in the sorted form.
Binary search looks for a particular item by comparing the middle most item of the collection. If a match occurs, then the index of item is returned. If the middle item is greater than the item, then the item is searched in the sub-array to the left of the middle item. Otherwise, the item is searched for in the sub-array to the right of the middle item. This process continues on the sub-array as well until the size of the sub array reduces to zero.
Example
public class BinarySearch {
   public static void main(String args[]) {
      int array[] =  {10, 20, 25, 57, 63, 96};
      int size = array.length;
      int low = 0;
      int high = size-1;
      int value = 25;
      int mid = 0;
      mid = low +(high-low)/2;

      while(low<=high) {
         if(array[mid] == value) {
            System.out.println(mid);
            break;
         } else if(array[mid]<value)
            low = mid+1;
            else high = mid - 1;
      }
      mid = (low+high)/2;
   }
}
Output
2
Java Data Structures - Recursion
Some computer programming languages allow a module or function to call itself. This technique is known as recursion. In recursion, a function either calls itself directly or calls a function that in turn calls the original function . The function is called recursive function.
int sampleMethod(int value) {
   if(value < 1) {
      return;
   }
   sampleMethod(value - 1);
   System.out.println(value);
}
Properties
A recursive function can go infinite like a loop. To avoid infinite running of recursive function, there are two properties that a recursive function must have −
Base criteria − There must be at least one base criteria or condition, such that, when this condition is met the function stops calling itself recursively.
Progressive approach − The recursive calls should progress in such a way that each time a recursive call is made it comes closer to the base criteria.
Implementation
Many programming languages implement recursion by means of stacks. Generally, whenever a function (caller) calls another function (callee) or itself as callee, the caller function transfers execution control to the callee. This transfer process may also involve some data to be passed from the caller to the callee.
This implies, the caller function has to suspend its execution temporarily and resume later when the execution control returns from the callee function. Here, the caller function needs to start exactly from the point of execution where it puts itself on hold. It also needs the exact same data values it was working on. For this purpose, an activation record (or stack frame) is created for the caller function.
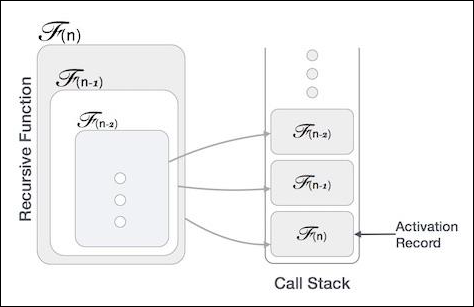
This activation record keeps the information about local variables, formal parameters, return address and all information passed to the caller function.
Analysis of Recursion
One may argue why to use recursion, as the same task can be done with iteration. The first reason is, recursion makes a program more readable and because of latest enhanced CPU systems, recursion is more efficient than iterations.
Time Complexity
In case of iterations, we take number of iterations to count the time complexity. Likewise, in case of recursion, assuming everything is constant, we try to figure out the number of times a recursive call is being made. A call made to a function is (1), hence the (n) number of times a recursive call is made makes the recursive function (n).
Space Complexity
Space complexity is counted as what amount of extra space is required for a module to execute. In case of iterations, the compiler hardly requires any extra space. The compiler keeps updating the values of variables used in the iterations. But in case of recursion, the system needs to store activation record each time a recursive call is made. Hence, it is considered that space complexity of recursive function may go higher than that of a function with iteration.
Java Data Structures - Fibonacci sequence
Dynamic programming approach is similar to divide and conquer in breaking down the problem into smaller and yet smaller possible sub-problems. But unlike, divide and conquer, these sub-problems are not solved independently. Rather, results of these smaller sub-problems are remembered and used for similar or overlapping sub-problems.
Dynamic programming is used where we have problems, which can be divided into similar sub-problems, so that their results can be re-used. Mostly, these algorithms are used for optimization. Before solving the in-hand sub-problem, dynamic algorithm will try to examine the results of the previously solved sub-problems. The solutions of sub-problems are combined in order to achieve the best solution.
So we can say that −
The problem should be able to be divided into smaller overlapping sub-problem.
An optimum solution can be achieved by using an optimum solution of smaller sub-problems.
Dynamic algorithms use memorization.
Comparison
In contrast to greedy algorithms, where local optimization is addressed, dynamic algorithms are motivated for an overall optimization of the problem.
In contrast to divide and conquer algorithms, where solutions are combined to achieve an overall solution, dynamic algorithms use the output of a smaller sub-problem and then try to optimize a bigger sub-problem. Dynamic algorithms use memorization to remember the output of already solved sub-problems.
Dynamic programming can be used in both top-down and bottom-up manner. And of course, most of the times, referring to the previous solution output is cheaper than re-computing in terms of CPU cycles.
The Fibonacci sequence in Java
Following is the solution of the Fibonacci sequence in Java using dynamic programming technique.
Example
import java.util.Scanner;

public class Fibonacci {
   public static int fibonacci(int num) {
      int fib[] = new int[num + 1];
      fib[0] = 0;
      fib[1] = 1;

      for (int i = 2; i < num + 1; i++) {
         fib[i] = fib[i - 1] + fib[i - 2];
      }
      return fib[num];
   }
   public static void main(String[] args) {
	   Scanner sc = new Scanner(System.in);
      System.out.println("Enter a number :");
      int num = sc.nextInt();

      for (int i = 1; i <= num; i++) {
         System.out.print(" "+fibonacci(i));
      }
   }
}
Output
1 1 2 3 5 8 13 21 34 55 89 144
Java Data Structures - knapsack problem
Following is the solution of the knapsack problem in Java using dynamic programming technique.
Example
public class KnapsackExample {
   static int max(int a, int b) {
      return (a > b)? a : b;
   }
   public static int knapSack(int capacity, int[] items, int[] values, int numOfItems ) {
      int i, w;
      int [][]K = new int[numOfItems+1][capacity+1];

      // Build table K[][] in bottom up manner
      for (i = 0; i <= numOfItems; i++) {
         for (w = 0; w <= capacity; w++) {
            if (i==0 || w==0) {
               K[i][w] = 0;
            } else if (items[i-1] <= w) {
               K[i][w] = max(values[i-1] + K[i-1][w-items[i-1]],  K[i-1][w]);
            } else {
               K[i][w] = K[i-1][w];
            }
         }
      }
      return K[numOfItems][capacity];
   }
   public static void main(String args[]) {
      int[] items = {12, 45, 67, 90, 45};
      int numOfItems = items.length;
      int capacity = 100;
      int[] values = {1200, 4500, 6700, 9000, 4500};

      int x = knapSack(capacity, items, values, numOfItems );
      System.out.println(x);
   }
}
Output
9000
Components of Greedy Algorithm
An algorithm is designed to achieve optimum solution for a given problem. In greedy algorithm approach, decisions are made from the given solution domain. As being greedy, the closest solution that seems to provide an optimum solution is chosen.
Greedy algorithms try to find a localized optimum solution, which may eventually lead to globally optimized solutions. However, generally greedy algorithms do not provide globally optimized solutions.
Components of Greedy Algorithm
Greedy algorithms have the following five components −
A candidate set − A solution is created from this set.
A selection function − Used to choose the best candidate to be added to the solution.
A feasibility function − Used to determine whether a candidate can be used to contribute to the solution.
An objective function − Used to assign a value to a solution or a partial solution.
A solution function − Used to indicate whether a complete solution has been reached.
Areas of Application
Greedy approach is used to solve many problems, such as
Finding the shortest path between two vertices using Dijkstras algorithm.
Finding the minimal spanning tree in a graph using Prims /Kruskals algorithm, etc.
Where Greedy Approach Fails
In many problems, Greedy algorithm fails to find an optimal solution, moreover it may produce a worst solution. Problems like Travelling Salesman and Knapsack cannot be solved using this approach.
Counting Coins
This problem is to count to a desired value by choosing the least possible coins and the greedy approach forces the algorithm to pick the largest possible coin. If we are provided coins of 1, 2, 5 and 10 and we are asked to count 18 then the greedy procedure will be.
Select one 10 coin, the remaining count is 8.
Then select one 5 coin, the remaining count is 3.
Then select one 2 coin, the remaining count is 1.
And finally, the selection of one 1 coins solves the problem.
Though, it seems to be working fine, for this count we need to pick only 4 coins. But if we slightly change the problem then the same approach may not be able to produce the same optimum result.
For the currency system, where we have coins of 1, 7, 10 value, counting coins for value 18 will be absolutely optimum but for count like 15, it may use more coins than necessary. For example, the greedy approach will use 10 + 1 + 1 + 1 + 1 + 1, total 6 coins. Whereas the same problem could be solved by using only 3 coins (7 + 7 + 1)
Hence, we may conclude that the greedy approach picks an immediate optimized solution and may fail where global optimization is a major concern.
Java Data Structures - Algorithm Analysis
Algorithm is a step-by-step procedure, which defines a set of instructions to be executed in a certain order to get the desired output. Algorithms are generally created independent of underlying languages, i.e. an algorithm can be implemented in more than one programming language.
Algorithm Analysis
Efficiency of an algorithm can be analyzed at two different stages, before implementation and after implementation. They are the following −
A Priori Analysis − This is a theoretical analysis of an algorithm. Efficiency of an algorithm is measured by assuming that all other factors, for example, processor speed, are constant and have no effect on the implementation.
A Posterior Analysis − This is an empirical analysis of an algorithm. The selected algorithm is implemented using programming language. This is then executed on target computer machine. In this analysis, actual statistics like running time and space required, are collected.
We shall learn about a priori algorithm analysis. Algorithm analysis deals with the execution or running time of various operations involved. The running time of an operation can be defined as the number of computer instructions executed per operation.
Algorithm Complexity
Suppose X is an algorithm and n is the size of input data, the time and space used by the algorithm X are the two main factors, which decide the efficiency of X.
Time Factor − Time is measured by counting the number of key operations such as comparisons in the sorting algorithm.
Space Factor − Space is measured by counting the maximum memory space required by the algorithm.
The complexity of an algorithm f(n) gives the running time and/or the storage space required by the algorithm in terms of n as the size of input data.
Space Complexity
Space complexity of an algorithm represents the amount of memory space required by the algorithm in its life cycle. The space required by an algorithm is equal to the sum of the following two components −
A fixed part that is a space required to store certain data and variables, that are independent of the size of the problem. For example, simple variables and constants used, program size, etc.
A variable part is a space required by variables, whose size depends on the size of the problem. For example, dynamic memory allocation, recursion stack space, etc.
Space complexity S(P) of any algorithm P is S(P) = C + SP(I), where C is the fixed part and S(I) is the variable part of the algorithm, which depends on instance characteristic I. Following is a simple example that tries to explain the concept −
Algorithm: SUM(A, B)
Step 1: START
Step 2: C <- A + B + 10
Step 3: Stop
Here we have three variables A, B, and C and one constant. Hence S(P) = 1 + 3. Now, space depends on data types of given variables and constant types and it will be multiplied accordingly.
Time Complexity
Time complexity of an algorithm represents the amount of time required by the algorithm to run to completion. Time requirements can be defined as a numerical function T(n), where T(n) can be measured as the number of steps, provided each step consumes constant time.
For example, addition of two n-bit integers takes n steps. Consequently, the total computational time is T(n) = c * n, where c is the time taken for the addition of two bits. Here, we observe that T(n) grows linearly as the input size increases.
Java Data Structures - Asymptotic Notations
Asymptotic analysis of an algorithm refers to defining the mathematical boundation/framing of its run-time performance. Using asymptotic analysis, we can very well conclude the best case, average case, and worst case scenario of an algorithm.
Asymptotic analysis is input bound i.e., if there's no input to the algorithm, it is concluded to work in a constant time. Other than the "input" all other factors are considered constant.
Asymptotic analysis refers to computing the running time of any operation in mathematical units of computation. For example, the running time of one operation is computed as f(n) and may be for another operation it is computed as g(n2). This means the first operation running time will increase linearly with the increase in n and the running time of the second operation will increase exponentially when n increases. Similarly, the running time of both operations will be nearly the same if n is significantly small.
Usually, the time required by an algorithm falls under three types −
Best Case − Minimum time required for program execution.
Average Case − Average time required for program execution.
Worst Case − Maximum time required for program execution.
Asymptotic Notations
Following are the commonly used asymptotic notations to calculate the running time complexity of an algorithm.
Notation
Notation
Notation
Big Oh Notation,
The notation (n) is the formal way to express the upper bound of an algorithm's running time. It measures the worst case time complexity or the longest amount of time an algorithm can possibly take to complete.
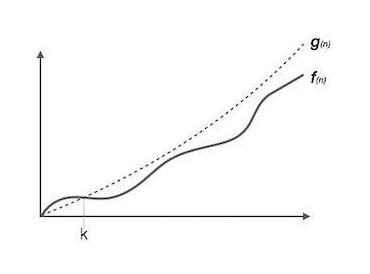
For example, for a function f(n)
(f(n)) = { g(n) : there exists c > 0 and n0 such that f(n) c.g(n) for all n > n0. }
Omega Notation,
The notation (n) is the formal way to express the lower bound of an algorithm's running time. It measures the best case time complexity or the best amount of time an algorithm can possibly take to complete.
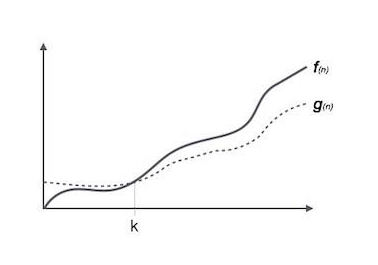
For example, for a function f(n)
(f(n)) { g(n) : there exists c > 0 and n0 such that g(n) c.f(n) for all n > n0. }
Theta Notation,
The notation (n) is the formal way to express both the lower bound and the upper bound of an algorithm's running time. It is represented as follows −
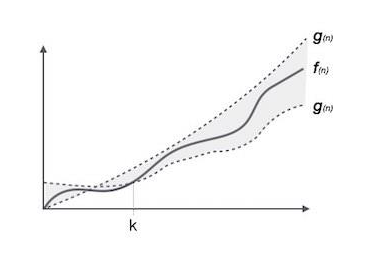
(f(n)) = { g(n) if and only if g(n) = (f(n)) and g(n) = (f(n)) for all n > n0. }
Common Asymptotic Notations
Following is a list of some common asymptotic notations −
| constant | (1) | |
| logarithmic | (log n) | |
| linear | (n) | |
| n log n | (n log n) | |
| quadratic | (n2) | |
| cubic | (n3) | |
| polynomial | n(1) | |
| exponential | 2(n) |
