- Google Plus - Business Page Setting
- Creating a New Account
- Navigating Through Google Plus
- Adding Business Details
- Uploading Profile Picture
- Google Plus - Adding a Cover Picture
- Google Plus - Networking
- Google Plus - Circles
- Google Plus - Communities
- Google Plus - Hangouts
- Google Plus - Events
- Google Plus - Posting Content
- Google Plus - Uploading a Post
- Google Plus - Editing a Post
- Google Plus - Deleting a Post
- Google Plus - Resharing a Post
- Google Plus - Reporting a Post
- Foster User Engagement
- Google Plus - Checking Notifications
- Google Plus - Adding Managers
- Google Plus - Setting Settings
- Google Plus - Notification Settings
- Google Plus - Circle Settings
- Google Plus - Photo & Video Settings
- Google Plus - Profile Settings
- Google Plus - Deleting an Account
- Google Plus - Insights
- Google Plus - Optimization Process
- Google Plus - Optimizing a Page
- Google Plus - Claiming Vanity URL
- Google Plus - +Post Ads
- Google Plus - Integration Process
- Google Plus - Badges
- Google Plus - Creating a Badge
- Connecting With YouTube
- Google Plus - Social Linking
- Google Plus Useful Resources
- Google Plus - Quick Guide
- Google Plus - Useful Resources
- Google Plus - Discussion
Google Plus - Quick Guide
Google Plus - Introduction
Google+ (Google Plus) is an interest-based social networking site owned by Google Inc. Launched in 2011, this platform brings together people with similar interest. Such group of people can build a community and share their ideas through photos and posts.
Google+ is unique in way in that it allows more transparency in what one shares and with whom it is shared. The Google+ menu bar is displayed on other Google services when one logs in the google account.
Some of the most prominent features of Google+ are as follows −
Posts where one can update the status.
Circles are used to share information with different groups.
Sparks offer videos that users might like.
Hangouts & Huddles are for video chat with a friend or a group of friends.
Google+ Versus Other Platforms
Google+ offers rich features like Hangouts, Google Events, Google Communities, Google Circles, etc. Other social platforms are standalone networking platforms. Google+ is integrated with all Google products and services.
Google+ helps to boost our SERP ranking, which is not possible with Facebook, Twitter, etc. Whatever we post on Google+ gets indexed in a short span of time enhancing the real-time search. Google+ uses rich snippets to optimize results. This enhances the credibility points for every activity on Google+.
Google+ Personal Page
Google+ personal profile page is where we can upload our pictures. A personal profile page provides the flexibility to engage with people. The profile should be actual with accurate name and pictures which are easily accessible. The default is personal and everything we post is private. Google+ personal page represents an individual and we can manage it as an individual. Basically, the person who creates the profile can manage it. Members of the circle can only like or comment on our posts and photos.
Business Profile Page
Google+ business page is similar to Facebook business page where our posts and uploaded pictures is visible to the users who like our page. We can comment or interact with people who comment on our business page. More than one person can use/manage the page unlike the personal profile page, where only the one has the right to maintain it.
In this case, the default is public where anyone can like or comment on our page. Google+ page represents a business, brand, etc. hence we can name the page accordingly. Google+ business page has a feature customer reviews which is not on personal profile page. It is a very efficient way to attract more users. Customer reviews makes the page look trustworthy to new users. The page also contains insights which shows how many people are engaging or viewing the page.
Google Plus - Business Page Setting
Google+ has over 300 million active users. Hence, it can be used for business purpose to reach millions of customers worldwide. The Google+ platform is managed through a dashboard Google My Business. It uses maps, search, and Google+ to make it easy for our brand to be more visible on search. It allows users to share their experiences in the form of reviews. We can use these reviews to get more credibility, improve our search rank and influence the buyers. To set up a business page, first we have to create an account.
Visit business.google.com or Google My Business locations. In case there are many businesses in different places, we have to set up an account for all of them individually. Click the hamburger icon on the top left corner of the page.
Click the Create business account. Enter the business type, it offers three options to choose from −
Storefront − Choose this option if the customers are to visit our business place. In the search results, Google+ will show the location, the duration and other contact information like phone number, address, etc.
Service area − Choose this option if the customers are to be served at their place. In the search results, Google+ will show location, duration, and other contact information, such as phone number, address, etc.
Brand − In search results, Google+ will not show the location, duration, and other contact information.
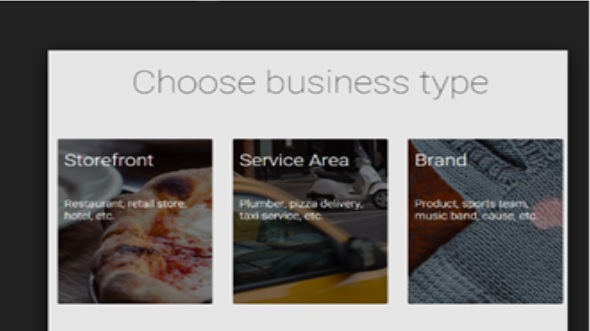
Service area and Storefront are options for local businesses, and brand is for the product type. From option 1 and 2, if we select one of them then well be prompted to select the business name and the location.
Add the business info. Make the business profile look decent and appealing to others by adding photos of the brand and also by creating a URL which provides a recognizable web address of the brand.
We can also connect the business page to the existing pages by selecting a location. Click Manage this location. Click the hamburger icon on the top left hand side of the page. Select settings and then click Connect a different page. Choose the Google+ page that is to be connected to the business account page from the dropdown menu and click Done. An account will be created. We can rename or delete the business account any time we feel like.
Google Plus - Creating a New Account
Following are the steps to create a new account.
Step 1 − Create a Gmail account. It is always advisable not to use the existing account if we are creating an account for business purposes. Create a new account and allow only business team members to your circles.
Step 2 − Open https://plus.google.com/
Step 3 − Click the hamburger icon situated on the top left side of the page that pops up.
Step 4 − Open the option Join Google+.
Step 5 − Create a public profile by adding name, DoB, gender, etc. and click Upgrade.
Step 6 − Search for people that we want to add to the page and click Continue.
Step 7 − Follow things of interest such as entertainment, news, fashion, etc.
Step 8 − Put a face to the name, mention the place of work, and educational qualifications. Click Finish once done filling all these details.
Step 9 − Build circles and communities.
Step 10 − Post contents, profile and cover pictures.
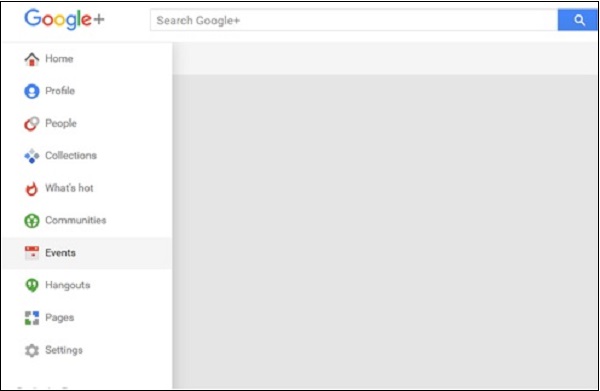
Navigating Through Google Plus
When we land on Google+ page, we will come across a left sidebar.
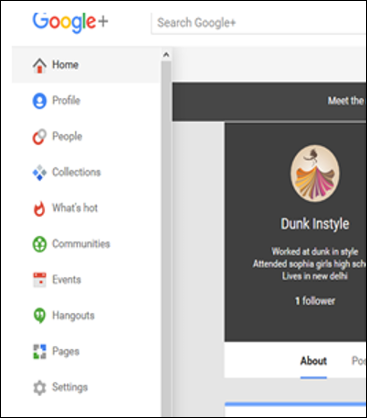
Following are the tabs on the sidebar.
Home tab is the timeline comprising the posts shared by others.
Collections tab is where we can collect different posts under different attributes. This is helpful for self as well as others to easily find what they want to see.
Communities tab refers to groups of different people who share the same interest as ours. We can join a community to see what is going on in peoples life, share our ideas, etc.
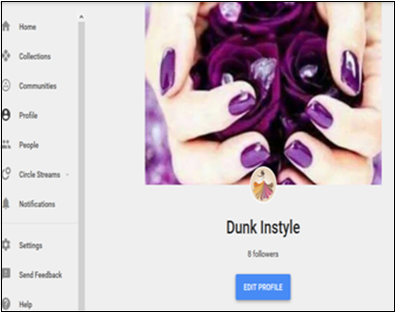
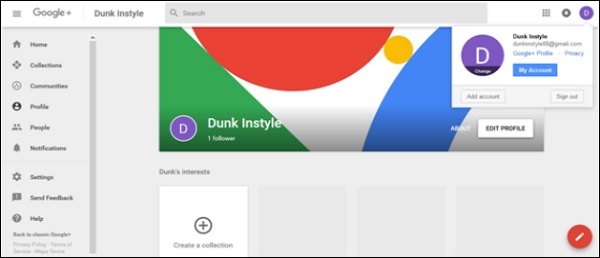
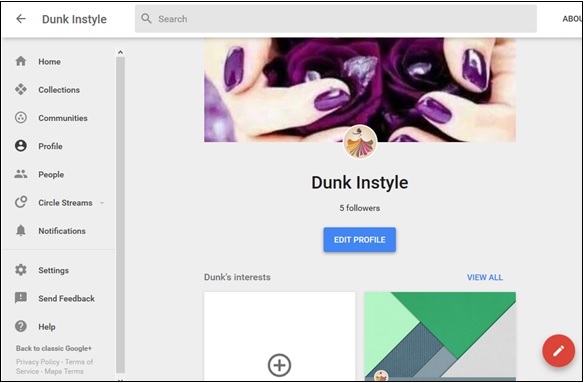
Profile tab is the intro page. This is where we can write a short description of our page or business. Users can view our interest boards and posts.
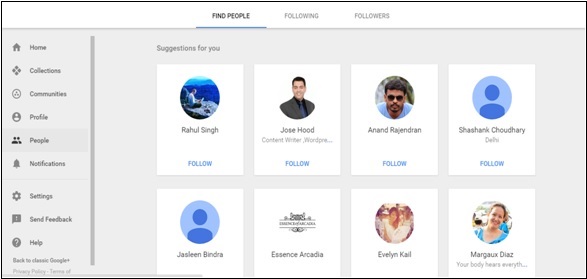
People tab is where we can see our followers and who we are following. This is where we receive some suggestion from the application as to who could be our interest or pal.
Notification tab is where we will be notified of all the activities taking place in our account.
Setting tab is an important tab. Using this tab, we can set our account as we wish to. We can edit people activities related to our account such as who can send notifications and comment on our posts, who can view our activities. We can even decide the privacy of our photos and videos. Edit how our profile looks to people and restrict our stream layout. We can even share our location if we desire.
Feedback button, as the name suggests, allows us to send feedback.
Help section supports us with issues we are having difficulty with.
Google Plus - Adding Business Details
To add business details to Google+ page, we need to have access to My Business section. Google My Business is a platform which makes it easy to find and connect with customers. It uses search, maps, etc. to make the brand visible to search results.

Business details help potential customers locate us and know important details about our business.
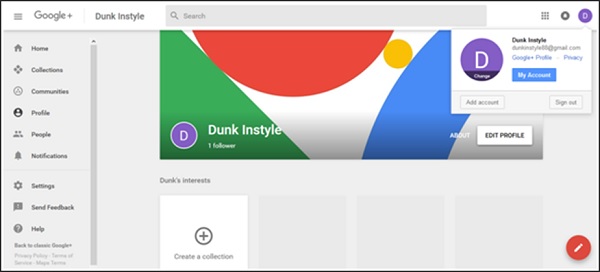
Google Plus - Uploading Profile Picture
In this chapter, we will discuss how you can upload a profile picture in your Google+ account.
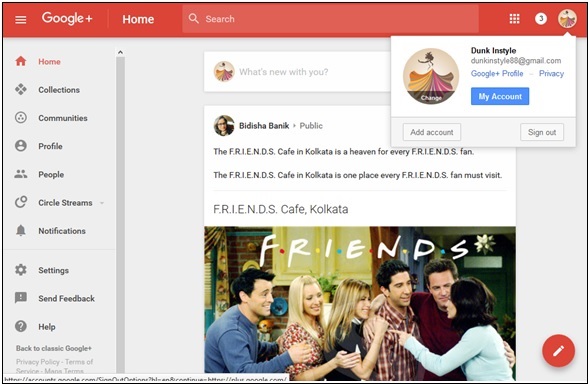
Step 1 − Open Google+ account using the link https://plus.google.com
Step 2 − Click the drop-down menu (hamburger icon) situated on the left corner of Google+ page.
Step 3 − Click Profile from the options.
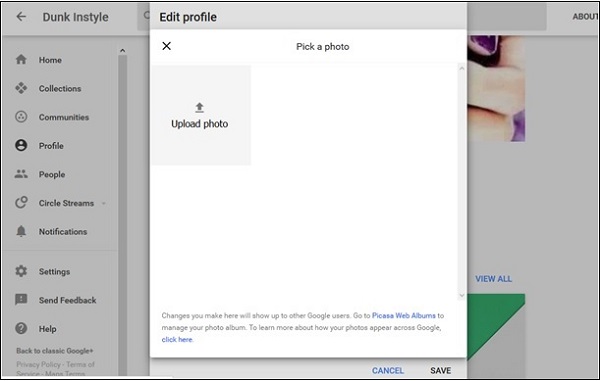
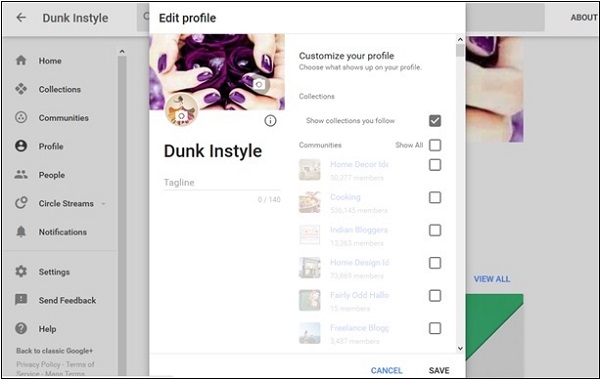
Step 4 − Click the option Edit profile.
Step 5 − Choose from the following options −
Upload photos (drag photo from computer drives)
photos/albums (select the photos from the existing ones)
Web camera (take a new click with web camera)
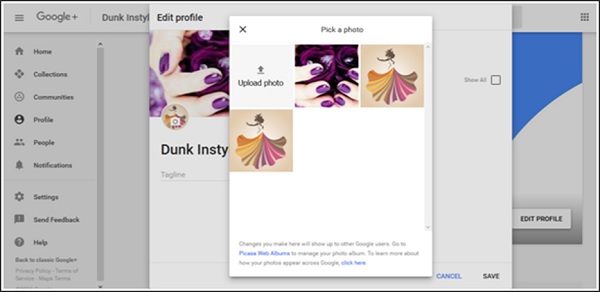
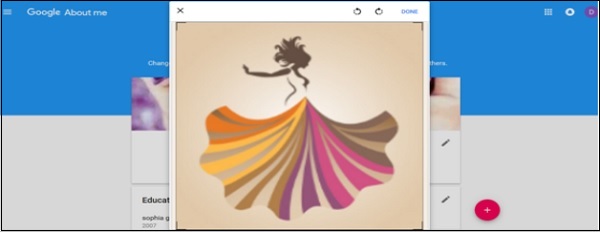
Step 6 − Crop and rotate the photo if desired.
Step 7 − Finally click the option Save.
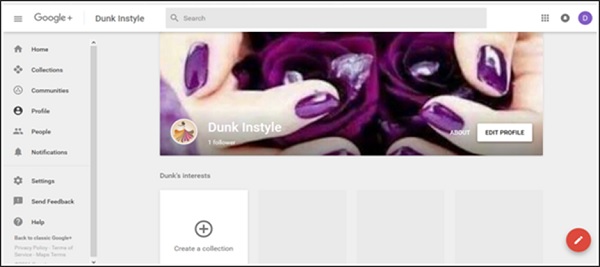
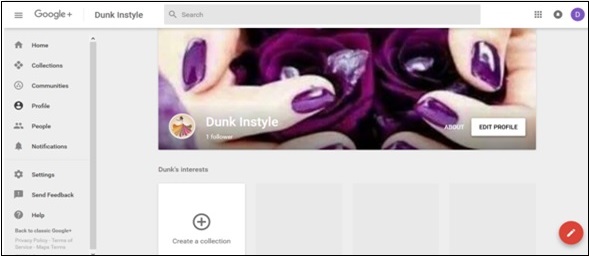
Google Plus - Adding a Cover Picture
In this chapter, we will discuss how you can add a cover picture in your Google+ account.
Step 1 − Open Google+ account.
Step 2 − Click the drop-down menu (hamburger icon) situated on the left corner of Google+ page.
Step 3 − Click Profile from the options.

Step 4 − Click the option Edit profile'.
Step 5 − Choose from the following options.
Upload photos (drag photo from computer drives)
photos/albums (select the photos from the existing ones)
Web camera (take a new click with web camera)
Step 6 − Crop and rotate the photo if desired.
Step 7 − Finally, click the option Save.
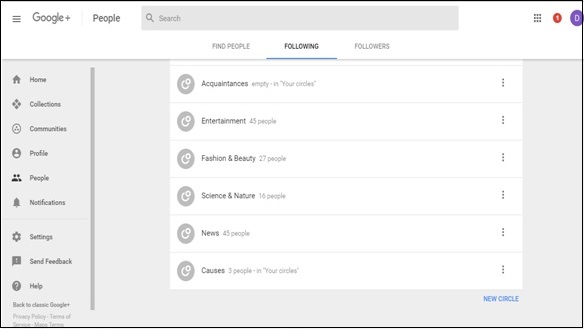
Google Plus - Circles
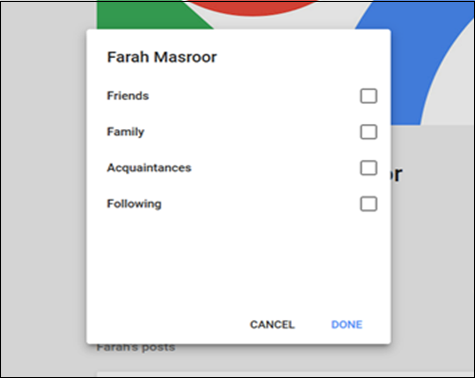
Google Circles can be used to group together different people. It may different members of the family, colleagues, or a group of people having similar interest. When we add people to a particular circle, they receive a notification of being added to the circle. Members of a circle can view the posts and photos in the circle. We can also add or remove people from circles at any time. Circles help to share the right information with the right people.
For example, it is a great way to share jokes with friends circle, while sharing business matters with work circle. People added to circles can also be available on our Google Hangout. By default people and pages added to circles are publicly visible. However, we can change the privacy options from settings. There is a daily limit of adding 5000 pages and profiles within all our circles. If we have reached this limit, we have to wait for another day to add more profiles and pages.
How to Create a Circle?
Step 1 − Open Google+ account.

Step 2 − Click People from the navigation menu.
Step 3 − Click the Following tab as shown in following screenshot.
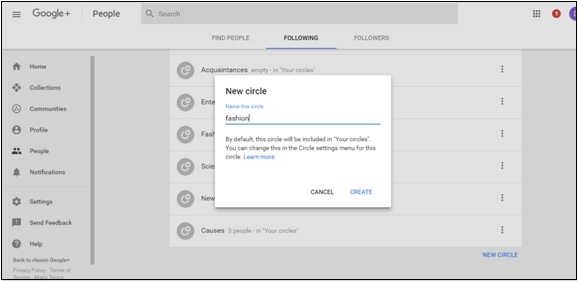
Step 4 − Scroll down and click New Circle as seen in the above screenshot.
Step 5 − Name the circle and once done, click Create.
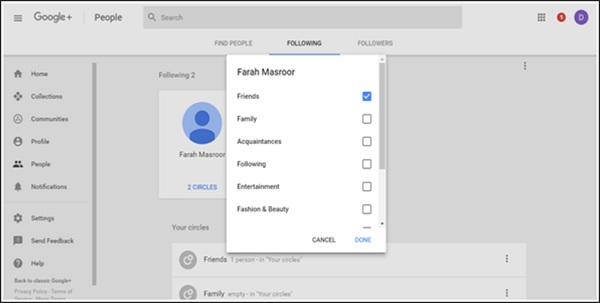
Adding People to Circles
Step 1 − Open the profile of the person who is to be added to the circle.
Step 2 − Click the circle that the person is to be added to.
Step 3 − Click Done.
Removing People From Circles
Step 1 − Open the profile of the person to be removed from the circle.
Step 2 − Click the circle that the person is in and from the menu uncheck the circle.
Step 3 − Click Done.
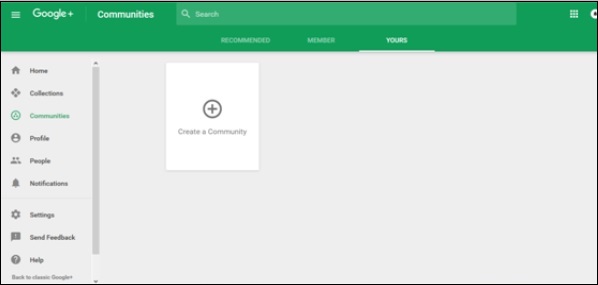
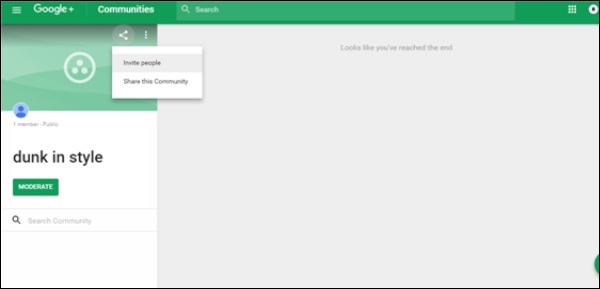
Google Plus - Communities
Google+ Communities play a major role in finding people with similar hobbies or interests. It helps to bring people together for discussing particular interests for example fashion, science, animals, etc. Communities are places where the users who are added to it share or ask specific questions or comments on a related topic. People can be invited to join the community and the page can be managed through pinned posts, hashtags, etc. A moderator can even police the person who shares anything unrelated to the community. In case we do not to receive notifications, we can turn them off from the community page.
We can create our own community. Before creating our profile, certain things to be kept in mind are −
Check the settings, to make sure whether it is to be public or private.
Photo gives the first impression. Hence, choose the photo wisely that portrays the community well.
'About section is important. It is the section people use to acquire information about the community. Write clear and logical information about the community such that people understand the purpose of building the community and what we want to share through the community.
Creating a Community
Step 1 − Select Communities from the navigation menu.

Step 2 − Click Create Community.
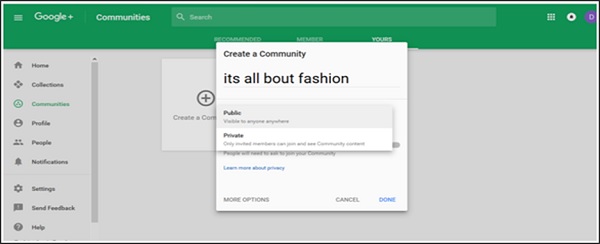
Step 3 − Choose the privacy option, whether the community should be public or private.
Step 4 − Name the Community.
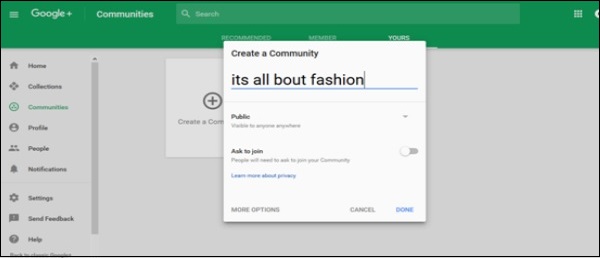
Step 5 − Click Done.
Step 6 − Add or invite people to the Community and share the community to receive large audience.
Difference Between Public and Private Community
Private Community − When we choose the private option for our community, we have to choose the option if people can search for our community or not.
Public Community − When we choose the public option for our community, we have to choose the option if people can ask for permission to join your community or not.
Make sure you choose this option carefully because you don't have option to alter your choice later.
Google Plus - Hangouts
This communication platform by Google, includes video chat, messaging, and VOIP features. It is a free service from Google that provides both single chat or group chats. Group chat can take place with up to 10 persons. Google Hangouts users can easily share files such as images and videos with other users.
This platform also offers hangouts on Air option using which we can broadcast live video chatting and discussions to the world through your Google+. These video chats and discussion is accessible to all. It can be edited and a copy of the broadcast can be shared though YouTube channel.
Hangouts is a good way to communicate with anyone and easily get an instant reply. Moreover, you can upload your video or pictures to one or many friends at a time.
To broadcast our Hangouts on Air, all we need is −
YouTube channel − Make sure to have a YouTube account. Create an account, if there isnt one.
Google+ profile − Make sure the Google+ page is connected to YouTube account. Nowadays they are automatically connected, however existing users should connect it to Google+ page.
Creating a Hangout
Step 1 − Open Google+ page.
Step 2 − Search for Hangouts in the drop-down menu located on the left side of the page.
Step 3 − Click + New Hangout. Check and add people to be added to Hangouts.
Step 4 − Step 4: Choose the format for Hangouts, i.e. either video or text hangout. We can also alter text chat to video chat any time by clicking the camera button that appears on the top of the chat window.

We can share emoticons or pictures through Hangouts. We can also add filters to the pictures and videos. When we are done chatting, click the Close (x) button.
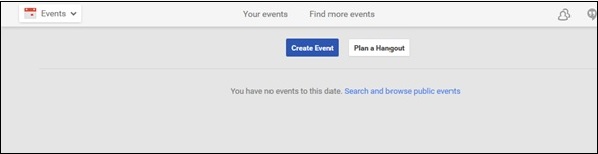
Google Plus - Events
Google+ Events page helps in organizing an upcoming event or occasion. It helps anyone using Gmail to add certain events in their calendars. All information about the particular event can be populated with just one click.
The event automatically gets added to Google calendar of those who are invited and are already in the circles. We can invite as many people or even the entire circle/community at the same time. Click +invite name, circles and select the privacy as public. By doing so, anyone can find the event and access the details.
Events automatically get synchronized with guests calendars. Everyone attending can share the photos/videos to the shared album. Guests can even inform whether they are going to attend the event or not. If there is a change in the date of the event, guests will be notified by email. They will receive a notification for the change in place, date, time, etc.
Creating a Google+ Event
Step 1 − Open Google+ account.
Step 2 − Click the Events tab.
Step 3 − Click Create event.
Step 4 − Fill all the information about the event such as Title, start/end date, location, description.
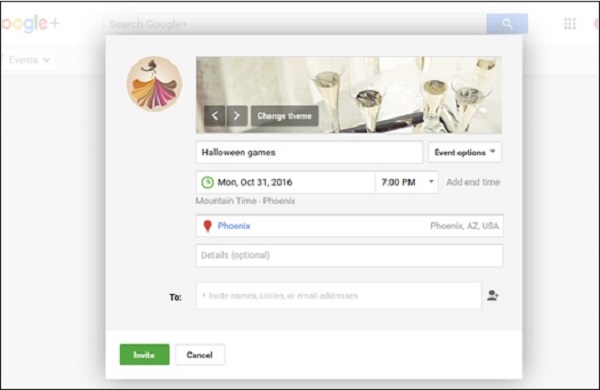
Step 5 − Upload the cover picture. Make sure the cover picture depicts the event.
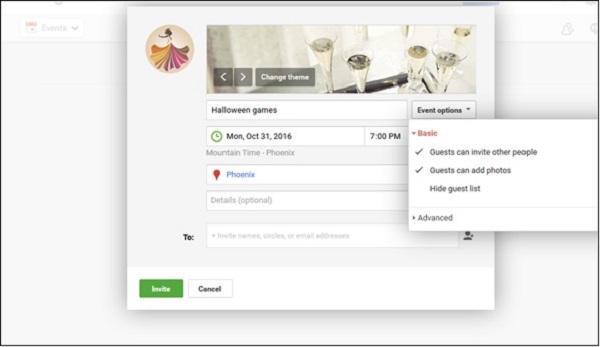
Step 6 − Check/uncheck the following options.
Guests can invite other people.
Guests can add photos.
Hide guests list.
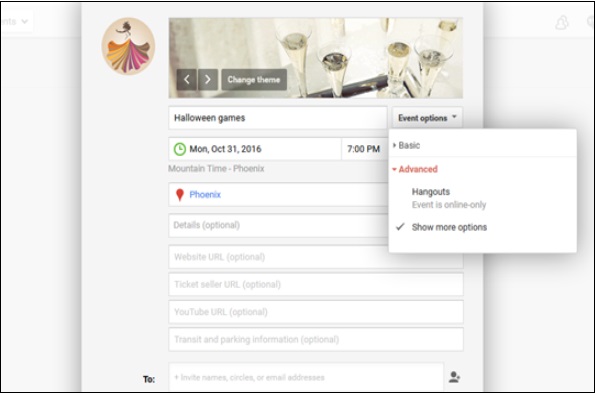
Step 7 − Add more description via Advanced tab.
Step 8 − Invite people who we want to come to the event by clicking the green invite button.
Step 9 − Publish the event.
Google Plus - Uploading a Post
We can upload posts on our Google+ profile easily and share it with people in our communities/circles or others who we want to share it with. When we share our post, it is visible on the receivers news feed. The post also appears on our profile page and people can comment, like, or share the post. We can also tag people to our post using + and their name.
Lets go step by step and learn how we can upload a post in Google+.
Step 1 − Open your Google+ account.
Step 2 − On the profile page whats new with you? will appear. Click it.
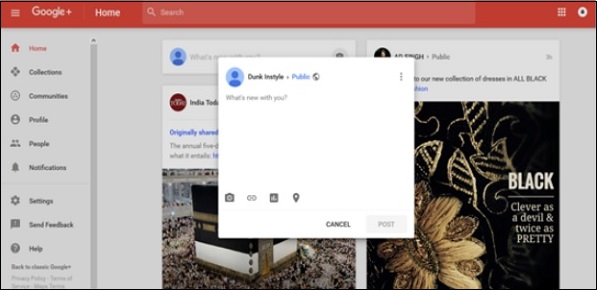
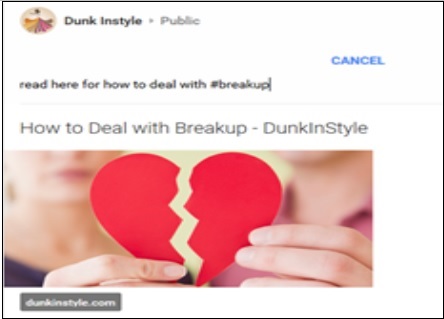
Step 3 − Write the post. We can also copy paste the content.
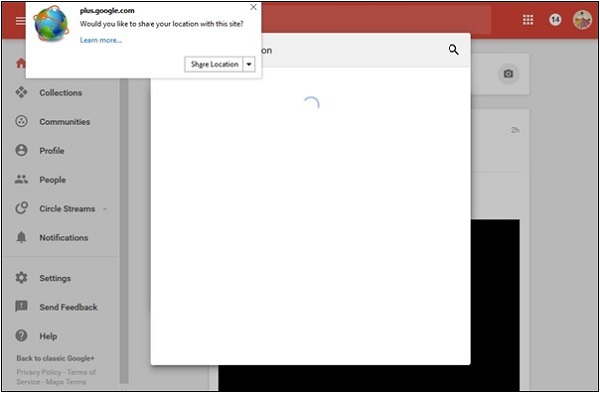
Step 4 − Tag anyone if desired. Add the location if needed.
Step 5 − Select whether the post should be public or private.
Step 6 − Once done, click the Post option. The post appears on our page as well as on the profile page of the persons tagged to the post.
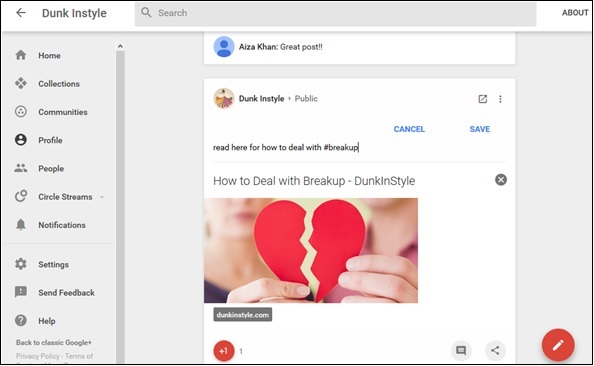
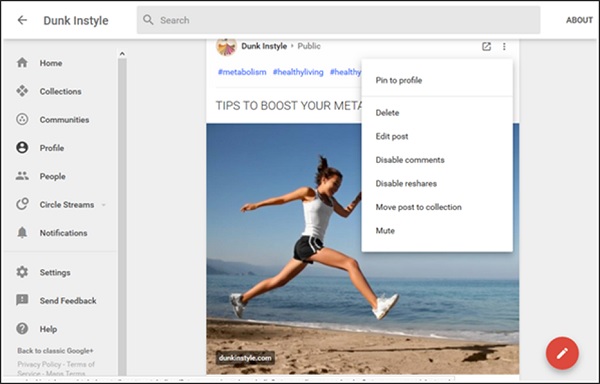
Google Plus - Editing a Post
Step 1 − Open the Google+ account and go to the post to be edited.
Step 2 − Click the Menu ![]() icon as shown in the following screenshot.
icon as shown in the following screenshot.
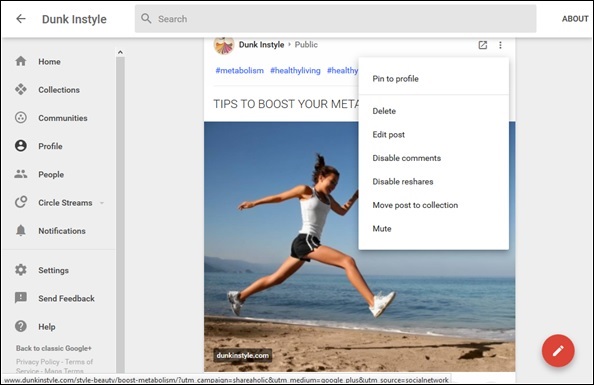
Step 3 − Click Edit post.
Step 4 − Click Done after completing the editing.
Google Plus - Deleting a Post
Step 1 − Open the post to be deleted.
Step 2 − Click the Menu ![]() icon.
icon.
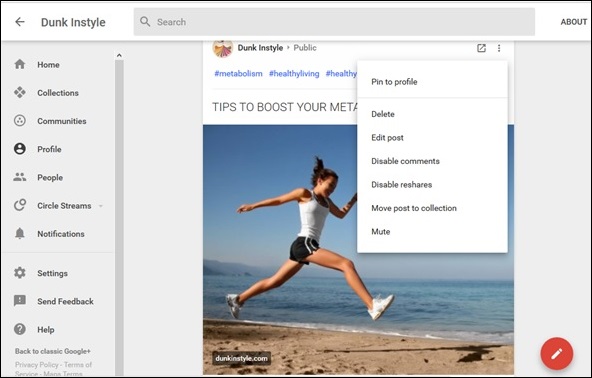
Step 3 − Click Delete option.
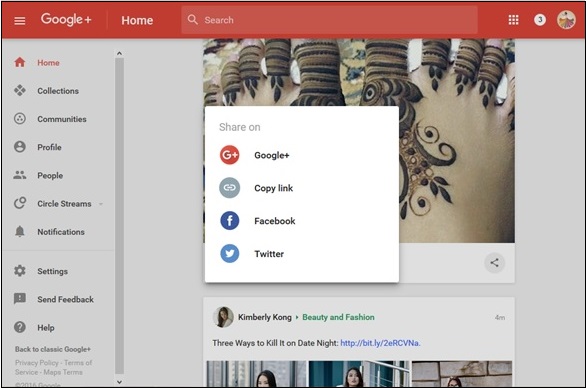
Google Plus - Resharing a Post
Step 1 − To re-share someone elses post, click the share  icon that appears on the post as seen in the following screenshot.
Step 2 − Click the options where we want to share. For example, Share on Google+.
Step 3 − Select the people we want to share the post with.
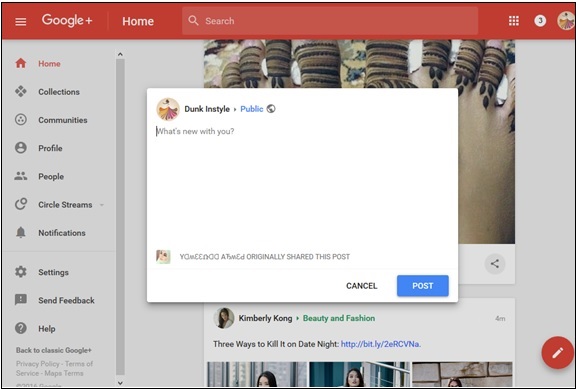
Step 4 − Click the Post option.
Prevent people from commenting on or sharing a post
Step 1 − Open the post. Turn off commenting or resharing while posting.
Step 2 − Click the Menu ![]() icon.
icon.
Step 3 − Choose the options Disable comments and Disable reshares.
Google Plus - Reporting a Post
If we see any violation on Google+ which is against the policies, we can immediately report it. Violation may include bullying, threatening, hate speech, sharing someones photos or videos without their permission, spam, illegal or violent content, etc.,
We can take a screenshot of the violation and send it to the local law enforcement. Google takes an immediate action if the content or the picture violates their policies. They will either remove the entire content, page, or disable the activity of the user. If anyone bothers us on Google+, then there is an option to block the users or delete them from our circles.
Following are the steps to report a post using Android app −
Step 1 − Open the Google+ account.
Step 2 − Click the post that is to be reported.
Step 3 − Click the Menu ![]() icon.
icon.
Step 4 − On the computer, the option is available on the top right corner of the post. Select the drop-down menu and click the option Report this post.
Report a Post using a Mobile Browser
Following are the steps to report a post using a mobile browser −
Step 1 − Open the Google+ account.
Step 2 − Click the post to be reported.
Step 3 − Click on the Menu ![]() icon.
icon.
Step 4 − On the mobile browser, click the action menu located on the top right corner. Select Report abuse and finally click Report.
If we find anyone posting illegal content that is violating the copyright policies of Google, we can help Google by sending a request to remove the content. Always remember that something you find violated may not be a spam according to the policies. Anyway, step up and voice your objection against any identity-related violation, offensive posts, illegal activity, pornography, etc.
Google Plus - Foster User Engagement
Google+ is a powerful social network and has the potential of drawing more visitors to our business. Following are some effective strategies to follow to engage more users.
Make Google+ page findable by adding a badge to the website to let users find it in one click.
Create circles strategically. Organize relationships on circles. Try creating one around the theme. search relevant people, and post to add to your circles.
Post compelling content. Genuine and good content draws large traffic without fail. Include visuals where necessary. Add lot of information to maximize readership.
Make use of hashtags on Google+. This assists in finding relevant stuff easily.
Interact with people to boost engagement. Revert to queries and comments proactively. Ask questions and opinions. This gives the users a feeling of being part of the business.
Join communities. To bring traffic to the page, be a part of communities to associate with the audience. Participate regularly without fail. This opens a direct line of communication with people.
Google Plus - Checking Notifications
Google+ sends notification to notify us about the recent activity, such as photos/videos shared with us. This ![]() icon at appears on the page is the notification icon and we can choose to receive the notification through emails, text messages, etc. Enabling notifications is important as it gives us the benefit of knowing what is happening on the platform.
icon at appears on the page is the notification icon and we can choose to receive the notification through emails, text messages, etc. Enabling notifications is important as it gives us the benefit of knowing what is happening on the platform.
It comes in handy when we receive a notification of any offensive or annoying post while we are not online. It is easy to either immediately delete the post or block the user. Notifications can be turned off at any point of time using the account settings.
How to Control the Notifications?
For Android Users
Following are the steps to change notification on/off in Android app.
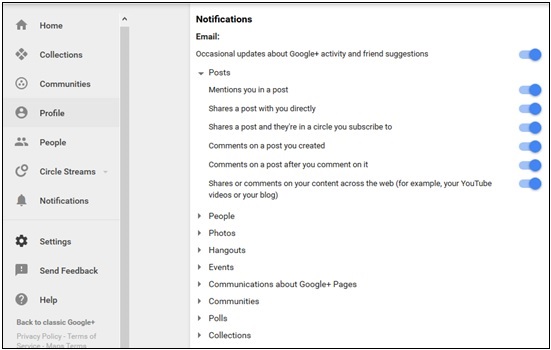
Step 1 − Open the Google+ account.
Step 2 − Click the Menu ![]() icon.
icon.
Step 3 − Select the Settings.
Step 4 − Click the Account Name and open the option Notifications.
Step 5 − Check or uncheck the option of notifications as required.
For PC Users
Following are the steps to change notification on/off in on a personal computer.
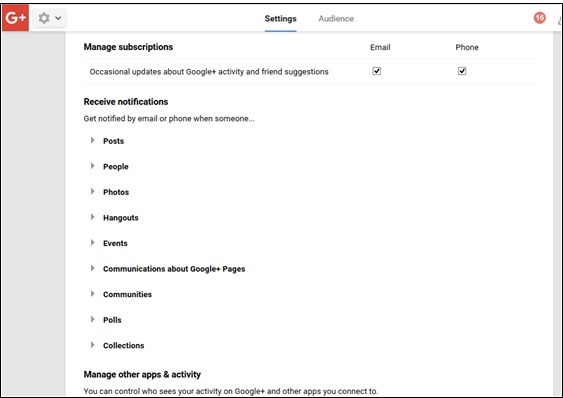
Step 1 − Open the Google+ account.
Step 2 − Go to Google+ Settings.
Step 3 − Scroll down the page to the option Receive notifications.
Step 4 − Check or uncheck the option of notifications as required.
Choose Who Can Directly Send Notifications
Theres another option to receive notifications about a particular post shared within circles. We can also receive notifications if people outside the circle comment on that post.
For Android Users
Step 1 − Open the Google+ account.
Step 2 − Open the Menu ![]() option.
option.
Step 3 − Select the Settings and go to Account settings. Choose the account that we wish to get updates for.
Step 4 − Click the Notifications and finally select the option Who can notify me.
For PC Users
Step 1 − Open the Google+ account.
Step 2 − Click Google+ Settings.
Step 3 − Choose the option Who can notify me. Select the appropriate option from the available choices.
Google Plus - Adding Managers
Page managers, page owners, and page communication managers are three different types of admins available on Google+. An owner is the person who can add/ remove managers. The manager should be chosen wisely because they have a lot of access on the page There can be 50 managers of a page at a time. Managers reserve the right to remove themselves from the position of manager from a page any time.
When an owner invites any person to the page as a manager, an invitation is sent to their Gmail account. The person has to accept the invitation in order to become a manager. Managers cannot remove or manage the listing, only an owner has access to this. Apart from this one thing, the manager has all the capabilities of an owner.
There are other managers called communication manager who have almost all capabilities of a manager, except managing videos on YouTube or editing business information. Communication manager has the authority to allow the audience to post on the page. These managers get an insight of the page and respond to the reviews and comments made by audience.
How to Add/ Remove a Manager
Following are the steps of add or remove a Manager.
Step 1 − Open your Google+ account page.
Step 2 − At the top of the page it will be written you are a manager of this page. Click switch to this page.
Step 3 − Next, access the settings.
Step 4 − Click the option managers at the top near Google+ settings.
Step 5 − To add manager, click Add managers and enter their email id.
Step 6 − To remove a manager from the page, click the cross option (x) given next to their name.
How to Add/Remove a Communication Manager
Following are the steps to add or remove a Communication Manager.
Step 1 − Open your Google+ account page.
Step 2 − At the top of the page, it will be written you are a manager of this page. Click switch to this page.
Step 3 − Next, access the settings.
Step 4 − Click the option managers at the top near Google+ settings.
Step 5 − To add a communication manager, click Add communication managers and enter their email id.
Step 6 − To remove a communication manager from the page, click the cross option (x) given next to their name.
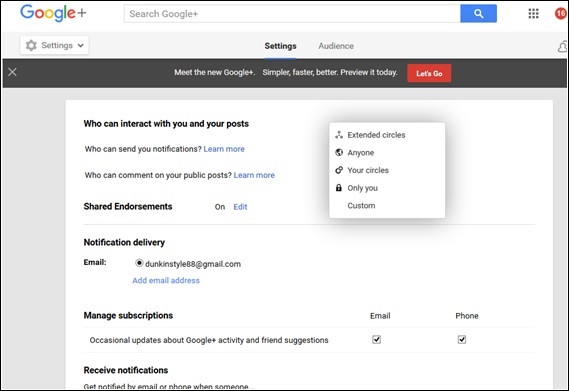
Google Plus - Notification Settings
Notification settings can be turned on or off according to our convenience. For example, if someone invites us to their community and we are interested in knowing everything about it, then we can turn on notifications. If any community or group discussion is annoying, then notification can be turned off without leaving the group/community.
Turn Notification Settings On/Off
Lets see how you can turn notification setting on or off. Follow the steps given below.
Step 1 − Open Google+ account.
Step 2 − Click the hamburger ![]() icon from the left corner of the page.
icon from the left corner of the page.
Step 3 − Click Settings.
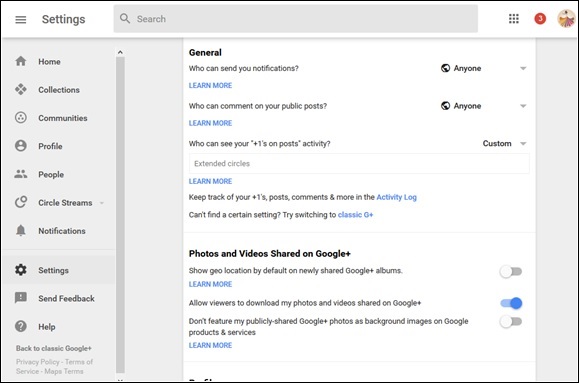
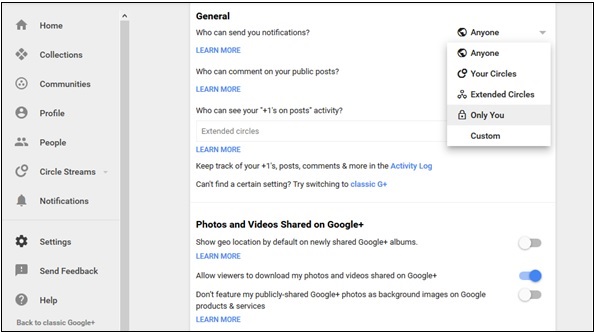
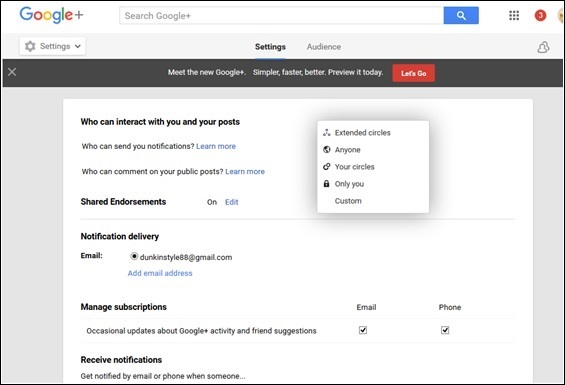
Step 4 − Under the General heading, tap the classic Google+. There is an option Who can send you notifications?.
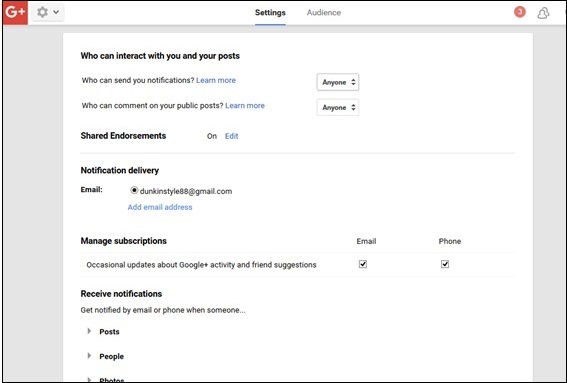
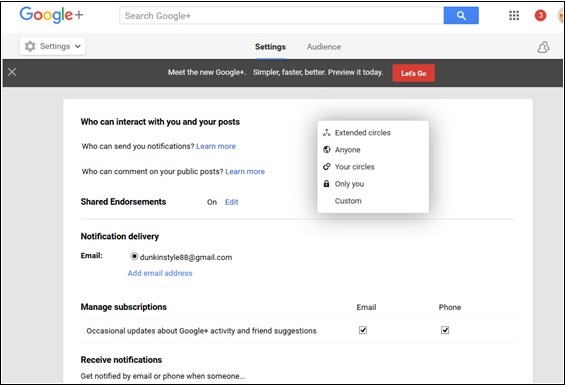
Step 5 − Choose from the following options −
- Extended circles
- Anyone
- Your circles
- Only you
- Custom
Step 6 − Choose from Notification delivery on which email ID should the notification arrive.
Step 7 − There is also an option of Add email address. We can add another email address to receive the notification.
Step 8 − Go to the option Receive notifications.
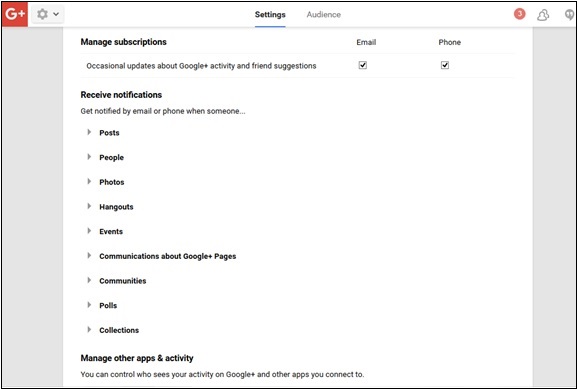
Step 9 − Check or uncheck from the following options to manage the notification settings.
- Posts
- People
- Hangouts
- Events
- Communication about google+ pages
- Communities
- Polls
- Collections
Google Plus - Circle Settings
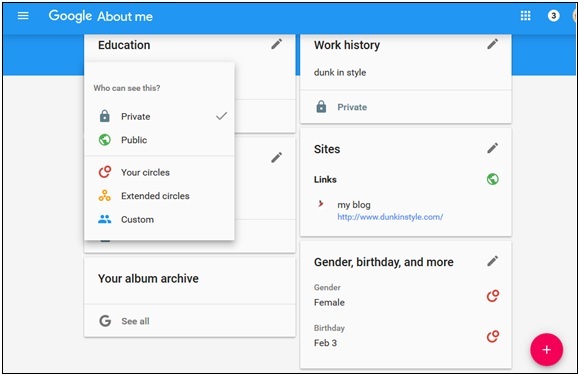
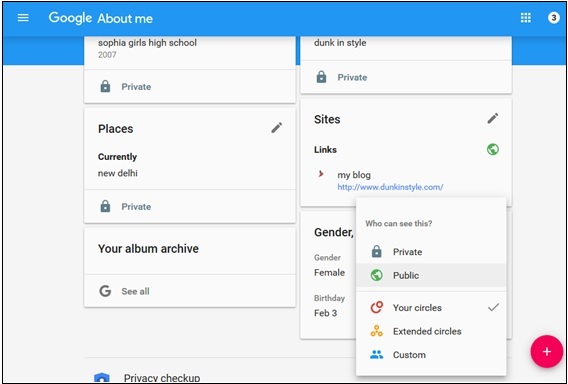
Through Circle Settings, we can control who gets to see our profile and posts. People who are in our circle, will see our profile and the posts we share, unless we restrict them. They will even come to know what we are sharing with other people.
Hide/Show Information to Circles
Step 1 − Open the Google+ account.
Step 2 − Click the hamburger ![]() icon from the left corner of the page.
icon from the left corner of the page.
Step 3 − Select the option Profile.
Step 4 − Click About me option situated on top of the cover page.
Step 5 − Edit the information Who can see this? as shown in the following screenshot.
Who Can See Circles When They View Our Profile
For Android App Users
Step 1 − Open the Google+ account.
Step 2 − Click the About option on the page.
Step 3 − Uncheck the box Show people you have added to circles to hide who is in your circle.
Step 4 − Check the box Show people in all circles to show the people who are in our circle.
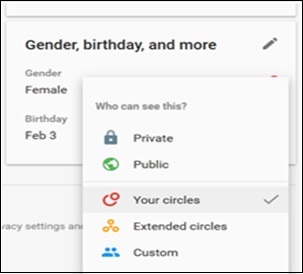
Step 5 − For the option Who can see this? choose public to show circles or choose your circles to show only the people in our circles.
Step 6 − Choose private if we want no one except us to see it.
For Desktop Users
Same procedure as Android App.
Google Plus - Photo & Video Settings
Using this setting, we can control which circle or people can see our videos/pictures. These settings are very easy and can be changed anytime.
How to Enable/Disable Photo or Video Settings
Lets see how you can enable or disable the photo or video settings in Google+.
Step 1 − Open Google+ account.
Step 2 − Click the hamburger ![]() icon from the left corner of the page.
icon from the left corner of the page.
Step 3 − Click Settings.
Step 4 − Under the General heading, tap the classic Google+ option.
Step 5 − Then, go to the option photos and videos.
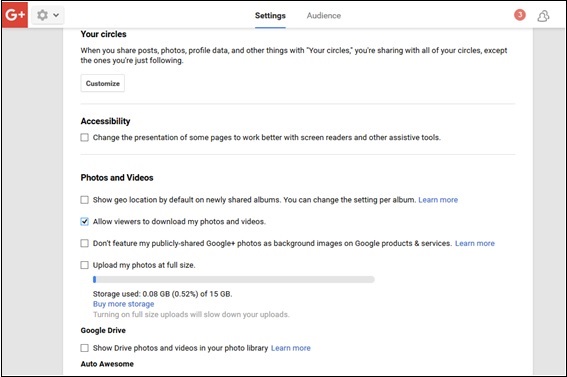
Step 6 − Check or uncheck the option Show your geo location by default. This allows circles and friends to see where the photos were taken.
Step 7 − Check or uncheck the option Allow viewers to download my photos and videos. This will allow or restrict users to download photos/videos from our profile.
Step 8 − Check or uncheck the option of featuring publicly shared pictures as background on some Google products such as Chromecast, Google Fiber, Device wallpapers, etc. as required.
Step 9 − Check for uploading photos at full size.
Step 10 − Check or uncheck for whether the drive photos/videos should show in our Google+ library.
Step 11 − Check or uncheck as required, for making or not making new images and movies from the existing photos automatically by Google+.
Google Plus - Profile Settings
We can change our profile setting and restrict viewers to see the profile information. We can also regulate whether or not our profile should be discoverable to unknown people during search. Our profile includes - the posts by us or the posts that we are tagged in, the communities created by us or the ones we are following, our collection or the collection of others we are following.
Control Who Can View Profile
Step 1 − Open Google+ account.
Step 2 − Click the hamburger ![]() icon from the left corner of the page.
icon from the left corner of the page.
Step 3 − Click Settings.
Step 4 − Under the General heading, tap the profile option.
Step 5 − Go to Profile and choose from the available options as required.
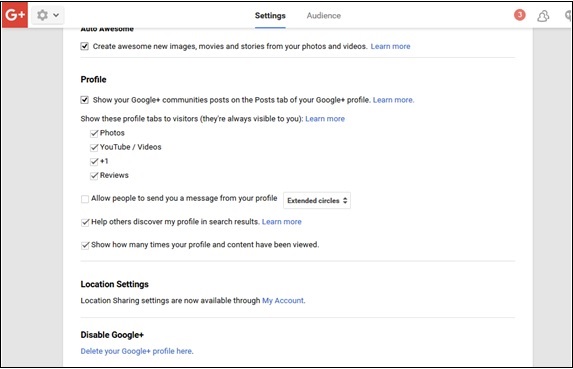
Step 6 − Check or uncheck how many times the content and profile is viewed.
Step 7 − Check or uncheck whether communities should show on our profile or not.
Step 8 − Check from the following options, what we want our viewers to see.
- Photos
- YouTube/videos
- +1
- Reviews
Step 9 − Check or uncheck if we want to be discoverable in search results.
Step 10 − Select who can see the people in circles.
- Only you
- Public
- Your circles
Step 11 − Check or uncheck to show who has added us to the circles or not.
Google Plus - Deleting an Account
In case we delete your Google+ account, we can't get back our photos/videos, circles and communities again. They permanently get deleted.
Step 1 − Open the Google+ account.
Step 2 − Click the hamburger ![]() icon on the left side of the page.
icon on the left side of the page.
Step 3 − Scroll down to the option Settings.
Step 4 − Under the Account, there is an option Delete your Google+ profile.
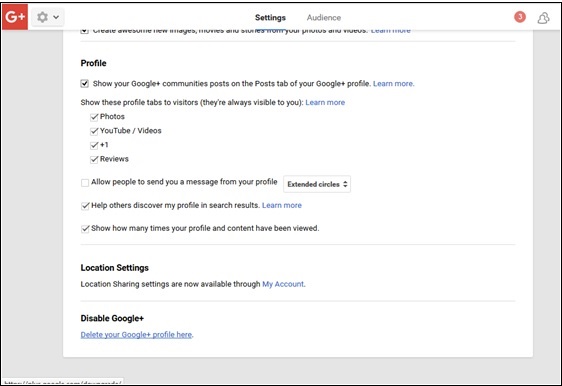
Step 5 − The page will again ask for Google+ password. Enter it.
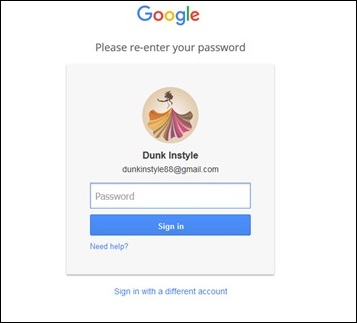
The following screenshot pops up. It shows what will be deleted and what will remain.
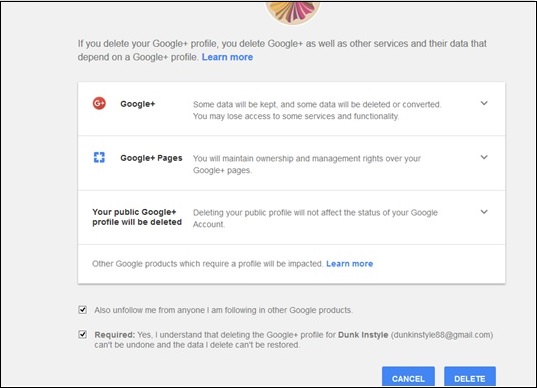
Step 6 − Read carefully and check the option as required.
Step 7 − Finally click Delete.
Google Plus - Insights
Google+ insights help in obtaining a view to our page insights for last month. Insights provide statistical information regarding the numbers of views of our posts, our recent new followers, and information on any recently added community or group.
Google+ insights favor us by showing all the activities on our profile at times when we are preoccupied and are not active. We can find out how many followers are signing in with Google+.
Types of Analytics
There are mainly three types of analytics within Google+ insights.
Visibility
The visibility option gives the historical activity. It shows the number of viewers we have had in the last 30 days. We can choose from when we want to analyze, however the automatic default is 30 days. It includes profile views including posts, photos, uploads, etc.
Visibility is basically the views about our business details and these views include −
- Picture views
- Page views
- Search views
- Content views
If our post or picture is shown to a single individual in both his/her Gmail account and Google+, it will only be counted for once and that is under the label of Google+. Insights also helps to view the analytical data of the action on our posts like comments or shares.
Engagement
It shows the number of +1s, shares and comments a page got over the month. This Google+ insight helps managers calculate the metrics about each post. For the first 72 hours, the statistical data displays after a gap of an hour.
We can even review which photo or video of ours was the most engaging, how many people are sharing our content. The recent posts section gives an idea on the number of views on the post along with analytics on the number of likes and comments on our post.
Audience
This special insight reports the growth of followers for our posts, pictures, or page. Information about the followers, whether they are outside our country can also be obtained.
With the help of gender and age graph, we can calculate gender and age percentage. Hence, the age group of followers can be easily calculated.
How to Access Insights?
Following are the steps to access Google+ insights.
On Personal Computer
Step 1 − Open the Google+ account.
Step 2 − Log in to the page Google my business.
Step 3 − Select the page to be managed.
Step 4 − Click View insights from Insights on the dashboard.
On Mobile
Step 1 − Open the Google+ account.
Step 2 − Log in to the page Google my business.
Step 3 − Click the drop-down menu.
Step 4 − Choose insights.
Google Plus - Optimizing a Page
Google+ is a powerful social engine because of its impressive features, number of powerful tools that are beneficial in a brand that is inimitable by any other social platform. The features of Google+ helps to make it a massive tool for Search Engine Optimization (SEO).
Following are some tips to remember while optimizing the page for search results −
Always be sure that your Google+ page should be linked to your website. We can even paste the link in the circles so that more number of people go through our link. We can also add Google+ badge to our website. This ensures more number of followers.
+1s is very beneficial in optimizing our page for search result. Make sure the page has many likes.
Make sure to fill in the About information, and fill in important business details −
Use an interesting introduction and give a clear idea of the business.
Make sure to fill the contact information which includes the phone no., address, etc.
Tagline should include a keyword because it is what will show in Google search, so make sure it is relevant.
Claim the Google local page as it helps in turning the page very high in search results near our area. Whether we have claimed the page or not, our customers can leave reviews, but claiming the Google page will list our page on the side bar.
Reclaiming a Page in Google+
Following are the steps to reclaim a page.
Step 1 − Open the Google+ account.
Step 2 − Select the drop-down menu on the top left corner.
Step 3 − Choose the option pages.
Step 4 − Choose local business or place.
Step 5 − If new to the business, fill all the requirements of the page.
Step 6 − If the local page is created by default and customers are reviewing the page, then choose the business from the Menu and click Submit.
Step 7 − Choose the option How you want to get your verification code?
Step 8 − Verify that code and the page has been claimed.
Optimizing Posts and Page for Sharing
If people find something our posts and pages engaging, they will like to share with their network.
Following are some things to keep in mind to optimize our posts/pages.
Make sure the content is great and attractive.
Make use of an editorial calendar to keep track of the posts.
Make sure the content is relevant to the page it is posted on.
Share the content using special keywords and phrases, using #hashtags before keywords will help the audience to find it quickly.
Choose the appropriate circles in which the content/posts should be shared. For example, when we share about the business, we should circulate these content in business circles only.
Promote the page in communities. The website should have a Google+ icon for directing any viewers to the page. Discuss about the page with potential customers online individually or in the group discussion.
Google Plus - Claiming Vanity URL
A custom URL is a must for giving people a short and easy to remember address of the page to find our Google+ profile. It will be generated with our name added with a few letters/numbers to make it a unique profile name.
Make sure to create a unique custom URL as we will not be able to change it later. These URLs are advanced and easy to recognize.
Getting a Custom URL for Google+ Profile
Step 1 − Open the Google+ account.
Step 2 − On the top left corner, click the hamburger ![]() icon.
icon.
Step 3 − Choose the option Profile.

Step 4 − Check near the profile, there is an option About. Click it.
Step 5 − Scroll down to links and search the header google+URL.
Step 6 − Click Get URL.
Step 7 − View the options of custom URLs to choose from. Remember to make it unique by adding special numbers and letters.
Step 8 − Next, click I agree to the terms of service.
Step 9 − Click Change URL.
The service will ask us to verify our account using the mobile number.
Step 10 − Type the number and click Send code.
Step 11 − Check and enter the code and click Verify.
Step 12 − Always keep in mind the URL cannot be changed later, so do it carefully and click Confirm choice.
Note − We cannot alter our custom URL, however, we do have a choice to change which letters we want to capitalize or which accents we want to have.
Conditions of Getting a Custom URL for Profile
Following are the conditions to be fulfilled according Google+ policy to obtain a custom URL.
- Account must be at least 30 days old.
- Profile page should have a profile photo.
- Account should have 10 or more followers.
- Account should have a proper standing.
Google+ Custom URL for Business Page
To be eligible for custom URL for business, Google+ page must be a verified business page. The page can also become eligible for custom URL, if it is linked to a website. If the page meets any one of these requirements, we get a notification on the top of the page.
On opening Google+ account, go to the business page. Check the I agree to the terms of services box. There will be three key elements in this policy.
Google has the right to reclaim custom URLs or can remove them for any reason, and without notice. .
You can get the custom URLs for free but Google may start charging a fee for the URLs. .
Your custom URLs must not contain words or phrases that is offensive and violates the Google policy.
Google Plus Post Ads
+Post Ads ensures that the content or blog is seen by the users of Google+. It helps to affiliate more people to engage to your posts, videos, etc. These ads reach the entire Google+ network and not merely ours.
Our posts or videos get traffic from the entire Google+ network. People can follow us, give us +1 from the ad directly. The +Posts ads on Google+ displays exactly the same way as normal ads. For example, when we create any hangout or event and promote it, the users who see will directly join even if they arent in our network.
Advantages of Google AdWords
Following are certain advantages of using Google AdWords.
Helps to reach the right audience.
Attracts more customers to the content.
People not in our network can also like our ad, and can reach us.
Engages more number of people to posts than regular posts do.
They are cost free and can be posted anytime.
Before creating +Post Ad
One should keep the following points in mind before creating +Post Ads −
There should be 1000 followers on Google+.
Blog/content must be relevant. Google+ supports family safe videos or contents.
While creating +Post Ad
One should keep the following points in mind while creating +Post Ads −
Write clear and relevant matter as the space is given limited. Hence, make Ad lines look attractive.
Before promoting make sure to preview the content as a viewer.
Use quality images. Make sure they are relevant to the Ad.
Use thumbnails while uploading videos to make the photos look enthralling.
Highlight special words by using #hashtags.
Regularly monitor the posts as anyone might post irrelevant comments.
Creating a +Post Ad
Step 1 − Open the Google+ page.
step 2 − Check that there should be at least 1000 followers. Begin using advertising by creating an engagement campaign.
step 3 − Select a new Ad option and choose the post.
Step 4 − A page pops up. On it is written Create an Ad. Draw photos or content as desired or promote either from any album. The system will direct us to our most recent posts.
Step 5 − If we want to only promote an ad, click Promote. If we want to change the size, select from the Ad size options.
Step 6 − Click the option Preview. Then, click Save.
Reviews Handling
Once the Google+ account is verified, customers can drop a review. We can view them and revert back. To view them, we need to be on My Business page.
When someone sends a review, always acknowledge to have seen it. Thank them for their valuable response. Always be humble and polite. Reply thankfully, appreciating the customer for the review. There are times customers might post negative reviews. Keep calm, no matter how bitter it is.
Reach the customer and try to resolve the issue. Try to have a conversation off Google+ page. Apologize and offer to resolve things. Once you are done resolving the issue, humbly ask to update the review on Google+. We should never underestimate the power of reviews, because they are from real customers and we can learn a lot from them.
Google Plus - Badges
Google+ platform is an efficient platform to integrate with other social networking platforms. Google+ allows interaction with all other platforms such as YouTube, Twitter, etc. We can provide a button of our website/page on our Google+ account that people can use to easily navigate to the page. This generates more traffic to our website/page. If there is a need for google authentication, we can develop our own badges, +1 buttons, and follow buttons.
Adding Badges
Google+ badge is similar to FB like button or the tweet button on Twitter. Its a good idea to let other people know that we are on Google+. It helps customers to like or follow us directly by clicking the badge provided on our page.
People from other platform can also connect with us or our page with just one click on the badge. Adding a badge establishes that the page is verified. Badge generates more followers. Make sure to make the badge appealing and apt to our business.
There are 3 different kinds of badges −
- Google+ profile badge
- Google+ page badge
- Google+ community badge

Google+ Profile Badge
The Google+ profile badge is for people to directly follow our personal profile, which helps the visitors to directly contact us. It provides an option for people to directly add us to their circles.
Following is the code to render a profile badge to our website.
<script src="https://apis.google.com/js/platform.js" async defer></script>
<g:person href="https://plus.google.com/{profileId}" datarel="author"></g:person>
Google+ Page Badge
The Google+ page badge is for people to follow our page unlike profile page in which the visitors directly engage with us.
Following is the code to render a page badge to our website.
<script src="https://apis.google.com/js/platform.js" async defer></script>
<g:page href="https://plus.google.com/{pageId}"></g:page>
Google+ Community Badge
The Google+ community badge is for people to directly preview their community. It helps people find their community and engage on topics which they find interesting.
Following is the code to render a community badge to our website.
<script src="https://apis.google.com/js/platform.js" async defer></script>
<g:community href="https://plus.google.com/communities/{communityId}"></g:community>
Google Plus - Creating a Badge
In this chapter, lets discuss how you can create a badge in Google+.
Step 1 − Log in to Google+ account.
Step 2 − Open developers.google.com.
Step 3 − Enter the required fields. Google+ offers options of adjusting the width (180-450 pixels), the layout (portrait or landscape), the theme (dark or light), cover photo, tagline, etc.
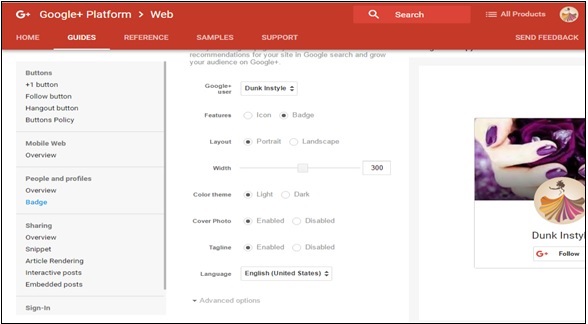
Step 4 − Once done with the editing process, we will receive a code. Copy the full code.
Step 5 − Go to the WordPress dashboard and select appearance → widgets.
Step 6 − Add the text widget to the sidebar where we want the follow option to appear.
Step 7 − Paste the copied code to the widget field. Now, automatically the badge starts appearing on the page.
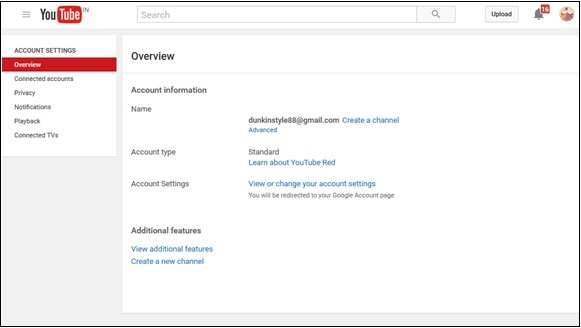
Google Plus - Connecting With YouTube
Google owns the YouTube platform, which is the largest video service provider. We can create a Google+ page through YouTube. Our channel will be connected to Google+ page. Our public videos will appear both on YouTube and Google+ page. This helps in engaging more number of people.
There can be multiple users managing one account on YouTube. If we want to use a different name from Google account, connect it to Google+ account. Viewers can't see our name or address as there will be no public association between Google+ and Google account. We can do this to enhance our business on YouTube without showing our personal account. When we connect our channel with Google+ page, it will show the same name as our channel on YouTube.
Its easy to switch the two accounts on YouTube to manage YouTube channel. We can simply change this from the top right corner of YouTube account by choosing the account from our list.
YouTube Integration
On opening YouTube channel, Google+ account is connected to it and displays the Google+ profile picture. We can use Google+ to upload videos on YouTube.
When we write a comment on YouTube, our Google+ profile and id shows to the other users. Moreover, when we change the name or display picture, it gets changed both on YouTube and Google+ pages.
Creating an Account to Connect YouTube with Google+
Open the YouTube app and try liking and commenting on the videos. We cannot do this as we are not connected to it using the Google account.
Step 1 − Go to Account settings.
Step 2 − Click Advanced account settings and then click Connect with a Google+ page.
Step 3 − Select from the options Use your Google+ page and click Next.
Connecting the Existing YouTube Channel to Google+
Step 1 − Open YouTube Account settings.
Step 2 − Click the option Confirm your name on YouTube.
Step 3 − Select the option to use the business name.
Step 4 − Click Advanced account settings and click Connect with a Google+ page.
Step 5 − Choose from the options provided.
- Use your Google+ pages.
- Use your current YouTube username.
- Create a new name.
- Use your Google account name.
Step 6 − Click Next and the account is connected.
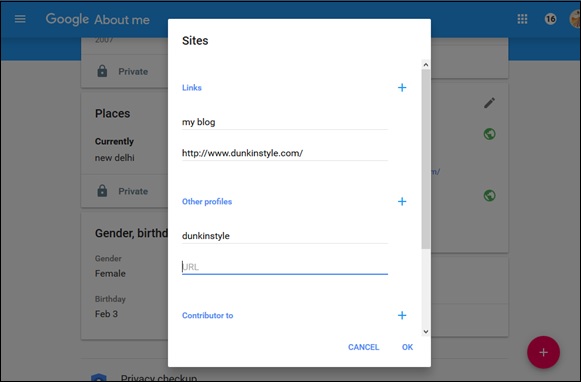
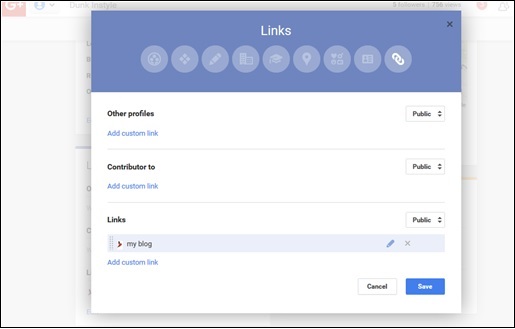
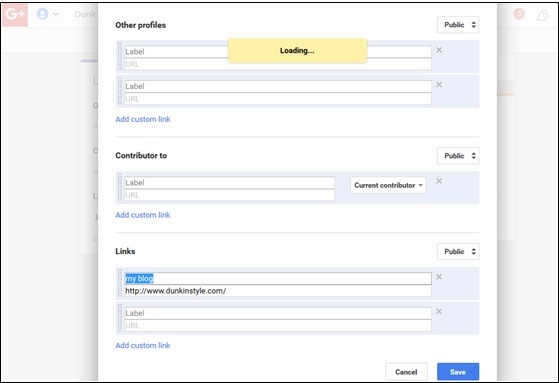
Google Plus - Social Linking
Google+ allows us to connect our Google+ account with other social networks. Without permission, Google won't share our personal things. It provides an opportunity to link with Google+ business page. When people search for us on Google, our profile pops up on the right side of search results.
This linking primarily affects the SEO and also increases the traffic to our website/page. We can link our Google+ account to any social platform so that people active on other platform can reach our page through these links.
Linking Other Social Platforms to Google+
Step 1 − Login to Google+ account.
Step 2 − Select the profile from the drop-down menu.
Step 3 − Click About.
Step 4 − Scroll down the screen to the option Links.
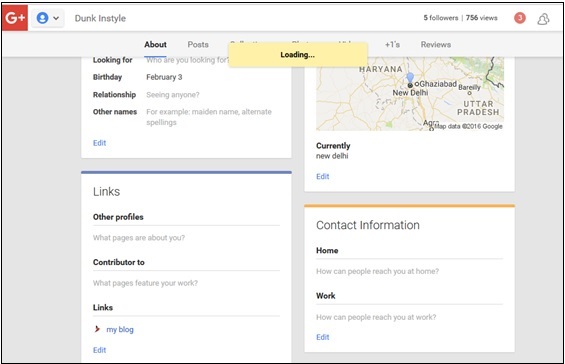
Step 5 − Click the Edit option.

Step 6 − To add a new social account, select Add custom link.
Step 7 − Write the URL and label that we want for the account.
Step 8 − Choose the privacy from the following options.
- Public or private
- Extended circles
- Custom
- Only you
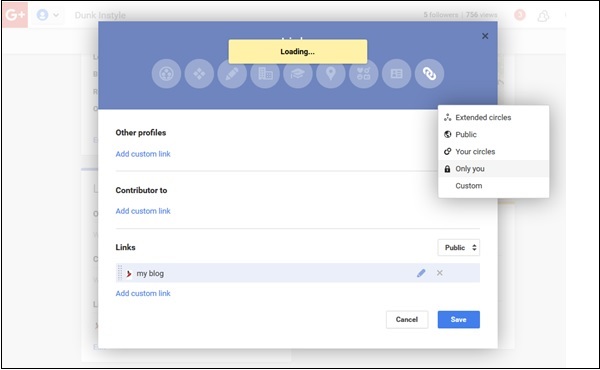
Step 9 − Mark as per choice.
Step 10 − Rearrange the order of your links.
Step 11 − Click Save.
In case the link is added earlier but not verified, then it can be verified by clicking the website button. When we are done a message pops out with a code. This code we need to label on our home page. In case of being an administrator running our own website, we can easily copy paste it to the home page. In other cases, we have to contact the webmaster. Doing so, links our website to our Google+ page.
Removing Other Social Platform Links From Google+
Step 1 − Login to Google+ account.
Step 2 − Select the profile from the drop-down menu.
Step 3 − Click About.
Step 4 − Scroll down the screen to the option Links.
Step 5 − Click Edit option.
Step 6 − Click the option X beside the linked accounts.
Step 7 − Remove the links by clicking X.
Step 8 − Click Save.
