
- Selenium Tutorial
- Selenium - Home
- Selenium - Overview
- Selenium - Components
- Selenium - Automation Testing
- Selenium - Environment Setup
- Selenium - Remote Control
- Selenium IDE Tutorial
- Selenium - IDE Introduction
- Selenium - Features
- Selenium - Limitations
- Selenium - Installation
- Selenium - Creating Tests
- Selenium - Creating Script
- Selenium - Store Variables
- Selenium - Alerts & Popups
- Selenium - Selenese Commands
- Selenium - Actions Commands
- Selenium - Accessors Commands
- Selenium - Assertions Commands
- Selenium - Assert/Verify Methods
- Selenium - Locating Strategies
- Selenium - Script Debugging
- Selenium - Verification Points
- Selenium - Pattern Matching
- Selenium - JSON Data File
- Selenium - Browser Execution
- Selenium - User Extensions
- Selenium - Code Export
- Selenium - JavaScript Functions
- Selenium - Plugins
- Selenium WebDriver Tutorial
- Selenium - Introduction
- Selenium WebDriver vs RC
- Selenium - Installation
- Selenium - First Test Script
- Selenium - Driver Sessions
- Selenium - Browser Options
- Selenium - Chrome Options
- Selenium - Edge Options
- Selenium - Firefox Options
- Selenium - Safari Options
- Selenium Web Elements
- Selenium - File Upload
- Selenium - Locator Strategies
- Selenium - Relative Locators
- Selenium - Finders
- Selenium - Find All Links
- Selenium - User Interactions
- Selenium - WebElement Commands
- Selenium - Browser Interactions
- Selenium - Browser Commands
- Selenium - Browser Navigation
- Selenium - Alerts & Popups
- Selenium - Handling Forms
- Selenium - Windows and Tabs
- Selenium - Handling Links
- Selenium - Input Boxes
- Selenium - Radio Button
- Selenium - Checkboxes
- Selenium - Dropdown Box
- Selenium - Handling IFrames
- Selenium - Handling Cookies
- Selenium - Date Time Picker
- Selenium - Dynamic Web Tables
- Selenium - Actions Class
- Selenium - Action Class
- Selenium - Keyboard Events
- Selenium - Key Up/Down
- Selenium - Copy and Paste
- Selenium - Handle Special Keys
- Selenium - Mouse Events
- Selenium - Drag and Drop
- Selenium - Scroll Operations
- Selenium - Waiting Strategies
- Selenium - Explicit/Implicit Wait
- Selenium - Support Features
- Selenium - Multi Select
- Selenium - Wait Support
- Selenium - Select Support
- Selenium - Color Support
- Selenium - Errors & Logging
- Selenium - Logging
- Selenium - Exception Handling
- Selenium - Miscellaneous
- Selenium - Handling Ajax Calls
- Selenium - JSON Data File
- Selenium - CSV Data File
- Selenium - Excel Data File
- Selenium - Cross Browser Testing
- Selenium - Multi Browser Testing
- Selenium - Multi Windows Testing
- Selenium - JavaScript Executor
- Selenium - Headless Execution
- Selenium - Capture Screenshots
- Selenium - Capture Videos
- Selenium - Page Object Model
- Selenium - Page Factory
- Selenium - Record & Playback
- Selenium - Frameworks
- Selenium - Browsing Context
- Selenium Grid Tutorial
- Selenium - Overview
- Selenium - Architecture
- Selenium - Components
- Selenium - Configuration
- Selenium - Create Test Script
- Selenium - Test Execution
- Selenium - Endpoints
- Selenium - Customizing a Node
- Selenium Reporting Tools
- Selenium - Reporting Tools
- Selenium - TestNG
- Selenium - JUnit
- Selenium - Allure
- Selenium & other Technologies
- Selenium - Java Tutorial
- Selenium - Python Tutorial
- Selenium - C# Tutorial
- Selenium - Javascript Tutorial
- Selenium - Kotlin Tutorial
- Selenium - Ruby Tutorial
- Selenium - Maven & Jenkins
- Selenium - Database Testing
- Selenium - LogExpert Logging
- Selenium - Log4j Logging
- Selenium - Robot Framework
- Selenium - AutoIT
- Selenium - Flash Testing
- Selenium - Apache Ant
- Selenium - Github
- Selenium - SoapUI
- Selenium - Cucumber
- Selenium - IntelliJ
- Selenium - XPath
- Selenium Miscellaneous Concepts
- Selenium - Automation Frameworks
- Selenium - Keyword Driven Framework
- Selenium - Data Driven Framework
- Selenium - Hybrid Driven Framework
- Selenium - SSL Certificate Error
- Selenium - Alternatives
- Selenium Useful Resources
- Selenium - Quick Guide
- Selenium - Useful Resources
- Selenium - Automation Practice
- Selenium - Discussion
Selenium with Robot Framework Tutorial
Selenium can be used with Robot API. A Robot Framework is used for creating automation framework used for acceptance test driven development. This acceptance test driven development approach is based on keyword driven testing. Selenium is used extensively for web automation testing. Selenium is an open-source and a portable automated software testing tool for testing web applications.
What is a Robot Framework?
A Robot Framework comprises a large number of libraries developed using Java, Python, and so on. Apart from the existing keywords available in the Robot framework, we can add new keywords in the Robot Framework using the syntax of the existing ones for developing new tests. Only basic programming knowledge is enough for using a Robot Framework.
Prerequisites to Setup Robot Framework
Step 1 − Download and install Python from the link − https://www.python.org/downloads/.
To get a more detailed view on how set up Python, refer to the link − Python.
Once we have successfully installed Python, we can confirm its installation by running the command: python –version, from the command prompt. The output of the command executed would point to the Python version installed in the machine.
Step 2 − Install the Python code editor called the PyCharm from the link − https://www.jetbrains.com/pycharm/.
Using this editor, we can start working on a Python project to start our test automation. To get a more detailed view on how to set up PyCharm, refer to the link − PyCharm.
Step 3 − Run the command: pip install selenium from the command prompt. This is done to install the Selenium. To confirm the version of Selenium installed in the machine, run the command −
pip show selenium
The output of this command shall give the result −
Name: selenium
Version: 4.19.0
Summary: None
Home-page: https://www.selenium.dev
Author: None
Author-email: None
License: Apache 2.0.
Step 4 − Run the command: pip install robotframework from the command prompt. This is done to install the Robot Framework. To confirm the version of Robot Framework installed in the machine, run the command −
pip show robotframework
The output of this command gave the below result −
Name: robotframework
Version: 7.0
Summary: Generic automation framework for acceptance
   testing and robotic process automation (RPA)
Home-page: https://robotframework.org
Author: Pekka Klärck
Author-email: peke@eliga.fi
License: Apache License 2.0
Location: /Users/opt/anaconda3/lib/python3.8/site-packages
Requires:
Required-by:
Step 5 − Run the command: pip install requests from the command prompt. This is done to install the request library which would help to automate the Rest APIs.
Step 6 − Run the command: pip install robotframework-requests from the command prompt. This is done to install the Robot Framework request library which would help to automate the Rest APIs.
Step 7 − Run the command: pip install -U robotframework-jsonlibrary from the command prompt. This is done to verify the JSON responses.
Step 8 − Restart PyCharm once Step 8 has been completed.
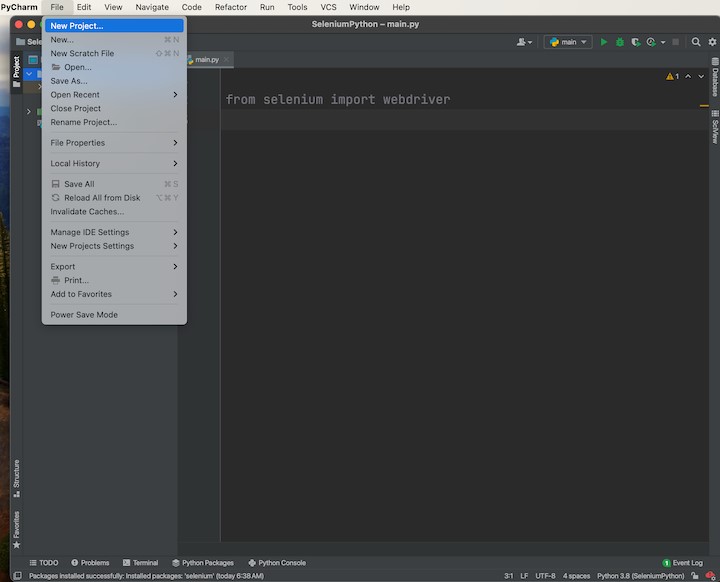
Step 9 − Open PyCharm and create a New Project by navigating to the File menu.
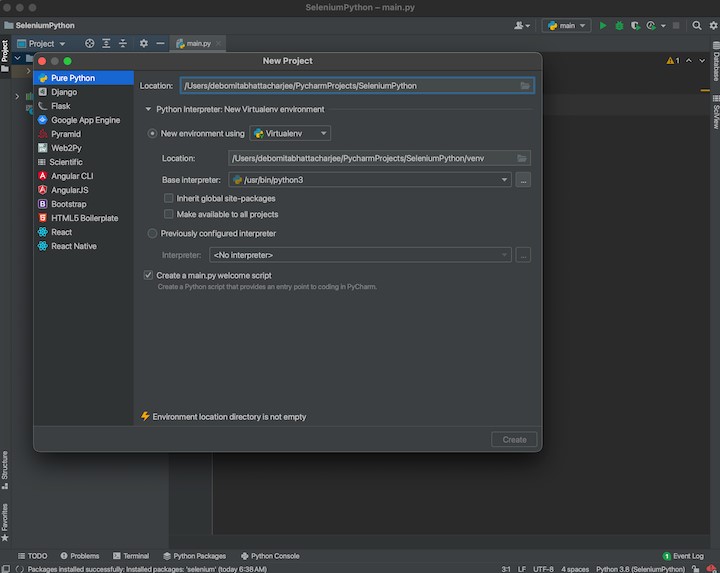
Enter the project name and location within the Location field, and then click on the Create button.
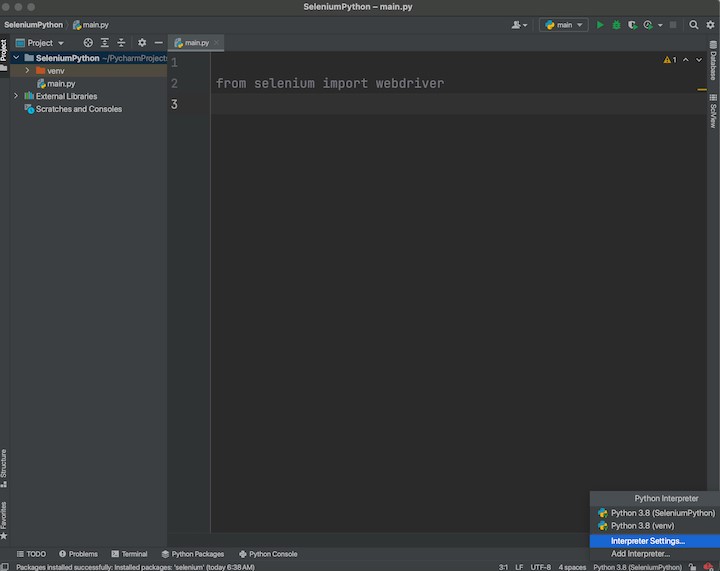
Step 10 − From the right bottom corner of the PyCharm editor, select the option Interpreter Settings.
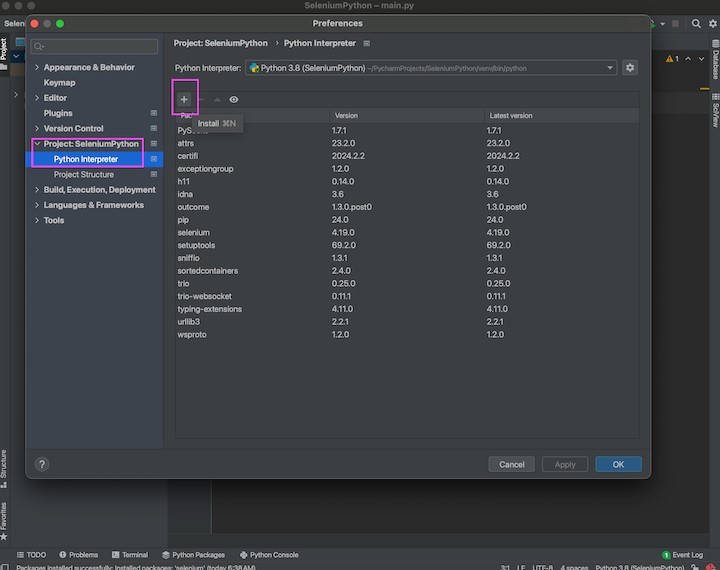
Select the option Python Interpreter from the left, then click on ‘+’.
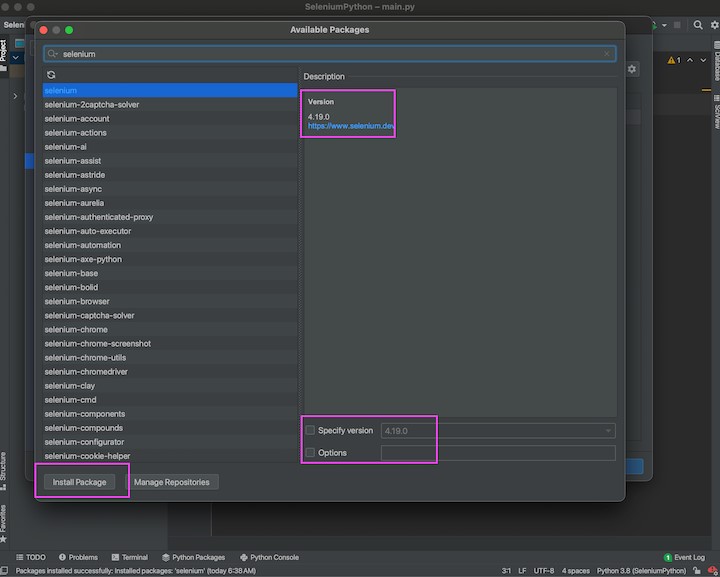
Step 11 − Enter selenium in the package search box inside the Available Packages popup, then the search results appear along with the Description to the right. The Description contains information about the version of the Selenium package that shall be installed.
There is also an option to install a specific version of the Selenium package beside the Specify version field. Then click on the Install Package button. After successful installation, the message Package ‘selenium’ installed successfully should display.
Step 12 − Enter robotframework in the package search box inside the Available Packages popup, and install it in the same way.
Step 13 − Enter requests in the package search box inside the Available Packages popup, and install it in the same way.
Step 14 − Enter robotframework-jsonlibrary in the package search box inside the Available Packages popup, and install it in the same way.
Step 15 − Enter robotframework-seleniumlibrary in the package search box inside the Available Packages popup, and install it in the same way.
Exit out of the Available Packages popup.
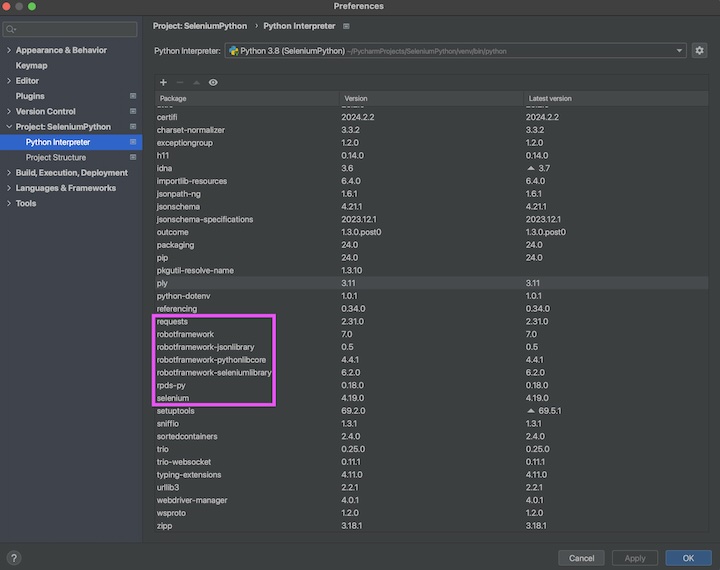
Step 16 − All the packages installed in the Steps 11, 12, 13, 14, and 15 should reflect under the Package. Click on the OK button. Restart PyCharm.
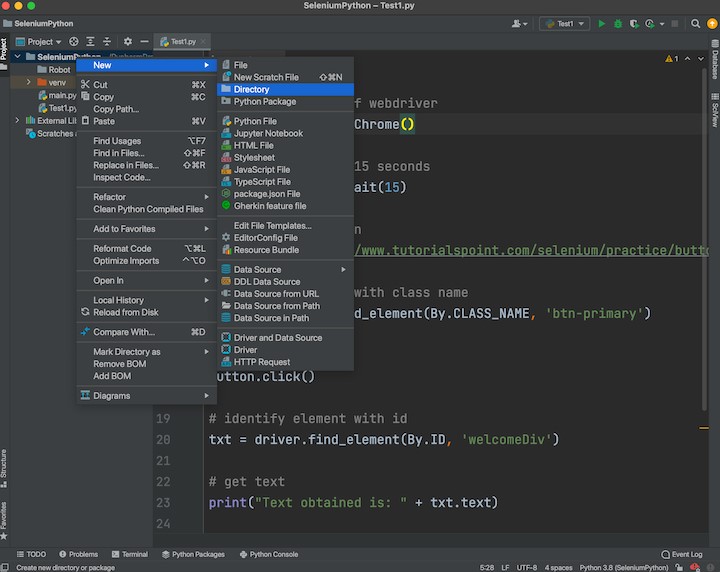
Step 17 − Create the first test case, by right clicking on the Project folder. Here, we have given the project name as SeleniumPython. Then right click on the newly created project, click on the New option, and finally select Directory.
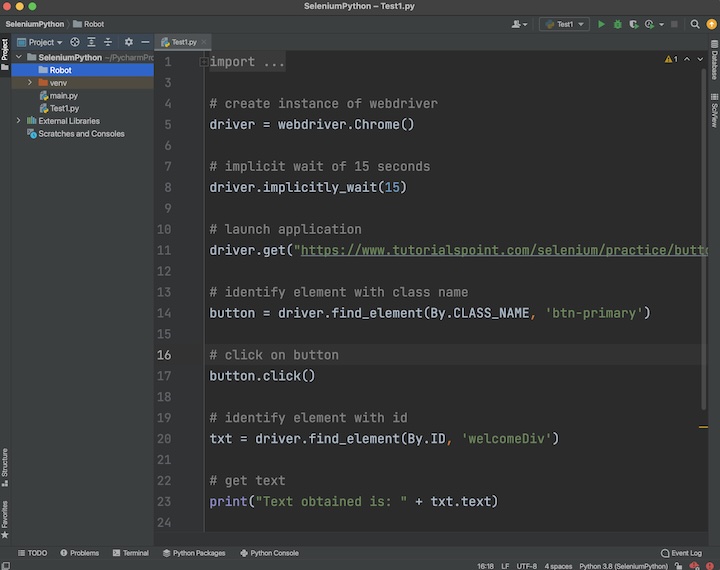
Step 18 − Enter a directory name, say Robot and click on Enter. The project Robot should appear in the left under the SeleniumPython project folder.
Step 19 − Navigate to the PyCharm Settings, and click on Plugins tab.
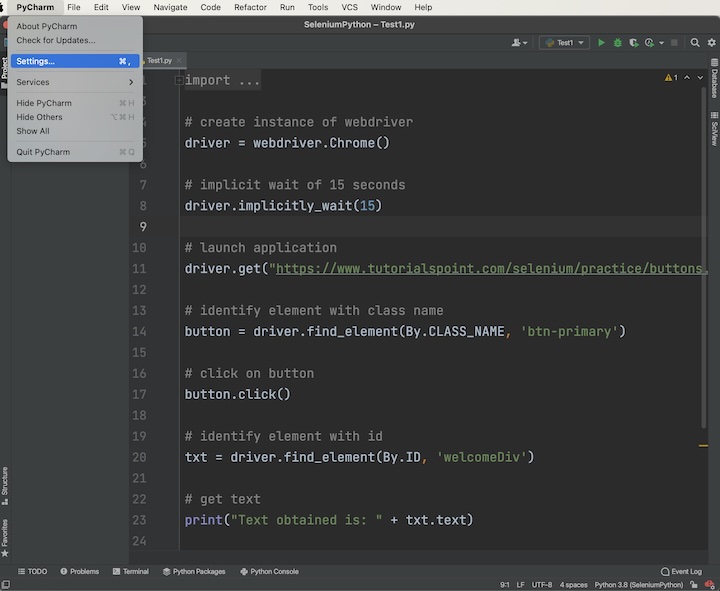
Step 20 − Enter IntelliBotSelenium in the search box, and click on the Install button. After installing this plugin, restart the PyCharm. This is done so that all the robot related test cases having extension as .robot can be identified by the PyCharm editor.
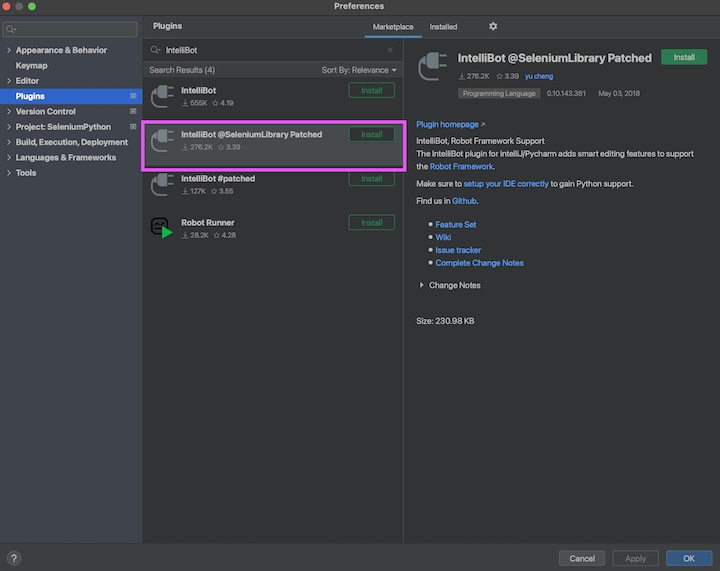
Step 21 − Right click on the directory Robot, and create a file, say GetRequest.robot.
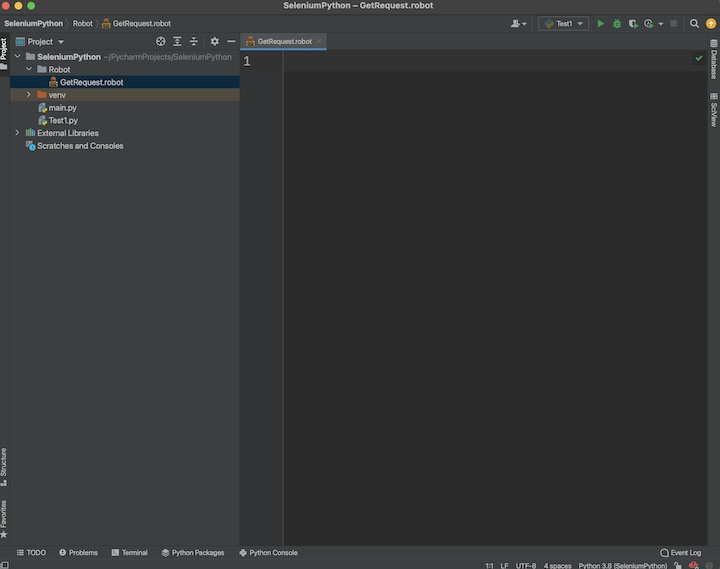
Step 22 − Add the below code to trigger a Get request
*** Settings ***
Library  RequestsLibrary

*** Variables ***
${baseUrl} https://api.restful-api.dev/objects
${object}  7

*** Test Cases ***
Get_Object
   create session firstSession ${baseUrl}
   ${response} = get request firstSession ${object}
   log to console ${response.status_code}
   log to console ${response.content}
   log to console ${response.header}
This concludes our comprehensive take on the tutorial on Selenium - Robot API. We’ve started with describing what a Robot Framework is and how to set up a Robot Framework using Python and Selenium.
This equips you with in-depth knowledge of the Selenium - Robot API. It is wise to keep practicing what you’ve learned and exploring others relevant to Selenium to deepen your understanding and expand your horizons.
