
- Selenium Tutorial
- Selenium - Home
- Selenium - Overview
- Selenium - Components
- Selenium - Automation Testing
- Selenium - Environment Setup
- Selenium - Remote Control
- Selenium IDE Tutorial
- Selenium - IDE Introduction
- Selenium - Features
- Selenium - Limitations
- Selenium - Installation
- Selenium - Creating Tests
- Selenium - Creating Script
- Selenium - Store Variables
- Selenium - Alerts & Popups
- Selenium - Selenese Commands
- Selenium - Actions Commands
- Selenium - Accessors Commands
- Selenium - Assertions Commands
- Selenium - Assert/Verify Methods
- Selenium - Locating Strategies
- Selenium - Script Debugging
- Selenium - Verification Points
- Selenium - Pattern Matching
- Selenium - JSON Data File
- Selenium - Browser Execution
- Selenium - User Extensions
- Selenium - Code Export
- Selenium - JavaScript Functions
- Selenium - Plugins
- Selenium WebDriver Tutorial
- Selenium - Introduction
- Selenium WebDriver vs RC
- Selenium - Installation
- Selenium - First Test Script
- Selenium - Driver Sessions
- Selenium - Browser Options
- Selenium - Chrome Options
- Selenium - Edge Options
- Selenium - Firefox Options
- Selenium - Safari Options
- Selenium Web Elements
- Selenium - File Upload
- Selenium - Locator Strategies
- Selenium - Relative Locators
- Selenium - Finders
- Selenium - Find All Links
- Selenium - User Interactions
- Selenium - WebElement Commands
- Selenium - Browser Interactions
- Selenium - Browser Commands
- Selenium - Browser Navigation
- Selenium - Alerts & Popups
- Selenium - Handling Forms
- Selenium - Windows and Tabs
- Selenium - Handling Links
- Selenium - Input Boxes
- Selenium - Radio Button
- Selenium - Checkboxes
- Selenium - Dropdown Box
- Selenium - Handling IFrames
- Selenium - Handling Cookies
- Selenium - Date Time Picker
- Selenium - Dynamic Web Tables
- Selenium - Actions Class
- Selenium - Action Class
- Selenium - Keyboard Events
- Selenium - Key Up/Down
- Selenium - Copy and Paste
- Selenium - Handle Special Keys
- Selenium - Mouse Events
- Selenium - Drag and Drop
- Selenium - Scroll Operations
- Selenium - Waiting Strategies
- Selenium - Explicit/Implicit Wait
- Selenium - Support Features
- Selenium - Multi Select
- Selenium - Wait Support
- Selenium - Select Support
- Selenium - Color Support
- Selenium - Errors & Logging
- Selenium - Logging
- Selenium - Exception Handling
- Selenium - Miscellaneous
- Selenium - Handling Ajax Calls
- Selenium - JSON Data File
- Selenium - CSV Data File
- Selenium - Excel Data File
- Selenium - Cross Browser Testing
- Selenium - Multi Browser Testing
- Selenium - Multi Windows Testing
- Selenium - JavaScript Executor
- Selenium - Headless Execution
- Selenium - Capture Screenshots
- Selenium - Capture Videos
- Selenium - Page Object Model
- Selenium - Page Factory
- Selenium - Record & Playback
- Selenium - Frameworks
- Selenium - Browsing Context
- Selenium Grid Tutorial
- Selenium - Overview
- Selenium - Architecture
- Selenium - Components
- Selenium - Configuration
- Selenium - Create Test Script
- Selenium - Test Execution
- Selenium - Endpoints
- Selenium - Customizing a Node
- Selenium Reporting Tools
- Selenium - Reporting Tools
- Selenium - TestNG
- Selenium - JUnit
- Selenium - Allure
- Selenium & other Technologies
- Selenium - Java Tutorial
- Selenium - Python Tutorial
- Selenium - C# Tutorial
- Selenium - Javascript Tutorial
- Selenium - Kotlin Tutorial
- Selenium - Ruby Tutorial
- Selenium - Maven & Jenkins
- Selenium - Database Testing
- Selenium - LogExpert Logging
- Selenium - Log4j Logging
- Selenium - Robot Framework
- Selenium - AutoIT
- Selenium - Flash Testing
- Selenium - Apache Ant
- Selenium - Github
- Selenium - SoapUI
- Selenium - Cucumber
- Selenium - IntelliJ
- Selenium - XPath
- Selenium Miscellaneous Concepts
- Selenium - Automation Frameworks
- Selenium - Keyword Driven Framework
- Selenium - Data Driven Framework
- Selenium - Hybrid Driven Framework
- Selenium - SSL Certificate Error
- Selenium - Alternatives
- Selenium Useful Resources
- Selenium - Quick Guide
- Selenium - Useful Resources
- Selenium - Automation Practice
- Selenium - Discussion
Selenium Grid - Test Execution
The latest version of Selenium Grid has a lot of differences from the older versions of Selenium Grid. The older version of Selenium Grid had only one mode - Hub and Node, while the latest version of Selenium Grid supports three modes - Standalone, Hub and Node, and Distributed.
The previous versions of Selenium Grid consisted of only two modes - Hub and Node, while the latest version of Selenium Grid has six components like the Router, Distributor, Nodes, Session Queue, Session Map, and Event Bus.
Selenium Grid is a tool that distributes the tests across multiple physical or virtual machines so that we can execute scripts in parallel (simultaneously). It dramatically accelerates the testing process, and runs the tests across multiple browsers and platforms and gives us quick and accurate feedback on the product.
Selenium Grid allows us to execute multiple instances of WebDriver or Selenium Remote Control allows execution of tests in parallel which use the same code base, hence the code need not be present on the system they execute. The selenium-server-standalone package includes Hub, WebDriver, and Selenium RC to execute the scripts in grid.
Prerequisites For Test Execution in Selenium Grid
Step 1 − Install Java(version above 8) in the system and check if it is present with the command: java -version. The java version installed will be visible if installation has been completed successfully.
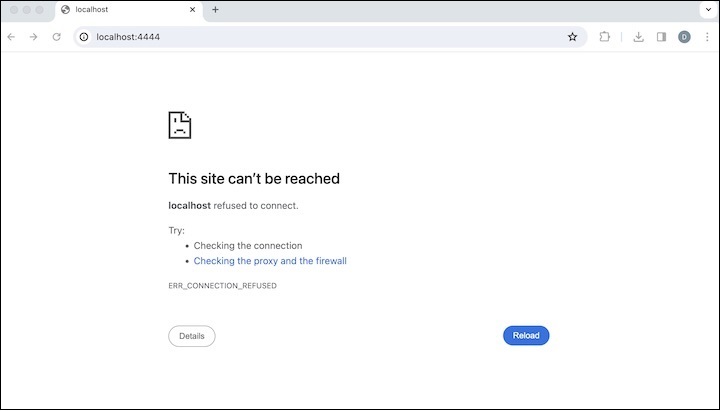
Step 2 − Check Grid status by opening a browser and entering:
For the UI version, type http://localhost:4444.
For Non UI version, type http://localhost:4444/status.
For both the cases, we would get the error - This site can’t be reached. Since Selenium Grid has not been started yet.
Test Execution in Selenium Grid
The steps to set up test execution in Selenium Grid in a Hub and Node mode are listed below −
Step 1 − Download Selenium Standalone Jar from the below link and save it in a folder − https://github.com/SeleniumHQ/selenium/releases.
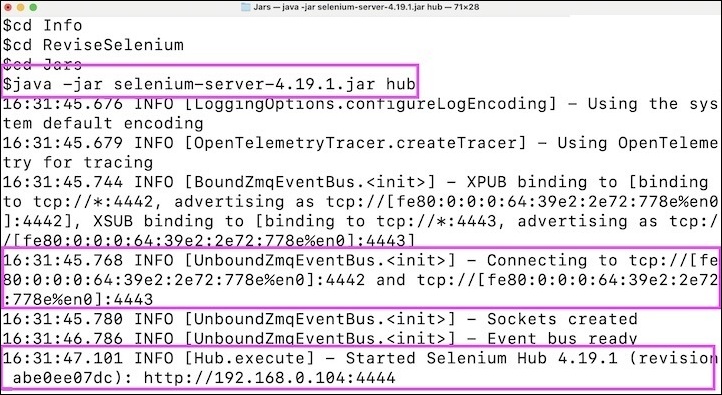
Step 2 − From the location of the folder where the Selenium Standalone Jar had been stored, run the below command from the terminal −
java -jar selenium-server-<version>.jar hub.
Please Note − The hub IP Address in the command line logs received while registering the hub.
In the below image, it shows the successful triggering of the Hub.
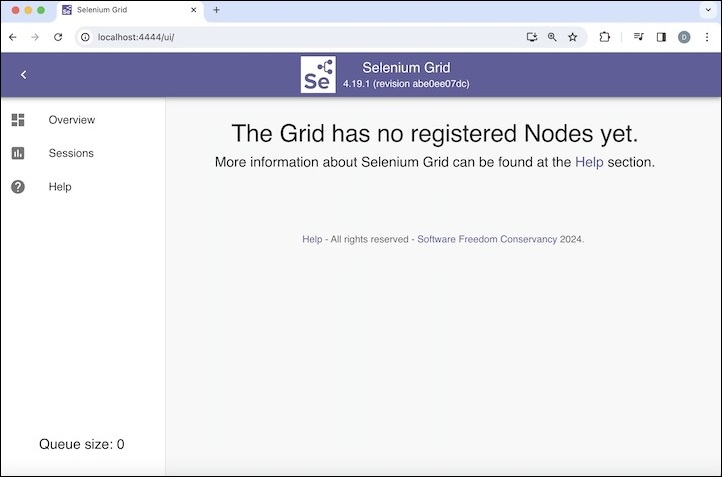
Step 3 − Check Grid status by opening a browser and entering: http://localhost:4444.
The Error − This site can’t be reached would no longer be there, and we would get Grid status showing the message - The Grid has no registered Nodes yet. This was because Node had not been registered yet.
Run Node in Same Machine
After configuring Hub by following the above steps 1,2, and 3, navigate to the location of the folder where the Selenium Standalone Jar had been stored, and run the below command by opening another new terminal window −
java -jar selenium-server-<version>.jar node.
This would help to launch the Node in the same machine.
Run Node in Different Machine
Step 1 − In another machine download Selenium Standalone Jar from the below link and save it in a folder − https://github.com/SeleniumHQ/selenium/releases.
Step 2 − Navigate to the location of the folder where the Selenium Standalone Jar had been stored, and run the below command by opening the terminal window −
java -jar selenium-server-<version>.jar node
   --detect-drivers true --publish-events tcp://{hub IP Address}:4442
   --subscribe-events tcp://{hub IP Address}:4443.
Please Note − The hub IP Address would be available in the command line logs received while registering the hub obtained in Step 3.
This would help to launch the Node in a different machine.
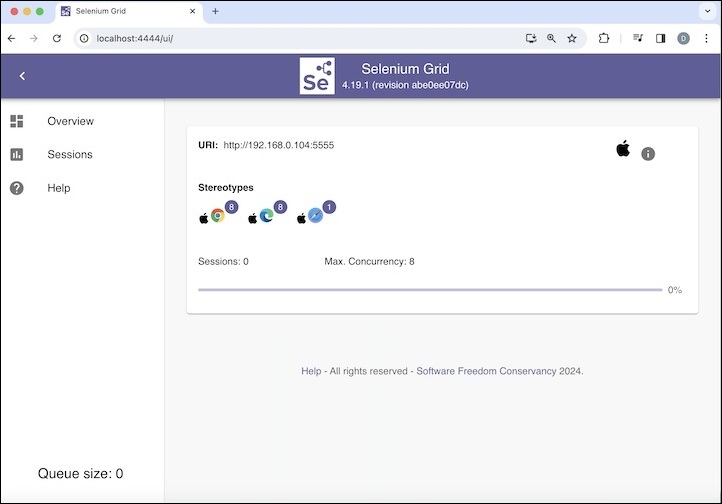
In the below image, it shows the successful registration of a Node from the same machine.
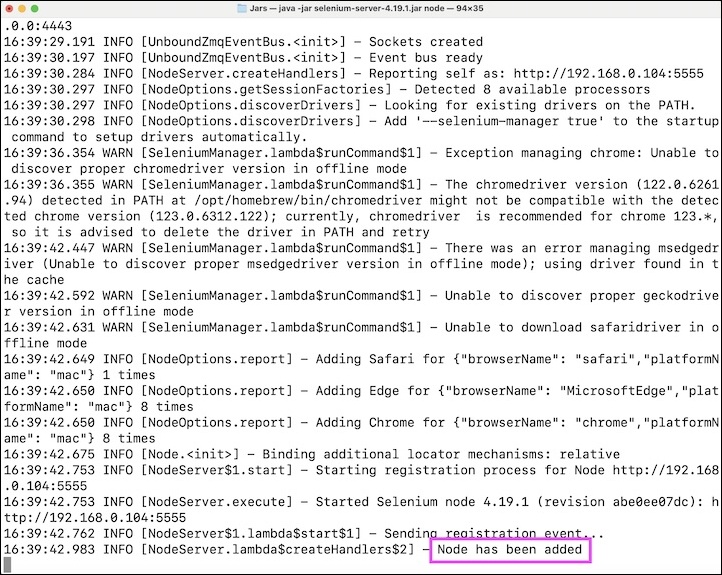
Step 3 − Check Grid again status by opening a browser and entering: http://localhost:4444.
The Message Showing − The Grid has no registered Nodes yet would not be there, in place of that, the Node would reflect.
Step 4 −
Code Implementation in Base.java
package BaseClass;

import java.net.MalformedURLException;
import java.net.URL;
import org.openqa.selenium.WebDriver;
import org.openqa.selenium.remote.DesiredCapabilities;
import org.openqa.selenium.remote.RemoteWebDriver;

public class Base {
   public WebDriver setBrowser(String browserName) throws MalformedURLException {
      WebDriver driver = null;
      DesiredCapabilities dc = new DesiredCapabilities();

      if(browserName.equalsIgnoreCase("chrome")) {
         dc.setBrowserName("chrome");
      } else if(browserName.equalsIgnoreCase("edge")) {
         dc.setBrowserName("MicrosoftEdge");
      }

      // Initiate RemoteWebDriver
      driver = new RemoteWebDriver(new URL("http://localhost:4444"),dc);
      return driver;
   }
}
Code Implementation in TestOne.java
package Grid;

import BaseClass.Base;
import org.openqa.selenium.WebDriver;
import org.testng.annotations.AfterMethod;
import org.testng.annotations.BeforeMethod;
import org.testng.annotations.Test;
import java.net.MalformedURLException;

public class TestOne extends Base {
   public WebDriver driver = null;
   @Test
   public void testOne() {

      // launch application
      driver.get("https://www.tutorialspoint.com/selenium/practice/links.php");

      // get page title
      System.out.println("Page title is: " + driver.getTitle() + " obtained from testOne");
   }
   @BeforeMethod
   public void setup() throws MalformedURLException {
      driver = setBrowser("chrome");
   }

   @AfterMethod
   public void tearDown() {

      // quitting browser
      driver.quit();
   }
}
Code Implementation in TestTwo.java
package Grid;

import BaseClass.Base;
import org.openqa.selenium.WebDriver;
import org.testng.annotations.AfterMethod;
import org.testng.annotations.BeforeMethod;
import org.testng.annotations.Test;
import java.net.MalformedURLException;

public class TestTwo extends Base {
   public WebDriver driver = null;

   @Test
   public void testTwo() {

      // launch application
      driver.get("https://www.tutorialspoint.com/selenium/practice/links.php");

      // get page title
      System.out.println("Page title is: " + driver.getTitle() + " obtained from testTwo");
   }

   @BeforeMethod
   public void setup() throws MalformedURLException {
      driver = setBrowser("edge");
   }

   @AfterMethod
   public void tearDown() {

      // quitting browser
      driver.quit();
   }
}
Configurations in testng.xml file.
<?xml version="1.0" encoding="UTF-8"?>
<!DOCTYPE suite SYSTEM "http://testng.org/testng-1.0.dtd">
<suite name = "Grid Test">
   <test thread-count = "5" name="Test">
      <classes>
         <class name="Grid.TestOne" />
         <class name="Grid.TestTwo"/>
      </classes>
   </test>
</suite>
Step 5 − Run the test from the testng.xml file.
It will show the following output −
Page title is: Selenium Practice - Links obtained from testOne
Page title is: Selenium Practice - Links obtained from testTwo

===============================================
Grid Test
Total tests run: 2, Passes: 2, Failures: 0, Skips: 0
===============================================

Process finished with exit code 0
In the above example, we had performed the test execution using the Hub and Node mode of the Selenium Grid.
This concludes our comprehensive take on the tutorial on Selenium Grid - Test Execution. We’ve started with describing prerequisites to perform test execution in Selenium Grid, and how to actually perform a test execution in Selenium Grid.
This equips you with in-depth knowledge of the Selenium Grid - Test Execution. It is wise to keep practicing what you’ve learned and exploring others relevant to Selenium to deepen your understanding and expand your horizons.