
- Selenium Tutorial
- Selenium - Home
- Selenium - Overview
- Selenium - Components
- Selenium - Automation Testing
- Selenium - Environment Setup
- Selenium - Remote Control
- Selenium IDE Tutorial
- Selenium - IDE Introduction
- Selenium - Features
- Selenium - Limitations
- Selenium - Installation
- Selenium - Creating Tests
- Selenium - Creating Script
- Selenium - Store Variables
- Selenium - Alerts & Popups
- Selenium - Selenese Commands
- Selenium - Actions Commands
- Selenium - Accessors Commands
- Selenium - Assertions Commands
- Selenium - Assert/Verify Methods
- Selenium - Locating Strategies
- Selenium - Script Debugging
- Selenium - Verification Points
- Selenium - Pattern Matching
- Selenium - JSON Data File
- Selenium - Browser Execution
- Selenium - User Extensions
- Selenium - Code Export
- Selenium - JavaScript Functions
- Selenium - Plugins
- Selenium WebDriver Tutorial
- Selenium - Introduction
- Selenium WebDriver vs RC
- Selenium - Installation
- Selenium - First Test Script
- Selenium - Driver Sessions
- Selenium - Browser Options
- Selenium - Chrome Options
- Selenium - Edge Options
- Selenium - Firefox Options
- Selenium - Safari Options
- Selenium Web Elements
- Selenium - File Upload
- Selenium - Locator Strategies
- Selenium - Relative Locators
- Selenium - Finders
- Selenium - Find All Links
- Selenium - User Interactions
- Selenium - WebElement Commands
- Selenium - Browser Interactions
- Selenium - Browser Commands
- Selenium - Browser Navigation
- Selenium - Alerts & Popups
- Selenium - Handling Forms
- Selenium - Windows and Tabs
- Selenium - Handling Links
- Selenium - Input Boxes
- Selenium - Radio Button
- Selenium - Checkboxes
- Selenium - Dropdown Box
- Selenium - Handling IFrames
- Selenium - Handling Cookies
- Selenium - Date Time Picker
- Selenium - Dynamic Web Tables
- Selenium - Actions Class
- Selenium - Action Class
- Selenium - Keyboard Events
- Selenium - Key Up/Down
- Selenium - Copy and Paste
- Selenium - Handle Special Keys
- Selenium - Mouse Events
- Selenium - Drag and Drop
- Selenium - Scroll Operations
- Selenium - Waiting Strategies
- Selenium - Explicit/Implicit Wait
- Selenium - Support Features
- Selenium - Multi Select
- Selenium - Wait Support
- Selenium - Select Support
- Selenium - Color Support
- Selenium - Errors & Logging
- Selenium - Logging
- Selenium - Exception Handling
- Selenium - Miscellaneous
- Selenium - Handling Ajax Calls
- Selenium - JSON Data File
- Selenium - CSV Data File
- Selenium - Excel Data File
- Selenium - Cross Browser Testing
- Selenium - Multi Browser Testing
- Selenium - Multi Windows Testing
- Selenium - JavaScript Executor
- Selenium - Headless Execution
- Selenium - Capture Screenshots
- Selenium - Capture Videos
- Selenium - Page Object Model
- Selenium - Page Factory
- Selenium - Record & Playback
- Selenium - Frameworks
- Selenium - Browsing Context
- Selenium Grid Tutorial
- Selenium - Overview
- Selenium - Architecture
- Selenium - Components
- Selenium - Configuration
- Selenium - Create Test Script
- Selenium - Test Execution
- Selenium - Endpoints
- Selenium - Customizing a Node
- Selenium Reporting Tools
- Selenium - Reporting Tools
- Selenium - TestNG
- Selenium - JUnit
- Selenium - Allure
- Selenium & other Technologies
- Selenium - Java Tutorial
- Selenium - Python Tutorial
- Selenium - C# Tutorial
- Selenium - Javascript Tutorial
- Selenium - Kotlin Tutorial
- Selenium - Ruby Tutorial
- Selenium - Maven & Jenkins
- Selenium - Database Testing
- Selenium - LogExpert Logging
- Selenium - Log4j Logging
- Selenium - Robot Framework
- Selenium - AutoIT
- Selenium - Flash Testing
- Selenium - Apache Ant
- Selenium - Github
- Selenium - SoapUI
- Selenium - Cucumber
- Selenium - IntelliJ
- Selenium - XPath
- Selenium Miscellaneous Concepts
- Selenium - Automation Frameworks
- Selenium - Keyword Driven Framework
- Selenium - Data Driven Framework
- Selenium - Hybrid Driven Framework
- Selenium - SSL Certificate Error
- Selenium - Alternatives
- Selenium Useful Resources
- Selenium - Quick Guide
- Selenium - Useful Resources
- Selenium - Automation Practice
- Selenium - Discussion
Selenium - Hybrid Driven Framework
Selenium Webdriver can be used to develop test scripts which are based on the hybrid driven framework. A hybrid driven framework is a combination of a keyword driven and data driven framework. Thus, in a hybrid framework we incorporate the advantages of both the keyword driven and data driven frameworks.
Why Hybrid Framework is Used?
A hybrid framework is adopted to utilize essential features of both the keyword and data driven frameworks. It helps to make the test cases more flexible and individual features can exist independently without affecting the others. The test cases created with a hybrid framework are easier to maintain and addition of new test cases to this type of framework require less of time.
Advantages of Hybrid Framework
The advantages of hybrid framework are listed below −
It is free and open source.
Can be used across multiple platforms, browsers, and devices.
Easy to maintain and scalable.
Disadvantages of Hybrid Framework
The disadvantages of hybrid framework are listed below −
Technical expertise is required to create a hybrid framework.
It is difficult to port the test cases created using a hybrid framework to another application.
Readability of test scripts can become challenging.
Basic Components of Hybrid Framework
The basic components of a hybrid framework are described in the below diagram −
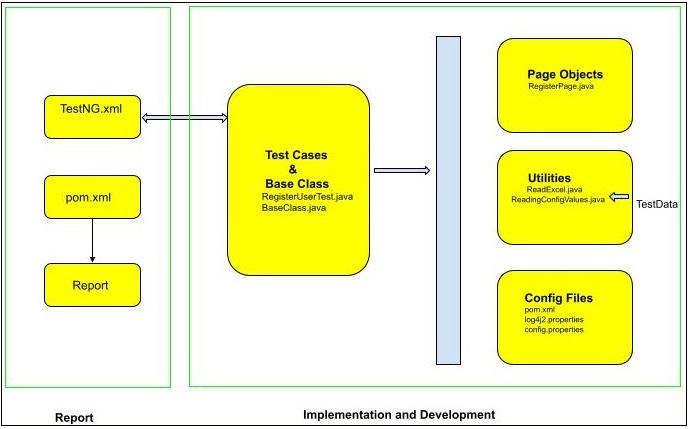
As shown in the above diagram, the hybrid framework is divided into two phases - implementation and development phase, and the report generation phase. The report generation phase can be further extended to incorporate the continuous integration phase. For the continuous integration phase, we can take the help of Jenkins, and other tools along with Git(for version control of the code).
Example
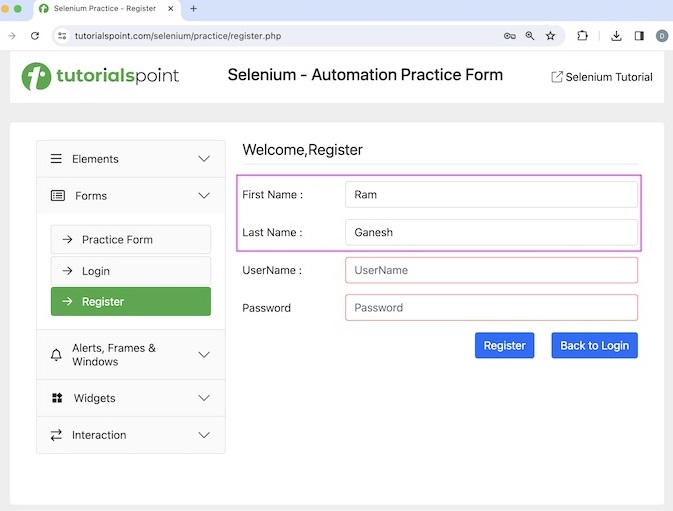
Let us take an example of the below page where we would input the First Name as Ram and the Last Name as Ganesh then verify the values entered in the registration page using a hybrid framework.
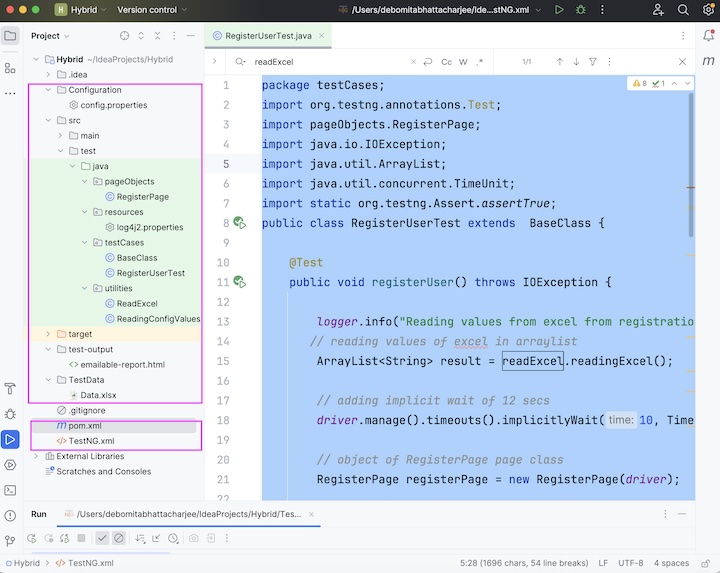
Based on the diagram shown previously, we would create a project Hybrid and that would have the folders and packages developed to create a hybrid framework.
Prerequisites
Install Java(version above 8) in the system and check if it is present with the command: java -version. The java version installed will be visible if installation has been completed successfully.
Install maven in the system and check if it is present with the command: mvn -version. The maven version installed will be visible if installation has been completed successfully.
Install any IDE like Eclipse, IntelliJ, and so on.
Add the TestNG dependencies from the link below: https://mvnrepository.com/artifact/org.testng/testng.
Add the Selenium Java dependencies from the below link:
https://mvnrepository.com/artifact/org.seleniumhq.selenium/selenium-java.
Add the Log4j dependencies from the below link −
Add Apache POI Common dependencies from the below link −
Add Apache POI API Based On OPC and OOXML Schemas dependencies from the below link −
https://mvnrepository.com/artifact/org.apache.poi/poi-ooxml.
Save the pom.xml with all the dependencies and update the maven project
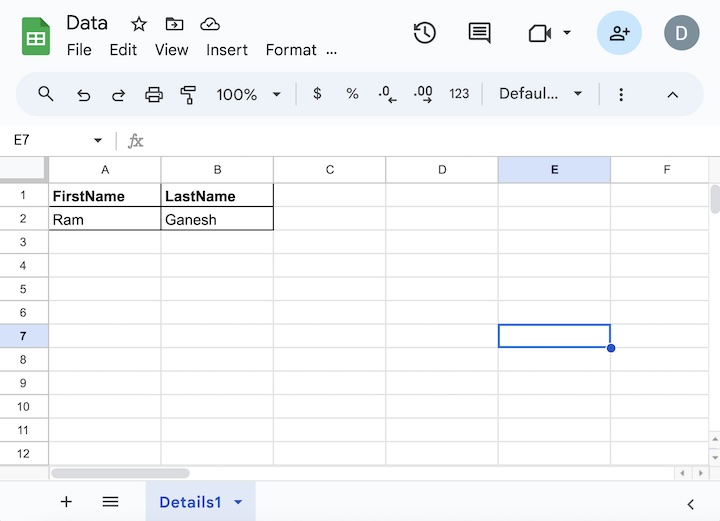
Step 1 − First of all, prepare an excel called Data.xlsx as shown in the below image with the data Ram, and Ganesh for the First Name and the Last Name fields. Place this file under the TestData folder in the project.
Step 2 − Store the environment values like the application URL within the file config.properties which contains data in key-value pairs under the Configuration folder.
baseUrl=https://www.tutorialspoint.com/selenium/practice/register.php
Step 3 − Create a configuration file - log4j2.properties file. Here, we would provide the settings. Created a file named log4j2.properties file under the resources folder.
Configurations in log4j2.properties file.
name=PropertiesConfig
property.filename = logs
appenders = console, file

appender.console.type = Console
appender.console.name = STDOUT
appender.console.layout.type = PatternLayout
appender.console.layout.pattern = [%-5level] %d{yyyy-MM-dd HH:mm:ss.SSS} [%t] %c{1} - %msg%n

appender.file.type = File
appender.file.name = LOGFILE
appender.file.fileName=${filename}/LogsGenerated.log
appender.file.layout.type=PatternLayout
appender.file.layout.pattern=[%-5level] %d{yyyy-MM-dd HH:mm:ss.SSS} [%t] %c{1} - %msg%n

loggers=file
logger.file.name=Logs
logger.file.level = debug
logger.file.appenderRefs = file
logger.file.appenderRef.file.ref = LOGFILE

rootLogger.level = debug
rootLogger.appenderRefs = stdout
rootLogger.appenderRef.stdout.ref = STDOUT
Step 4 − Create utility files to access the data from the config.properties file and Data.xlsx excel file in the test case. We would have the ReadingConfigValues.java class file to access the configuration values in the config.properties file and ReadExcel.java class file to access the test data in the Data.xlsx excel file. Both these class files were placed under the utilities package.
Code Implementation in ReadingConfigValues.java
package utilities;

import java.io.File;
import java.io.FileInputStream;
import java.util.Properties;

public class ReadingConfigValues {
   Properties p;
   public ReadingConfigValues(){

      // loading properties file with file location
      File s = new File("./Configuration/config.properties");

      try {

         // getting the key value pair
         FileInputStream fileInputStream = new FileInputStream(s);
         p = new Properties();
         p.load(fileInputStream);
      } catch (Exception e){
         System.out.println("Exception encountered: " + e);
      }
   }
   public String getURL() {

      // get URL from .properties file
      String url = p.getProperty("baseUrl");
      return url;
   }
}
Code Implementation in ReadExcel.java
package utilities;

import org.apache.poi.ss.usermodel.Cell;
import org.apache.poi.ss.usermodel.Row;
import org.apache.poi.xssf.usermodel.XSSFSheet;
import org.apache.poi.xssf.usermodel.XSSFWorkbook;
import java.io.File;
import java.io.FileInputStream;
import java.io.IOException;
import java.util.ArrayList;

public class ReadExcel {
   public ArrayList<String> readingExcel() throws IOException {
      int k;
      int l;

      // identify location of .xlsx file
      File f = new File("./TestData/Data.xlsx");
      FileInputStream i = new FileInputStream(f);

      // instance of XSSFWorkbook
      XSSFWorkbook w = new XSSFWorkbook(i);

      // create sheet in XSSFWorkbook with name Details1
      XSSFSheet s = w.getSheet("Details1");

      // get row and column numbers
      int r = s.getLastRowNum() + 1;
      int c = s.getRow(0).getLastCellNum();

      ArrayList<String> names = new ArrayList<>();

      // iterating through rows
      for (k = 1; k < r; k++) {
         Row rw = s.getRow(k);
         String name = "";

         // iterating through columns
         for (l = 0; l < c; l++) {
            Cell cell = rw.getCell(l);
            if("" != name){
               name += "," + cell.getStringCellValue();
            } else {
               name += cell.getStringCellValue();
            }
         }

         // storing excel values read to arraylist
         names.add(name);
      }

      // closing excel file
      w.close();
      return names;
   }
}
Step 5 − Create a page class RegisterPage.java under the pageObject package where we would have the web elements - input boxes to enter data and actions to be performed on those elements.
package pageObjects;

import org.openqa.selenium.WebDriver;
import org.openqa.selenium.WebElement;
import org.openqa.selenium.support.FindBy;
import org.openqa.selenium.support.PageFactory;

public class RegisterPage {
   WebDriver driver;
   @FindBy(xpath = "//*[@id='firstname']")
   WebElement txtFname;

   @FindBy(xpath = "//*[@id='lastname']")
   WebElement txtLname;
   @FindBy(xpath = "//*[@id='signupForm']/div[5]/input")
   WebElement btnRegister;
   public RegisterPage(WebDriver driver) {
      this.driver=driver;

      // initializing all page objects
      PageFactory.initElements(driver, this);
   }
   public void inputFirstname(String fname) {
      txtFname.sendKeys(fname);
   }
   public void inputLastname(String lname) {
      txtLname.sendKeys(lname);
   }
   public void clickRegister() {
      btnRegister.click();
   }
   public String getFirstName(){
      return txtFname.getAttribute("value");
   }
   public String getLastName(){
      return txtLname.getAttribute("value");
   }
}
Step 6 − Add the below configurations in TestNG.xml with capabilities to execute the test cases in Chrome and Edge browsers.
<?xml version="1.0" encoding="UTF-8"?>
<!DOCTYPE suite SYSTEM "http://testng.org/testng-1.0.dtd">
<suite name="All Test Suite">
   <test verbose="2" preserve-order="true" name="RegisterUser.java">
      <parameter name="browser" value="Chrome"></parameter>
      <classes>
         <class name="testCases.RegisterUserTest"></class>
      </classes>
   </test>
</suite>
Step 7 − Create test classes - BaseClass.java and RegisterUserTest.java under the testCases package where we would write the actual test case.
Code Implementation in BaseClass.java
package testCases;

import org.apache.logging.log4j.LogManager;
import org.apache.logging.log4j.Logger;
import org.openqa.selenium.WebDriver;
import org.openqa.selenium.chrome.ChromeDriver;
import org.openqa.selenium.edge.EdgeDriver;
import org.testng.annotations.AfterClass;
import org.testng.annotations.BeforeClass;
import org.testng.annotations.Parameters;
import utilities.ReadingConfigValues;
import utilities.ReadExcel;

public class BaseClass {

   // reading values from external files
   ReadingConfigValues readingConfigValues = new ReadingConfigValues();
   ReadExcel readExcel = new ReadExcel();
   public String baseUrl = readingConfigValues.getURL();
   public static WebDriver driver;
   public static Logger logger;

   @BeforeClass
   @Parameters("browser")
   public void setup(String browser){
      logger = LogManager.getLogger(BaseClass.class);
      logger.info("Application Launched");

      // Initiate browser driver as per browser value
      if (browser.equalsIgnoreCase("Chrome")) {
         driver = new ChromeDriver();
         System.out.println("Browser opened in Chrome");
      } else if (browser.equalsIgnoreCase("Edge")) {
         driver = new EdgeDriver();
         System.out.println("Browser opened in Edge");
      }

      // launch application
      driver.get(baseUrl);
   }
   @AfterClass
   public void tearDown(){

      // quitting browser
      driver.quit();
   }
}
Code Implementation in RegisterUserTest.java
package testCases;

import org.testng.annotations.Test;
import pageObjects.RegisterPage;
import java.io.IOException;
import java.util.ArrayList;
import java.util.concurrent.TimeUnit;
import static org.testng.Assert.assertTrue;

public class RegisterUserTest extends  BaseClass {
   @Test
   public void registerUser() throws IOException {
      logger.info("Reading values from excel from registration");

      // reading values of excel in arraylist
      ArrayList<String> result = readExcel.readingExcel();

      // adding implicit wait of 12 secs
      driver.manage().timeouts().implicitlyWait(10, TimeUnit.SECONDS);

      // object of RegisterPage page class
      RegisterPage registerPage = new RegisterPage(driver);
      logger.info("Starting registration");

      // input first and last name
      for (int i = 0; i <result.size(); i++) {
         String[] names = result.get(i).split(",");
         registerPage.inputFirstname(names[0]);
         registerPage.inputLastname(names[1]);
      }

      // click register button
      registerPage.clickRegister();
      logger.info("Verification of entered values");

      // verify value input in the first name
      if (registerPage.getFirstName().equalsIgnoreCase("Ram")){

         // assertions to test case
         assertTrue(true);
      } else {
         assertTrue(false);
      }

      // verify value input in the last name
      if (registerPage.getLastName().equalsIgnoreCase("Ganesh")){

         // assertions to test case
         assertTrue(true);
      } else {
         assertTrue(false);
      }
   }
}
Step 8 − The below dependencies added to pom.xml.
<?xml version="1.0" encoding="UTF-8"?>
<project xmlns="http://maven.apache.org/POM/4.0.0"
   xmlns:xsi="http://www.w3.org/2001/XMLSchema-instance"
   xsi:schemaLocation="http://maven.apache.org/POM/4.0.0
   http://maven.apache.org/xsd/maven-4.0.0.xsd">

   <modelVersion>4.0.0</modelVersion>
   <groupId>org.example</groupId>
   <artifactId>SeleniumJava</artifactId>
   <version>1.0-SNAPSHOT</version>

   <properties>
      <maven.compiler.source>16</maven.compiler.source>
      <maven.compiler.target>16</maven.compiler.target>
      <project.build.sourceEncoding>UTF-8</project.build.sourceEncoding>
   </properties>

   <!-- https://mvnrepository.com/artifact/org.seleniumhq.selenium/selenium-java -->
   <dependencies>
      <dependency>
         <groupId>org.seleniumhq.selenium</groupId>
         <artifactId>selenium-java</artifactId>
         <version>4.11.0</version>
      </dependency>

      <!-- https://mvnrepository.com/artifact/org.apache.poi/poi -->
      <dependency>
         <groupId>org.apache.poi</groupId>
         <artifactId>poi</artifactId>
         <version>5.2.5</version>
      </dependency>

      <!-- https://mvnrepository.com/artifact/org.apache.poi/poi-ooxml -->
      <dependency>
         <groupId>org.apache.poi</groupId>
         <artifactId>poi-ooxml</artifactId>
         <version>5.2.5</version>
      </dependency>

      <!-- https://mvnrepository.com/artifact/org.testng/testng -->
      <dependency>
         <groupId>org.testng</groupId>
         <artifactId>testng</artifactId>
         <version>7.9.0</version>
         <scope>test</scope>
      </dependency>
      <dependency>
         <groupId>org.apache.logging.log4j</groupId>
         <artifactId>log4j-api</artifactId>
         <version>2.23.1</version>
      </dependency>
      <dependency>
         <groupId>org.apache.logging.log4j</groupId>
         <artifactId>log4j-core</artifactId>
         <version>2.23.1</version>
      </dependency>

      <!-- https://mvnrepository.com/artifact/com.aventstack/extentreports -->
      <dependency>
         <groupId>com.aventstack</groupId>
         <artifactId>extentreports</artifactId>
         <version>5.1.1</version>
      </dependency>
   </dependencies>
</project>
Step 9 − Run the test from the TestNG.xml file, by right clicking on it, and selecting the option Run TestNG.xml.
Output
Browser opened in Chrome
===============================================
All Test Suite
Total tests run: 1, Passes: 1, Failures: 0, Skips: 0
===============================================

Process finished with exit code 0
In the above example, we had taken help of the TestNG test framework and Page Object Model design pattern, to create a test and launched the application in the Chrome browser based on the Chrome parameter passed from the TestNG.xml file. Then obtained the test data from the Data.xlsx file and entered them in the First Name and Last Name fields in the registration page.
The result in the console shows Total tests run: 1, as there is one method with @Test annotation registerUser().
Finally, the message Passes: 1, and Process finished with exit code 0 was received, signifying successful execution of the code.
Step 10 − Refresh the project and a new folder called the test-output should get generated in the project structure.
Step 11 − Right-click on the emailable-report.html and select the option to open in a browser.
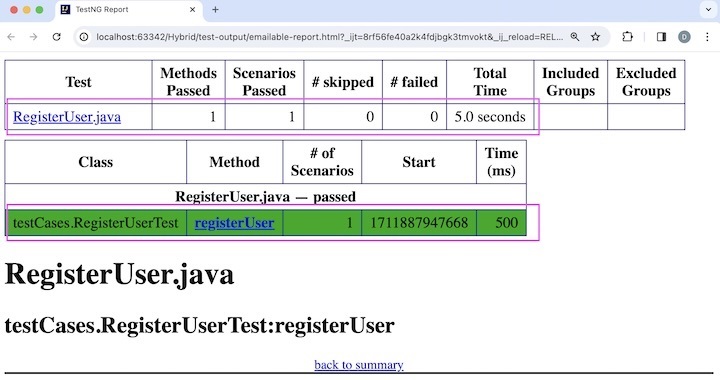
The report opened in the browser showing the test class name - RegisterUser.java with total number passed, skipped, failed, duration of test, and so on. Also, the test method name registerUser was also included in the report.
This concludes our comprehensive take on the tutorial on Selenium Webdriver - Hybrid Driven Framework. We’ve started with describing why a hybrid driven framework is used, what are the advantages, disadvantages, and basic components of a hybrid driven framework, and walked through an example of how to implement a hybrid driven framework along with Selenium Webdriver.
This equips you with in-depth knowledge of the Hybrid Driven Framework in Selenium Webdriver. It is wise to keep practicing what you’ve learned and exploring others relevant to Selenium to deepen your understanding and expand your horizons.