- Spring Data Tutorial - Home
- Spring Data Apache Solr
- Overview
- Prerequisites
- Introduction
- What is Apache Solr?
- Getting Started
- Querying
- Features
- Conclusion
- Spring Data Cassandra
- Overview
- Prerequisites
- Introduction
- What is Cassandra?
- Getting Started
- Annotation AllowFiltering with Query Methods
- Partition and Clustering
- Coding hands-on on Partitioning and Clustering
- Features
- Conclusion
- Spring Data Couchbase
- Overview
- Prerequisites
- Introduction
- What is Couchbase?
- Getting Started
- Views
- CouchbaseTemplate
- Hands-on using CouchbaseTemplate
- Features
- Conclusion
- Spring Data Elasticsearch
- Overview
- Prerequisites
- Introduction
- What is ElasticSearch?
- Getting Started
- Querying
- Configuring ElasticsearchOperations bean
- Features
- Conclusion
- Spring Data JDBC
- Introduction
- Need of Spring Data JDBC
- Features
- Domain-Driven Design
- Prerequisites
- Getting Started
- Conclusion
- Spring Data JPA
- Background
- Introduction
- Prerequisites
- Getting Started
- Features
- Conclusion
- Spring Data MongoDB
- Overview
- Prerequisites
- Introduction
- What is MongoDB?
- Getting Started
- Query Methods
- Annotations
- Exposing REST end points
- Relationship
- Conclusion
- Spring Data Redis
- Overview
- Prerequisites
- Introduction
- What is Redis?
- Redis Java Clients
- Getting Started
- Features
- Conclusion
- Spring Data REST
- Background
- Introduction to Spring Data REST
- Prerequisites
- Getting Started
- Features
- Conclusion
- Spring Data Tutorial Useful Resources
- Spring Data Tutorial - Quick Guide
- Spring Data Tutorial - Useful Resources
- Spring Data Tutorial - Discussion
Spring Data Tutorial - Quick Guide
Spring Data Apache Solr - Overview
In this tutorial, we will learn about Spring Data Apache Solr. We will start with the basics and go through the configuration of Apache Solr to work with Spring Data. We will also do some handson coding to perform CRUD operation using Spring Data Apache Solr.
Spring Data Apache Solr - Prerequisites
About 30 minutes
Basic Spring Data knowledge
A Basic understanding of the Apache Solr Database.
A java based IDE (Eclipse, STS or IntelliJ IDEA)
JDK 1.8 or later
Gradle 4+ or Maven 3.2+
Apache Solr installed
Spring Data Apache Solr - Introduction
As we know that, the Spring Data framework is the umbrella project which contains many subframeworks. All these sub frameworks deal with data access which is specific to a database. Spring Data Apache Solr is one of the sub−framework of the Spring Data project that provides easy configuration and access to the Apache Solr a full−text search engine. It offers a familiar interface for those who have worked with other modules of the Spring Data in the past. Before jumping the Spring Data Apache Solr, lets have a basic understanding of Apache Solr.
What is Apache Solr
Apache Solr is an open−source enterprise search platform built on Apache Lucene. It is a highlyscalable, reliable, and fault−tolerant, that provides distributed indexing, load-balanced querying,replication, centralized configuration, recovery, and automated failover. To achieve the search and navigation features of Apache Solr, most of the worlds popular sites use it. To learn more about Apache Solr, visit our tutorials by clicking here.
Installation Guide
Since this tutorial will be working extensively with Apache Solr. Make sure it is installed on your machine, if not already installed you can download it from official website.
Steps Post Installation
Once it is installed, we can create a Core. A Core in Apache Solr is equivalent to a database in RDBMS.
Create Core
Lets create a Core named tutorials_point, to do so navigate to bin directory and execute below command.
solr create -c users
Getting Started with Spring Data Solr
Like other Spring−based projects, you can start from scratch by creating a maven or Gradle based project from your favourite IDE. Follow below step by step process or you can bypass the basic setup steps that are already familiar with.
Adding Dependencies
If you have created normal Maven or Gradle projects then add below dependencies to your pom.
For Maven
<dependency>
   <groupId>org.springframework.boot</groupId>
   <artifactId>spring-boot-starter-data-solr</artifactId>
</dependency>
For Gradle
implementation('org.springframework.boot:spring-boot-starter-data-solr')
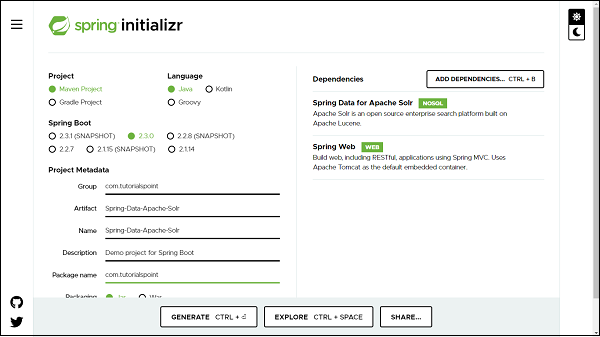
Above one is the Spring Data Apache Solr dependency. If you have created your project as Spring Boot or Starting with Spring Initializr then your final list of dependencies wil look like this −

Note − The code sample and examples used in this tutorial has been created through Spring Initializr. The following is your final pom.xml file that is created when you choose Maven −
<?xml version="1.0" encoding="UTF-8"?>
<project xmlns="http://maven.apache.org/POM/4.0.0" xmlns:xsi="http://www.w3
   .org/2001/XMLSchema-instance"
   xsi:schemaLocation="http://maven.apache.org/POM/4.0.0 https://maven.apa
   che.org/xsd/maven-4.0.0.xsd">
   <modelVersion>4.0.0</modelVersion>
   <parent>
      <groupId>org.springframework.boot</groupId>
      <artifactId>spring-boot-starter-parent</artifactId>
      <version>2.3.0.RELEASE</version>
      <relativePath/> <!-- lookup parent from repository -->
   </parent>
   <groupId>com.tutorialspoint</groupId>
   <artifactId>Spring-Data-Solr</artifactId>
   <version>0.0.1-SNAPSHOT</version>
   <name>Spring-Data-Solr</name>
   <description>Spring Data Apache Solr project using Spring Boot</description>
   <properties>
      <java.version>1.8</java.version>
   </properties>
   <dependencies>
      <dependency>
         <groupId>org.springframework.boot</groupId>
         <artifactId>spring-boot-starter-data-solr</artifactId>
      </dependency>
      <dependency>
         <groupId>org.springframework.boot</groupId>
         <artifactId>spring-boot-starter-web</artifactId>
      </dependency>
      <dependency>
         <groupId>org.springframework.boot</groupId>
         <artifactId>spring-boot-starter-test</artifactId>
         <scope>test</scope>
         <exclusions>
            <exclusion>
               <groupId>org.junit.vintage</groupId>
               <artifactId>junit-vintage-engine</artifactId>
            </exclusion>
         </exclusions>
      </dependency>
   </dependencies>
   <build>
   <plugins>
         <plugin>
            <groupId>org.springframework.boot</groupId>
            <artifactId>spring-boot-maven-plugin</artifactId>
         </plugin>
      </plugins>
   </build>
</project>
Creating Solr Document
A Solr document in Apache Solr is an actual domain object and it will be created as a POJO. Its maps columns to be persisted into the database. It uses annotation @SolrDocument from org.springframework.data.solr.core.mapping.
Lets define our first document −
import org.springframework.data.annotation.Id;
import org.springframework.data.solr.core.mapping.Indexed;
import org.springframework.data.solr.core.mapping.SolrDocument;
@SolrDocument(collection = "users")
public class Users {
   @Id
   @Indexed
   private Long id;
   @Indexed(name = "name", type = "string")
   private String name;
   public Users() {
   }
   public Users(Long id, String name) {
      this.id = id;
      this.name = name;
   }
   public Long getId() {
      return id;
   }
   public void setId(Long id) {
      this.id = id;
   }
   public String getName() {
      return name;
   }
   public void setName(String name) {
      this.name = name;
   }
   @Override
   public String toString() {
      return "Customer [id=" + id + ", name=" + name + "]";
   }
}
@SolrDocument− We used to mark our domain object with this annotation to map class Users as Solr document which is indexed to collection name users. @Id here we mark it for identity purpose which will act as a primary key. This annotation is from org.springframework.data.annotation.Id.
@Indexed − It is used to indexed the field to users collection, so that it is searchable
Creating a Repository
Lets define an interface which will be our repository −
import java.util.List;
import org.springframework.data.solr.repository.SolrCrudRepository;
import com.tutorialspoint.entity.Users;
public interface UsersRepository extends SolrCrudRepository<Users, Long> {
   public List<Users> findByName(String name);
}
The process of creating a repository is similar to the repository creation in any Spring data−based project, the only difference here is that it extends SolrCrudRepository from org.springframework.data.solr.repository, which works on top of SolrRepository which again extends PagingAndSortingRepository.
Configuring DataSource
We can configure Solr using application.properties file, and Java-based configuration. We can choose either one among them. Lets discuss one by one.
Java Based Configuration
Create a config file, say SolrConfig,
import org.apache.solr.client.solrj.SolrClient;
import org.apache.solr.client.solrj.impl.HttpSolrClient;
import org.springframework.context.annotation.Bean;
import org.springframework.context.annotation.ComponentScan;
import org.springframework.context.annotation.Configuration;
import org.springframework.data.solr.core.SolrTemplate;
import org.springframework.data.solr.repository.config.EnableSolrRepositori
es;
@Configuration
@EnableSolrRepositories(basePackages = "com.tutorialspoint.repository")
@ComponentScan
public class SolrConfig {
   @Bean
   public SolrClient solrClient() {
      return new HttpSolrClient.Builder("http://localhost:8983/solr").bui
      ld();
   }
   @Bean
   public SolrTemplate solrTemplate(SolrClient client) throws Exception {
      return new SolrTemplate(client);
   }
}
Using application.properties file
Below one is the majorly used configuration.
spring.data.solr.host=http://localhost:8983/solr/
We can also enable/disable the Solr repository based on the requirement by adding the following property.
spring.data.solr.repositories.enabled=false
Performing CRUD Operation
Now lets perform below some CRUD operation. We will try adding some users to the above document, and retrieve some of them by their id or name. Following is the code for the same.
import java.util.Optional;
import org.springframework.boot.CommandLineRunner;
import org.springframework.boot.SpringApplication;
import org.springframework.boot.autoconfigure.SpringBootApplication;
import org.springframework.context.annotation.Bean;
import com.tutorialspoint.entity.Users;
import com.tutorialspoint.repository.UsersRepository;
@SpringBootApplication
public class SpringDataSolrApplication {
   public static void main(String[] args) {
      SpringApplication.run(SpringDataSolrApplication.class, args);
   }
   @Bean
   CommandLineRunner commandLineRunner(UsersRepository usersRepository) {
      return new CommandLineRunner() {
         @Override
         public void run(String... args) throws Exception {
            // Creating some entries
            Users user1 = usersRepository.save(new Users(1l, "Kallis"))
            ;
            System.out.println(usersRepository.save(user1));
            Users user2 = usersRepository.save(new Users(2l, "Mills"));
            System.out.println(user2);
            Users user3 = usersRepository.save(new Users(3l, "Wilson"))
            ;
            System.out.println(user3);
            // Fetching entry
            System.out.println(usersRepository.findById(2l));
            // Find all entry
            usersRepository.findAll().forEach(System.out::println);
            // Update entry
            Optional<Users> usersrOptional = usersRepository.findById(3
            l);
            if (usersrOptional.isPresent()) {
               Users user = usersrOptional.get();
               user.setName("Wilson Monk");
               usersRepository.save(user);
            }
            System.out.println(usersRepository.findByName("Wilson Monk"
            ));
            // Deleting entry
            usersRepository.delete(user2);
            // fetch all Entry
            usersRepository.findAll().forEach(System.out::println);
         }
      };
   }
}
The above code has used CommandLineRunner which will be executed on application startup. We have created three users and saved them in the database and executed the method findById() to retrieve the user by id. We also tried updating one of the records and re−retrieved byName() query method to check if it has been updated. Finally we are deleting one of the records. Lets run the application as the Spring Boot App, below is the output. Creating Entries
Customer [id=1, name=Kallis]
Customer [id=2, name=Mills]
Customer [id=3, name=Wilson]
// Fetching entry by Id
Optional[Customer [id=2, name=Mills]]
Finding all entry
Customer [id=1, name=Kallis]
Customer [id=2, name=Mills]
Customer [id=3, name=Wilson]
Updating an entry name from Wilson to Wilson Monk and retrieving it byName
[Customer [id=3, name=Wilson Monk]]
Deleted the entry with id 2, and re−retrived all entry
Customer [id=1, name=Kallis]
Customer [id=3, name=Wilson Monk]
Spring Data Apache Solr - Querying
The concept Query methods and Custom Query methods are easily accessible here because the repository associated with SolrCrudRepository works on top of PagingAndSortingRepository which in turns extends CrudRepository. Thus by default all the methods like save(), findOne(), findById(), findAll(), count(), delete(), deleteById() etc are accesible and can be used. Other than this it also has access to all the methods associated with Paging and sorting. Spring Data Apache Solr comes with a rich set of query approaches such as −
Method Name Query Generation
Custom Query With @Query Annotation
Named Query
Lets explore the above query technique defined by the Spring Data Solr API.
Method Name Query Generation
These are the usual query methods which get generated based on the methods name of the attribute of our domain object, such as −
List<Users> findByName(String name);
Custom Query with @Query Annotation
We can also create our search query using @Query annotation. Lets define a custom query and use @Query annotation.
@Query("id:*?0* OR name:*?0*")
public Page<Users> findByCustomQuery(String searchTerm, Pageable pageable);
The above custom query will fetch a record from the Solr database by performing a lookup on the id and name of a user. and it will return the results. Lets invoke this method and try fetching out the result −
usersRepository.findByCustomQuery("Kallis", PageRequest.of(0, 5)).forEach(S
ystem.out::println);
The above statement is saying to fetch a user based on the name Kallis, and obtain the first−page result with the size of max 5 records. The output of the above statement will be −
Customer [id=1, name=Kallis]
Named Query
This type of query is similar to Custom Query with @Query Annotation, except these queries are declared in a separate properties file. Lets create a properties file named namedQueries.properties(We can give any name) in parallel to application.properties file. Now lets add our first named query in that file.
Users.findByNamedQuery=id:*?0* OR name:*?0*
After adding the above file and query to that file our project structure will look like this.
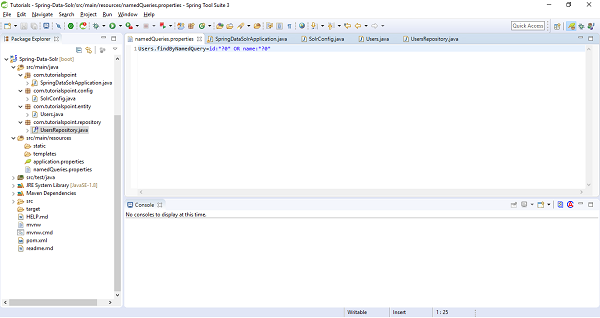
Lets add this file information as class path in SolrConfig file. Add namedQueriesLocation = "classpath:namedQueries.properties" as attribute under @EnableSolrRepositories. Our updated SolrConfig file will be
import org.apache.solr.client.solrj.SolrClient;
import org.apache.solr.client.solrj.impl.HttpSolrClient;
import org.springframework.context.annotation.Bean;
import org.springframework.context.annotation.ComponentScan;
import org.springframework.context.annotation.Configuration;
import org.springframework.data.solr.core.SolrTemplate;
import org.springframework.data.solr.repository.config.EnableSolrRepositori
es;
@Configuration
@EnableSolrRepositories(basePackages = "com.tutorialspoint.repository", nam
edQueriesLocation = "classpath:namedQueries.properties")
@ComponentScan
public class SolrConfig {
   @Bean
   public SolrClient solrClient() {
      return new HttpSolrClient.Builder("http://localhost:8983/solr").bui
      ld();
   }
   @Bean
   public SolrTemplate solrTemplate(SolrClient client) throws Exception {
      return new SolrTemplate(client);
   }
}
Now, lets move to our repository and add a custom query to invoke this named query.
@Query(name = "Users.findByNamedQuery")
public Page<Users> findByNamedQuery(String searchTerm, Pageable pageable);
Note− @Query annotation is optional here and not required in case the qury method name findByNamedQuery matches with the query name used in properties file. Lets invoke above method and check the result.
usersRepository.findByNamedQuery("Wilson", PageRequest.of(0, 5)).forEach(Sy
stem.out::println);
The above statement will return result of first page with at most 5 records, as follows −
Customer [id=3, name=Wilson Monk]
Spring Data Apache Solr - Features
Familiar and common interface to build repositories.
Object−based and annotation-based mapping.
Fluent Query API for Query, custom query, and named query methods.
Multi−core support.
Spring Data Apache Solr - Conclusion
So far we learned, how Spring Data Apache Solr is useful in working with the Solr search engine. We created a project and integrated with the Apache Solr database. We performed some CRUD operations. We also learned about the various query technique provided by Spring Data Apache Solr API.
Spring Data Cassandra - Overview
In this tutorial, we will learn about Spring Data Cassandra. We will start with the basics and go through the configuration of Cassandra databases to work with Spring Data. We will also do some hands-on coding to perform CRUD operation using Spring Data Cassandra.
Spring Data Cassandra - Prerequisites
About 30 minutes
Basic Spring Data knowledge
A Basic understanding of the Cassandra Database.
A java based IDE (Eclipse, STS or IntelliJ IDEA)
JDK 1.8 or later
Gradle 4+ or Maven 3.2+
Cassandra installed
Spring Data Cassandra - Introduction
As we know that, the Spring Data framework is the umbrella project which contains many sub−frameworks. All these sub frameworks deal with data access which is specific to a database. Spring Data Cassandra is one of the sub−framework of the Spring Data project that provides access to the Cassandra a Column based NoSql database. It offers a familiar interface for those who have worked with other modules of the Spring Data in the past. Before jumping the Spring Data Cassandra, lets have a basic understanding of Cassandra.
What is Cassandra
Cassandra is an open−source column−oriented NoSQL database. It is a distributed database management system that can manage large amounts of data across multiple servers. It provides high availability through data replication across multiple data−centres, which guarantees for no single point of failure. Cassandra Query Language (CQL) is its query language which is similar to SQL. To learn more about Cassandra, visit our tutorials by clicking here.
Installation Guide
Since this tutorial will be working extensively with Cassandra. Make sure it is installed on your machine, If not already installed follow our installation guide by clicking here.
Steps Post Installation
Once it is installed, we can create Keyspace. A keyspace in Cassandra is equivalent to a database in RDBMS.
Create KEYSPACE
Lets create a KESPACE named tutorials_point, using below syntax.
CREATE KEYSPACE IF NOT EXISTS tutorials_point WITH replication = {'class':'SimpleStrategy', 'replication_factor':1};
Create table
The syntax and process of creating a table in Cassandra are also similar to the RDBMS table. a table in Cassandra can be created in a KEYSAPCE. Lets move into KEYSPACE.
use tutorials_point ;
Now, create a table customer which has two fields id, and name. Use below syntax.
CREATE TABLE customer(
   id INT PRIMARY KEY,
   name text
);
Getting Started with Spring Data Cassandra
Like other Spring−based projects, you can start from scratch by creating a maven or Gradle based project from your favorite IDE. Follow below step by step process or you can bypass the basic setup steps that are already familiar with.
Adding Dependencies.
If you have created normal Maven or Gradle projects then add below dependencies to your pom. For Maven
<dependency>
   <groupId>org.springframework.boot</groupId>
   <artifactId>spring-boot-starter-data-cassandra</artifactId>
</dependency>
Above one is the Spring Data Cassandra dependency. If you have created your project as Spring Boot or Starting with Spring Initializr then your final list of dependencies will look like this −
Note − The code sample and examples used in this tutorial has been created through Spring Initializr. The following is your final pom.xml file that is created when you choose Maven −
<?xml version="1.0" encoding="UTF-8"?>
<project xmlns="http://maven.apache.org/POM/4.0.0"
xmlns:xsi="http://www.w3.org/2001/XMLSchema-instance"
xsi:schemaLocation="http://maven.apache.org/POM/4.0.0 https://maven.apache.org/xsd/maven-4.0.0.xsd">
   <modelVersion>4.0.0</modelVersion>
   <parent>
   <groupId>org.springframework.boot</groupId>
   <artifactId>spring-boot-starter-parent</artifactId>
   <version>2.2.7.RELEASE</version>
   <relativePath /> <!-- lookup parent from repository -->
   </parent>
   <groupId>com.tutorialspoint</groupId>
   <artifactId>Spring-Data-Cassandra</artifactId>
   <version>0.0.1-SNAPSHOT</version>
   <name>Spring-Data-Cassandra</name>
   <description>Spring Data Cassandra project using Spring Boot</description>
   <properties>
      <java.version>1.8</java.version>
   </properties>
   <dependencies>
      <dependency>
         <groupId>org.springframework.boot</groupId>
         <artifactId>spring-boot-starter-data-cassandra</artifactId>
      </dependency>
      <dependency>
         <groupId>org.springframework.boot</groupId>
         <artifactId>spring-boot-starter-web</artifactId>
      </dependency>
      <dependency>
         <groupId>org.springframework.boot</groupId>
         <artifactId>spring-boot-starter-test</artifactId>
         <scope>test</scope>
         <exclusions>
            <exclusion>
               <groupId>org.junit.vintage</groupId>
               <artifactId>junit-vintage-engine</artifactId>
            </exclusion>
         </exclusions>
      </dependency>
   </dependencies>
   <build>
      <plugins>
         <plugin>
            <groupId>org.springframework.boot</groupId>
            <artifactId>spring-boot-maven-plugin</artifactId>
         </plugin>
      </plugins>
   </build>
</project>
Creating Table
A table for Cassandra data base is equivalent to a model/entity, it is an actual domain object and it will be created as a POJO. Its maps columns to be persisted into the database. It uses annotation @Table from org.springframework.data.cassandra.core.mapping. Lets define our first table −
import org.springframework.data.cassandra.core.mapping.PrimaryKey;
import org.springframework.data.cassandra.core.mapping.Table;
@Table("customer")
public class Customer {
   @PrimaryKey
   private Long id;
   private String name;
   public Customer() {
   }
   public Customer(Long id, String name) {
      this.id = id;
      this.name = name;
   }
   public Long getId() {
      return id;
   }
   public void setId(Long id) {
      this.id = id;
   }
   public String getName() {
      return name;
   }
   public void setName(String name) {
      this.name = name;
   }
   @Override
   public int hashCode() {
      final int prime = 31;
      int result = 1;
      result = prime * result + ((id == null) ? 0 : id.hashCode());
      result = prime * result + ((name == null) ? 0 : name.hashCode());
      return result;
   }
   @Override
   public boolean equals(Object obj) {
      if (this == obj)
      return true;
      if (obj == null)
      return false;
      if (getClass() != obj.getClass())
      return false;
      Customer other = (Customer) obj;
      if (id == null) {
         if (other.id != null)
         return false;
      } else if (!id.equals(other.id))
      return false;
      if (name == null) {
         if (other.name != null)
         return false;
      } else if (!name.equals(other.name))
      return false;
      return true;
   }
   @Override
   public String toString() {
      return "Customer [id=" + id + ", name=" + name + "]";
   }
}
@Table: We used to mark our domain object with this annotation to map Cassandra table. @PrimaryKey here we mark it for identity purpose. This annotation is from org.springframework.data.cassandra.core.mapping. We van also use @Id for identity purposes, which is from import org.springframework.data.annotation from Spring Data. We use @PrimaryKey annotation against a field if that field consist of partition and clustering columns. We will understand this concept in details in later section of this article. We can also use other annotations like @Column to name our column if it we dont want the name used in the class field and it is optional.
Creating a Repository
Lets define an interface which will be our repository −
import org.springframework.data.cassandra.repository.CassandraRepository;
import com.tutorialspoint.entity.Customer;

public interface CustomerRepository extends CassandraRepository<Customer, Long> {
}
The process of creating a repository is similar to the repository creation in any spring data-based project, the only difference here is that it extends CassandraRepository from org.springframework.data.cassandra.repository, which works on top of CrudRepository.
Configuring DataSource
We can configure Cassandra using application.properties file, using XML and using Java based configuration. We can choose either one among them. Lets discuss one by one.
XML Based Configurations
Below one is the equivalent XML configuration.
<beans:beans xmlns:beans="http://www.springframework.org/schema/beans"
xmlns:cassandra="http://www.springframework.org/schema/data/cassandra"
xmlns:context="http://www.springframework.org/schema/context"
xmlns:xsi="http://www.w3.org/2001/XMLSchema-instance"
xsi:schemaLocation="http://www.springframework.org/schema/cql http://www.springframework.org/schema/cql/spring-cql-1.0.xsd
http://www.springframework.org/schema/beans http://www.springframework.org/schema/beans/spring-beans.xsd
http://www.springframework.org/schema/data/cassandra http://www.springframework.org/schema/data/cassandra/spring-cassandra.xsd
http://www.springframework.org/schema/context http://www.springframework.org/schema/context/spring-context.xsd">
<cassandra:cluster id="cassandraCluster"
contact-points="127.0.0.1" port="9042" />
   <cassandra:converter />
   <cassandra:session id="cassandraSession" cluster-ref="cassandraCluster"
      keyspace-name="tutorials_point" />
   <cassandra:template id="cqlTemplate" />
   <cassandra:repositories base-package="com.tutorialspoint.repository" />
   <cassandra:mapping entity-base-packages="com.tutorialspoint.entity" />
</beans:beans>
Replace the cluster info, bucket and repositories details.
Java Based Configuration
Create a config file, say CassandraConfig, and extend AbstractCassandraConfiguration, this will ask to implement necessary methods which will be used for passing credentials as follows −
import org.springframework.context.annotation.Bean;
import org.springframework.context.annotation.Configuration;
import org.springframework.data.cassandra.config.AbstractCassandraConfiguration;
import org.springframework.data.cassandra.config.CassandraClusterFactoryBean;
import org.springframework.data.cassandra.config.SchemaAction;
import org.springframework.data.cassandra.repository.config.EnableCassandraRepositories;
@Configuration
@EnableCassandraRepositories(basePackages = "com.tutorialspoint.repository")
public class CassandraConfig extends AbstractCassandraConfiguration {
   @Override
   protected String getKeyspaceName() {
      return "tutorials_point";
   }
   @Bean
   public CassandraClusterFactoryBean cluster() {
      CassandraClusterFactoryBean cluster = new CassandraClusterFactoryBean();
      cluster.setContactPoints("127.0.0.1");
      cluster.setPort(9042);
      cluster.setJmxReportingEnabled(false);
      return cluster;
   }
   @Override
   public SchemaAction getSchemaAction() {
      return SchemaAction.CREATE_IF_NOT_EXISTS;
   }
}
Using application.properties file
Below one is the majorly used configuration, just replace the credentials.
spring.data.cassandra.keyspace-name=tutorials_point
spring.data.cassandra.contact-points=127.0.0.1
spring.data.cassandra.port=9042
Performing CRUD Operation
Now lets perform below some CRUD operation. We will try adding some customers to the above document, and retrieve some of them by their id or name. Following is the code for the same.
import java.util.Optional;
import org.springframework.boot.CommandLineRunner;
import org.springframework.boot.SpringApplication;
import org.springframework.boot.autoconfigure.SpringBootApplication;
import org.springframework.context.annotation.Bean;
import com.tutorialspoint.entity.Customer;
import com.tutorialspoint.repository.CustomerRepository;
@SpringBootApplication
public class SpringDataCassandraApplication {
   public static void main(String[] args) {
      SpringApplication.run(SpringDataCassandraApplication.class, args);
   }
   @Bean
   CommandLineRunner commandLineRunner(CustomerRepository customerRepository) {
      return new CommandLineRunner() {
         @Override
         public void run(String... args) throws Exception {
            // Creating some entries
            Customer customer1 = customerRepository.save(new Customer(1l, "Asad"));
            System.out.println(customerRepository.save(customer1));
            Customer customer2 = customerRepository.save(new Customer(2l, "Ali"));
            System.out.println(customer2);
            Customer customer3 = customerRepository.save(new Customer(3l, "John"));
            System.out.println(customer3);
            // Fetching entry
            System.out.println(customerRepository.findById(1l));
            // Find all entry
            System.out.println(customerRepository.findAll());
            // Update entry
            Optional<Customer> customerOptional = customerRepository.findById(3l);
            if (customerOptional.isPresent()) {
               Customer customer = customerOptional.get();
               customer.setName("John Montek");
               System.out.println(customerRepository.save(customer));
            }
            // Deleting entry
            customerRepository.delete(customer2);
            // fetch all Entry
            System.out.println(customerRepository.findAll());
         }
      };
   }
}
The above code has used CommandLineRunner which will be executed on application startup. We have created four customers and saved them in the database and executed the method findById() to retrieve the customers. We also tried updating one of the records and re-retrieved to check if it has been updated. Finally we are deleting one of the records. Lets run the application as the Spring Boot App, below is the output.
Creating Entriess
Customer    [id=1,    name=Asad]
Customer    [id=2,    name=Ali]
Customer    [id=3,    name=John]
Finding one of the entry
Optional[Customer [id=1, name=Asad]]
Finding all entry
[Customer [id=1, name=Asad], Customer [id=2, name=Ali], Customer [id=3, name=John]]
Updating an entry
Customer [id=3, name=John Montek]
Deleted one of the entry and re-retrieved all entry
[Customer [id=1, name=Asad], Customer [id=3, name=John Montek]]
Annotation @AllowFiltering with Query Methods
The concept Query methods and Custom Query methods are easily accessible here because the repository associated with CassandraRepository works on top of CrudRepository. Thus by default all the methods like save(), findOne(), findById(), findAll(), count(), delete(), deleteById() etc are accesible and can be used. The columns in Cassandra cant be used for query conditions unless Cassandra allows. For such query conditions and filtering related operations, we need to use an annotation on our queries called @AllowFiltering such as −
@AllowFiltering
Customer findByName(String string);
If we dont use this annotation we will get below error −
Cannot execute this query as it might involve data filtering and thus may have unpredictable performance. If you want to execute this query despite the performance unpredictability, use ALLOW FILTERING
Partitioning and Clustering
If you are well versed with Cassandra, then you might know how partitioning and clustering takes place. Here we will focus on a basic understanding of these concepts so that it is easy for us to perform some hands−on on this concept. Partitioning and Clustering in Cassandra can be used with the help of primary keys. Below are the two aspects of primary keys in the context of Cassandra.
Partitioning Column
In Cassandra, a partition is a section or segment where the data is persisted. These partitions are useful in distinguishing the location where data is stored. Due to this it enables Cassandra to read the data faster because all the similar data is packed and stored together in these partitions. When queries these data retrieved together. The query containing equality conditions (= or! =) are queried over these partitioned columns.
Clustering Column
To achieve the uniqueness and ordering of records, Cassandra cluster the columns. The clustered columns help us to query the record using equality and conditional operators such as >=, <= etc.
Hands-on using Partition and Clustering
To illustrate the above Partitioning and Clustering concept, we will create an entity/table as a POJO, which will consist of a primary key, which will again be a reference to another POJO. Thus here one table will be created using two POJO where one will act as a primary key of another one.
Create Entity/Table
Lets create both the classes which will be our table.
import org.springframework.data.cassandra.core.mapping.Column;
import org.springframework.data.cassandra.core.mapping.PrimaryKey;
import org.springframework.data.cassandra.core.mapping.Table;
@Table("user")
public class User {
   @PrimaryKey
   private UserKey key;
   @Column("first_name")
   private String firstName;
   private String email;
   public User() {
   }
   public User(UserKey key, String firstName, String email) {
      this.key = key;
      this.firstName = firstName;
      this.email = email;
   }
   public UserKey getKey() {
      return key;
   }
   public void setKey(UserKey key) {
      this.key = key;
   }
   public String getFirstName() {
      return firstName;
   }
   public void setFirstName(String firstName) {
      this.firstName = firstName;
   }
   public String getEmail() {
      return email;
   }
   public void setEmail(String email) {
      this.email = email;
   }
   @Override
   public String toString() {
      return "User [key=" + key + ", firstName=" + firstName + ", email=" + email + "]";
   }
}
Above one is the User table which consist of a primary key called UserKey which is again an Java class and it is called as PrimaryKeyClass. Lets create this as well.
Create UserKey as `PrimaryKeyClass`
import java.io.Serializable;
import java.util.UUID;
import org.springframework.data.cassandra.core.cql.Ordering;
import org.springframework.data.cassandra.core.cql.PrimaryKeyType;
import org.springframework.data.cassandra.core.mapping.PrimaryKeyClass;
import org.springframework.data.cassandra.core.mapping.PrimaryKeyColumn;
@PrimaryKeyClass
public class UserKey implements Serializable {
   @PrimaryKeyColumn(name = "last_name", type = PrimaryKeyType.PARTITIONED)
   private String lastName;
   @PrimaryKeyColumn(name = "salary", ordinal = 0, type = PrimaryKeyType.CLUSTERED)
   private Double salary;
   @PrimaryKeyColumn(name = "user_id", ordinal = 1, ordering = Ordering.DESCENDING)
   private UUID id;
   public UserKey(String lastName, Double salary, UUID id) {
      this.lastName = lastName;
      this.salary = salary;
      this.id = id;
   }
   public String getLastName() {
      return lastName;
   }
   public void setLastName(String lastName) {
      this.lastName = lastName;
   }
   public Double getSalary() {
      return salary;
   }
   public void setSalary(Double salary) {
      this.salary = salary;
   }
   public UUID getId() {
      return id;
   }
   public void setId(UUID id) {
      this.id = id;
   }
   @Override
   public int hashCode() {
      final int prime = 31;
      int result = 1;
      result = prime * result + ((id == null) ? 0 : id.hashCode());
      result = prime * result + ((lastName == null) ? 0 : lastName.hashCode());
      result = prime * result + ((salary == null) ? 0 : salary.hashCode());
      return result;
   }
   @Override
   public boolean equals(Object obj) {
      if (this == obj)
      return true;
      if (obj == null)
      return false;
      if (getClass() != obj.getClass())
      return false;
      UserKey other = (UserKey) obj;
      if (id == null) {
         if (other.id != null)
         return false;
      } else if (!id.equals(other.id))
      return false;
      if (lastName == null) {
         if (other.lastName != null)
         return false;
      } else if (!lastName.equals(other.lastName))
      return false;
      if (salary == null) {
         if (other.salary != null)
         return false;
      } else if (!salary.equals(other.salary))
      return false;
      return true;
   }
   @Override
   public String toString() {
      return "UserKey [lastName=" + lastName + ", salary=" + salary + ", id=" + id + "]";
   }
}
In the above class we can see the annotation called @PrimaryKeyClass which states that this class will act as a Primary key. The fields of this class is annotated with annotation @PrimaryKeyColumn which simply means the column are the part of Primary Key. The attribute used with these annotations defines the partitioning, clustering and ordering of the records.
For above POJOs we need to write equivalent CQL to create table in Cassandra.
CREATE TABLE user(
   last_name TEXT,
   salary DOUBLE,
   user_id UUID,
   first_name TEXT,
   email TEXT,
   PRIMARY KEY ((last_name), salary, user_id)
) WITH CLUSTERING ORDER BY (salary ASC, user_id DESC);
Create Repository
Now, lets create repository for above table.
import java.util.List;
import org.springframework.data.cassandra.repository.CassandraRepository;
import org.springframework.data.cassandra.repository.Query;
import com.tutorialspoint.entity.User;
import com.tutorialspoint.entity.UserKey;
public interface UserRepository extends CassandraRepository<User, UserKey> {
   List<User> findByKeyLastName(final String lastName);
   List<User> findByKeyLastNameAndKeySalaryGreaterThan(final String firstName, final Double salary);
   @Query(allowFiltering = true)
   List<User> findByFirstName(final String firstName);
}
If we observe the above interface, the generic used with CassandraRepository<User, UserKey> is the table name User and the primary key UserKey. Other than this, the repository consists of some of the derived query methods.
Lets have a look on some CRUD operations using CommandLineRunner.
@Bean
CommandLineRunner commandLineRunner(UserRepository userRepository) {
   return new CommandLineRunner() {
      @Override
      public void run(String... args) throws Exception {
         // Creating entries into the database
         final UserKey key1 = new UserKey("Miller", 81000d, UUID.randomUUID());
         final User user1 = new User(key1, "John", "john@tutorialspoint.com");
         userRepository.insert(user1);
         final UserKey key2 = new UserKey("Monty", 85000d, UUID.randomUUID());
         final User user2 = new User(key2, "Carlos", "carlos@tutorialspoint.com");
         userRepository.insert(user2);
         final UserKey key3 = new UserKey("Benjamin", 95000d, UUID.randomUUID());
         final User user3 = new User(key3, "Franklin", "franklin@tutorialspoint.com");
         userRepository.insert(user3);
         // Fetching entry by last name
         userRepository.findByKeyLastName("Miller").forEach(System.out::println);
         // Find entry by last name and salary greater than
         userRepository.findByKeyLastNameAndKeySalaryGreaterThan("Monty", 81000d).forEach(System.out::println);
         // find entry by first name
         userRepository.findByFirstName("Franklin").forEach(System.out::println);
      }
   };
}
User [key=UserKey [lastName=Miller, salary=81000.0, id=c6344f55-06f2-4edf-8bdb-e55269a0c73a], firstName=John, email=john@tutorialspoint.com]
User [key=UserKey [lastName=Monty, salary=85000.0, id=e8d9100f-1fad-4c93-b735-93fe27d067a7], firstName=Carlos, email=carlos@tutorialspoint.com]
User [key=UserKey [lastName=Benjamin, salary=95000.0, id=fef72f65-ce91-482f-8ed8-e0e39330241f], firstName=Franklin, email=franklin@tutorialspoint.com]
Spring Data Cassandra - Features
Familiar and common interface to build repositories.
JavaConfig and XML based support for Keyspace and table creation.
Object−based and annotation−based mapping.
Support for Query, custom methods, and derived query methods.
Partitioning and clustering support using PrimaryKey.
Spring Data Cassandra - Conclusion
So far we learned, how Spring Data Cassandra is useful in working with Cassandra. We have created a project which connected with the Cassandra database, and performed some CRUD operation. We also learned about the PrimaryKey concept used in Cassandra and did some hands-on coding using this concept.
Spring Data Couchbase - Overview
In this tutorial, we will learn about Spring Data Couchbase. We will code and integrate the Spring Data with Couchbase. This tutorial will also focus some light on creating views and working with CouchbaseTemplate.
Spring Data Couchbase - Prerequisites
About 30 minutes
Basic Spring Data knowledge
A Basic understanding of the Couchbase Database.
A Basic understanding of the Couchbase Database.
JDK 1.8 or later
Gradle 4+ or Maven 3.2+
Couchbase installed
Spring Data Couchbase - Introduction
As we know that, the Spring Data framework is the umbrella project which contains many sub-frameworks. All these sub frameworks deal with data access which is specific to a database. Spring Data Couchbase is one of the sub-framework of the Spring Data project that provides access to the Couchbase document database. Before jumping the Spring Data Couchbase, lets have a basic understanding of Couchbase.
What is Couchbase
Couchbase is an open-source document−oriented NoSQL database. It stores the information in key−value format, more specifically like a JSON document. We use Couchbase for horizontal scaling. To learn more about Couchbase, visit the official site by clicking here.
Installation Guide
Since this tutorial will be working extensively with Couchbase. Make sure it is installed on your machine, If not you can install it from here based on your system configuration.
Steps Post Installation
Once it is installed, it will navigate us to the URL − http://localhost:8091/index.html
Create Cluster
It will ask to set up the cluster, Click to create a new one, It will look like: Now, It −
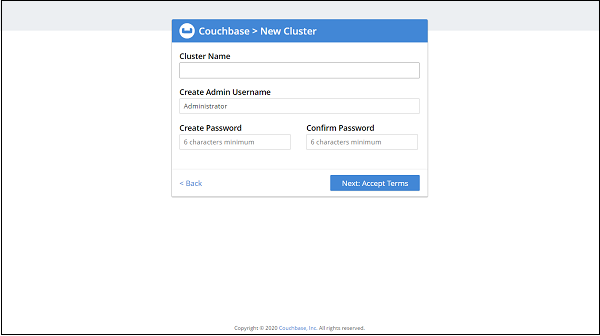
Now, It will ask to accept Terms and condition −
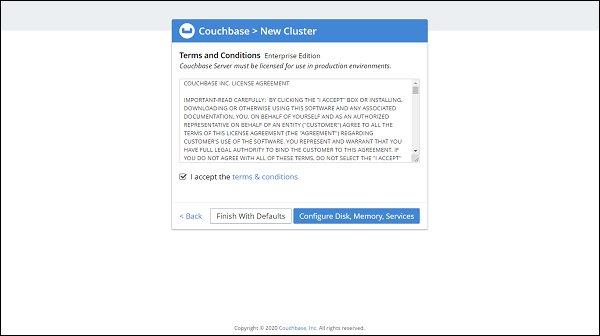
Accept it and click on Configure Disk, Memory, Services (You can also click on Finish with defaults, if don't want to configure).
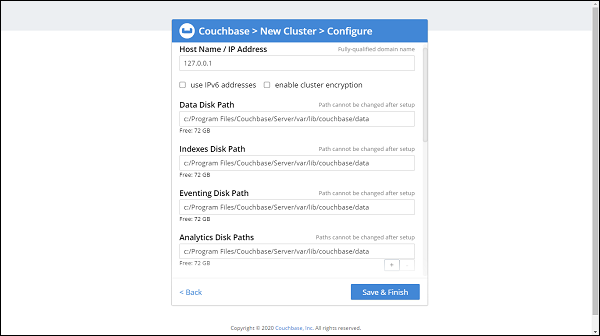
See if configurations like disk and memory need to be changed, Once done click on Save and Finish. The final screen will be −
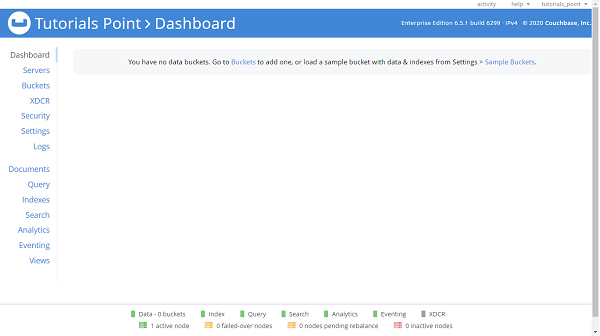
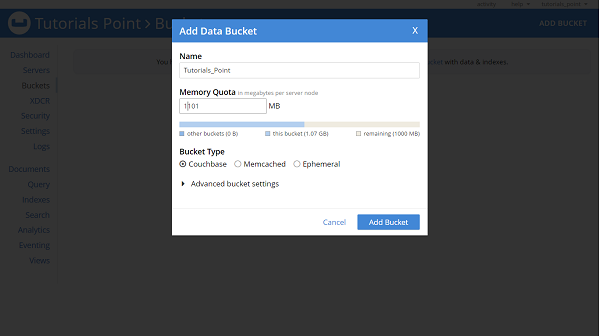
Create Bucket
Once the cluster setup is done we need to create a bucket. Click on Buckets and then click on ADD BUCKET. Enter a name for Bucket, Here we have given Tutorials_Point
What is Bucket in the Couchbase?
A Bucket in the Couchbase is similar to the Table in RDBMS, or equivalent to a Collection in the MongoDB database. The bucket keeps holds of documents.
Create Primary Index
By default custom queries will be processed using the N1QL engine, If we are using Couchbase 4.0 or later. We must need to create a primary index on the bucket, to add support for N1QL. To create primary index Click on Query and then type below command in Query Editor
CREATE PRIMARY INDEX ON Tutorials_Point USING GSI;
In the above command, Tutorials_Point is our Bucket name, GSI is a global secondary index, and GSI is majorly used for optimizing Adhoc N1QL queries.
Spring Data Couchbase - Getting Started
Like other Spring-based projects, you can start from scratch by creating a maven or Gradle based project from your favourite IDE. Follow below step by step process or you can bypass the basic setup steps that are already familiar with.
Adding Dependencies.
If you have created normal Maven or Gradle projects then add below dependencies to your pom. For Maven
<dependency>
   <groupId>org.springframework.boot</groupId>
   <artifactId>spring-boot-starter-data-couchbase</artifactId>
</dependency>
Above one is the Spring Data Couchbase dependency. If you have created your project as Spring Boot or Starting with Spring Initializr then your final list of dependencies wil look like this:
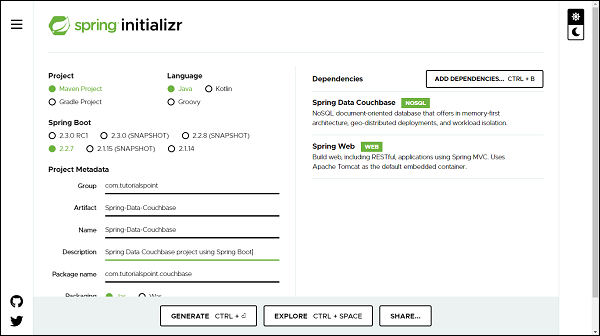
Note − The code sample and examples used in this tutorial has been created through Spring Initializr. The following is your final pom.xml file that is created when you choose Maven −
<?xml version="1.0" encoding="UTF-8"?>
<project xmlns="http://maven.apache.org/POM/4.0.0" xmlns:xsi="http://www.w3.org/2001/XMLSchema-instance"
xsi:schemaLocation="http://maven.apache.org/POM/4.0.0 https://maven.apache.org/xsd/maven-4.0.0.xsd">
   <modelVersion>4.0.0</modelVersion>
   <parent>
      <groupId>org.springframework.boot</groupId>
      <artifactId>spring-boot-starter-parent</artifactId>
      <version>2.2.7.RELEASE</version>
      <relativePath/> <!-- lookup parent from repository -->
   </parent>
   <groupId>com.tutorialspoint</groupId>
   <artifactId>Spring-Data-Couchbase</artifactId>
   <version>0.0.1-SNAPSHOT</version>
   <name>Spring-Data-Couchbase</name>
   <description>Spring Data Couchbase project using Spring Boot</description>
   <properties>
      <java.version>1.8</java.version>
   </properties>
   <dependencies>
      <dependency>
         <groupId>org.springframework.boot</groupId>
         <artifactId>spring-boot-starter-data-couchbase</artifactId>
      </dependency>
      <dependency>
         <groupId>org.springframework.boot</groupId>
         <artifactId>spring-boot-starter-test</artifactId>
         <scope>test</scope>
         <exclusions>
            <exclusion>
               <groupId>org.junit.vintage</groupId>
               <artifactId>junit-vintage-engine</artifactId>
            </exclusion>
         </exclusions>
      </dependency>
   </dependencies>
   <build>
      <plugins>
         <plugin>
            <groupId>org.springframework.boot</groupId>
            <artifactId>spring-boot-maven-plugin</artifactId>
         </plugin>
      </plugins>
   </build>
</project>
Creating Document
A Document is equivalent to a model/entity, it is an actual domain object and it will be created as a POJO. Lets define our first document −
import javax.validation.constraints.NotNull;
import org.springframework.data.couchbase.core.mapping.Document;
import com.couchbase.client.java.repository.annotation.Field;
import com.couchbase.client.java.repository.annotation.Id;
@Document(expiry = 0)
public class Customer {
   @Id
   private Long id;
   @NotNull
   private String name;
   private String email;
   @Field("income")
   private Double salary;
   public Customer() {
   }
   public Customer(Long id, String name, String email, Double salary) {
      this.id=id;
      this.name = name;
      this.email = email;
      this.salary = salary;
   }
   public Long getId() {
      return id;
   }
   public void setId(Long id) {
      this.id = id;
   }
   public String getName() {
      return name;
   }
   public void setName(String name) {
      this.name = name;
   }
   public String getEmail() {
      return email;
   }
   public void setEmail(String email) {
      this.email = email;
   }
   public Double getSalary() {
      return salary;
   }
   public void setSalary(Double salary) {
      this.salary = salary;
   }
   @Override
   public String toString() {
      return "Customer [id=" + id + ", name=" + name + ", email=" + email + ", salary=" + salary + "]";
   }
}
@Document: Unlike JPA where we used to mark our domain object with annotation @Entity, here we mark it with @Document from package org.springframework.data.couchbase.core.mapping, which represents it is a Couchbase document. It has an attribute called expiry, which is TTL of the document. @Id: This is for identity purposes and it is from the native Couchbase SDK package com.couchbase.client.java.repository.annotation. We can also use @Id from Spring Data.
If we use both @Id annotation (from Spring Data and native Couchbase SDK) on two different fields of the same class, the annotation from Spring Data will take precedence and that field will be used as the document key.
@Field("income"): @Field annotation is from native Couchbase SDK, it is used to mark the field. We can consider this as a @Column annotation from JPA. If we want to give some other name to our column then we can pass it to this annotation.
Creating a Repository
Lets define an interface which will be our repository: Lets define an interface which will be our repository −
import java.util.List;
import org.springframework.data.couchbase.repository.CouchbaseRepository;
import org.springframework.stereotype.Repository;
import com.tutorialspoint.couchbase.document.Customer;
@Repository
public interface CustomerRepository extends CouchbaseRepository<Customer, Long> {
   List<Customer> findByEmail(String string);
}
The process of creating a repository is similar to the repository creation in any Spring data−based project, the only difference here is that it extends CouchbaseRepository from org.springframework.data.couchbase.repository, which works on top of CrudRepository.
Configuring DataSource
We can configure Couchbase using application.properties file, using XML and using Java based configuration. We can choose either one among them. Lets discuss one by one.
XML Based Configurations
Below one is the equivalent XML configuration.
<?xml version="1.0" encoding="UTF-8"?>
<beans:beans xmlns:beans="http://www.springframework.org/schema/beans"
xmlns:xsi="http://www.w3.org/2001/XMLSchema-instance"
xmlns="http://www.springframework.org/schema/data/couchbase
xsi:schemaLocation="http://www.springframework.org/schema/beans
http://www.springframework.org/schema/beans/spring-beans.xsd
http://www.springframework.org/schema/data/couchbase
http://www.springframework.org/schema/data/couchbase/spring-couchbase.xsd">
   <couchbase:cluster>
      <couchbase:node>localhost</couchbase:node>
   </couchbase:cluster>
   <couchbase:clusterInfo login="tutorials_point" password="qwerty" />
   <couchbase:bucket bucketName="Tutorials_Point" bucketPassword="123456"/>
   <couchbase:repositories base-package="com.tutorialspoint.couchbase.repository"/>
</beans:beans>
Replace the cluster info, bucket and repositories details.
Java Based Configuration
Create a config file, say CouchbaseConfig, and extend AbstractCouchbaseConfiguration, this will ask to implement necessary methods which will be used for passing credentials as follows −
import java.util.Arrays;
import java.util.List;
import org.springframework.context.annotation.Configuration;
import org.springframework.data.couchbase.config.AbstractCouchbaseConfiguration;
import org.springframework.data.couchbase.repository.config.EnableCouchbaseRepositories;
@Configuration
@EnableCouchbaseRepositories(basePackages = { "com.tutorialspoint.couchbase.repository" })
public class CouchbaseConfig extends AbstractCouchbaseConfiguration {
   @Override
   protected List<String> getBootstrapHosts() {
      return Arrays.asList("127.0.0.1");
   }
   @Override
   protected String getBucketName() {
      return "Tutorials_Point";
   }
   @Override
   protected String getBucketPassword() {
      return "";
   }
}
Using application.properties file
Below one is the majorly used configuration, just replace the credentials.
spring.couchbase.bootstrap-hosts=127.0.0.1
spring.couchbase.bucket.name=Tutorials_Point
spring.couchbase.bucket.password=123456
spring.data.couchbase.auto-index=true
Performing CRUD Operation
Now lets perform below some CRUD operation. We will try adding some customers to the above document, and retrieve some of them by their id or name. Following is the code for the same.
import org.springframework.boot.CommandLineRunner;
import org.springframework.boot.SpringApplication;
import org.springframework.boot.autoconfigure.SpringBootApplication;
import org.springframework.context.annotation.Bean;
import com.tutorialspoint.couchbase.document.Customer;
import com.tutorialspoint.couchbase.repository.CustomerRepository;
@SpringBootApplication
public class SpringDataCouchbaseApplication {
   public static void main(String[] args) {
      SpringApplication.run(SpringDataCouchbaseApplication.class, args);
   }
   @Bean
   CommandLineRunner commandLineRunner(CustomerRepository customerRepository) {
      return new CommandLineRunner() {
         @Override
         public void run(String... args) throws Exception {
            // Persisting some documents
            customerRepository.save(new Customer(101l, "Duke", "duke@yahoo.com", 11000d));
            customerRepository.save(new Customer(102l, "Monty", "monty@yahoo.com", 22000d));
            customerRepository.save(new Customer(103l, "Carlos", "carlos@yahoo.com", 33000d));
            customerRepository.save(new Customer(104l, "Benjamin", "benjamin@yahoo.com", 44000d));
            // Fetching documents
            System.out.println(customerRepository.findById(101l));
            System.out.println(customerRepository.findByEmail("carlos@yahoo.com"));
            // Update record
            Customer customer = customerRepository.findById(101l).get();
            customer.setSalary(55000d);
            customer.setName("Duke Daniel");
            customerRepository.save(customer);
            System.out.println(customerRepository.findById(101l));
            // Delete Record
            customerRepository.deleteById(103l);
            System.out.println(customerRepository.findById(103l));
         }
      };
   }
}
The above code has used CommandLineRunner which will be executed on application startup. We have created four customers and saved them in the database and executed the method findById() and findByEmail to retrieve the customers. We also tried updating one of the record and re− retrieve to check if it has been updated. Finally we are deleting one of the record. Lets run the application as the Spring Boot App, below is the output.
Optional [Customer [id=101, name=Duke, email=duke@yahoo.com, salary=11000.0]]
[Customer [id=103, name=Carlos, email=carlos@yahoo.com, salary=33000.0]]
Optional [Customer [id=101, name=Duke Daniel, email=duke@yahoo.com, salary=55000.0]]
Optional.empty
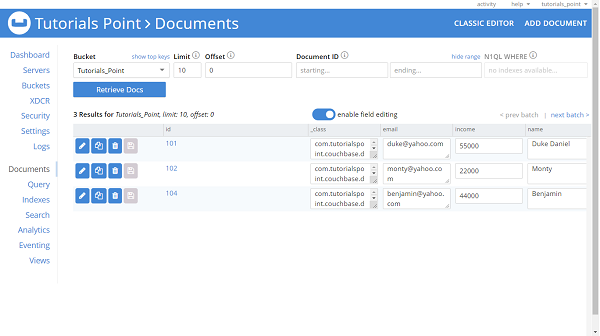
If we navigate to the Couchbase server dashboard, we can see that customer with id 103 is missing and rest three customer are available. Have a look at the image below.
Spring Data Couchbase - Views
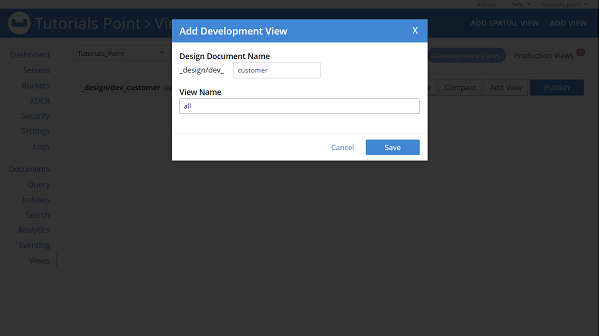
We need to create a Couchbase design document and Views in our bucket. Our document class name will be a design document name but in lowerCamelCase format( Here its customer). To support the findAll repository method we need to create a view named all. To create design documents and views, Go to the Couchbase server dashboard, and click on Views, followed by ADD VIEW.
Enter the details as mentioned in the below image.
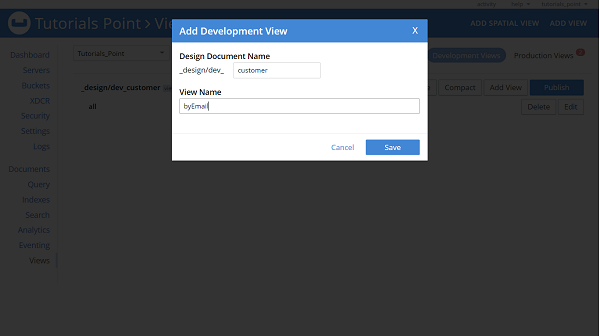
If we want to create a view for any custom method such as findBySalary or findByEmail then it needs to be created in the same way, as follows.
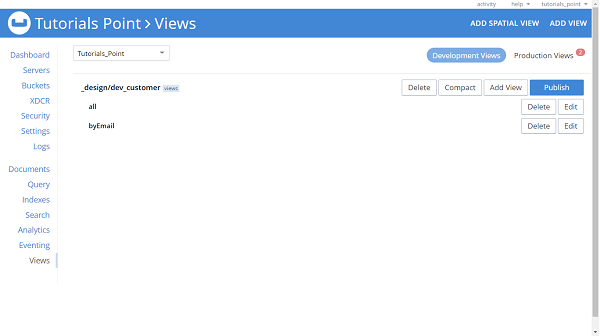
Similarly, we can create views for all other custom methods of our repository. Finally, it will look like this −
If we want, we can create or modify the views using Map functions, to do this click on edit, and enter map function. Lets say we want to create views for findByName, then our equivalent map function will be −
function (doc, meta) {
   if(doc._class == "com.tutorialspoint.couchbase.document.Customer"
   && doc.name) {
      emit(doc.name, null);
   }
}
For field salary and method findBySalary it will be −
function (doc, meta) {
   if(doc._class == "com.tutorialspoint.couchbase.document.Customer"
   && doc.salary) {
      emit(doc.salary, null);
   }
}
Views based custom methods inside repository must be annotated with the annotation @View as given below −
@View
List<Customer> findByName(String name);
Creation of view are optional if we are using Couchbase server 4.0 or later, otherwise it is mandatory.
Spring Data Couchbase - CouchbaseTemplate
To work with CouchbaseTemplate, we must create Views as mentioned in the previous section.The CouchbaseTemplate is from native Couchbase SDK from package org.springframework.data.couchbase.core. It also provides us a way to perform CRUD operation what we did earlier with the help of a repository.
Hands-on using CouchbaseTemplate
Lets have a look on some CRUD operations using CommandLineRunner.
import org.springframework.beans.factory.annotation.Autowired;
import org.springframework.boot.CommandLineRunner;
import org.springframework.boot.SpringApplication;
import org.springframework.boot.autoconfigure.SpringBootApplication;
import org.springframework.context.annotation.Bean;
import org.springframework.data.couchbase.core.CouchbaseTemplate;
import com.couchbase.client.java.view.ViewQuery;
import com.tutorialspoint.couchbase.document.Customer;
import com.tutorialspoint.couchbase.repository.CustomerRepository;
@SpringBootApplication
public class SpringDataCouchbaseApplication {
   private static final String DESIGN_DOC = "customer";
   @Autowired
   private CouchbaseTemplate template;
   public static void main(String[] args) {
      SpringApplication.run(SpringDataCouchbaseApplication.class, args);
   }
   @Bean
   CommandLineRunner commandLineRunner(CustomerRepository customerRepository) {
      return new CommandLineRunner() {
         @Override
         public void run(String... args) throws Exception {
            // Creating some documents
            template.insert(new Customer(105l, "John", "john@yahoo.com", 12000d));
            template.insert(new Customer(106l, "Franklin", "franklin@yahoo.com", 32000d));
            template.insert(new Customer(103l, "Simon", "simon@yahoo.com", 34000d));
            template.insert(new Customer(107l, "Cark", "clark@yahoo.com", 54000d));
            // Fetching documents
            System.out.println(template.findByView(ViewQuery.from(DESIGN_DOC, "all"), Customer.class));
            System.out.println(template.findByView(ViewQuery.from(DESIGN_DOC, "byEmail"), Customer.class));
            // Update document
            Customer customer = template.findById("103", Customer.class);
            customer.setSalary(55000d);
            customer.setName("Simon Ford");
            template.save(customer);
            // Deleting Document
            Customer customer7 = template.findById("107", Customer.class);
            template.remove(customer7);
         }
      };
   }
}
[Customer [id=103, name=Simon Ford, email=simon@yahoo.com, salary=55000.0],
Customer [id=101, name=Duke Daniel, email=duke@yahoo.com, salary=55000.0], Customer [id=102, name=Monty, email=monty@yahoo.com, salary=22000.0], Customer [id=104, name=Benjamin, email=benjamin@yahoo.com, salary=44000.0], Customer [id=105, name=John, email=john@yahoo.com, salary=12000.0], Customer [id=106, name=Franklin, email=franklin@yahoo.com, salary=32000.0]]
[Customer [id=104, name=Benjamin, email=benjamin@yahoo.com, salary=44000.0], Customer [id=101, name=Duke Daniel, email=duke@yahoo.com, salary=55000.0], Customer [id=106, name=Franklin, email=franklin@yahoo.com, salary=32000.0], Customer [id=105, name=John, email=john@yahoo.com, salary=12000.0], Customer [id=102, name=Monty, email=monty@yahoo.com, salary=22000.0], Customer [id=103, name=Simon Ford, email=simon@yahoo.com, salary=55000.0]]
Spring Data Couchbase - Features
Support for configuring DataSource using XML, Java, and properties file.
CouchbaseTemplate helper to perform Couchbase operations.
Object−based and annotation−based mapping.
Support for Query methods and Derived methods.
Spring Data Couchbase - Conclusion
So far we learned, how Spring Data Couchbase is useful in working with Couchbase. We have created a project which connected with the Couchbase server, and performed some CRUD operation. We also learned about CouchbaseTemplate and did some hands-on coding using this concept.
Spring Data Elasticsearch - Overview
In this tutorial we learn about Spring Data Elasticsearch. We will go through the basics of Elasticsearch and integrate it with Spring Data Project. We will code and practice the core and advance concepts used in Spring Data Elasticsearch.
Spring Data Elasticsearch - Prerequisites
About 15 minutes
Basic Spring Data framework knowledge
Basic understanding of Elasticsearch
A java based IDE (Eclipse, STS or IntelliJ IDEA)
JDK 1.8 or later
Gradle 4+ or Maven 3.2+
Spring Data Elasticsearch - Introduction
Spring Data Elasticsearch, is a part of the Spring Data project. It provides integration with the Elasticsearch engine. It uses POJO centric model to interact with Elasticsearch documents. Before jumping in the depth of the tutorial, lets have a basic understanding of Elasticsearch.
What is Elasticsearch
Elasticsearch is a search engine, based on Apache Lucene library. It is an open−source distributed full−text search engine. It is accessible using the HTTP web interface and uses schema−free JSON documents. It is developed in Java and license under the Apache license. To learn more about ElasticSearch, read our Elasticsearch tutorial by clicking here.
Installation Guide
This tutorial assumes that Elastic search is installed on the machine and its running. If not, you can download it from here. Once it is downloaded navigate to the config folder and change the cluster name and path data. However it is optional. Finally start/run the elastic search server. You can also follow our installation guide by clicking here.
Spring Data Elasticsearch - Getting Started
We can create a Spring project in our favourite IDE. You can create a Spring or Spring Boot based project through IDE. The code sample and examples used in this tutorial has been created through Spring Initializr. If you have created normal Maven or Gradle projects then add below dependencies (i.e. Spring Web and Spring Data Elasticsearch (Access+Driver) to your pom or Gradle file.
For Maven
<dependency>
   <groupId>org.springframework.boot</groupId>
   <artifactId>spring-boot-starter-web</artifactId>
</dependency>
<dependency>
   <groupId>org.springframework.boot</groupId>
   <artifactId>spring-boot-starter-data-elasticsearch</artifactId>
</dependency>
Above are two Spring Web and Spring Data Elasticsearch dependences. If you have created your project as Spring Boot or Starting with Spring Initializr then your final list of dependencies will look like this −
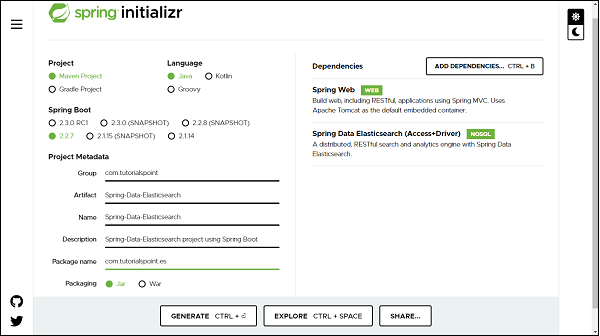
The following is our final pom.xml file that is created when you choose Maven −
<?xml version="1.0" encoding="UTF-8"?>
<project xmlns="http://maven.apache.org/POM/4.0.0" xmlns:xsi="http://www.w3.org/2001/XMLSchema-instance"
xsi:schemaLocation="http://maven.apache.org/POM/4.0.0 https://maven.apache.org/xsd/maven-4.0.0.xsd">
   <modelVersion>4.0.0</modelVersion>
   <parent>
      <groupId>org.springframework.boot</groupId>
      <artifactId>spring-boot-starter-parent</artifactId>
      <version>2.2.7.RELEASE</version>
      <relativePath/> <!-- lookup parent from repository -->
   </parent>
   <groupId>com.tutorialspoint</groupId>
   <artifactId>Spring-Data-Elasticsearch</artifactId>
   <version>0.0.1-SNAPSHOT</version>
   <name>Spring-Data-Elasticsearch</name>
   <description>Spring Data Elasticsearchproject using Spring Boot</description>
   <properties>
      <java.version>1.8</java.version>
   </properties>
   <dependencies>
   <dependency>
      <groupId>org.springframework.boot</groupId>
      <artifactId>spring-boot-starter-data-elasticsearch</artifactId>
   </dependency>
   <dependency>
      <groupId>org.springframework.boot</groupId>
      <artifactId>spring-boot-starter-web</artifactId>
   </dependency>
   <dependency>
      <groupId>org.springframework.boot</groupId>
      <artifactId>spring-boot-starter-test</artifactId>
      <scope>test</scope>
      <exclusions>
         <exclusion>
            <groupId>org.junit.vintage</groupId>
            <artifactId>junit-vintage-engine</artifactId>
         </exclusion>
      </exclusions>
   </dependency>
   </dependencies>
   <build>
      <plugins>
         <plugin>
            <groupId>org.springframework.boot</groupId>
            <artifactId>spring-boot-maven-plugin</artifactId>
         </plugin>
      </plugins>
   </build>
</project>
Creating a Customer Entity
An entity in Elasticsearch context is called Document. Lets create it using annotation @Document from org.springframework.data.elasticsearch.annotations.
import java.util.List;
import org.springframework.data.annotation.Id;
import org.springframework.data.elasticsearch.annotations.Document;
import org.springframework.data.elasticsearch.annotations.Field;
import org.springframework.data.elasticsearch.annotations.FieldType;
@Document(indexName = "tutorials_point", type = "customer", shards = 3)
public class Customer {
   @Id
   private Long id;
   private String name;
   private String email;
   private Double salary;
   @Field(type = FieldType.Nested, includeInParent = true)
   private List<Address> addresses;
   public Long getId() {
      return id;
   }
   public void setId(Long id) {
      this.id = id;
   }
   public String getName() {
      return name;
   }
   public void setName(String name) {
      this.name = name;
   }
   public String getEmail() {
      return email;
   }
   public void setEmail(String email) {
      this.email = email;
   }
   public Double getSalary() {
      return salary;
   }
   public void setSalary(Double salary) {
      this.salary = salary;
   }
   public List<Address> getAddresses() {
      return addresses;
   }
   public void setAddresses(List<Address> addresses) {
      this.addresses = addresses;
   }
   @Override
   public String toString() {
      return "Customer [id=" + id + ", name=" + name + ", email=" + email + ", salary=" + salary + ", addresses="
      + addresses + "]";
   }
}
We can observe that the annotation Document contains some other properties such as an index, type and shard. It simply means that the instance of Customer class will be stored in the Elasticsearch under an index called tutorials_point, and document type will be customer with sharding value 3. Coming to the field of Customer class, it has @Id from org.springframework.data.annotation and a new annotation called @Field from org.springframework.data.elasticsearch.annotations. It has two attributes defined first one is type and other one is includeInParent. Which means, at the time of indexing in elastic search, the object of the associated class Address will be embedded in Customer.
Creating a Customer Repository
Repository creation is similar to other Spring Data projects, the only difference here is that, we need to extend ElasticsearchRepository which works on top of ElasticsearchCrudRepository which in turn works on top of PagingAndSortingRepository.
import org.springframework.data.elasticsearch.repository.ElasticsearchRepository;
import org.springframework.stereotype.Repository;
import com.tutorialspoint.es.document.Customer;
@Repository
public interface CustomerRepository extends ElasticsearchRepository<Customer, Long> {
}
Accessing Data Using ElasticSearch from Customer Repository
Lets define a controller to perform some read and write operation to the Elastic search through REST APIs.
import java.util.Optional;
import org.springframework.beans.factory.annotation.Autowired;
import org.springframework.web.bind.annotation.DeleteMapping;
import org.springframework.web.bind.annotation.GetMapping;
import org.springframework.web.bind.annotation.PathVariable;
import org.springframework.web.bind.annotation.PostMapping;
import org.springframework.web.bind.annotation.RequestBody;
import org.springframework.web.bind.annotation.RequestMapping;
import org.springframework.web.bind.annotation.RestController;
import com.tutorialspoint.es.document.Customer;
import com.tutorialspoint.es.service.CustomerService;
@RestController
@RequestMapping("/rest")
public class CustomerController {
   @Autowired
   private CustomerService customerService;
   // Persisting a customer to ElasticSearch
   @PostMapping("/customer/save")
   public Customer persistCustomer(@RequestBody Customer customer) {
      return customerService.save(customer);
   }
   // Retrieving a customer from ElasticSearch
   @GetMapping("/customer/find-by-id/{id}")
   public Customer fetchCustomer(@PathVariable Long id) {
      Optional<Customer> customerOpt = customerService.findById(id);
      return customerOpt.isPresent() ? customerOpt.get() : null;
   }
   // Deleting a customer from elasticsearch
   @DeleteMapping("/customer/delete/{id}")
   public void deleteObject(@PathVariable Long id) {
      customerService.deleteById(id);
   }
}
Lets Define a Service for this.
import java.util.Optional;
import org.springframework.beans.factory.annotation.Autowired;
import org.springframework.stereotype.Service;
import com.tutorialspoint.es.document.Customer;
import com.tutorialspoint.es.repository.CustomerRepository;
import com.tutorialspoint.es.service.CustomerService;
@Service
public class CustomerServiceImpl implements CustomerService {
   @Autowired
   private CustomerRepository customerRepository;
   @Override
   public Customer save(Customer customer) {
      return customer = customerRepository.save(customer);
   }
   @Override
   public Optional<Customer> findById(Long id) {
      return customerRepository.findById(id);
   }
   @Override
   public void deleteById(Long id) {
      customerRepository.deleteById(id);
   }
}
Persisting an Object
Since our code is ready, we can launch our application, make sure Elasticsearch server is configured, installed and running on machine. Lets try pushing some customer details into the elastic search through rest end points http://localhost:8080/rest/customer/save. It will be a POST call with below body −
{
   "id": 1,
   "name": "Jack",
   "email": "jack@yahoo.com",
   "salary": 18100.0,
   "addresses": [
      {
         "city": "Mumbai",
         "country": "India",
         "zipCode": 111111
      }
   ]
}
Congratulation, it has been pushed and we received 200[OK] as response. Lets add one more −
{
   "id": 2,
   "name": "Ma",
   "email": "ma@yahoo.com",
   "salary": 38100.0,
   "addresses": [
      {
         "city": "Chennai",
         "country": "India",
         "zipCode": 111111
      }
   ]
}
and it has been pushed.
Retrieving an Object
Lets fetch one of the above customer and check, Our API end point will be http://localhost:8080/rest/customer/find-by-id/1, Here wwe are fetching by ID and the customer with id 1. RESPONSE −
{
   "id": 1,
   "name": "Jack",
   "email": "jack@yahoo.com",
   "salary": 18100.0,
   "addresses": [
      {
         "city": "Mumbai",
         "country": "India",
         "zipCode": 111111
      }
   ]
}
Deleting an Object
Lets delete a customer with id 2, our end point will be http://localhost:8080/rest/customer/delete/2. It will be a DELETE call. RESPONSE: 200 [OK]. If we try fetching it out through GET, we wont be getting any data.
Spring Data Elasticsearch - Querying
Since Spring Data ElasticSearch repository works on top of PagingAndSortingRepository. It allows both type of query, i.e., Standard query methods as well as customer query methods. Lets work with both one by one.
Query Methods
Query methods are also called as method name based queries. It allows us to look for the data based on the fields methods name. Lets suppose we want to find the Customer from Elasticsearch based on his name. To do so we can add below Query method to our repository.
Page<Customer> findByName(String name, Pageable pageable);
Custom QueryMethods
There may be a situation where we couldnt fetch the data from Elasticsearch based on the Query methods, In that case we can use custom queries. Lets say we want to fetch the customer details based on his City name, where city is the part of Address and Address is nested in Customer class as list. No worry it too simple. In this case we will use @Query annotation from org.springframework.data.elasticsearch.annotations over our custom query.
@Query("{\"bool\": {\"must\": [{\"match\": {\"addresses.city\": \"?0\"}}]}}")
Page<Customer> findByAddressCityUsingCustomQuery(String name, Pageable pageable);
Above query returns the customer having city equivalent to passed city in the parameter.
Hands on Coding for Query/Custom Query Methods
Lets add above two methods in our repository. Now our repository will look like −
import org.springframework.data.domain.Page;
import org.springframework.data.domain.Pageable;
import org.springframework.data.elasticsearch.annotations.Query;
import org.springframework.data.elasticsearch.repository.ElasticsearchRepository;
import org.springframework.stereotype.Repository;
import com.tutorialspoint.es.document.Customer;
@Repository
public interface CustomerRepository extends ElasticsearchRepository<Customer, Long> {
   Page<Customer> findByName(String name, Pageable pageable);
   @Query("{\"bool\": {\"must\": [{\"match\": {\"addresses.city\": \"?0\"}}]}}")
   Page<Customer> findByAddressCityUsingCustomQuery(String name, Pageable pageable);
}
Lets write create some end point to fetch out these two operations. Add below two end points in the controller.
// Retrieving a customer from ElasticSearch by Name
@GetMapping("/customer/find-by-name/{name}")
public List<Customer> fetchCustomerByNAme(@PathVariable String name) {
   Page<Customer> customerOpt = customerService.findByName(name);
   return customerOpt.get().collect(Collectors.toList());
}
// Retrieving a customer from ElasticSearch by City name
@GetMapping("/customer/find-by-address-city/{city}")
public List<Customer> fetchCustomerByCity(@PathVariable String city) {
   Page<Customer> customerOpt = customerService.findByAddressCity(city);
   return customerOpt.get().collect(Collectors.toList());
}
Lets add below two methods to our services,
@Override
public Page<Customer> findByName(String name) {
   return customerRepository.findByName(name, PageRequest.of(0, 2));
}
@Override
public Page<Customer> findByAddressCity(String city) {
   return customerRepository.findByAddressCityUsingCustomQuery(city, PageRequest.of(0, 2));
}
Lets perform below two GET operation for fetching customer based on his name and based on city name.
GET API − http://localhost:8080/rest/customer/find-by-name/Jack
RESPONSE −
[
   {
      "id": 1,
      "name": "Jack",
      "email": "jack@yahoo.com",
      "salary": 18100.0,
      "addresses": [
         {
            "city": "Mumbai",
            "country": "India",
            "zipCode": 111111
         }
      ]
   }
]
GET API − http://localhost:8080/rest/customer/find-by-address-city/Mumbai
RESPONSE −
[
   {
      "id": 1,
      "name": "Jack",
      "email": "jack@yahoo.com",
      "salary": 18100.0,
      "addresses": [
         {
            "city": "Mumbai",
            "country": "India",
            "zipCode": 111111
         }
      ]
   }
]
We will learn more about fetching complex data from elastic search in next section
Configuring ElasticsearchOperations bean
So far, we were performing operations on CustomerRepository to fetch, update or delete the data. Spring Data Elasticsearch provides an interface called ElasticsearchOperations through which we can perform some more complex operation in a simple way. ElasticsearchTemplate is an implementation of ElasticsearchOperations, Lets configure this ElasticsearchTemplate bean, so that we can effectively use it. Create a class with name ElasticsearchConfig (probably we can give any name) and annotate it with @Configuartion. Use below code sample −
import java.net.InetAddress;
import java.net.UnknownHostException;
import org.elasticsearch.client.Client;
import org.elasticsearch.client.transport.TransportClient;
import org.elasticsearch.common.settings.Settings;
import org.elasticsearch.common.transport.TransportAddress;
import org.elasticsearch.transport.client.PreBuiltTransportClient;
import org.springframework.beans.factory.annotation.Value;
import org.springframework.context.annotation.Bean;
import org.springframework.context.annotation.ComponentScan;
import org.springframework.context.annotation.Configuration;
import org.springframework.data.elasticsearch.core.ElasticsearchOperations;
import org.springframework.data.elasticsearch.core.ElasticsearchTemplate;
import org.springframework.data.elasticsearch.repository.config.EnableElasticsearchRepositories;
@Configuration
@EnableElasticsearchRepositories(basePackages = "com.tutorialspoint.es.repository")
@ComponentScan(basePackages = { "com.tutorialspoint.es.service.impl" })
public class ElasticsearchConfig {
   @Value("${elasticsearch.home:D:\\PersonalData\\elasticsearch-7.6.2-windows-x86_64\\elasticsearch-7.6.2}")
   private String elasticsearchHome;
   @Value("${elasticsearch.cluster.name:tutorials_Point}")
   private String clusterName;
   @Bean
   public Client client() throws UnknownHostException {
      TransportClient client = null;
      try {
         final Settings elasticsearchSettings = Settings.builder().put("client.transport.sniff", true)
         .put("path.home", elasticsearchHome).put("cluster.name", clusterName).build();
         client = new PreBuiltTransportClient(elasticsearchSettings);
         client.addTransportAddress(new TransportAddress(InetAddress.getByName("127.0.0.1"), 9300));
      } catch (UnknownHostException e) {
         e.printStackTrace();
      }
      return client;
   }
   @Bean
   public ElasticsearchOperations elasticsearchTemplate() throws UnknownHostException {
      return new ElasticsearchTemplate(client());
   }
}
All the annotations used above are Spring enable standard annotation. @EnableElasticsearchRepositories, is used to scan the repository package. In the above configuration we are using Transport Client. This transport client requires below settings −
client.transport.sniff, to be marked as true, to enable sniffing feature.
path.home is a path to the installation directory of Elastic search.
cluster.name is used to provide cluster name, in case we are not using default cluster name i.e., elasticsearch. Finally, to get TransportClient, we are passing the bind address and port. In the second bean, we are passing this transport client and getting ElasticsearchTemplate of ElasticsearchOperations to work with Elastic search server. How this will help in interacting with the server, lets understand in the next section.
Working with QueryDSL
A Query DSL could be considered as an AST (Abstract Syntax Tree), Query DSL is used to define a query. To do so we will be using a Query Builder called NativeSearchQueryBuilder. Lets define a class called QueryDSLBuilder, and autowire the ElasticsearchTemplate.
import org.springframework.beans.factory.annotation.Autowired;
import org.springframework.data.elasticsearch.core.ElasticsearchTemplate;
import org.springframework.stereotype.Service;
@Service
public class QueryDSLBuilder {
   @Autowired
   private ElasticsearchTemplate elasticsearchTemplate;
}
Multi-Match search
Lets say we want to search a keyword/text in name or email, if the given keyword matches in either name or email, it will return those customer list. Lets have a look on Code −
//Find all customer whose name or email is as per given text
public List<Customer> fetchCustomerWithMultiTextMatch(String text) {
   QueryBuilder queryBuilder = QueryBuilders.boolQuery()
   .must(QueryBuilders.multiMatchQuery(text, "name", "email"));
   SearchQuery searchQuery = new NativeSearchQueryBuilder().withQuery(queryBuilder).build();
   return elasticsearchTemplate.queryForList(searchQuery, Customer.class);
}
The above operation can be considered as OR operation between two or more fields.
Multi-Field search
Lets say we want to search two keyword in the field name and email . If the keyword is available in both of the field, then it will return the result with Customer list. Lets have a look on code −
// Find all the customer whose name and salary is matched
public List<Customer> fetchCustomerByMultiFieldMatch(String text, Double salary) {
   QueryBuilder queryBuilder = QueryBuilders.boolQuery().must(QueryBuilders.matchQuery("name", text))
   .must(QueryBuilders.matchQuery("salary", salary));
   SearchQuery searchQuery = new NativeSearchQueryBuilder().withQuery(queryBuilder).build();
   return elasticsearchTemplate.queryForList(searchQuery, Customer.class);
}
The above operation can be considered as AND operation between two or more fields.
Searching a part of word/data (Wildcard/Partial)
Lets say we want to search a partial text and want to check any String matching with this text in the field name should return that customer details. Lets have a look on the code −
// Fetch all the customer whose name matches with fully or partially with given text
public List<Customer> fetchCustomerByPartilaMatch(String text) {
   SearchQuery searchQuery = new NativeSearchQueryBuilder()
   .withFilter(QueryBuilders.regexpQuery("name", ".*" + text + ".*")).build();
   return elasticsearchTemplate.queryForList(searchQuery, Customer.class);
}
We can consider above operation as LIKE in RDBMS or contains() method in Java.
Updating an Object
Lets say we want to update a customer name from X to Y. This can be done by fetching the customer details by name and then updating his name. Have a look on the code.
// Update a customer whose name is ? to ?
@Transactional
public void updateHavingName(String from, String to) {
   // First find the customer whose name is ?
   QueryBuilder queryBuilder = QueryBuilders.boolQuery().must(QueryBuilders.matchQuery("name", from));
   SearchQuery searchQuery = new NativeSearchQueryBuilder().withQuery(queryBuilder).build();
   List<Customer> customers = elasticsearchTemplate.queryForList(searchQuery, Customer.class);
   // Iterate through each customer whose name is ?
   for (Customer customer : customers) {
      // Update Customer name
      customer.setName(to);
      customerRepository.save(customer);
   }
}
In the above code first we are finding the customer and then updating the name.
Deleting an Object
Lets say we want to delete a customer whose name is X, This operation also similar to above one, and requires finding the customer and then deleting it. Lets have a look on code.
// Delete a customer whose name is ?
public void deleteByName(String name) {
   QueryBuilder queryBuilder = QueryBuilders.boolQuery().must(QueryBuilders.matchQuery("name", name));
   SearchQuery searchQuery = new NativeSearchQueryBuilder().withQuery(queryBuilder).build();
   List<Customer> customers = elasticsearchTemplate.queryForList(searchQuery, Customer.class);
   for (Customer customer : customers) {
      customerRepository.delete(customer);
   }
}
In the above code, first we are finding the customer with name X and then deleting it. We can call the above code from our controller class by adding respective end points. Here is the final controller code.
import java.util.List;
import java.util.Optional;
import java.util.stream.Collectors;
import org.springframework.beans.factory.annotation.Autowired;
import org.springframework.data.domain.Page;
import org.springframework.web.bind.annotation.DeleteMapping;
import org.springframework.web.bind.annotation.GetMapping;
import org.springframework.web.bind.annotation.PathVariable;
import org.springframework.web.bind.annotation.PostMapping;
import org.springframework.web.bind.annotation.RequestBody;
import org.springframework.web.bind.annotation.RequestMapping;
import org.springframework.web.bind.annotation.RestController;
import com.tutorialspoint.es.document.Customer;
import com.tutorialspoint.es.service.CustomerService;
import com.tutorialspoint.es.service.impl.QueryDSLBuilder;
@RestController
@RequestMapping("/rest")
public class CustomerController {
   @Autowired
   private CustomerService customerService;
   @Autowired
   private QueryDSLBuilder queryDSLBuilder;
   // Persisting a customer to ElasticSearch
   @PostMapping("/customer/save")
   public Customer persistCustomer(@RequestBody Customer customer) {
      return customerService.save(customer);
   }
   // Retrieving a customer from ElasticSearch
   @GetMapping("/customer/find-by-id/{id}")
   public Customer fetchCustomer(@PathVariable Long id) {
      Optional<Customer> customerOpt = customerService.findById(id);
      return customerOpt.isPresent() ? customerOpt.get() : null;
   }
   // Deleting a customer from elasticsearch
   @DeleteMapping("/customer/delete/{id}")
   public void deleteObject(@PathVariable Long id) {
      customerService.deleteById(id);
   }
   // Retrieving a customer from ElasticSearch by Name
   @GetMapping("/customer/find-by-name/{name}")
   public List<Customer> fetchCustomerByNAme(@PathVariable String name) {
      Page<Customer> customerOpt = customerService.findByName(name);
      return customerOpt.get().collect(Collectors.toList());
   }
   // Retrieving a customer from ElasticSearch by City name
   @GetMapping("/customer/find-by-address-city/{city}")
   public List<Customer> fetchCustomerByCity(@PathVariable String city) {
      Page<Customer> customerOpt = customerService.findByAddressCity(city);
      return customerOpt.get().collect(Collectors.toList());
   }
   // Retrieving a customer from ElasticSearch whose name or email matches with given keywords
   @GetMapping("/customer/multi-match/{text}")
   public List<Customer> fetchCustomerWithTextMatch(@PathVariable String text) {
      return queryDSLBuilder.fetchCustomerWithMultiTextMatch(text);
   }
   // Retrieving a customer from ElasticSearch whose name and salary are as per given search keywords
   @GetMapping("/customer/multi-field/{name}/{salary}")
   public List<Customer> fetchCustomerByFieldMatch(@PathVariable String name, @PathVariable Double salary) {
      return queryDSLBuilder.fetchCustomerByMultiFieldMatch(name, salary);
   }
   /*
   * Retrieving a customer from ElasticSearch whose name matches fully or
   * partially with given text
   */
   @GetMapping("/customer/partial-match/{text}")
   public List<Customer> fetchCustomerByPartilaMatch(@PathVariable String text) {
      return queryDSLBuilder.fetchCustomerByPartilaMatch(text);
   }
   // Updating a customer name from X to Y
   @PostMapping("/customer/update/{from}/{to}")
   public void updateCustomerHavingTextInName(@PathVariable String from, @PathVariable String to) {
      queryDSLBuilder.updateHavingName(from, to);
   }
   // Deleting a customer from elasticsearch by name
   @DeleteMapping("/customer/delete/by-name/{name}")
   public void deleteCustometHavingName(@PathVariable String name) {
      queryDSLBuilder.deleteByName(name);
   }
}
Spring Data Elasticsearch - Features
Java nd XML based configuration support.
ElasticsearchTemplate an implementation of ElasticsearchOperations interface helps us to perform Elasticsearch related operations.
Query and Custom Query method support.
Mapping support between documents and POJO.
Spring Data Elasticsearch - Conclusion
So far we learned, what Spring Data Elasticsearch is? And how it works? We understood the concepts and performed hands−on coding as well.
Spring Data JDBC - Introduction
Spring Data JDBC is one of the parts of the Spring Data family. The design objective of this open−source framework is to provide lightweight, fast, generic and easy to use data access object implementation for relational databases. The Spring Data JDBC module works with JDBC based data access layers and makes it easy to implement JDBC based repositories.
Need of Spring Data JDBC
Before discussing the topic in detail lets first understand Why do we need this persistence framework, that too when more than 50% of developers use persistence APIs like JPA, to be more precise Hibernate and other JPA implementation. Literally speaking Hibernate and others are great frameworks, they are powerful, have a lot of features like Lazy loading, first and second level cache, dirty checking, etc. But the problem with some of them is that, they increase the complexity of the code on the project side which often gets really confusing. Now the question is how can we reduce this complexity and what are the available alternatives? There are of course many other frameworks available in the market but all come with some or more issues and they leave a lot of work for us if we want to deal with objects, like we have to do mapping by ourselves. Thus here Spring Data JDBC comes into the picture. Spring Data JDBC is simple and easy because there is no session, no caching, and no dirty checking no such concept. When we save an entity use save() method it will execute insert or update, If you do not call explicitly save() method, it does not(There is neither dirty tracking nor session). One important thing to note here is that Spring Data JDBC doesnt support schema generation unlike Hibernate.
Spring Data JDBC - Features
Customizable NamingStrategy to achieve CRUD operations for simple aggregates.
Config based repository configuration through annotation @EnableJdbcRepositories.
Supports @Query annotations for writing custom queries.
Supports most of the databases like MySQL, PostgreSQL, H2, HSQLDB, Derby and many more.
Supports transactions.
It publishes application events for operations done on entities, some of them are BeforeSaveEvent, AfterSaveEvent, BeforeDeletEvent, AfterDeleteEvent, and AfterLoadEvent (when an aggregate get instantiated from the database).
It supports Auditing through annotation @EnableJdbcAuditing.
If you want to update or delete records through queries, you can use the annotation @Modifying
It can be integrated with MyBatis.
It forces us to think in aggregates (A design principle of DDD).
Spring Data JDBC - Domain Driven Design
What is Domain Driven Design (DDD)
Domain−Driven Design is a book by Eric Evans. The Spring Data JDBC repository concept has been taken from DDD. To be more specific it has been inspired by the rules of aggregate design, another concept from the same book. The rules of aggregate design says that
All the different entities (which have strong coupling) should be grouped together which in turn called aggregates, and the top entity of the aggregate is called the aggregate root. Each aggregate has exactly one aggregate root which could be one of the entities of the aggregate.
In short we should have a repository that should follow the rules of aggregate design of DDD i.e. a repository per aggregate root. We will try to understand this concept in detail in the relationship section of this tutorial.
Spring Data JDBC - Prerequisites
What You Need (Prerequisites)
About 30 minutes
Basic Spring framework knowledge
A java based IDE (Eclipse, STS or IntelliJ IDEA)
JDK 1.8 or later
Gradle 4+ or Maven 3.2+
Spring Data JDBC - Getting started
Like other Spring-based projects, you can start from scratch by creating a maven or Gradle based project from your favourite IDE. Follow below step by step process or you can bypass the basic setup steps that are already familiar with.
Adding Dependencies.
If you have created normal Maven or Gradle projects then add below dependencies to your pom.
For Maven
<dependency>
   <groupId>org.springframework.data</groupId>
   <artifactId>spring-data-jdbc</artifactId>
   <version>1.1.6.RELEASE</version>
</dependency>
For Gradle
compile group: 'org.springframework.data', name: 'spring-data-jdbc', version:
'1.1.6.RELEASE'
If you have created your project as Spring Boot or Starting with Spring Initializr then do not forget to add Spring Data Jdbc dependency.
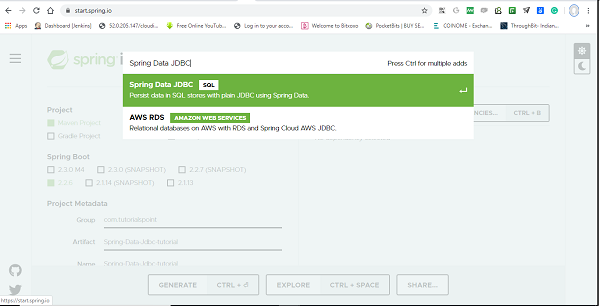
Post selection of Spring Data Jdbc dependency, it will look like this.
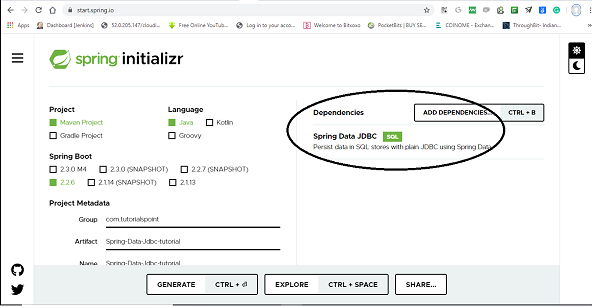
The following is your pom.xml file that is created when you choose Maven −
<?xml version="1.0" encoding="UTF-8"?>
<project xmlns="http://maven.apache.org/POM/4.0.0" xmlns:xsi="http://www.w3.or
g/2001/XMLSchema-instance"
xsi:schemaLocation="http://maven.apache.org/POM/4.0.0 https://maven.apache
.org/xsd/maven-4.0.0.xsd">
   <modelVersion>4.0.0</modelVersion>
   <parent>
      <groupId>org.springframework.boot</groupId>
      <artifactId>spring-boot-starter-parent</artifactId>
      <version>2.2.6.RELEASE</version>
      <relativePath/> <!-- lookup parent from repository -->
   </parent>
   <groupId>com.tutorialspoint</groupId>
   <artifactId>Spring-Data-Jdbc-tutorials</artifactId>
   <version>0.0.1-SNAPSHOT</version>
   <name>Spring-Data-Jdbc-tutorials</name>
   <description>Demo project for Spring Data JDBC</description>
   <properties>
      <java.version>1.8</java.version>
   </properties>
   <dependencies>
      <dependency>
         <groupId>org.springframework.boot</groupId>
         <artifactId>spring-boot-starter-data-jdbc</artifactId>
      </dependency>
      <dependency>
         <groupId>org.springframework.boot</groupId>
         <artifactId>spring-boot-starter-test</artifactId>
         <scope>test</scope>
         <exclusions>
            <exclusion>
               <groupId>org.junit.vintage</groupId>
               <artifactId>junit-vintage-engine</artifactId>
            </exclusion>
         </exclusions>
      </dependency>
      <dependency>
         <groupId>org.hsqldb</groupId>
         <artifactId>hsqldb</artifactId>
         <scope>runtime</scope>
      </dependency>
   </dependencies>
   <build>
      <plugins>
         <plugin>
            <groupId>org.springframework.boot</groupId>
            <artifactId>spring-boot-maven-plugin</artifactId>
         </plugin>
      </plugins>
   </build>
</project>
You can add database dependency as per of your choice, Here in this tutorial we will work with hsqldb. Once dependencies are added, we can add couple of classes and interfaces which will act as our entities and repositories. Note- All the code covered in this tutorial has been generated through Spring Boot.
Creating Entities
Spring Data JDBC is very flexible when it comes to visibility, its recommended that entities are immutable i.e., all the fields are marked as final, but it is not mandatory. Spring Data JDBC used the default naming strategy that returns camel case into snake case. Although you can change it. also if you want to choose a different table names you can use @Table annotation and it works similarly for column with @Column annotation.
import org.springframework.data.annotation.Id;
import org.springframework.data.relational.core.mapping.Column;
public class Users {
   @Id
   private Long id;
   @Column("full_name") //optional, use if you want column name of your choic
   e
   private String fullName;
   @Column("date_of_birth") //Use only if you want column name of your choic
   e
   private LocalDate dob;
   public Users(Long id, String fullName, LocalDate dob) {
      this.id = id;
      this.fullName = fullName;
      this.dob = dob;
   }
   public static Users create(String name, LocalDate dateOfBirth) {
      return new Users(null, name, dateOfBirth);
   }
   @Override
   public String toString() {
      return "Users [id=" + id + ", fullName=" + fullName + ", dob=" + dob +
      "]";
   }
}
It is recommended that entity has single all argument constructor for the framework itself, and other constructors are modeled as a static factory method.
Key Note −
In Spring Data JDBC, the entity has only one special requirement and that is @Id annotation and that comes from org.springframework.data, if you have imported anything that comes from javax.persistence then probably you are doing something wrong. All other annotations like @Column, @Table etc are optional, you can use as per your requirements. Getter/Setter is also optional and depends on your use case.
Creating Repositories
Most of us know how the repository works, For those who dont Repositories could be created as an interface. We can extend our repository with either of the predefined interfaces i.e., Repository or CrudRepository from Spring Data. CrudRepository gives us most commonly used CRUD methods like save(), delete(), findById(), findAll() and few others. We can also add our custom methods, but we have to write a SQL query for them. To do so this framework comes with standard support for @Query annotation, where we can just write our query and another important note is that at this stage it only supports named parameters, so we cant reference parameters with its index number.
import java.util.List;
import org.springframework.data.jdbc.repository.query.Query;
import org.springframework.data.repository.CrudRepository;
import org.springframework.data.repository.query.Param;
import com.tutorialspoint.entities.Users;
public interface UsersRepositories extends CrudRepository<Users, Long> {
   @Query("select * from Users where full_name=:fullName")
   List<Users> findByName(@Param("fullName") String name);
}
Key Note −
Since Spring Data JDBC doesnt support derived queries, we need to use @Query annotation for our custom query, as follows
@Query(select * from Users where full_name=:fullName)
Perform CRUD Operation
Lets perform some CRUD operation and check if it is working. But wait a second, as we discussed earlier Spring Data JDBC doesnt support schema generation, so we need to do it manually. In real-world project we can use one of the database migration frameworks like Flyway, Liquibase etc.But here for the sake of simplicity we will use Spring Boot feature to bootstrap schema from the schema.sql file. So lets create the database schema for users table. Create a schema.sql file under the resource folder and add below SQL statement to that.
create table users(
   id integer identity primary key,
   full_name varchar(50),
   date_of_birth date
);
Lets turn on SQL logging to see what exactly queries are being executed. This can be done by adding a logging statement logging.level.sql=debug under application.properties file. Now lets perform below some CRUD operation. We will try to add some users to the table users and retrieve one of them by their name. Following is the code for the same.
import org.springframework.boot.ApplicationRunner;
import org.springframework.boot.SpringApplication;
import org.springframework.boot.autoconfigure.SpringBootApplication;
import org.springframework.context.annotation.Bean;
import com.tutorialspoint.entities.Users;
import com.tutorialspoint.repositories.UsersRepositories;
@SpringBootApplication
public class SpringDataJdbcTutorialsApplication {
   public static void main(String[] args) {
      SpringApplication.run(SpringDataJdbcTutorialsApplication.class, args);
   }
   @Bean
   ApplicationRunner applicationRunner(UsersRepositories usersRepositories) {
      return args -> {
         Users users1 = Users.create("Asad", LocalDate.of(1991, 03, 01));
         Users users2 = Users.create("Ali", LocalDate.of(1992, 03, 13));
         Users users3 = Users.create("Asad Ali", LocalDate.of(1991, 11, 17)
         );
         System.out.println(usersRepositories.save(users1));//persist user1
         System.out.println(usersRepositories.save(users2));//persist user2
         System.out.println(usersRepositories.save(users3));//persist user3
         System.out.println(usersRepositories.findByName("Asad"));//fech us
         er Asad
      };
   }
}
Your final project structure will look something like this.
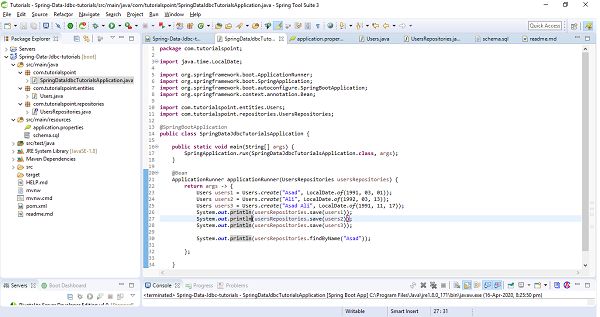
The above sample test code has used ApplicationRunner which will be executed on application startup. We have created three users and saved them in the database and executed the method findByName() to see if it is actually finding the correct one. Lets run the application as the Spring Boot App, and check the output. Notice below Statements in the output screenshot.
[INSERT INTO users (full_name, date_of_birth) VALUES (?, ?)]
Users [id=0, fullName=Asad, dob=1991-03-01]

[INSERT INTO users (full_name, date_of_birth) VALUES (?, ?)]
Users [id=1, fullName=Ali, dob=1992-03-13]

[INSERT INTO users (full_name, date_of_birth) VALUES (?, ?)]
Users [id=2, fullName=Asad Ali, dob=1991-11-17]

[select * from Users where full_name=?]
[Users [id=0, fullName=Asad, dob=1991-03-01]]

Relationships
Spring Data JDBC supports one to one and one to many relations, but there is no support for many to one and many to many but provides a different way to achieve it, of course through aggregate root principle of DDD. Lets discuss and try to implement each of them.
One to One
Suppose, above discussed entity Users has an address, Here we will treat Address as part Users entity (meaning Address will only be accessible for the Users). This means Users have fields pointing to Address, but there wont be any reference for the Users in the Address class. Now the Address entity will look something like this.
public class Address {
   private String addressLine;
   public Address(String addressLine) {
      this.addressLine = addressLine;
   }
   @Override
   public String toString() {
      return "Address [address_line=" + addressLine + "]";
   }
}
Lets apply some changes at Users side, and then Users entity will look like
import org.springframework.data.annotation.Id;
import org.springframework.data.relational.core.mapping.Column;
public class Users {
   @Id
   private Long id;
   @Column("full_name")
   private String fullName;
   @Column("date_of_birth")
   private LocalDate dob;
   private Address address;
   public Users(Long id, String fullName, LocalDate dob, Address address) {
      this.id = id;
      this.fullName = fullName;
      this.dob = dob;
      this.address = address;
   }
   public static Users create(String name, LocalDate dateOfBirth, Address add
   ress) {
      return new Users(null, name, dateOfBirth, address);
   }
   @Override
   public String toString() {
      return "Users [id=" + id + ", fullName=" + fullName + ", dob=" + dob +
      ", address=" + address + "]";
   }
}
We do not require to add any annotation like @OnetoOne in Spring Data JDBC. Spring Data JDBC automatically detects and knows that it is going to be one to one relationship. Lets create address schema, and add it to schema.sql file. There is no need to modify the Users table and in the address table just need to add one extra column that will be a foreign key to the Users table. By default the name of the column has to match the reference entity table name, so in this case it will be users. Below is the address schema.
create table address(
   users integer primary key references users(id),
   address_line varchar(250)
);
Now lets try to add some addresses to the above test sample, below are the changes, add it to your code and run it. I hope it works fine.
@Bean
ApplicationRunner applicationRunner(UsersRepositories usersRepositories) {
return args -> {
   Users users1 = Users.create("Asad", LocalDate.of(1991, 03, 01), ne
   w Address("Texas City"));
   Users users2 = Users.create("Ali", LocalDate.of(1992, 03, 13), new
   Address("Washington DC"));
   Users users3 = Users.create("Asad Ali", LocalDate.of(1991, 11, 17)
   , new Address("NY"));
   System.out.println(usersRepositories.save(users1));
   System.out.println(usersRepositories.save(users2));
   System.out.println(usersRepositories.save(users3));
   System.out.println(usersRepositories.findAll());
};
and the console output for print methods will be as follows.
Users [id=0, fullName=Asad, dob=1991-03-01, address=Address [address_line=Texas City]]
Users [id=1, fullName=Ali, dob=1992-03-13, address=Address [address_line=Washington DC]]
Users [id=2, fullName=Asad Ali, dob=1991-11-17, address=Address [address_line=NY]]
[Users [id=0, fullName=Asad, dob=1991-03-01, address=Address [address_line=Texas City]], Users
[id=1, fullName=Ali, dob=1992-03-13, address=Address [address_line=Washington DC]], Users
[id=2, fullName=Asad Ali, dob=1991-11-17, address=Address [address_line=NY]]]
We might have observed that, we have not created any separate repository for Address, and we always access Address through the Users. So if we want to delete an address for a user, we dont call delete() anywhere on Address entity/repository. Instead we set the address to null on the users side. Lets try how it works. Add a setter method for address in Users entity.
public void setAddress(Address address) {
   this.address = address;
}
and call this setter to set null value for the address to which you want to delete. Have a look on the below statements.
@Bean
ApplicationRunner applicationRunner(UsersRepositories usersRepositories) {
   return args -> {
      Users users = Users.create("Ali", LocalDate.of(1992, 03, 13), new
      Address("Washington DC"));
      System.out.println(usersRepositories.save(users));
      users.setAddress(null); // Delete addre
      ss by setting it to null
      System.out.println(usersRepositories.save(users));
   };
}
and output would be
Users [id=1, fullName=Ali, dob=1992-03-13, address=Address [address_line=Washington DC]]
Users [id=1, fullName=Ali, dob=1992-03-13, address=null]
One to Many
Spring Data JDBC is flexible with One to Many relationships and we can use either Set, List or Map to map the relationship between parent and child entity. I think the most common and easiest way would be to use the Set. So lets modify our use case a little bit. This time we will say a user is having more than one address. Now our Users class will look like
import org.springframework.data.annotation.Id;
import org.springframework.data.relational.core.mapping.Column;
public class Users {
   @Id
   private Long id;
   @Column("full_name")
   private String fullName;
   @Column("date_of_birth")
   private LocalDate dob;
   private Set<Address> address; //multiple address in the form of set
   public Users(Long id, String fullName, LocalDate dob, Set<Address> address
   ) {
      this.id = id;
      this.fullName = fullName;
      this.dob = dob;
      this.address = address;
   }
   public static Users create(String name, LocalDate dateOfBirth, Set<Address
   > address) {
      return new Users(null, name, dateOfBirth, address);
   }
   public void addAddress(Address address) {
      this.address.add(address);
   }
   @Override
   public String toString() {
      return "Users [id=" + id + ", fullName=" + fullName + ", dob=" + dob +
      ", address=" + address + "]";
   }
}
and as per the above changes, change a bit in our sample code as follows.
@Bean
ApplicationRunner applicationRunner(UsersRepositories usersRepositories) {
   return args -> {
      Set<Address> addressSet = new HashSet<Address>();
      addressSet.add(new Address("Texas City"));
      addressSet.add(new Address("Washington DC"));
      Users users = Users.create("Asad", LocalDate.of(1991, 03, 01), add
      ressSet);
      System.out.println(usersRepositories.save(users));
   };
}
Now, lets change database schema of address otherwise it will raise an error of duplicate primary key. We need to use here an id which will be the primary key from the reference. But there is no need to modify the Address class. Now our Address schema will be as follows.
create table address(
id serial primary key ,
users integer references users(id),
address_line varchar(250)
);
Executing the above sample code will give an output something like this.
Users [id=0, fullName=Asad, dob=1991-03-01, address=[Address [address_line=Tex
as City], Address [address_line=Washington DC]]]
Now we can say that both the addresses have been saved. Now lets suppose we want to modify the User name or dob. Lets try updating name and check what is happening. To do so add a setter method in Users class.
public void setName(String name) {
   this.fullName = name;
}
Now try updating name from sample code as follows.
@Bean
ApplicationRunner applicationRunner(UsersRepositories usersRepositories) {
   return args -> {
      Set<Address> addressSet = new HashSet<Address>();
      addressSet.add(new Address("Texas City"));
      addressSet.add(new Address("Washington DC"));
      Users users = Users.create("Asad", LocalDate.of(1991, 03, 01), add
      ressSet);
      System.out.println(usersRepositories.save(users));
      users.setName("Asad Ali"); //Update fullNam
      e
      System.out.println(usersRepositories.save(users));
   };
}
When we look at the console output and the debug query, it is deleting all the addresses before updating the user, and inserting again all the addresses against that user.
Executing prepared SQL statement [DELETE FROM address WHERE address.users = ?]
The reason is Spring Data JDBC unlike Hibernate doesnt use any type of proxies. So it doesnt track the changes and it doesnt have the way to know if the addresses have been removed or not. So instead it deletes all the children, and ask them again to re−insert if it is there. But this is something can potentially hit our performance because it may execute for huge collections with a lot of insert statements.
Many to Many
Lets try to have a look at the definition first, when we have two entities and one entity references many entities of another type and entity from the second type references many entities of the first type then this is called as many to many relationships between these two entities. In relational databases we model it as two different entities as two tables (Suppose book and author) and the relation between these two is kept in the so-called conjunction table (book_author). This table has an id of the first table and an id of the second table. As we discussed earlier Spring Data JDBC doesnt support this kind of relationship in the way other JPA frameworks provide and the reason is that there is a circular dependency between these two classes, also there is no clear ownership. So Spring Data JDBC comes with a different approach. Instead of referencing entities directly, you reference entities using ids, and this found the principle of Domain−Driven Design that says that if you two aggregates referencing them directly, you should refer them by ids. Lets try to implement this with an example and coding exercise. Consider we have two tables Authors and Books, Lets try to implement many to many relationship between them. Authors can have multiple Books and of course Books can be written by multiple authors. These two entities will look something like this.
import java.time.LocalDate;
import org.springframework.data.annotation.Id;
public class Authors {
   @Id
   private Long id;
   private String name;
   private LocalDate dob;
   public Long getId() {
      return id;
   }
   public String getName() {
      return name;
   }
   public void setName(String name) {
      this.name = name;
   }
   public LocalDate getDob() {
   return dob;
   }
   public void setDob(LocalDate dob) {
      this.dob = dob;
   }
   public void setId(Long id) {
      this.id = id;
   }
   @Override
   public String toString() {
      return "Authors [id=" + id + ", name=" + name + ", dob=" + dob + "]";
   }
}
and
import java.util.HashSet;
import java.util.Set;
import org.springframework.data.annotation.Id;
public class Books {
   @Id
   private Long id;
   private String isbn;
   private String title;
   private Set<AuthorsReference> authors = new HashSet<AuthorsReference>();
   public void addAuthor(Authors authors) {
      this.authors.add(new AuthorsReference(authors.getId()));
   }
   public Long getId() {
      return id;
   }
   public void setId(Long id) {
      this.id = id;
   }
   public String getIsbn() {
      return isbn;
   }
   public void setIsbn(String isbn) {
      this.isbn = isbn;
   }
   public String getTitle() {
      return title;
   }
   public void setTitle(String title) {
      this.title = title;
   }
   public Set<AuthorsReference> getAuthors() {
      return authors;
   }
   public void setAuthors(Set<AuthorsReference> authors) {
      this.authors = authors;
   }
   @Override
   public String toString() {
      return "Books [id=" + id + ", isbn=" + isbn + ", title=" + title + ",
      authors=" + authors + "]";
   }
}
There is a field of collection type Set in Book table i.e., AuthorReference, It will represent the conjunction table. Create a class with the same name, and just to make naming clear put the @Table annotation and say this is the relation between book and author (book_author). This class will have only one field which is author (id) of type long. Your final class will be as follows.
import org.springframework.data.relational.core.mapping.Table;
@Table("book_author")
public class AuthorsReference {
   private Long author;
   public AuthorsReference(Long author) {
      this.author = author;
   }
}
Now create repositories for Books and Authors, We are not required to create repository of AuthorsReference. Your repositories will be as follows.
import org.springframework.data.repository.CrudRepository;
import com.tutorialspoint.entities.Authors;
public interface AuthorsRepository extends CrudRepository<Authors, Long> {
}
and
import org.springframework.data.repository.CrudRepository;
import com.tutorialspoint.entities.Books;
public interface BooksRepository extends CrudRepository<Books, Long> {
}
Now, lets add SQL schemas for all the above three tables, i.e Books, Authors and AuthorsReference.
create table books(
   id integer identity primary key,
   title varchar(250),
   isbn varchar(250)
);
create table authors(
   id integer identity primary key,
   name varchar(50),
   dob date
);
create table book_author(
   author integer,
   books integer,
   primary key(books, author)
);
Now lets perform some CRUD operations and check if all good. Below is our test code, place it in ApplicationRunner section.
@Bean
ApplicationRunner applicationRunner(UsersRepositories usersRepositories) {
   return args -> {
      Authors authors = new Authors();
      authors.setName("Asad Ali");
      System.out.println(authorsRepository.save(authors));
      Books books = new Books();
      books.setTitle("An Introduction to Spring Data JDBC");
      books.setIsbn("5261327");
      books.addAuthor(authors);
      System.out.println(booksRepository.save(books));
   };
}
and the output of the print statements is as follows.
Authors [id=0, name=Asad Ali, dob=null]
Books [id=0, isbn=5261327, title=An Introduction to Spring Data JDBC, authors=[AuthorsReference
[author=0]]]
Key Observations w.r.t Aggregate root principle of DDD
Things to be noted from the above discussed relationship is that, do we have created repositories for each and every entity? The answer is No, we dont create a repository for entity, instead we created repository for aggregates. In the above examples entity Users was aggregate for entity Address, because these addresses alone dont really exist and they dont have meaning, so we created a repository for Users but not for Address. Similarly in the case of Books and AuthorsReference, we have created a repository for aggregate root Books but not for AuthorsReference. The keynote to remember here is that repositories always work on aggregates and we request to load or save whole aggregates.
Spring Data JDBC - Conclusion
The concept of repository, aggregate, and aggregate root has been taken from the Domain− Driven Design (DDD), and all the Spring data modules are inspired by these concepts. Spring Data JDBC forces us to think of the persistence stuff w.r.t aggregate root principle of DDD. Since Spring Data JDBC doesnt support one to Many and Many to Many relationships other than ids, and it always forces us to think about aggregates, which is one of the major strengths of Spring Data JDBC.
Spring Data JPA Background
When we develop a Java-based enterprise application, we isolate the code across the classes and interfaces in the form of layers. These layers are Data access layers, Service Layers, Presentation layers, and sometimes integration layers. The data access layers are responsible for connecting to the database and execute all the SQL statements that our application needs against the database. It pushes and fetches data to and from the databases and hands over the data to service layers where all the business logic gets executed. Finally Presentation layers use the service layers and present the result to the end-user. Sometimes integration layers allows to integrate with our application or sometimes our application gets connected with other application to consume services provided by that application and this happen through the integration layer. Since Spring Data JPA works with the Data access layer, so our detailed discussion will revolve around this layer.
What is ORM
ORM stands for object−relational mapping. It is a process of mapping a Java class with a database table and fields of classes gets mapped with the columns of the tables. Once mapping is done then synchronization takes place from objects to database rows. ORM deals with these objects instead of writing SQL and invoke methods like save(), update(), delete() on the object. Invoking these methods generates SQL statements automatically and using JDBC internally ORM tool does the insertion, updation and deletion of the record to/from database.
What is JPA
JPA is a standard from Oracle that stands for Java persistence API, to perform object−relational mapping in Java−based enterprise application. Like any other standard from Oracle JPA also comes with some specifications and some APIs. Specification is nothing but a set of rules written in plain English. Specification is for JPA vendors and the providers whereas API is for developers or programmers. Some of the popular JPA providers are HIbernate, OpenJPA, Eclipse Link etc which implements the JPA API by following the specifications. Hibernate is the most popular JPA provider used in most of the Java-based enterprise applications. A JPA API is a set of classes such as EntityManagerFactory, EntityManager, etc. The annotations like @Entity, @Table, @Id, and @Column is the most widely used annotation from JPA.
For more details on JPA read our complete tutorials by clicking here
The problem
While working on Data access layers lets say for User module typically we create UserDao which is an interface and then we will create a class UserDaoImpl which will implement that interface, and this will, in turn, use the EntityManager and EntityManagerFactory from JPA API, or it may use the hibernate template from the Spring. These classes, in turn, depend on the Datasource which usually gets configured as the implementation of Datasource i.e.,DriverManagerDataSource from Spring which knows how to connect to the data source and this whole process gets repeated almost for every module or entity that we develop in our application. Apart from these, there were some more challenges(configuration relate, performing pagination and auditing related) that a developer have to deal manually with every application. This overall process was sometimes error-prone and time−consuming.
The Solution
This is the place where Spring data JPA comes in and says Dont perform these stuff and avoid these boilerplate coding and configuration instead this will be performed internally by myself(Spring Data JPA). what a developer need s to do is to come up with Data access layers and define domain objects or JPA entities such as User and all the fields associated with it and then define an interface that will be your repository including custom finder methods and then Spring will provide the implementation automatically.
Spring Data JPA - Introduction
Spring Data JPA is another great framework from the Spring Data family. It has been designed on top of JPA, which makes it easy to implements JPA based repositories. The objective of Spring Data JPA is to improve the implementation of data access layers. The developers at Spring usually make necessary improvements over the time to make things easier for us by removing a lot of boilerplate code as discussed above. Spring Data is such a framework that removes a lot of configuration and coding hassle when we deal with data access layers for our application.
Spring Data JPA Prerequisites
About 30 minutes
Basic Spring framework knowledge
A java based IDE (Eclipse, STS or IntelliJ IDEA)
JDK 1.8 or later
Gradle 4+ or Maven 3.2+
Spring Data JPA - Getting started
Like other Spring−based projects, you can start from scratch by creating a maven or Gradle based project from your favorite IDE. Follow below step by step process or you can bypass the basic setup steps that are already familiar with.
Adding Dependencies
If you have created normal Maven or Gradle projects then add below dependencies to your pom.
For Maven
<!-- https://mvnrepository.com/artifact/org.springframework.data/spring-data-jpa -->
<dependency>
   <groupId>org.springframework.data</groupId>
   <artifactId>spring-data-jpa</artifactId>
   <version>2.2.6.RELEASE</version>
</dependency>
For Gradle
// https://mvnrepository.com/artifact/org.springframework.data/spring-data-jpa
compile group: 'org.springframework.data', name: 'spring-data-jpa', version: '2.2.6.RELEASE'
If you have created your project as Spring Boot or Starting with Spring Initializr then do not forget to add Spring Data JPA dependency.
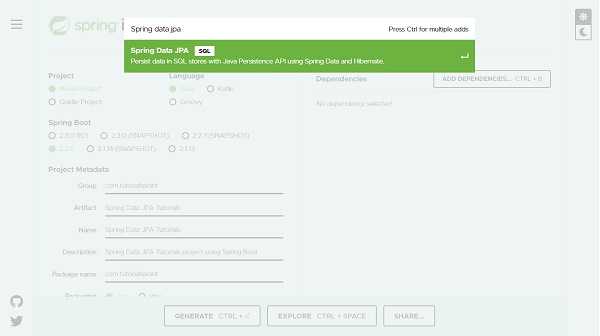
Post selection of Spring Data JPA dependency it will look like this.
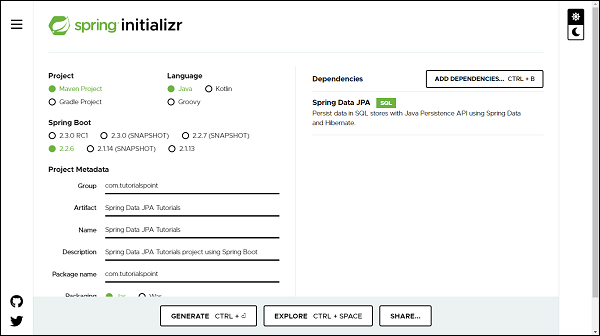
Note− This tutorial assumes that MySQL is installed on your machine and a database is created. If you dont know how to install MySQL and create a database learn our ∽ MySQL tutorials by clicking here.
You can add database dependency as per of your choice, For illustration purpose this tutorial has used hsqldb and MySQL database. You can find the respective dependency in below pom. The following is your final pom.xml file that is created when you choose Maven −
<?xml version="1.0" encoding="UTF-8"?>
<project xmlns="http://maven.apache.org/POM/4.0.0" xmlns:xsi="http://www.w3.org/2001/XMLSchema-instance"
xsi:schemaLocation="http://maven.apache.org/POM/4.0.0 https://maven.apache.org/xsd/maven-4.0.0.xsd">
   <modelVersion>4.0.0</modelVersion>
   <parent>
      <groupId>org.springframework.boot</groupId>
      <artifactId>spring-boot-starter-parent</artifactId>
      <version>2.2.6.RELEASE</version>
      <relativePath/> <!-- lookup parent from repository -->
   </parent>
   <groupId>com.tutorialspoint</groupId>
   <artifactId>Spring-Data-JPA-Tutorials</artifactId>
   <version>0.0.1-SNAPSHOT</version>
   <name>Spring-Data-JPA-Tutorials</name>
   <description>Spring Data JPA project using Spring Boot</description>
   <properties>
      <java.version>1.8</java.version>
   </properties>
   <dependencies>
      <dependency>
         <groupId>org.springframework.boot</groupId>
         <artifactId>spring-boot-starter-data-jpa</artifactId>
      </dependency>
      <dependency>
         <groupId>com.h2database</groupId>
         <artifactId>h2</artifactId>
         <scope>runtime</scope>
      </dependency>
      <dependency>
         <groupId>mysql</groupId>
         <artifactId>mysql-connector-java</artifactId>
         <scope>runtime</scope>
      </dependency>
      <dependency>
         <groupId>org.springframework.boot</groupId>
         <artifactId>spring-boot-starter-test</artifactId>
         <scope>test</scope>
         <exclusions>
            <exclusion>
               <groupId>org.junit.vintage</groupId>
               <artifactId>junit-vintage-engine</artifactId>
            </exclusion>
         </exclusions>
      </dependency>
   </dependencies>
   <build>
      <plugins>
         <plugin>
            <groupId>org.springframework.boot</groupId>
            <artifactId>spring-boot-maven-plugin</artifactId>
         </plugin>
      </plugins>
   </build>
</project>
Here in this tutorial we will work with hsqldb Once dependencies are added, we can add a couple of classes and interfaces which will act as our entities and repositories. Note- All the code covered in this tutorial has been generated through Spring Boot.
Configuring application.properties file
If you have created your project using Spring Boot, it gives your application.properties file under resource folder of your project. If not, you can create an application.properties file in src/main/resources/ folder. Once file created enter the MySQL database details such as database name, username and password as shown below. If you are not giving database details in application.properties file and you have added dependency for hsqldb databse then by default thi sdatabase will be used by Spring data JPA for your project.
spring.jpa.hibernate.ddl-auto=update
spring.datasource.url=jdbc:mysql://localhost:3306/tutorials_point
spring.datasource.username=mySqlUserName
spring.datasource.password=mySqlPassword
In the above configuration we have spring.jpa.hibernate.ddl−auto whose default value for MySQL is none and for H2 database is create−drop. All possible values are create, update,create−drop and none. create− A database get created everytime but never drops on close. update− A database get changed as per entity structure. create−drop− A database get created everytime but drops it once SessionFactory is closed none− No change in the database structure. Note− If we do not have our database structure, we should use create or update.
Creating Entities
An entity in Spring Data JPA can be created using annotation @Entity from javax.persistence. Create a normal java class and add the entity annotation. This annotation instruct the Hibernate to create a table using the class definition. Lets have a look on below created User entity.
import javax.persistence.Entity;
import javax.persistence.GeneratedValue;
import javax.persistence.GenerationType;
import javax.persistence.Id;
@Entity
public class User {
   @Id
   @GeneratedValue(strategy = GenerationType.AUTO)
   private Long id;
   private String firstName;
   private String lastName;
   private String email;
   protected User() {
   }
   public User(String firstName, String lastName, String email) {
      this.firstName = firstName;
      this.lastName = lastName;
      this.email = email;
   }
   public Long getId() {
      return id;
   }
   public void setId(Long id) {
      this.id = id;
   }
   public String getFirstName() {
      return firstName;
   }
   public void setFirstName(String firstName) {
      this.firstName = firstName;
   }
   public String getLastName() {
      return lastName;
   }
   public void setLastName(String lastName) {
      this.lastName = lastName;
   }
   public String getEmail() {
      return email;
   }
   public void setEmail(String email) {
      this.email = email;
   }
   @Override
   public String toString() {
      return "User [id=" + id + ", firstName=" + firstName + ", lastName=" + lastName + ", email=" + email + "]";
   }
}
If you want to give a custom name to your entity use annotation @Table from javax.persistence. Syntax @Table(name="table_name"). Since Spring Data JPA works on top of JPA, and so all other annotation used above are from javax.persistence. Default Constructor- defined above will be used by JPA and not by you and so declared as protected. The other parameterised construtor will be used y you to create an object of User to persist into the database. The annotation @Id is used against id property to recongnise objects ID. The annotaion GeneratedValueis to instruct the JPA that Id genartion should happen automatically. The toSting()is used for your convenience to print User properties.
Creating Repositories
Lets create an interface which will be our repository. In Spring Data JPA we need to extend CrudRepository from org.springframework.data.repository. CrudRepository gives us most commonly used CRUD methods like save(), delete(), findById(), findAll() and few others. Lets have a look on created repository.
import org.springframework.data.repository.CrudRepository;
import com.tutorialspoint.entities.User;
public interface UserRepositories extends CrudRepository<User, Long> {

}
Extending a CrudRepository automatically creates a bean against the interface name. In our case Spring will create a bean called userRepository. The CrusRepository takes a generic parameter which will be the entity name and its Id type. In our case it is User and Long respectively. Extending CrudRepository enables access to several most commonly used CRUD methods like save(), delete(), findById(), findAll() and few others. There is much more to learn about the methods inside the repository, we will be discussing this in the section of Query Methods in detail, but first lets perform some CRUD operation on the above-created entity. In legacy Java application, You were supposed to write an implementation class for UserRepository, but with Spring Data JPA you are not supposed to write any implementation of UserRepository interface. Spring Data JPA automatically creates an implementation in the background for you, when you run your application.
Note− We are not required to create a database schema manually in Spring Data JPA, Hibernate will automatically translate the above−defined entity into the table.
Perform CRUD Operation
We will try to add some users to the table users and retrieve one of them by their name. Create operation is straight forward, instantiate User and invoke save() of the repository, user will get created into the database. To retrieve invoke findBy Query methods (We will discuss Query Methods in detail in next section), To perform an update operation call update() method and delete() for deleting an entry from a database. Here is the code
import org.springframework.boot.ApplicationRunner;
import org.springframework.boot.SpringApplication;
import org.springframework.boot.autoconfigure.SpringBootApplication;
import org.springframework.context.annotation.Bean;
import com.tutorialspoint.entities.User;
import com.tutorialspoint.repositories.UserRepositories;
@SpringBootApplication
public class SpringDataJpaTutorialsApplication {
   public static void main(String[] args) {
      SpringApplication.run(SpringDataJpaTutorialsApplication.class, args);
   }
   @Bean
   ApplicationRunner applicationRunner(UserRepositories usersRepositories) {
      return args -> {
         User users1 = new User("William", "Monk", "monk@xyz.com");
         User users2 = new User("Tofel", "Patrick", "tofel@xyz.com");
         User users3 = new User("Johnson", "Mitchel", "johnson@xyz.com");
         usersRepositories.save(users1);// persist user1
         usersRepositories.save(users2);// persist user2
         usersRepositories.save(users3);// persist user3
         // Retrieve User William
         System.out.println(usersRepositories.findById(users1.getId()));
         System.out.println(usersRepositories.findById(users2.getId()));
         users2.setLastName("Scotch");
         // Updating User Tofel last name and retrieve
         System.out.println(usersRepositories.save(users2));
         // Delete User Johnson
         usersRepositories.delete(users3);
         // Try Fetching User Johnson
         System.out.println(usersRepositories.findById(users3.getId()));
      };
   }
}
Your final project structure will look something like this.
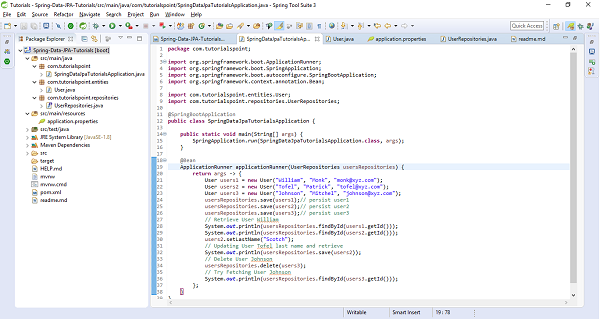
The above sample test code has used ApplicationRunner which will be executed on application startup. It creates three users and saved them in the database. It has also updated one of the user and deleted the other one and tried testing by fetching them out to make sure the code is working. Lets run the application as the Spring Boot App, below is the screenshot of the output.
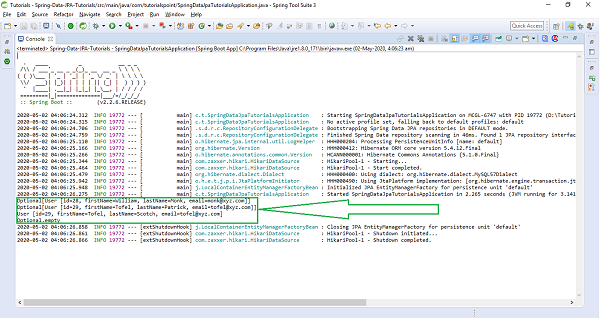
Query Methods
Spring Data JPA lets you define the methods inside the repository with the method signature. In above declared entity User has methods for attributes like firstName,lastName,email, So you can declare your query method with these signature inside UserRepository which will be findByFirstName(), findByLastName(), and findByEmail(). Similarly for other properties of your entity you can generate your query method from their name. You just need to prefix findBy against each property in a camelcase fashion. These query methods are also called as FinderMethods. Declaring queries by following this naming convention and invoking these methods at run time Spring Data will generate queries for you and it will load the data from the database.
Find By One Field
As discussed above, if you want to fetch a record just by using one field of the entity, the query method inside the repository will be written as follows.
import org.springframework.data.repository.CrudRepository;
import com.tutorialspoint.entities.User;
import java.lang.String;
import java.util.List;
public interface UserRepositories extends CrudRepository<User, Long> {
   List<User> findByFirstName(String firstname);
   List<User> findByLastName(String lastname);
   List<User> findByEmail(String email);
}
Find By Multiple Field
The convention is not limited to find a record by using only one field but also you can club more than one properties together and write finder method. If you want to find a record based on two or more field just use the Query keywords. Suppose you want to find all the users by their firstName and email id then your resultant quesry will be List<User> findByFirstNameAndEmail(String name, String email). Other example could be List<User> findByFirstNameAndLastName(String firstName,String lastName);
Find Using Query Keyword
The concatenation of the two field has been done with And keyword. The followings are the list of Query keywords that can be used in finder methods.
Query Keywords |
Query Keywords Expressions |
Sample |
|---|---|---|
AND |
And |
findByFirstNameAndLastName |
OR |
Or |
findByFirstNameOrEmail |
IN |
In, IsIn |
findByEmailIn(Collection<String> emails) |
BEFORE |
Before, IsBefore |
findByStartDateBefore |
AFTER |
After, IsAfter |
findByStartDateAfter |
BETWEEN |
Between, IsBetween |
findByStartDateBetween |
CONTAINING |
Containng, IsContainng, Contains |
findByFirstNameContaining |
FALSE |
False, IsFalse |
findByAvailebleFalse |
EXISTS |
Exists |
findByEmailExists |
Query Keywords |
Query Keywords Expressions |
Sample |
|---|---|---|
ENDING_WITH |
EndingWith, IsEndingWith, EndsWith |
findByLastNameEndingWith |
GREATER_THAN |
GreaterThan, IsGreaterThan |
findBySalaryGreaterThan |
GREATER_THAN_EQUALS |
GreaterThanEqual, IsGreaterThanEqual |
findBySalaryGreaterThanEqual |
LESS_THAN |
LessThan |
findBySalaryLessThan |
LESS_THAN_EQUALS |
After, IsAfter |
findByStartDateAfter |
BETWEEN |
LessThanEqual |
findBySalaryLessThanEqual |
IS_EMPTY |
Empty, IsEmpty |
findByEmailIsEmpty |
IS_NOT_EMPTY |
NotEmpty, IsNotEmpty |
findByEmailIsNotEmpty |
IS_NULL |
IsNull |
findByEmailNotNull |
NOT_NULL |
NotNull |
findByEmailNotNull |
IS_NOT_NULL |
IsNotNull |
findByEmailIsNotNull |
LIKE |
Like |
findByLastNameLike |
NOT_LIKE |
NotLike |
findByLastNameNotLike |
STARTING_WITH |
StartingWith |
findByLastNameStartingWith |
ORDER_BY |
OrderBy |
findByEmailOrderByLastNameDesc |
Query Keywords |
Query Keywords Expressions |
Sample |
|---|---|---|
NOT |
Not |
findByLastNameNot |
NOT_IN |
NotIn |
findByEmailNotIn(Collection |
TRUE |
True |
findByAvailebleTrue |
IGNORE_CASE |
IgnoreCase |
findByLastNameIgnoreCase |
Hands−on Coding on Query Methods
Lets modify the above entity a bit and add some Integer, Boolean and Date fields along with String, so that we can perform most of the query methods. Now it will look like as follows.
import java.util.Date;
import javax.persistence.Entity;
import javax.persistence.GeneratedValue;
import javax.persistence.GenerationType;
import javax.persistence.Id;
@Entity
public class User {
   @Id
   @GeneratedValue(strategy = GenerationType.AUTO)
   private Long id;
   private String firstName;
   private String lastName;
   private String email;
   private Long salary;
   private boolean available;
   private Date startDate;
   protected User() {
   }
   public User(String firstName, String lastName, String email, Long salary, boolean available, Date startDate) {
      this.firstName = firstName;
      this.lastName = lastName;
      this.email = email;
      this.salary = salary;
      this.available = available;
      this.startDate = startDate;
   }
   public Long getId() {
      return id;
   }
   public void setId(Long id) {
      this.id = id;
   }
   public String getFirstName() {
      return firstName;
   }
   public void setFirstName(String firstName) {
      this.firstName = firstName;
   }
   public String getLastName() {
      return lastName;
   }
   public void setLastName(String lastName) {
      this.lastName = lastName;
   }
   public String getEmail() {
      return email;
   }
   public void setEmail(String email) {
      this.email = email;
   }
   public Long getSalary() {
      return salary;
   }
   public void setSalary(Long salary) {
      this.salary = salary;
   }
   public boolean isAvailable() {
      return available;
   }
   public void setAvailable(boolean available) {
      this.available = available;
   }
   public Date getStartDate() {
      return startDate;
   }
   public void setStartDate(Date startDate) {
      this.startDate = startDate;
   }
   @Override
   public String toString() {
      return "User [id=" + id + ", firstName=" + firstName + ", lastName=" + lastName + ", email=" + email
      + ", salary=" + salary + ", available=" + available + ", startDate=" + startDate + "]";
   }
}
Lets Add some Query methods inside repository,
import org.springframework.data.repository.CrudRepository;
import com.tutorialspoint.entities.User;
import java.lang.String;
import java.util.List;
import java.lang.Long;
import java.util.Date;
public interface UserRepositories extends CrudRepository<User, Long> {
   List<User> findByFirstName(String firstname);
   List<User> findByLastName(String lastname);
   List<User> findByEmail(String email);
   List<User> findByFirstNameAndLastName(String firstName, String lastName);
   List<User> findBySalaryLessThan(Long salary);
   List<User> findByStartDateAfter(Date startdate);
   List<User> findByStartDateBefore(Date startdate);
}
Lets persist some users and add try fetching them using the above query methods.
import java.util.Date;
import org.springframework.boot.ApplicationRunner;
import org.springframework.boot.SpringApplication;
import org.springframework.boot.autoconfigure.SpringBootApplication;
import org.springframework.context.annotation.Bean;
import com.tutorialspoint.entities.User;
import com.tutorialspoint.repositories.UserRepositories;
@SpringBootApplication
public class SpringDataJpaTutorialsApplication {
   public static void main(String[] args) {
   SpringApplication.run(SpringDataJpaTutorialsApplication.class, args);
   }
   @Bean
   ApplicationRunner applicationRunner(UserRepositories usersRepositories) {
      return args -> {
         User users1 = new User("Micheal", "Stoch", "stochk@xyz.com", 10000L, true, new Date());
         User users2 = new User("Benjamin", "Franklin", "franklin@xyz.com", 15000L, false, new Date());
         User users3 = new User("Rosoto", "Warner", "rosoto@xyz.com", 19000L, true, new Date());
         usersRepositories.save(users1);// persist user1
         usersRepositories.save(users2);// persist user2
         usersRepositories.save(users3);// persist user3
         // Retrieve Users based on query methods
         System.out.println(usersRepositories.findByEmail("rosoto@xyz.com"));
         System.out.println(usersRepositories.findByFirstName("Micheal"));
         System.out.println(usersRepositories.findByFirstNameAndLastName("Benjamin", "Franklin"));
         System.out.println(usersRepositories.findBySalaryLessThan(15000L));
         System.out.println(usersRepositories.findByStartDateAfter(new Date()));// It shouldn't return any result
      };
   }
}
Program Output
For the above print statements below is the output.
[User [id=36, firstName=Rosoto, lastName=Warner, email=rosoto@xyz.com, salary=19000, available=true, startDate=2020-05-02 17:35:42.567]]

[User [id=34, firstName=Micheal, lastName=Stoch, email=stochk@xyz.com, salary=10000, available=true, startDate=2020-05-02 17:35:42.567]]

[User [id=35, firstName=Benjamin, lastName=Franklin, email=franklin@xyz.com, salary=15000, available=false, startDate=2020-05-02 17:35:42.567]]

[User [id=34, firstName=Micheal, lastName=Stoch, email=stochk@xyz.com, salary=10000, available=true, startDate=2020-05-02 17:35:42.567]]

[] // empty list necause no entry has satrt date after the current date
Similarly, you can use other query methods based on your requirements.
Paging and Sorting
The above queries work well if the database has limited records, but you can think of a situation where a database is having records in millions and billions. You can take an example of any e−commerce website where you are looking for a product. When you search for a product on an e-commerce site, it will not display all the records at once, instead, it will show you the some of the products(say top 10 or 50) and the remaining products it will page the results. This concept is called pagination where you have an option of going to the next page or certain page number and fetching the record of that page. This approach is efficient because it doesnt load the all data at once instead it loads the few records from the database. Not only this, but you can also sort the record based on their price, ratings, and relevancy, etc. Spring Data JPA supports pagination as well as sorting, the only things you need to do is extending PagingAndSortingRepository instead of CrudRepository. PagingAndSortingRepository is a child interface of the CrudRepository. Pageable is a most key interfaces for Paging and PageRequest is the implementation for Pageable. For sorting you have three key classes Sort, Direction, and Order from Spring Data.
Page Request
It consists of 3, of static method as follows.
PageRequest.of(int page, int size);
It creates an unsorted PageRequest, where the page is a non−negative page index and size is the size of page(number of records per page) to be returned, and it should be non-negative.
PageRequest.of(int page, int size, Sort sort);
It creates a sorted PageRequest.
Sort parameter must not be null, if so use Sort.unsorted() instead.
PageRequest.of(int page, int size, Direction direction, String properties)
It creates a PageRequest with sort direction and properties applied.
direction and properties must not be null.
Sort
It consist of 4, by static methods as follows
Sort.by(String property);
It creates a sort for the given properties and properties must not be null.
Sort.byby(List<Orders> order);
It creates a sort for the given Orders and orders must not be null.
Sort.by(Order orders);
It creates a sort for the given Orders and orders must not be null.
Sort.by(Direction direction, String properties)
Sort.by(Direction direction, String properties) − It creates a Sort; direction and properties must not be null.
Lets create an entity Product to illustrate the paging and sorting concept.
import javax.persistence.Entity;
import javax.persistence.Id;
@Entity
public class Product {
   @Id
   @GeneratedValue(strategy = GenerationType.AUTO)
   private Long id;
   private String name;
   private String features;
   private Double price;
   protected Product() {
   }
   public Product(String name, Double price, String features) {
      this.name = name;
      this.price = price;
      this.features = features;
   }
   public Long getId() {
      return id;
   }
   public void setId(Long id) {
      this.id = id;
   }
   public String getName() {
      return name;
   }
   public void setName(String name) {
      this.name = name;
   }
   public Double getPrice() {
      return price;
   }
   public void setPrice(Double price) {
      this.price = price;
   }
   public String getFeatures() {
      return features;
   }
   public void setFeatures(String features) {
      this.features = features;
   }
   @Override
   public String toString() {
      return "Product [id=" + id + ", name=" + name + ", features=" + features + ", price=" + price + "]";
   }
}
Lets create a repository for above entity, but make sure to extend PagingAndSortingRepository instaed of CrudRepository.
import org.springframework.data.repository.PagingAndSortingRepository;
import com.tutorialspoint.entities.Product;
import java.lang.String;
import java.util.List;
import java.lang.Long;
import java.lang.Double;
public interface ProductRepository extends PagingAndSortingRepository<Product, Lo ng> {
   List<Product> findByName(String name, Pageable pageable);
   List<Product> findByIdIn(List<Long> ids, Pageable pageable);
   List<Product> findByNameAndFeatures(String name, String features, Pageable pageable);
   List<Product> findByPriceGreaterThan(Double price, Pageable pageable);
   List<Product> findByPriceBetween(Double price1, Double price2, Pageable pageable);
   List<Product> findByNameContains(String features, Pageable pageable);
   List<Product> findByNameLike(String features, Pageable pageable);
}
Now lets write business logic to save some products and fetch some record page wise and in sorted fashion from the database. The below code contains some such operations, have a look at each.
import java.util.Date;
import org.springframework.boot.ApplicationRunner;
import org.springframework.boot.SpringApplication;
import org.springframework.boot.autoconfigure.SpringBootApplication;
import org.springframework.context.annotation.Bean;
import org.springframework.data.domain.Page;
import org.springframework.data.domain.PageRequest;
import org.springframework.data.domain.Pageable;
import com.tutorialspoint.entities.Product;
import com.tutorialspoint.entities.User;
import com.tutorialspoint.repositories.ProductRepository;
import com.tutorialspoint.repositories.UserRepositories;
@SpringBootApplication
public class SpringDataJpaTutorialsApplication {
   public static void main(String[] args) {
      SpringApplication.run(SpringDataJpaTutorialsApplication.class, args);
   }
   @Bean
   ApplicationRunner applicationRunner(ProductRepository productRepository) {
      return args -> {
         Product product = new Product("IPhone", 70000.00, "IOS");
         Product product2 = new Product("Laptop", 90000.00, "Core i5");
         Product product3 = new Product("TV", 30000.00, "4k Smart");
         Product product4 = new Product("Bed", 40000.00, "King Size");
         Product product5 = new Product("Fridge", 25000.00, "Double Door");
         Product product6 = new Product("Wachine Machine", 50000.00, "Automatic");
         Product product7 = new Product("Xiomi Smart Phone", 45000.00, "Android");
         productRepository.save(product);
         productRepository.save(product2);
         productRepository.save(product3);
         productRepository.save(product4);
         productRepository.save(product5);
         productRepository.save(product6);
         productRepository.save(product7);
         // Pagination with findAll() method
         Pageable pageable = PageRequest.of(0, 2);
         Page<Product> products = productRepository.findAll(pageable);
         products.stream().forEach(System.out::println);
      };
   }
}
For illustration purpose, above code is fetching 2 records per page, So for the first page below is the out put.
Product [id=1, name=IPhone, features=IOS, price=70000.0] Product [id=2, name=Laptop, features=Core i5, price=90000.0]
Lets modify the pageable Pageable pageable = PageRequest.of(1, 2); and fetch second page record, It will return the output as follows.
Product [id=3, name=TV, features=4k Smart, price=30000.0] Product [id=4, name=Bed, features=King Size, price=40000.0]
Lets Sorting the records based on price, To do so add the below code.
Sort sort = Sort.by("price");
Iterable<Product> sortedProducts = productRepository.findAll(sort);
sortedProducts.forEach(f -> System.out.println(f.getName() + "->" + f.getPrice()));
Above sorting methods returns result in Ascending order by default. Have a look on output
Fridge->25000.0
TV->30000.0
Bed->40000.0
Xiomi             Smart          Phone->45000.0
Wachine                          Machine->50000.0
IPhone->70000.0
Laptop->90000.0
If you want to fetch the record in Descending order, use Direction as follows.
Sort sortDesc = Sort.by(Direction.DESC, "price");
Iterable<Product> sortedProductsDesc = productRepository.findAll(sortDesc);
sortedProductsDesc.forEach(f -> System.out.println(f.getName() + " " + f.getPrice()));
Laptop                              90000.0
IPhone                              70000.0
Wachine           Machine           50000.0
Xiomi       Smart          Phone    45000.0
Bed                                 40000.0
TV                                  30000.0
Fridge                              25000.0
If you want to sort the record based on multiple properties, you can do this.
Sort sortByMultiplePropDesc = Sort.by(Direction.DESC, "price", "name");
Iterable<Product> sortByMultiplePropDescItr = productRepository.findAll(sortByMultiplePropDesc);
sortByMultiplePropDescItr.forEach(f -> System.out.println(f.getName() + " " + f.getPrice()));
Above code Sorts the recors based on price and then the result of this again get sorted by name
Laptop                                             90000.0
IPhone                                             70000.0
Wachine                 Machine                    50000.0
Xiomi             Smart          Phone             45000.0
Bed                                                40000.0
TV                                                 30000.0
Fridge                                             25000.0
Lets Put Paging and Sorting together, with findAll() method
Pageable pageablewithSort = PageRequest.of(0, 2, Direction.DESC, "price");
Page<Product> pageProduct = productRepository.findAll(pageablewithSort);
pageProduct.stream().forEach(f -> System.out.println(f.getName() + "-" + f.getPrice()));
Output
Laptop                  90000.0
IPhone                  70000.0
Finally, lets apply paging and sorting with Query methods(custom finder methods)
Pageable customPageablewithSort = PageRequest.of(0, 7, Direction.DESC, "name");
List<Product> pageProductCustom = productRepository.findByNameContains("Phone", customPageablewithSort);
pageProductCustom.stream().forEach(f -> System.out.println(f.getName() + "--" + f.getPrice()));
Above code, trying to find out all the products whose name contains Phone, belwo is the output
Xiomi          Smart    Phone45000.0
IPhone70000.0
JPQL
It stands for Java Persistence Query language. Its is a standard from JPA to perform some query operation against objects and domain classes. Instaed of writing SQL queries against database tables, you can write JPQL queries against the class objects and fields. JPQL is similar to SQL queries but instead of writing table and column name from database, you will be using your domain class name. For Example you have a table in database called employee_details but your mapped Java/Domain class name is EmployeeDetails, then your SQL select query will be select * from employee_details but your JPQL query will be select * from EmployeeDetails . Note in JPQL it has used domain name not the database table name. Lets take another example, Suppose you want to fetch first_name and last_ name of a user from user table, created in the begining off this tutorials. So your SQL query will be select first_name,last_name from user but your JPQL query will be select firstName,lastName from User. If youhave observe the query you will find JPQL always uses class/domain name, instead of database tanle or column name. These JPQL will internally get converted to SQL queries by ORM tool. With JPQL You can use named parameters, you can perform both select and non select operations such as update and delete etc using JPQL. You can also use aggregate functions, relational operators, joinsconditional operaters and almost everything what is there in SQL can be performed with JPQL easily.
JPQL is case sensitive when it comes to the domain class names, and its fields name. but it is not case sennsitive, when it comes to keyword used in the JPQL query such as like, count, etc.
A JPQL query is written by using annotation @Query from org.springframework.data.jpa.repository. Lets have a look at one of the queries.
@Query("from User")
List<User> findAllUsers();
This query says that fetch all the users from the user table.
Read Partial Data
Lets write a query to fetch only firstName and lastName of a user, but not the whole information. You can write your JPQL as follows.
@Query("select u.firstName,u.lastName from User u")
List<Object[]> findUserPartialData();
It will return the list of object, you can iterate through the list and get the firstName at index 0 and last name at index 1.
Using Named Query Parameter
If you want to fetch a user by firstName then your named query will be written as
@Query("select u from User u where u.firstName=:name")
List<User> findAllUsersByName(String name);
Remember the parameter name in the query is a query parameter and that should be mentioned in the query after =: (an equal and colon sign). The above query can also be written as
@Query("from User where firstName=:name")
List<User> findAllUsersByName(String name);
Non Select Operations
JPQL support DDL operation as well, such as create, update, and delete. To do so you need to use an annotation @Modifying on top of your query. This is because if you do not specify @Modifying annotation, by default Spring data assumes that all queries are read(select) queries. To perform any non−select operation you should need to use this annotation, violating this will result in an exception. Apart from this, to perform such DDL operation your query should also be annotated with @Transactional annotation from javax.transaction.Transactional. Lets write a DDL query to delete users based on the first name through JPQL.
@Modifying
@Transactional
@Query("delete from User where firstName=:fName")
void deleteUserByFirstName(String fName);
Features of Spring Data JPA
So far you saw that how Spring Data JPA is efficient compared to legacy ORM and JPA frameworks. Since it is on top of JPA it supports legacy framework features as well, additionally, it provides below features.
Provides support to create repositories using Spring and JPA.
Pagination and Sorting support
Query methods/finder method support
Query validation for custom queries annotated with @Query annotation.
Spring Data JPA - Conclusion
Spring Data JPA is one of the powerful framework that helps in implementing JPA based repositories. If you are already aware of JPA based framework then its easy to use it, because it works on top of JPA and implements all the specifications provided by JPA.
Spring Data MongoDB - Overview
In this tutorial we will learn to integrate our Spring Data-based application with MongoDB i.e., a document database. We will perform the CRUD operations using MongoRepository. We will also focus some light on Query methods used by MongoRepository and we will see how the custom query methods used in MongoRepository are different from our JPA based repositories. Not only this, but we will also expose some of the rest endpoints to access data through it.
Spring Data MongoDB - Prerequisites
About 30 minutes
Basic Spring Data knowledge
A java based IDE (Eclipse, STS or IntelliJ IDEA)
JDK 1.8 or later
Gradle 4+ or Maven 3.2+
Spring Data MongoDB - Introduction
As we know that, the Spring Data framework is the umbrella project which contains many subframeworks. All these sub frameworks deal with data access which is specific to a database. Spring Data MongoDB is one of the sub−framework of the Spring Data project, which provides access to the MongoDB document database. Before jumping the Spring Data MongoDb, lets have a basic understanding of MongoDB.
What is MongoDB
MongoDB is a document−based NoSQL database. It stores the information in key−value format, more specifically like a JSON document. We use MongoDB for storing a high volume of data. On a high−level, MongoDB uses terms like Database, Collection, Document, and Field.
Database −
It is equivalent to the RDBMS database which acts as a container for collections.
Collection −
It exists within a database and it is equivalent to the tables in RDBMS.
Document −
It is a equivalent to a row in RDBMS. A document in MongoDB collection is a single record.
Field −
It is an equivalent to a column in RDBMS having a key−value pair. A document could have zero or more fields. To learn more about MongoDB, visit our tutorials by clicking here.
Installation Guide
Since this tutorial will be working extensively with MongoDB. Make sure it is installed on your machine, If not you can install it from here based on your system configuration. While installing make sure to install the Compass tool. It is a client with a nice GUI to interact with MongoDB server. Once it is installed you can create a database (say tutorials_point), by providing a collection name (say customers) through Compass GUI, finally it will look like −
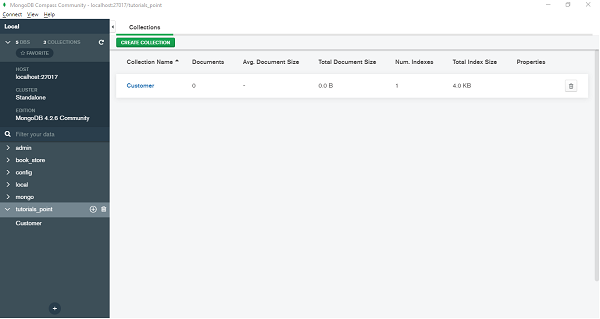
Spring Data MongoDB - Getting Started
Like other Spring-based projects, you can start from scratch by creating a maven or Gradle based project from your favourite IDE. Follow below step by step process or you can bypass the basic setup steps that are already familiar with.
Adding Dependencies.
If you have created normal Maven or Gradle projects then add below dependencies to your pom.
For Maven
<dependency>
   <groupId>org.springframework.boot</groupId>
   <artifactId>spring-boot-starter-web</artifactId>
</dependency>
<dependency>
   <groupId>org.springframework.boot</groupId>
   <artifactId>spring-boot-starter-data-mongodb</artifactId>
</dependency>
Above are two Spring Web and Spring Data MongoDB dependences. If you have created your project as Spring Boot or Starting with Spring Initializr then your final list of dependencies will look like this −
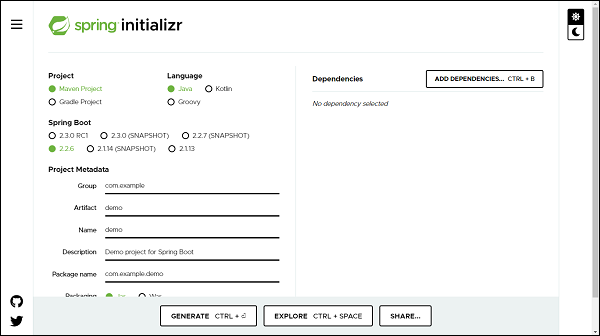
Note − The code sample and exapmles used in this tutorial has been created through Spring Initializr. The following is your final pom.xml file that is created when you choose Maven −
<?xml version="1.0" encoding="UTF-8"?>
<project xmlns="http://maven.apache.org/POM/4.0.0"
xmlns:xsi="http://www.w3.org/2001/XMLSchema-instance"
xsi:schemaLocation="http://maven.apache.org/POM/4.0.0 https://maven.apa
che.org/xsd/maven-4.0.0.xsd">
   <modelVersion>4.0.0</modelVersion>
   <parent>
      <groupId>org.springframework.boot</groupId>
      <artifactId>spring-boot-starter-parent</artifactId>
      <version>2.2.6.RELEASE</version>
      <relativePath /> <!-- lookup parent from repository -->
   </parent>
   <groupId>com.tutorialspoint</groupId>
   <artifactId>Spring-Data-MongoDB</artifactId>
   <version>0.0.1-SNAPSHOT</version>
   <name>Spring-Data-MongoDB</name>
   <description>Spring Data MongoDB project using Spring Boot</description>
   <properties>
      <java.version>1.8</java.version>
   </properties>
   <dependencies>
      <dependency>
         <groupId>org.springframework.boot</groupId>
         <artifactId>spring-boot-starter-data-mongodb</artifactId>
      </dependency>
      <dependency>
         <groupId>org.springframework.boot</groupId>
         <artifactId>spring-boot-starter-web</artifactId>
      </dependency>
      <dependency>
         <groupId>org.springframework.boot</groupId>
         <artifactId>spring-boot-starter-test</artifactId>
         <scope>test</scope>
         <exclusions>
            <exclusion>
               <groupId>org.junit.vintage</groupId>
               <artifactId>junit-vintage-engine</artifactId>
            </exclusion>
         </exclusions>
      </dependency>
   </dependencies>
   <build>
      <plugins>
         <plugin>
            <groupId>org.springframework.boot</groupId>
            <artifactId>spring-boot-maven-plugin</artifactId>
         </plugin>
      </plugins>
   </build>
</project>
Creating Collection
A collection is equivalent to a model, it will be created as a POJO. Lets define our first collection −
import org.springframework.data.annotation.Id;
import org.springframework.data.mongodb.core.index.IndexDirection;
import org.springframework.data.mongodb.core.index.Indexed;
import org.springframework.data.mongodb.core.mapping.Document;
@Document(collection = "customer")
public class Customer {
   @Id
   private Long id;
   private String name;
   @Indexed(unique = true)
   private String email;
   @Indexed(direction = IndexDirection.DESCENDING)
   private Double salary;
   public Long getId() {
      return id;
   }
   public void setId(Long id) {
      this.id = id;
   }
   public String getName() {
      return name;
   }
   public void setName(String name) {
      this.name = name;
   }
   public String getEmail() {
      return email;
   }
   public void setEmail(String email) {
      this.email = email;
   }
   public Double getSalary() {
      return salary;
   }
   public void setSalary(Double salary) {
      this.salary = salary;
   }
   @Override
   public String toString() {
      return "Customer [id=" + id + ", name=" + name + ", email=" + email
      + ", salary=" + salary + "]";
   }
}
@Document: Unlike JPA where we used to mark our domain object with annotation @Entity,here we mark it with @Document. If we do not specify a collection attribute, by default, a collectionwith the class name (first character lowercased) will get created i.e., customer. If we want to specify some other name we can add attribute collection to the @Document annotation. @Id: This is for identity purposes. @Indexed(unique = true): @Indexed annotation is used to mark the field as Indexed in the MongoDB. Here, it will index the email with a unique attribute. @Indexed(direction = IndexDirection.DESCENDING): This is applied to the field that will be indexed in a descending order. Similarly we can use IndexDirection.ASCENDING for ascending order.
Creating a Repository
Lets define an interface which will be our repository −
import org.springframework.data.mongodb.repository.MongoRepository;
import com.tutorialspoint.document.Customer;
public interface CustomerRepository extends MongoRepository<Customer, Long>
{
}
The process of creating a repository is similar to the repository creation in any Spring data−based project, the only difference here is that it extends MongoRepository from org.springframework.data.mongodb.repository, which works on top of CrudRepository.
Configuring the DataSource
Lets define our MongoDB related details in application.properties file. If our MongoDB server is clustered then we can specify its url as follows
spring.data.mongodb.uri=mongodb+srv://<username>:<password>@<cluster-name>-
<instance-id>/<database-name>?retryWrites=true
If it is on our local machine the configuration will go like this.
spring.data.mongodb.host=localhost
spring.data.mongodb.port=27017
spring.data.mongodb.database=tutorials_point
spring.data.mongodb.username=test
spring.data.mongodb.password=test
Performing CRUD Operation
Now lets perform below some CRUD operation. We will try adding some customers to the above document, and retrieve some of them by their id or name. Following is the code for the same.
import org.springframework.boot.CommandLineRunner;
import org.springframework.boot.SpringApplication;
import org.springframework.boot.autoconfigure.SpringBootApplication;
import org.springframework.context.annotation.Bean;
import com.tutorialspoint.document.Customer;
import com.tutorialspoint.repository.CustomerRepository;
@SpringBootApplication
public class SpringDataMongoDbApplication {
   public static void main(String[] args) {
      SpringApplication.run(SpringDataMongoDbApplication.class, args);
   }
   @Bean
   CommandLineRunner commandLineRunner(CustomerRepository customerReposito
   ry) {
      return new CommandLineRunner() {
         @Override
         public void run(String... args) throws Exception {
            //Persist customers
            System.out.println(customerRepository.save(new Customer(1l,
            "Johnson", "john@yahoo.co", 10000d)));
            System.out.println(customerRepository.save(new Customer(2l,
            "Kallis", "kallis@yahoo.co", 20000d)));
            // Fetch customer by Id
            System.out.println(customerRepository.findById(1l));
         }
      };
   }
}
The above code has used CommandLineRunner which will be executed on application startup. We have created two customers and saved them in the database and executed the method findById() to see if it is actually finding the correct one. Lets run the application as the Spring Boot App, below is the output.
Customer [id=1, name=Johnson, email=john@yahoo.co, salary=10000.0]
Customer [id=2, name=Kallis, email=kallis@yahoo.co, salary=20000.0]
Optional[Customer [id=1, name=Johnson, email=john@yahoo.co, salary=10000.0]]
Spring Data MongoDB - Query Methods
Since MongoDBRepository works on top of CrudRepository, so we have access to all the query methods as well as custom query methods. As per business requirements, we can add some custom query methods to our customer repository −
import java.util.List;
import java.util.Optional;
import org.springframework.data.mongodb.repository.MongoRepository;
import com.tutorialspoint.document.Customer;
public interface CustomerRepository extends MongoRepository<Customer, Long>{
   Optional<Customer> findByEmail(String email);
   List<Customer> findBySalaryGreaterThanEqual(double salary);
   List<Customer> findBysalaryBetween(double from, double to);
}
We have added three query methods, which helps in finding the customers based on email and salary. Lets test these query methods by adding some code to CommandLineRunner.
@Bean
CommandLineRunner commandLineRunner(CustomerRepository customerReposito
ry) {
   return new CommandLineRunner() {
      @Override
      public void run(String... args) throws Exception {
         // Fetch by email
         System.out.println(customerRepository.findByEmail("john@yah
         oo.co"));
         // fetch whose salary is =>20000
         System.out.println(customerRepository.findBySalaryGreaterTh
         anEqual(20000));
         // fetch whose salary is in between 1000 to 12000
         System.out.println(customerRepository.findBysalaryBetween(1
         000, 12000));
      }
   };
}
In the above code, we are trying to fetch a customer by email and salary, it will print the result as follows −
Optional[Customer [id=1, name=Johnson, email=john@yahoo.co, salary=10000.0]
]
[Customer [id=2, name=Kallis, email=kallis@yahoo.co, salary=20000.0]]
[Customer [id=1, name=Johnson, email=john@yahoo.co, salary=10000.0]]
Spring Data MongoDB - Annotations
Spring Data MongoDB uses various annotations, lets discuss them in details
Indexes related Annotations
This type of annotation talks about indexing the fields
@Indexed
We have used this annotation above in our Customer document,
@CompoundIndexes
Spring Data MongoDB also supports compound indexes. It s used at Documents level to hold references to multiple fields using single index.
@Document
@CompoundIndexes({ @CompoundIndex(name = "name_salary", def = "{'name.id':1
, 'salary':1}") })
public class Customer {
}
In the above code we have created the compound index with name and salary fields.
Common Annotations
@Transient
As we can guess, The fields which are annotated as @Transient are not part of persistence and they are excluded from being pushed into the database. For instance
public class Customer {
   @Transient
   private String gender;
}
The gender will not be persisted into the database.
@Field
It is used to give a name to the field in the JSON document, We can treat this as the name attribute of @Column annotation of JPA. If we want a JSON document field to be saved other than our java field name, then we use this annotation, For Instance.
@Field("dob")
private Date dateOfBirth;
Here, our Java attribute is dateOfBirth but in the database it will be dob.
Exposing REST endpoints
To do so, lets define a controller and some mapping of the endpoints.
import java.util.List;
import java.util.Optional;
import org.springframework.beans.factory.annotation.Autowired;
import org.springframework.web.bind.annotation.DeleteMapping;
import org.springframework.web.bind.annotation.GetMapping;
import org.springframework.web.bind.annotation.PathVariable;
import org.springframework.web.bind.annotation.PostMapping;
import org.springframework.web.bind.annotation.RequestBody;
import org.springframework.web.bind.annotation.RequestMapping;
import org.springframework.web.bind.annotation.RestController;
import com.tutorialspoint.document.Customer;
import com.tutorialspoint.repository.CustomerRepository;
@RestController
@RequestMapping("/rest")
public class CustomerController {
   @Autowired
   private CustomerRepository customerRepository;
   @GetMapping("/customers")
   public List<Customer> fetchCustomers() {
      return customerRepository.findAll();
   }
   @PostMapping("/customer/add")
   public void persisDocument(@RequestBody Customer customer) {
      customerRepository.save(customer);
   }
   @GetMapping("/customer/find/{id}")
   public Optional<Customer> fetchDocument(@PathVariable Long id) {
      return customerRepository.findById(id);
   }
   @DeleteMapping("/customer/{id}")
   public void deleteDocument(@PathVariable Long id) {
      customerRepository.deleteById(id);
   }
}
The above controller have different mapping methods, responsible for fetching[GET], adding[POST], finding[GET] and deleting[DELETE] the customer from data source. Lets add a customer to the data source, It will be a post call with Customer details in the body. Our endpoint url will be http://localhost:8080/rest/customer/add and pass the below data in the body.
{
   "id":3,
   "name":"Asad",
   "email":"asad@gmail.com",
   "salary":28500
}
The api will return response code 200[OK]. Now, lets first find out all the customers availble in the document. To do so we can use Postman client. Lets execute rest end point http://localhost:8080/rest/customersthrough postman −
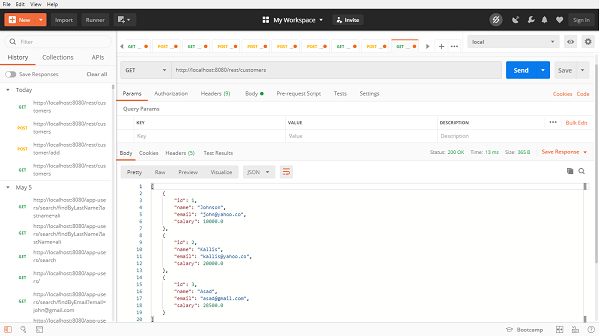
[
   {
      "id": 1,
      "name": "Johnson",
      "email": "john@yahoo.co",
      "salary": 10000.0
   },
   {
      "id": 2,
      "name": "Kallis",
      "email": "kallis@yahoo.co",
      "salary": 20000.0
   },
   {
      "id": 3,
      "name": "Asad",
      "email": "asad@gmail.com",
      "salary": 28500.0
   }
]
Similarly we can find a customer by passing an id of customer, lets find the customer with id=2,our rest end point will be http://localhost:8080/rest/customer/find/2, and the output will be −
{
   "id": 2,
   "name": "Kallis",
   "email": "kallis@yahoo.co",
   "salary": 20000.0
}
Now, lets try deleting a resource by passing customer id and invikoing DELETE method with rest end point http://localhost:8080/rest/customer/3 and it has been deleted.
Spring Data MongoDB - Relationships
Lets discuss a use case where a customer can purchase multiple products, based on review of a product. Also in this case, consider a customer has only one address to ship the product. Below is the ER diagram for this use case, we will discuss this relationship use case through Spring Data MongoDB.
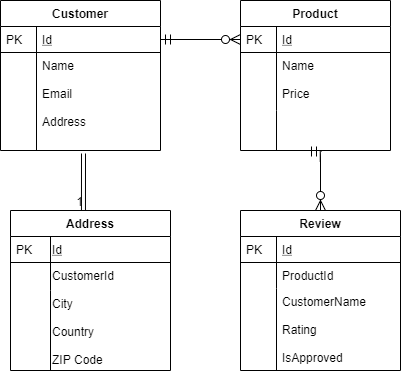
Lets re−write the Customer document with other dependent class, which will be as follows.
Root Document Customer
import java.util.ArrayList;
import java.util.List;
import org.springframework.data.annotation.Id;
import org.springframework.data.mongodb.core.index.Indexed;
import org.springframework.data.mongodb.core.mapping.Document;
@Document
public class Customer {
   @Id
   private String id;
   private String name;
   @Indexed(unique = true)
   private String email;
   private Address address;
   private List<Product> products;
   public Customer() {
      this.products = new ArrayList<Product>();
   }
   public Customer(String name, String email, Address address, List<Produc
   t> products) {
      this.name = name;
      this.email = email;
      this.address = address;
      this.products = products;
   }
   public String getId() {
      return id;
   }
   public void setId(String id) {
      this.id = id;
   }
   public String getName() {
      return name;
   }
   public void setName(String name) {
      this.name = name;
   }
   public String getEmail() {
   return email;
   }
   public void setEmail(String email) {
      this.email = email;
   }
   public Address getAddress() {
      return address;
   }
   public void setAddress(Address address) {
      this.address = address;
   }
   public List<Product> getProducts() {
      return products;
   }
   public void setProducts(List<Product> products) {
      this.products = products;
   }
   @Override
   public String toString() {
      return "Customer [id=" + id + ", name=" + name + ", email=" + email
      + ", address=" + address + ", products="
      + products + "]";
   }
}
Address class
public class Address {
   private String city;
   private String country;
   private Integer zipCode;
   public Address() {
   }
   public Address(String city, String country, Integer zipCode) {
      this.city = city;
      this.country = country;
      this.zipCode = zipCode;
   }
   public String getCity() {
      return city;
   }
   public void setCity(String city) {
      this.city = city;
   }
   public String getCountry() {
      return country;
   }
   public void setCountry(String country) {
      this.country = country;
   }
   public Integer getZipCode() {
      return zipCode;
   }
   public void setZipCode(Integer zipCode) {
      this.zipCode = zipCode;
   }
   @Override
   public String toString() {
      return "Address [city=" + city + ", country=" + country + ", zipCod
      e=" + zipCode + "]";
   }
}
Product Document
import java.util.List;
import org.springframework.data.annotation.Id;
import org.springframework.data.mongodb.core.mapping.Document;
@Document
public class Product {
   @Id
   private String id;
   private String name;
   private Double price;
   private List<Review> reviews;
   public Product() {
   }
   public Product(String name, Double price, List<Review> reviews) {
      this.name = name;
      this.price = price;
      this.reviews = reviews;
   }
   public String getName() {
      return name;
   }
   public void setName(String name) {
      this.name = name;
   }
   public Double getPrice() {
      return price;
   }
   public void setPrice(Double price) {
      this.price = price;
   }
   public List<Review> getReviews() {
      return reviews;
   }
   public void setReviews(List<Review> reviews) {
      this.reviews = reviews;
   }
   public String getId() {
      return id;
   }
   public void setId(String id) {
      this.id = id;
   }
   @Override
   public String toString() {
      return "Product [id=" + id + ", name=" + name + ", price=" + price
      + ", reviews=" + reviews + "]";
   }
}
Review Class
public class Review {
   private String customerName;
   private Integer rating;
   private boolean approved;
   public Review() {
   }
   public Review(String customerName, Integer rating, boolean approved) {
      this.customerName = customerName;
      this.rating = rating;
      this.approved = approved;
   }
   public String getCustomerName() {
      return customerName;
   }
   public void setCustomerName(String customerName) {
      this.customerName = customerName;
   }
   public Integer getRating() {
      return rating;
   }
   public void setRating(Integer rating) {
      this.rating = rating;
   }
   public boolean isApproved() {
      return approved;
   }
   public void setApproved(boolean approved) {
      this.approved = approved;
   }
   @Override
   public String toString() {
      return "Review [ customerName=" + customerName + ", rating=" + rati
      ng + ", approved=" + approved + "]";
   }
}
Customer Repository
import java.util.Optional;
import org.springframework.data.mongodb.repository.MongoRepository;
import com.tutorialspoint.document.Customer;
public interface CustomerRepository extends MongoRepository<Customer, Strin
g> {
   Optional<Customer> findByEmail(String email);
}
Product Repository
import org.springframework.data.mongodb.repository.MongoRepository;
import com.tutorialspoint.document.Product;
public interface ProductRepository extends MongoRepository<Product, String>
{
   Product findByName(String string);
}
If you observe, we have not created a repository for Address and Reviews, because Spring Data MongoDb is a part of the Spring Data project and the complete Spring data project work on the aggregate root principle of DDD. Since the address is the part of the Customer document, and Review is part of the Product document, so we are required to create one repository per aggregate root. If we want we can skip the Product repository as well, and it still works.
In the above long list of documents, unlike our JPA based application we have not used any annotation for representing a relationship like @OneToOne or @OneToMany. Spring Data MongoDB doesnt entertain such annotations, and it understand the relationship based on context. We can find in the above documents that a customer can have an address and many products. Also a product could have many reviews. Lets try persisting some data and fetching it out. To do so we will be using CommandLineRunner.
import java.util.Arrays;

import org.springframework.boot.CommandLineRunner;
import org.springframework.boot.SpringApplication;
import org.springframework.boot.autoconfigure.SpringBootApplication;
import org.springframework.context.annotation.Bean;
import com.tutorialspoint.document.Address;
import com.tutorialspoint.document.Customer;
import com.tutorialspoint.document.Product;
import com.tutorialspoint.document.Review;
import com.tutorialspoint.repository.CustomerRepository;
import com.tutorialspoint.repository.ProductRepository;
@SpringBootApplication
public class SpringDataMongoDbApplication {
   public static void main(String[] args) {
      SpringApplication.run(SpringDataMongoDbApplication.class, args);
   }
   @Bean
   CommandLineRunner commandLineRunner(CustomerRepository customerReposito
   ry, ProductRepository productRepository) {
      return new CommandLineRunner() {
         @Override
         public void run(String... args) throws Exception {
         // Persist a product with review
            Product product = new Product("IpHone", 60000.0d, Arrays.as
            List(new Review("asad", 4, true)));
            product = productRepository.save(product);
            // Persist a customer with address and product
            Customer customer = new Customer("Asad Ali", "asad@gmail.co
            m", new Address("Hyd", "India", 122001),
            Arrays.asList(product));
            customer = customerRepository.save(customer);
            // Fetch the customer
            System.out.println(customer);
         }
      };
   }
}
OUTPUT
Customer [id=5eb327768442b8385bd4bb1a, name=Asad Ali, email=asad@gmail.com,
address=Address [city=Hyd, country=India, zipCode=122001], products=[Product
[id=5eb327768442b8385bd4bb19, name=IpHone, price=60000.0, reviews=[Review [
customerName=asad, rating=4, approved=true]]]]]
Lets perform one more insert and retrieve operation to the above documents:
@Bean
CommandLineRunner commandLineRunner(CustomerRepository customerReposito
ry, ProductRepository productRepository) {
   return new CommandLineRunner() {
      @Override
      public void run(String... args) throws Exception {
         Product samsung = new Product("Samsung", 50000.0d, Arrays.a
         sList(new Review("ali", 5, true)));
         samsung = productRepository.save(samsung);
         //Fetch Old record with name Iphone
         Product product = productRepository.findByName("IpHone");
         // Save multiple two products for this user
         Customer customer = new Customer("Ali", "ali@gmail.com", ne
         w Address("Gurgaon", "India", 122018),
         Arrays.asList(samsung, product));
         customer = customerRepository.save(customer);
         System.out.println(customer);
         // Find by Email
         System.out.println(customerRepository.findByEmail("asad@gma
         il.com"));
      }
   };
}
OUTPUT
Customer [id=5eb32bd590ac0c3e200677ea, name=Ali, email=ali@gmail.com,
address=Address [city=Gurgaon, country=India, zipCode=122018], products=[Product
[id=5eb32bd490ac0c3e200677e9, name=Samsung, price=50000.0, reviews=[Review [
customerName=ali, rating=5, approved=true]]], Product [id=5eb327768442b8385bd4bb19,
name=IpHone, price=60000.0, reviews=[Review [ customerName=asad, rating=4,
approved=true]]]]]
Optional[Customer [id=5eb327768442b8385bd4bb1a, name=Asad Ali, email=asad@gmail.com,
address=Address [city=Hyd, country=India, zipCode=122001], products=[Product
[id=5eb327768442b8385bd4bb19, name=IpHone, price=60000.0, reviews=[Review [
customerName=asad, rating=4, approved=true]]]]]]
Spring Data MongoDB - Conclusion
So far we learned, how Spring Data MongoDB is useful in working with MongoDB. We have created a project which connected with the MongoDB server, and performed some CRUD operation. We also exposed some of the rest endpoints and performed restful operations.
Spring Data Redis - Overview
In this tutorial we learn about Spring Data Redis. We will integrate Spring Data with Redis (A popular in−memory data store) by setting up a Spring−based application.
Spring Data Redis - Prerequisites
About 30 minutes
Basic Spring Data framework knowledge
Basic understanding of Redis framework
A java based IDE (Eclipse, STS or IntelliJ IDEA)
JDK 1.8 or later
Gradle 4+ or Maven 3.2+
Spring Data Redis - Introduction
Spring Data Redis, is a part of the Spring Data project. It provides configuration based access to the Redis from Spring application. It offers a level of abstraction for interacting with Key storebased data structure. Before jumping to the coding exercise lets have a basic understanding of Redis.
What is Redis
Redis is an open−source NoSQL database. Redis is a powerful and extremely fast in−memory database. It stores data in key−value pairs. It provides the functionality of distributed caching, where we store most frequently used data which results in quick response instead of performing a lookup into the database each time when an API request comes. It supports a rich set of data structures (lists, sets, strings, hashes, and bitmaps, etc.), also it comes with great features like builtin replication, LRU eviction, different levels of on-disk persistence and transactions.
Usage of Redis in Web Applications
The most common use cases of Redis in Web applications are it is used for User session management where we store and invalidate user sessions. It is also used for caching purposes, where we store the most frequently used data. Not only this, we can achieve the Pub/Sub (Publisher and Subscriber) mechanism through Redis, which is often used for Queues & Notifications. The generation of leader boards in the gaming app is also one of the popular use cases. Geospatial searches are another most common use case where using geospatial commands we can find the location of a user or distance between two geospatial objects, etc. To know more about Redis, its installation, its data types and commands, read out our Redis tutorial by clicking here.
Redis Java Clients
As we know that, to connect with the relational database we need Driver, Similarly, we need a client to connect to a Redis database. A client allows us to communicate with the database programmatically. There are many Redis client that supports most of the programming languages. In this tutorial we will work with the most popular Java Client Jedis. Though there are Java clients as well such as Lettuce RJC, and Radisson, etc. To know more about Java Clients that Redis support click here
What is Jedis
Jedis is a java client library. It is a small lightweight and extremely fast client library in Java for Redis. Spring Data supports Jedis because the implementation of Redis using Jedis is painless. One thing to remember is that Jedis instance is not thread-safe, However using Jedis pool we can achieve thread-safety. Just make a note, Redis itself is a single−threaded which provides concurrency.
Jedis Pool
Jedis pool objects are thread−safe, and can be used for multiple threads. Instead of creating a new connection to the database each time when we send a database request we prefer using the pool. Pool keeps several connections open based on the pool configuration and when a request comes in, it takes a connection from the pool and returns it to the pool when the request is fulfilled. Doing so improves the performance by avoiding the creation of a new connection with each new request.
Spring Data Redis - Getting Started
We can create a Spring project in our favourite IDE. You can create a Spring or Spring Boot based project through IDE. The code sample and examples used in this tutorial has been created through Spring Initializr. If you have created normal Maven or Gradle projects then add below dependencies (i.e. Spring Web Starter and Spring Data Redis (Access + Driver) to your
For Maven
<dependency>
   <groupId>org.springframework.boot</groupId>
   <artifactId>spring-boot-starter-web</artifactId>
</dependency>
<dependency>
   <groupId>org.springframework.boot</groupId>
   <artifactId>spring-boot-starter-data-redis</artifactId>
</dependency>
Above are two Spring Web and Spring Data Redis dependences. If you have created your project as Spring Boot or Starting with Spring Initializr then your final list of dependencies wil look like this −
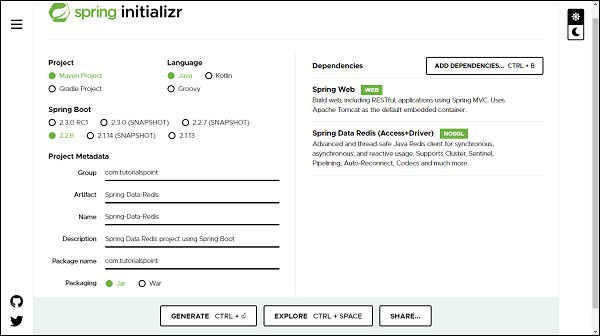
Apart from this, we need to add two more dependencies that is Jedis client and commonspool2 from apache, lets add these two to our POM.
<dependency>
   <groupId>redis.clients</groupId>
   <artifactId>jedis</artifactId>
</dependency>
<dependency>
   <groupId>org.apache.commons</groupId>
   <artifactId>commons-pool2</artifactId>
   <version>2.8.0</version>
</dependency>
The following is our final pom.xml file that is created when you choose Maven −
<?xml version="1.0" encoding="UTF-8"?>
<project xmlns="http://maven.apache.org/POM/4.0.0"
xmlns:xsi="http://www.w3.org/2001/XMLSchema-instance"
xsi:schemaLocation="http://maven.apache.org/POM/4.0.0 https://maven.apa
che.org/xsd/maven-4.0.0.xsd">
   <modelVersion>4.0.0</modelVersion>
   <parent>
      <groupId>org.springframework.boot</groupId>
      <artifactId>spring-boot-starter-parent</artifactId>
      <version>2.2.6.RELEASE</version>
      <relativePath /> <!-- lookup parent from repository -->
   </parent>
   <groupId>com.tutorialspoint</groupId>
   <artifactId>Spring-Data-Redis</artifactId>
   <version>0.0.1-SNAPSHOT</version>
   <name>Spring-Data-Redis</name>
   <description>Spring Data Redis project using Spring Boot</description>
   <properties>
      <java.version>1.8</java.version>
   </properties>
   <dependencies>
      <dependency>
         <groupId>org.springframework.boot</groupId>
         <artifactId>spring-boot-starter-data-redis</artifactId>
      </dependency>
      <dependency>
         <groupId>redis.clients</groupId>
         <artifactId>jedis</artifactId>
      </dependency>
      <dependency>
         <groupId>org.apache.commons</groupId>
         <artifactId>commons-pool2</artifactId>
         <version>2.8.0</version>
      </dependency>
      <dependency>
         <groupId>org.springframework.boot</groupId>
         <artifactId>spring-boot-starter-web</artifactId>
      </dependency>
      <dependency>
         <groupId>org.springframework.boot</groupId>
         <artifactId>spring-boot-starter-test</artifactId>
         <scope>test</scope>
         <exclusions>
            <exclusion>
               <groupId>org.junit.vintage</groupId>
               <artifactId>junit-vintage-engine</artifactId>
            </exclusion>
         </exclusions>
      </dependency>
   </dependencies>
   <build>
      <plugins>
         <plugin>
            <groupId>org.springframework.boot</groupId>
            <artifactId>spring-boot-maven-plugin</artifactId>
         </plugin>
      </plugins>
   </build>
</project>
For Gradle
plugins {
   id 'org.springframework.boot' version '2.2.6.RELEASE'
   id 'io.spring.dependency-management' version '1.0.9.RELEASE'
   id 'java'
}
group = 'com.example'
version = '0.0.1-SNAPSHOT'
sourceCompatibility = '1.8'
repositories {
   mavenCentral()
}
dependencies {
   implementation 'org.springframework.boot:spring-boot-starter-data-redis
   '
   implementation 'org.springframework.boot:spring-boot-starter-web'
   testImplementation('org.springframework.boot:spring-boot-starter-test')
   {
      exclude group: 'org.junit.vintage', module: 'junit-vintage-engine'
   }
}
test {
   useJUnitPlatform()
}
Add the external dependency for Jedis and common−poole2 to the above file.
//https://mvnrepository.com/artifact/redis.clients/jedis
compile group: redis.clients, name: jedis, version: 2.8.0
//https://mvnrepository.com/artifact/org.apache.commons/commons-pool2
compile group: org.apache.commons, name: commons-pool2, version: 2.8.0
The Redis Configuration
To set up a connection between Redis server and application, we will use Redis Client i.e. Jedis. We will be using JedisConnectionFactory class from Jedis, to get Redis connections, bypassing Redis server details like host, port, etc.
RedisTemplate
RedisTemplate is a class from Spring Data Redis. Through RedisTemplate we achieve an abstractions level which helps us in performing various Redis operations such as serialization and exception translation. It provides a set of methods to communicate with a Redis instance. In short RedisTemplate is the central class to interact with the Redis data to perform various Redis operations, through the following methods.
RedisTemplate Operations
Based on the data type we are using, we can use the right from Redis templates. Some of the popular operations are −
For Value related Operation it uses opsForValue() method which returns Redis string/value operations.
For Hash related Operation it uses the opsForHash() method which returns Redis hash operations.
For List related Operation it uses the opsForList() method which returns Redis List operations.
For Set related Operation it uses opsForSet() method which returns Redis Set operations.
For ZSet related Operation it uses the opsForZSet() method which returns Redis sorted set operations.
RedisTemplate class takes two−parameter (i.e. the type of Redis key and the type of Redis value) on instantiation.
Serializers
Once we started storing data in Redis, we will notice that Redis stores the data in bytes. But to do further processing we may need to convert these bytes into various other data types such as String, JSON, XML, objects, etc. We can do this conversion with the help of Serializers. Thus a serializer converts a byte data into other types and vice versa. There are 5 main types of serializers.
GenericToStringSerializer: It serializes String to bytes and vice versa
JacksonJsonRedisSerializer: It converts object to JSON and vice versa
JdkSerializationRedisSerializer: It uses the Java−based serialization methods
OxmSerializer: It uses the Object/XML mapping.
StringRedisSerializer: It also converts the String into Bytes and vice versa but using the specified charset. by default it uses UTF−8 charset.
Redis Java Configuration
Lets define a config class to configure Spring Data Redis.
import org.springframework.context.annotation.Bean;
import org.springframework.context.annotation.Configuration;
import org.springframework.data.redis.connection.jedis.JedisConnectionFacto
ry;
import org.springframework.data.redis.core.RedisTemplate;
@Configuration
public class RedisConfig {
   // Define a connection factory
   @Bean
   JedisConnectionFactory jedisConnectionFactory() {
      return new JedisConnectionFactory();
   }
   // Define a RedisTemplate using JedisConnection Factory
   @Bean
   public RedisTemplate<String, Object> redisTemplate() {
      RedisTemplate<String, Object> template = new RedisTemplate<>();
      template.setConnectionFactory(jedisConnectionFactory());
      return template;
   }
}
In the above config class, first we created JedisConnectionFactory using Jedis Client, and then we created RedisTemplate using JedisConnectionFactory. This RedisTemplate will now be used for querying the data from repository.
Custom Connection Properties
If we observe the above config class, we can find that Redis server details are missing. Lets add Redis server details to the JedisConnection factory.
@Bean
JedisConnectionFactory jedisConnectionFactory() {
   RedisStandaloneConfiguration redisStandaloneConfiguration = new Red
   isStandaloneConfiguration("localhost", 6379);
   return new JedisConnectionFactory(redisStandaloneConfiguration);
}
We can also keep the server host and port information in the application.properties and use them here as follows −
@Autowired
private Environment env;
@Bean
JedisConnectionFactory jedisConnectionFactory() {
   RedisStandaloneConfiguration redisStandaloneConfiguration = new Red
   isStandaloneConfiguration(
   env.getProperty("spring.redis.host", "127.0.0.1"),
   Integer.parseInt(env.getProperty("spring.redis.port", "6379
   ")));
   return new JedisConnectionFactory(redisStandaloneConfiguration);
}
and our application.properties file will contain below two properties.
spring.redis.host=127.0.0.1
spring.redis.port=6379
We can also specify some other properties such as password, total pool connection or idle pool connection if applicable. So far, we are done with the configuration setup. Make sure that Redis is installed and it is running on your machine before launching the application.
Creating Entity
It will be a normal Java class (POJO) −
import java.io.Serializable;
public class Customer implements Serializable {
   private Long id;
   private String name;
   private String email;
   private Double salary;
   public Long getId() {
      return id;
   }
   public void setId(Long id) {
      this.id = id;
   }
   public String getName() {
      return name;
   }
   public void setName(String name) {
      this.name = name;
   }
   public String getEmail() {
      return email;
   }
   public void setEmail(String email) {
      this.email = email;
   }
   public Double getSalary() {
      return salary;
   }
   public void setSalary(Double salary) {
      this.salary = salary;
   }
   @Override
   public String toString() {
      return "Customer [id=" + id + ", name=" + name + ", email=" + email
      + ", salary=" + salary + "]";
   }
   @Override
   public int hashCode() {
      final int prime = 31;
      int result = 1;
      result = prime * result + ((email == null) ? 0 : email.hashCode());
      result = prime * result + ((id == null) ? 0 : id.hashCode());
      result = prime * result + ((name == null) ? 0 : name.hashCode());
      result = prime * result + ((salary == null) ? 0 : salary.hashCode()
      );
      return result;
   }
   @Override
   public boolean equals(Object obj) {
      if (this == obj)
      return true;
      if (obj == null)
      return false;
      if (getClass() != obj.getClass())
      return false;
      Customer other = (Customer) obj;
      if (email == null) {
         if (other.email != null)
         return false;
      } else if (!email.equals(other.email))
      return false;
      if (id == null) {
         if (other.id != null)
         return false;
      } else if (!id.equals(other.id))
      return false;
      if (name == null) {
         if (other.name != null)
         return false;
      } else if (!name.equals(other.name))
      return false;
      if (salary == null) {
         if (other.salary != null)
         return false;
      } else if (!salary.equals(other.salary))
      return false;
      return true;
   }
}
Creating Repository
It will be an interface.
import java.util.List;
import java.util.Map;
import java.util.Set;
import com.tutorialspoint.jedis.entity.Customer;
public interface CustomerRepository {
   // Working with Strings
   void setCustomerAsString(String key, String value);
   Object getCustomerAsString(String key);
   void deleteByKey(String id);
   // Working with List
   void persistCustomerList(Customer customer);
   List<Object> fetchAllCustomer();
   // Working with Set
   void persistCustomerSet(Customer customer);
   Set<Object> fetchAllCustomerFromSet();
   boolean isSetMember(Customer customer);
   // Working with Hash
   void persistCustomeHash(Customer customer);
   void updateCustomerHash(Customer customer);
   Map<Object, Object> findAllCustomerHash();
   Object findCustomerInHash(Long id);
   void deleteCustomerHash(Long id);
}
Lets write an implementation of this interface.
import java.util.List;
import java.util.Map;
import java.util.Set;
import java.util.concurrent.TimeUnit;
import org.springframework.beans.factory.annotation.Autowired;
import org.springframework.data.redis.core.RedisTemplate;
import org.springframework.stereotype.Repository;
import com.tutorialspoint.jedis.entity.Customer;
import com.tutorialspoint.jedis.repository.CustomerRepository;
@Repository
public class CustomerRepositoryImpl implements CustomerRepository {
   private final String CUSTOMER_LIST_KEY = "customer_list";
   private final String CUSTOMER_SET_KEY = "customer_set";
   private final String CUSTOMER_HASH_KEY = "customer_hash";
   @Autowired
   private RedisTemplate<String, Object> redisTemplate;
   @Override
   public void setCustomerAsString(String key, String value) {
      redisTemplate.opsForValue().set(key, value);
      redisTemplate.expire(key, 60, TimeUnit.SECONDS);
   }
   @Override
   public Object getCustomerAsString(String key) {
      return redisTemplate.opsForValue().get(key);
   }
   @Override
   public void deleteByKey(String key) {
      redisTemplate.expire(key, 0, TimeUnit.SECONDS);
   }
   // List Operations
   @Override
   public void persistCustomerList(Customer customer) {
      redisTemplate.opsForList().leftPush(CUSTOMER_LIST_KEY, customer);
   }
   @Override
   public List<Object> fetchAllCustomer() {
      return redisTemplate.opsForList().range(CUSTOMER_LIST_KEY, 0, -1);
   }
   // Set Operations
   @Override
   public void persistCustomerSet(Customer customer) {
      // Add an object to given set
      redisTemplate.opsForSet().add(CUSTOMER_SET_KEY, customer);
   }
   @Override
   public Set<Object> fetchAllCustomerFromSet() {
      // Fetch an object from a given set key
      return redisTemplate.opsForSet().members(CUSTOMER_SET_KEY);
   }
   // Hash operations
   @Override
   public boolean isSetMember(Customer customer) {
      // Check whether an object is part of the guven set or not?
      return redisTemplate.opsForSet().isMember(CUSTOMER_SET_KEY, custome
      r);
   }
   @Override
   public void persistCustomeHash(Customer customer) {
      // Persisting an object to the hash
      redisTemplate.opsForHash().put(CUSTOMER_HASH_KEY, customer.getId(),
      customer);
   }
   @Override
   public void updateCustomerHash(Customer customer) {
      // Updating an object to the hash
      redisTemplate.opsForHash().put(CUSTOMER_HASH_KEY, customer.getId(),
      customer);
   }
   @Override
   public Map<Object, Object> findAllCustomerHash() {
      // Finding all customer in Hash
      return redisTemplate.opsForHash().entries(CUSTOMER_HASH_KEY);
   }
   @Override
   public Object findCustomerInHash(Long id) {
      // Find a customer from Hash based on id
      return redisTemplate.opsForHash().get(CUSTOMER_HASH_KEY, id);
   }
   @Override
   public void deleteCustomerHash(Long id) {
      // Delete a customer from Hash
      redisTemplate.opsForHash().delete(CUSTOMER_HASH_KEY, id);
   }
}
In the above implementation we are using RedisTemplate to perform operation like push, get and delete etc with Redis database. WE have given expiry time in second with value 60. That means data will get deleted from database post 60 second of persistence time. Also we are trying to delete an object from Redis data base, for that we are using expire() method of RedisTemplate(). Deleting a record from Redis is simply mean expiring it. Lets write service to invoke these methods.
import java.util.List;
import java.util.Map;
import java.util.Set;
import com.tutorialspoint.jedis.entity.Customer;
public interface CustomerService {
   void setCustomerAsString(String key, String value);
   String getCustomerAsString(String key);
   void deleteById(String id);
   void persistCustomerToList(Customer customer);
   List<Object> fetchAllCustomer();
   void persistCustomerToSet(Customer customer);
   Set<Object> findAllSetCustomer();
   boolean isSetMember(Customer customer);
   void deleteFromHash(Long id);
   Customer findHashCustomer(Long id);
   void updateCustomerTohash(Customer customer);
   Map<Object, Object> findAllHashCustomer();
   void persistCustomerToHash(Customer customer);
}
Lets write an implementation of the above service −
import java.util.List;
import java.util.Map;
import java.util.Set;
import org.springframework.beans.factory.annotation.Autowired;
import org.springframework.stereotype.Service;
import com.tutorialspoint.jedis.entity.Customer;
import com.tutorialspoint.jedis.repository.CustomerRepository;
import com.tutorialspoint.jedis.service.CustomerService;
@Service
public class CustomerServiceImpl implements CustomerService {
   @Autowired
   private CustomerRepository customerRepository;
   @Override
   public void setCustomerAsString(String key, String value) {
      customerRepository.setProgrammerAsString(key, value);
   }
   @Override
   public String getCustomerAsString(String key) {
      return (String) customerRepository.getProgrammerAsObject(key);
   }
   @Override
   public void deleteById(String id) {
      customerRepository.deleteByKey(id);
   }
   @Override
   public void persistCustomerToList(Customer customer) {
      customerRepository.persistCustomerList(customer);
   }
   @Override
   public List<Object> fetchAllCustomer() {
      return customerRepository.fetchAllCustomer();
   }
   @Override
   public void persistCustomerToSet(Customer customer) {
      customerRepository.persistCustomerSet(customer);
   }
   @Override
   public Set<Object> findAllSetCustomer() {
      return customerRepository.fetchAllCustomerFromSet();
   }
   @Override
   public boolean isSetMember(Customer customer) {
      return customerRepository.isSetMember(customer);
   }
   // Hash related operations
   @Override
   public void deleteFromHash(Long id) {
      customerRepository.deleteCustomerHash(id);
   }
   @Override
   public Customer findHashCustomer(Long id) {
      Customer customer = (Customer) customerRepository.findCustomerInHas
      h(id);
      return customer;
   }
   @Override
   public void updateCustomerTohash(Customer customer) {
      customerRepository.updateCustomerHash(customer);
   }
   @Override
   public Map<Object, Object> findAllHashCustomer() {
      return customerRepository.findAllCustomerHash();
   }
   @Override
   public void persistCustomerToHash(Customer customer) {
      customerRepository.persistCustomeHash(customer);
   }
}
Accessing Data Using RedisTemplate from Customer Repository
Now, lets create a controller to push and fetch some data through rest endpoints.
import java.util.List;
import java.util.Map;
import java.util.Set;
import org.springframework.beans.factory.annotation.Autowired;
import org.springframework.web.bind.annotation.DeleteMapping;
import org.springframework.web.bind.annotation.GetMapping;
import org.springframework.web.bind.annotation.PathVariable;
import org.springframework.web.bind.annotation.PostMapping;
import org.springframework.web.bind.annotation.RequestBody;
import org.springframework.web.bind.annotation.RestController;
import com.fasterxml.jackson.core.JsonProcessingException;
import com.fasterxml.jackson.databind.ObjectMapper;
import com.tutorialspoint.jedis.entity.Customer;
import com.tutorialspoint.jedis.service.CustomerService;
@RestController
public class CustomerController {
   @Autowired
   private CustomerService customerService;
   // Persisting an object
   @PostMapping("/customer/add")
   public void persistObject(@RequestBody Customer customer) {
      ObjectMapper objectMapper = new ObjectMapper();
      try {
         customerService.setCustomerAsString(String.valueOf(customer.getI
         d()),
         objectMapper.writeValueAsString(customer));
      } catch (JsonProcessingException e) {
         e.printStackTrace();
      }
   }
   // Retrieving an object
   @GetMapping("/customer/find/{id}")
   public String fetchObject(@PathVariable String id) {
      return customerService.getCustomerAsString(id);
   }
   // Deleting an object
   @DeleteMapping("/customer/delete/{id}")
   public void deleteObject(@PathVariable String id) {
      customerService.deleteById(id);
   }
   // Add an object to the list
   @PostMapping("/customer/list/add")
   public void persistObjectList(@RequestBody Customer customer) {
      customerService.persistCustomerToList(customer);
   }
   // Retrieving all object from the list
   @GetMapping("/customer/find/all")
   public List<Object> fetchObjectList() {
      return customerService.fetchAllCustomer();
   }
   // Add an object to the set
   @PostMapping("/customer/set/add")
   public void persistObjecSet(@RequestBody Customer customer) {
      customerService.persistCustomerToSet(customer);
   }
   // Retrieving all object from the set
   @GetMapping("/customer/find/set/all")
   public Set<Object> findAllSetCustomer() {
      return customerService.findAllSetCustomer();
   }
   // Check whether an object is in the set or not
   @PostMapping("/customer/set/memeber")
   public boolean isSetMember(@RequestBody Customer customer) {
      return customerService.isSetMember(customer);
   }
   // Add an object to the HASH
   @PostMapping("/customer/hash/add")
   public void persistObjecHash(@RequestBody Customer customer) {
      customerService.persistCustomerToHash(customer);
   }
   // Retrieving all object from the HASH
   @GetMapping("/customer/find/hash/all")
   public Map<Object, Object> findAllHashCustomer() {
      return customerService.findAllHashCustomer();
   }
   // Update an object to the HASH
   @PostMapping("/customer/hash/update")
   public void updateHashCustomer(@RequestBody Customer customer) {
      customerService.updateCustomerTohash(customer);
   }
   // Retrieving all object from the HASH
   @GetMapping("/customer/find/hash/{id}")
   public Customer findHashCustomer(@PathVariable Long id) {
      return customerService.findHashCustomer(id);
   }
   // Deleting an object
   @DeleteMapping("/customer/hash/delete/{id}")
   public void deleteObjectFromHash(@PathVariable Long id) {
      customerService.deleteFromHash(id);
   }
}
Persisting and Object as String
Lets persist some data through postman, our endpoint will be http://localhost:8080/customer/add of type POST, we can pass Customer fields in the body −
{
   "id":1,
   "name":"Jacob",
   "email":"john@gmail.com",
   "salary":28500
}
Now hit the send button, the record is persisted and postman returned the response 200 [OK].
Retrieving an Object as String
Lets try to fetch it out the above record from Redis database through postman, it would be a GET call with url http://localhost:8080/customer/find/1 RESPONSE
{"id":1,"name":"Jacob","email":"john@gmail.com","salary":28500.0}
Make sure to invoke above GET call within 60 second, because while saving, we have given the expiry time in second with duration 60.
Deleting an Object
Lets try deleting it out from the database. Let call our delete api with endpoint http://localhost:8080/customer/delete/1 of Type DELETE. Invoking this API will return 200 [OK] which means record has been dropped out from the Redis database. If you try fetching it out, there wont be any record.
Working with List Data Type
If you observe in the UserRepositoryImpl, we have addedbelow code for working with List.
// List Operations
@Override
public void persistCustomerList(Customer customer) {
   redisTemplate.opsForList().leftPush(CUSTOMER_LIST_KEY, customer);
}
@Override
public List<Object> fetchAllCustomer() {
   return redisTemplate.opsForList().range(CUSTOMER_LIST_KEY, 0, -1);
}
Persisting a list of Objects
To do So, we used opsForList() method of RedisTemplate. All the customers will get added to the list one by one. Lets add some of them using rest end points http://localhost:8080/customer/list/add. It will be a POST call
{
   "id":1,
   "name":"Jacob",
   "email":"john@gmail.com",
   "salary":28500
}
and, add one more customer to the list.
{
   "id":2,
   "name":"John",
   "email":"jacob@gmail.com",
   "salary":18500
}
Submitting the above two request body will give 200 [OK].
Fetching a list of Objects
Lets fetch out the list of customers available in the list. It will be a GET call with end point http://localhost:8080/customer/find/all RESPONSE −
[
   {
      "id": 2,
      "name": "John",
      "email": "jacob@gmail.com",
      "salary": 18500.0
   },
   {
      "id": 1,
      "name": "Jacob",
      "email": "john@gmail.com",
      "salary": 28500.0
   }
]
Working with Set Data Type
If we observe in the UserRepository, we have added below part of code to work with Set related operations.
// Set Operations
@Override
public void persistCustomerSet(Customer customer) {
   // Add an object to given set
   redisTemplate.opsForSet().add(CUSTOMER_SET_KEY, customer);
}
@Override
public Set<Object> fetchAllCustomerFromSet() {
   //Fetch an object from a given set key
   return redisTemplate.opsForSet().members(CUSTOMER_SET_KEY);
}
@Override
public boolean isSetMember(Customer customer) {
   // Check whether an object is part of the guven set or not?
   return redisTemplate.opsForSet().isMember(CUSTOMER_SET_KEY, custome
   r);
}
Persisting a Set of Objects
Lets add below data to the set, It would be a POST call with endpoint http://localhost:8080/customer/set/add with body −
{
   "id":1,
   "name":"Asad",
   "email":"asad@gmail.com",
   "salary":38500
}
and another object
{
   "id":2,
   "name":"Ali",
   "email":"ali@gmail.com",
   "salary":8500
}
Fetching Set Objects
Lets fetch the data from set, It would be a GET call with endpoint http://localhost:8080/customer/find/set/all OUTPUT −
[
   {
      id: 1,
      name: Asad,
      email: "asad@gmail.com",
      salary: 38500.0
   },
   {
      id: 2,
      name: Ali,
      email: "ali@gmail.com",
      salary: 8500.0
   }
]
Is an Object Member of Set
Lets check whether an object is part of given set or not, It would be a POST call, and data need to be passed in the body, with endpoint url http://localhost:8080/customer/set/memeber BODY −
{
   "id":2,
   "name":"Ali",
   "email":"ali@gmail.com",
   "salary":8500
}
OUTPUT
true with 200 [OK]
Working with Hash Data Type
If we observe in the CustomerRepository, we have added below part of code to perform certain operations with Hash −
// Hash operations
@Override
public boolean isSetMember(Customer customer) {
   // Check whether an object is part of the guven set or not?
   return redisTemplate.opsForSet().isMember(CUSTOMER_SET_KEY, custome
   r);
}
@Override
public void persistCustomeHash(Customer customer) {
   // Persisting an object to the hash
   redisTemplate.opsForHash().put(CUSTOMER_HASH_KEY, customer.getId(),
   customer);
}
@Override
public void updateCustomerHash(Customer customer) {
   // Updating an object to the hash
   redisTemplate.opsForHash().put(CUSTOMER_HASH_KEY, customer.getId(),
   customer);
}
@Override
public Map<Object, Object> findAllCustomerHash() {
   // Finding all customer in Hash
   return redisTemplate.opsForHash().entries(CUSTOMER_HASH_KEY);
}
@Override
public Object findCustomerInHash(Long id) {
   // Find a customer from Hash based on id
   return redisTemplate.opsForHash().get(CUSTOMER_HASH_KEY, id);
}
@Override
public void deleteCustomerHash(Long id) {
   // Delete a customer from Hash
   redisTemplate.opsForHash().delete(CUSTOMER_HASH_KEY, id);
}
In the above code sample, we are using common put method() for pushing a new object into the Hash as well as for updating an object into the hash. This is because a put method will override the entry if it already exists.
Persisting an object to the Hash
{
   "id":1,
   "name":"Martin",
   "email":"martin@gmail.com",
   "salary":380500
}
and another object
{
   "id":2,
   "name":"Luther",
   "email":"luther@gmail.com",
   "salary":100500
}
Fetching all objects from Hash
Lets fetch the above added data from the hash using GET URL http://localhost:8080/customer/find/hash/all OUTPUT −
{
   "1": {
      "id": 1,
      "name": "Martin",
      "email": "martin@gmail.com",
      "salary": 380500.0
   },
   "2": {
      "id": 2,
      "name": "Luther",
      "email": "luther@gmail.com",
      "salary": 100500.0
   }
}
Updating an Object to the Hash
Lets update customer whose id is 1, we will update his salary using POST URL http://localhost:8080//customer/hash/update and Body Data −
{
   "id":1,
   "name":"Martin",
   "email":"martin@gmail.com",
   "salary":180500
}
Finding an object from the Hash
Lets fetch the above customer, and check whether data has been updated or not. It will be a GET call with URL http://localhost:8080/customer/find/hash/1 RESPONSE −
{
   "id":1,
   "name":"Martin",
   "email":"martin@gmail.com",
   "salary":180500
}
Deleting an object from the Hash
Lets try deleting the customer with id=1. It wil be a DELETE call with URI http://localhost:8080/customer/hash/delete/1, and the customer has been deleted.
Spring Data Redis with CrudRepository
In the above examples we have been working with a domain class and repository without extending CrudRepository. Spring Data Redis has inbuilt support for CrudRepositories as well. Working with CrudRepository with Spring Data Redis requires entities to be annotated with special kind of annotations. Lets create a new entity and repository to illustrate this in details.
Creating Entity
import org.springframework.data.redis.core.RedisHash;
@RedisHash("user")
public class User {
   public enum Gender {
      MALE, FEMALE
   }
   @Id
   private Long id;
   private String name;
   @Indexed
   private Gender gender;
   private int marks;
   public User(String name, Gender gender, int marks) {
      this.name = name;
      this.gender = gender;
      this.marks = marks;
   }
   public Long getId() {
      return id;
   }
   public void setId(Long id) {
      this.id = id;
   }
   public String getName() {
      return name;
   }
   public void setName(String name) {
      this.name = name;
   }
   public Gender getGender() {
      return gender;
   }
   public void setGender(Gender gender) {
      this.gender = gender;
   }
   public int getMarks() {
      return marks;
   }
   public void setMarks(int marks) {
      this.marks = marks;
   }
}
The above entity is annotated with annotation @RedisHash, It marks the entity as an aggregate root to be stored in a RedisHash. We can also use other annotations supported by Spring Data.
Creating Repositories
Lets create a repository, this time we will extend CrudRepository.
import org.springframework.data.repository.CrudRepository;
import org.springframework.stereotype.Repository;
import com.tutorialspoint.jedis.entity.User;
@Repository
public interface UserRepository extends CrudRepository<User, Long> {
}
By extending CrudRepository, in UserRepository, we have automatically access to the all persistence method for CRUD functionality.
Accessing Data Using User Repository
Lets create a controller to push and fetch data to/from the Redis database.
import java.util.Optional;
import org.springframework.beans.factory.annotation.Autowired;
import org.springframework.web.bind.annotation.DeleteMapping;
import org.springframework.web.bind.annotation.GetMapping;
import org.springframework.web.bind.annotation.PathVariable;
import org.springframework.web.bind.annotation.PostMapping;
import org.springframework.web.bind.annotation.RequestBody;
import org.springframework.web.bind.annotation.RestController;
import com.tutorialspoint.jedis.entity.User;
import com.tutorialspoint.jedis.repository.UserRepository;
@RestController
public class UserController {
   @Autowired
   private UserRepository userRepository;
   // Persisting an object
   @PostMapping("/user/add")
   public void persistObject(@RequestBody User user) {
      userRepository.save(user);
   }
   // Retrieving an object
   @GetMapping("/user/find/{id}")
   public Optional<User> fetchObject(@PathVariable Long id) {
      return userRepository.findById(id);
      // Deleting an object
      @DeleteMapping("/user/delete/{id}")
      public void deleteObject(@PathVariable Long id) {
         userRepository.deleteById(id);
      }
      // Retrieving all object from the list
      @GetMapping("/user/find/all")
      public Iterable<User> fetchObjectList() {
         return userRepository.findAll();
      }
   }
}
Persisting and Object
Lets push some data using postman, our endpoint will be http://localhost:8080/user/add, It will be a POST call, with below data in body.
{
   "id": 1,
   "name": "Jacob",
   "gender": 1,
   "marks": 98
}
and
{
   "id":2,
   "name":"John",
   "gender":0,
   "marks":88
}
We have pushed two users data in through above API. WE can push as many we want in similar way.
Retrieving an Object
Lets find out the user data pushed above, our GET API end point will be http://localhost:8080/user/find/2, We are trying to fetch the user with id=2. RESPONSE −
{
   "id": 2,
   "name": "John",
   "gender": "MALE",
   "marks": 88
}
Finding all Objects
Lets try fetching out all the user records present in the Redis database. Our GET API end point will be http://localhost:8080/user/find/all RESPONSE −
[
   {
      "id": 1,
      "name": "Jacob",
      "gender": "FEMALE",
      "marks": 98
   },
   {
      "id": 2,
      "name": "John",
      "gender": "MALE",
      "marks": 88
   }
]
Deleting an Object
Finally, lets try deleting out one of the user record, We will try to delete user with id=1, our DELETE API endpoint will be http://localhost:8080/user/delete/1. Hitting this api will give us 200 [OK] and if we try fetching out again with GET URI http://localhost:8080/user/find/1 we will get response as 200 [OK] with content null.
Spring Data Redis - Feature
It provides connection support with multiple Redis Driver i.e. Jedis, Lettuce etc.
It provides RedisTemplate to perform various Redis related operations.
It supports PUB/Sub feature.
Spring Data Redis - Conclusion
In this tutorial we learned about Spring Data Redis in depth. We learned about Redis Client, RedisTemplate, and its various operations. We also practiced some of the example by creating entity and repository and pushing the data into it.
Spring Data REST - Background
In general, if we have to create a REST API or a restful application using Spring, We majorly use SpringMVC module. As a result, a controller gets created, and then we use a service layer which in turn uses the services provided by the Data access layer (DAO). These data access layer uses JPA to connect with the database, which exposes out the database table as restful resources. SO this is the traditional flow to create a restful application. We have to go through the same boilerplate process again and again, no matter how many applications we have to create. Over this, if our application has to support HAL or HATEOAS functionality then we have to write additional code for this in our controller methods. Is not it cumbersome? The good news is that Spring Data rest help us to create a restful application without the above boilerplate process. Before discussing the Spring Data REST in detail lets have some clarity on core concepts.
What is REST
REST stands for REpresentational State Transfer. It is an architectural style principle defined by Roy Fielding in his Ph.D. dissertation in the year 2000. This principle defines a set of guidelines or specifications. Since it is just a specification, so there must be an implementation of it, and that is HTTP. The HTTP is an implementation of REST and it provides a uniform interface to perform CRUD operation using HTTP methods i.e. POST, GET, PUT, and DELETE. Any web application that allows to perform CRUD operation is usually done through an HTTP uniform interface which in turn provides easy access through URI. Uniform interface and easy access is one of the principles of REST. Click here to know more about REST
HAL and HATEOAS
HATEOAS stands for Hypermedia as the engine of application state. It is another principle of a REST. HATEOAS provides a way to navigate through all the restful resources in our application using hypermedia links. HAL stands for Hypertext application language, is an implementation of HATEOAS. HAL provides the exact structure of the responses of an event so that it can navigate to the resources using links. In short HAL is a JSON representation format that provides us a consistent and good way to hyperlink between resources in our res APIs. We will learn more about HAL in the later section of this tutorials.
Spring Data REST - Introduction
As we have learned in the previous chapter of Spring Data JPA that it simplifies the data access layer, which says that if we want to implement a data access layer then simply create a JPA entity followed by creating a repository that will extend CrudRepository.
Spring Data REST took this to the next level by exposing out all the operation of a repository i.e., save (), delete (), findOne (), findAll () as RESTful resources. Spring Data REST says that without writing any controller and other code and by simply writing a JPA entity and creating an interface and extending a CrudRepository you can expose your database entity as a RESTful resource. Not only this, you will be having HAL and HATEOAS support as well. You are not required to write any custom logic for all this work.
In short Spring Data REST is one of the modules of the Spring Data project. It provides us to build hypermedia−driven RESTful services and it works on top of Spring Data repositories. It scans and analyses our application domain model and generates hypermedia−driven HTTP resources for our web services.
Spring Data REST - Prerequisites
About 30 minutes
Basic Spring Data JPA knowledge
A java based IDE (Eclipse, STS or IntelliJ IDEA)
JDK 1.8 or later
Gradle 4+ or Maven 3.2+
Spring Data REST - Getting Started
Like other Spring−based projects, you can start from scratch by creating a maven or Gradle based project from your favourite IDE. Follow below step by step process or you can bypass the basic setup steps that are already familiar with.
Adding Dependencies
If you have created normal Maven or Gradle projects then add below dependencies to your pom. Spring Data REST is built on top of Spring Data JPA so lets add the dependency for this followed by Spring Data REST dependency. We will also work with HAL based data and with hsqldb, so lets add them as well
For Maven
<dependency>
   <groupId>org.springframework.data</groupId>
   <artifactId>spring-data-jpa</artifactId>
   <version>2.2.6.RELEASE</version>
</dependency>
<dependency>
   <groupId>org.springframework.boot</groupId>
   <artifactId>spring-boot-starter-data-rest</artifactId>
   <version>2.2.6.RELEASE</version>
</dependency>
<dependency>
   <groupId>org.springframework.data</groupId>
   <artifactId>spring-data-rest-hal-browser</artifactId>
   <version>2.2.6.RELEASE</version>
</dependency>
<dependency>
   <groupId>com.h2database</groupId>
   <artifactId>h2</artifactId>
   <scope>runtime</scope>
</dependency>
If you have created your project as Spring Boot or Starting with Spring Initializr then your final list of dependencies will look like this −
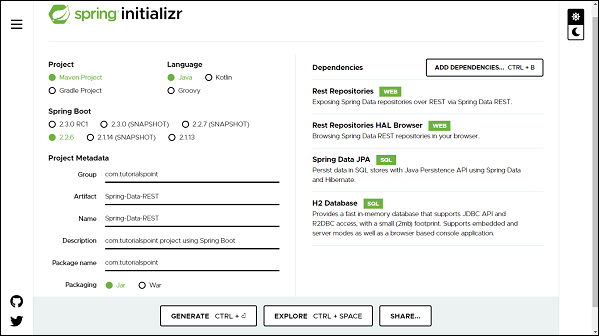
Note − The code sample and examples used in this tutorial has been created through Spring Initializr.
You can add database dependency as per of your choice, for illustration purpose this tutorial has used in−memory hsqldb database. The following is your final pom.xml file that is created when you choose Maven −
<?xml version="1.0" encoding="UTF-8"?>
<project xmlns="http://maven.apache.org/POM/4.0.0" xmlns:xsi="http://www.w3
.org/2001/XMLSchema-instance"
xsi:schemaLocation="http://maven.apache.org/POM/4.0.0 https://maven.apa
che.org/xsd/maven-4.0.0.xsd">
   <modelVersion>4.0.0</modelVersion>
   <parent>
      <groupId>org.springframework.boot</groupId>
      <artifactId>spring-boot-starter-parent</artifactId>
      <version>2.2.6.RELEASE</version>
      <relativePath/> <!-- lookup parent from repository -->
   </parent>
   <groupId>com.tutorialspoint</groupId>
   <artifactId>Spring-Data-REST</artifactId>
   <version>0.0.1-SNAPSHOT</version>
   <name>Spring-Data-REST</name>
   <description>Spring Data REST project using Spring Boot</description>
   <properties>
      <java.version>1.8</java.version>
   </properties>
   <dependencies>
      <dependency>
         <groupId>org.springframework.boot</groupId>
         <artifactId>spring-boot-starter-data-jpa</artifactId>
      </dependency>
      <dependency>
         <groupId>org.springframework.boot</groupId>
         <artifactId>spring-boot-starter-data-rest</artifactId>
      </dependency>
      <dependency>
         <groupId>org.springframework.data</groupId>
         <artifactId>spring-data-rest-hal-browser</artifactId>
      </dependency>
      <dependency>
         <groupId>com.h2database</groupId>
         <artifactId>h2</artifactId>
         <scope>runtime</scope>
      </dependency>
      <dependency>
         <groupId>org.springframework.boot</groupId>
         <artifactId>spring-boot-starter-test</artifactId>
         <scope>test</scope>
         <exclusions>
         <exclusion>
               <groupId>org.junit.vintage</groupId>
               <artifactId>junit-vintage-engine</artifactId>
            </exclusion>
         </exclusions>
      </dependency>
   </dependencies>
   <build>
      <plugins>
         <plugin>
            <groupId>org.springframework.boot</groupId>
            <artifactId>spring-boot-maven-plugin</artifactId>
         </plugin>
      </plugins>
   </build>
</project>
Creating the First REST API
Spring Data REST allows us to create a restful resource, just by creating an entity and repository. Since Spring Data REST works on top of Spring Data JPA, so the entity and repository creation will be using Spring Data JPA
Creating Entity
An entity in Spring Data JPA can be created using annotation @Entity from javax.persistence. Create a normal java class and add the entity annotation. This annotation instruct the Hibernate to create a table using the class definition. Lets have a look on below created User entity.
import javax.persistence.Entity;
import javax.persistence.GeneratedValue;
import javax.persistence.GenerationType;
import javax.persistence.Id;
@Entity
public class User {
   @Id
   @GeneratedValue(strategy = GenerationType.AUTO)
   private Long id;
   private String firstName;
   private String lastName;
   private String email;
   protected User() {
   }
   public User(String firstName, String lastName, String email) {
      this.firstName = firstName;
      this.lastName = lastName;
      this.email = email;
   }
   public Long getId() {
      return id;
   }
   public void setId(Long id) {
      this.id = id;
   }
   public String getFirstName() {
      return firstName;
   }
   public void setFirstName(String firstName) {
      this.firstName = firstName;
   }
   public String getLastName() {
      return lastName;
   }
   public void setLastName(String lastName) {
      this.lastName = lastName;
   }
   public String getEmail() {
      return email;
   }
   public void setEmail(String email) {
      this.email = email;
   }
   @Override
   public String toString() {
      return "User [id=" + id + ", firstName=" + firstName + ", lastName=
      " + lastName + ", email=" + email + "]";
   }
}
If you want to give a custom name to your entity use annotation @Table from javax.persistence. Syntax @Table(name="table_name"). Since Spring Data JPA works on top of JPA, and so all other annotation used above are from javax.persistence.
Default Constructor− defined above will be used by JPA and not by you and so declared as protected. The other parameterised constructor will be used y you to create an object of User to persist into the database. The annotation @Id is used against id property to recognise objects ID. The annotation GeneratedValue is to instruct the JPA that Id generation should happen automatically. The toString() is used for your convenience to print User properties.
Creating Repositories
Lets create an interface which will be our repository. In Spring Data JPA we need to extend CrudRepository from org.springframework.data.repository. CrudRepository gives us most commonly used CRUD methods like save (), delete (), findById (), findAll () and few others. Lets have a look on created repository.
import org.springframework.data.repository.CrudRepository;
import com.tutorialspoint.entities.User;
public interface UserRepositories extends CrudRepository<User, Long> {
}
Extending a CrudRepository automatically creates a bean against the interface name. In our case Spring will create a bean called userRepository. The CrudRepository takes a generic parameter which will be the entity name and its Id type. In our case it is User and Long respectively. Extending CrudRepository enables access to several most commonly used CRUD methods like save (), delete (), findById (), findAll () and few others. There is much more to learn about the methods inside the repository, we will be discussing this in the section of Query Methods in detail, but first lets perform some CRUD operation on the above−created entity. In legacy Java application, you were supposed to write an implementation class for UserRepository, but with Spring Data JPA you are not supposed to write any implementation of the UserRepository interface. Spring Data JPA automatically creates an implementation in the background for you, when you run your application.
Note − We are not required to create a database schema manually in Spring Data JPA, Hibernate will automatically translate the above−defined entity into the table.
Configuring the Data Source in application.properties file
If you are using database other thank H2, like MySQL, then first add dependencies and then configure the database credentials in your application properties file: If you have created your project using Spring Boot, it gives your application.properties file under the resource folder of your project. If not, you can create an application.properties file in src/main/resources/ folder. Once the file created enter the MySQL database details such as database name, username, and password as shown below. If you are not giving database details in the application.properties file and you have added dependency for hsqldb database then by default this database will be used by Spring Data JPA for your project.
spring.jpa.hibernate.ddl-auto=update
spring.datasource.url=jdbc:mysql://localhost:3306/tutorials_point
spring.datasource.username=mySqlUserName
spring.datasource.password=mySqlPassword
In the above configuration we have spring.jpa.hibernate.ddl−auto whose default value for MySQL is none and for H2 database is create−drop. All possible values are create, update,create−drop and none.
create − A database gets created every time but never drops on close.
update − A database gets changed as per entity structure.
create−drop − A database gets created every time but drops it once SessionFactory is closed
none − No change in the database structure.
Note − If we do not have our database structure, we should use create or update.
Test the REST API
Once we are done with project setup, entity and repository creation, we can launch the project. Lets see our application by running it. Depending on how you have created the application, launch it (If it is a Spring Boot, then launch as a Spring boot or Java Application). If you have not mentioned the port in properties file then it will launches the application by default on port 8080. Post launching the application it will look like −
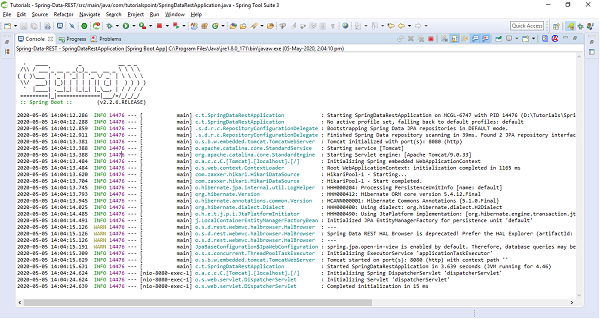
Note −
If you are getting any warning related to deprecation of HAL Browser, you can replace your HAL Browser dependency with below one. Once replaced, re−launch the application
<dependency>
   <groupId>org.springframework.data</groupId>
   <artifactId>spring-data-rest-hal-explorer</artifactId>
</dependency>
Since the server is running on port 8080, Now, Open the postman and enter url http://localhost:8080 and hit the Send button, you will get the response −
{
"_links": {
"users": {
"href": "http://localhost:8080/users"
},
"profile": {
"href": "http://localhost:8080/profile"
}
}
}
The above response consist of the list of services in the application, and also an additional service which we didnt expose called profile. This profile provides application metadata.
This to be noted that above response is structured as per the REST specification and guidelines which contains a uniform interface and and messages which are self−descriptive in nature.
Now lets understand what is happening in the background. Spring Data REST at run time scans through all the repositories that we have created and it exposes them out as restful resources. In our case the only restful resource is users, because we have only for repository for an entity called User.
Lets click on the href link http://localhost:8080/users, this url will return the response −
{
"_embedded": {
"users": []
},
"_links": {
"self": {
"href": "http://localhost:8080/users"
},
"profile": {
"href": "http://localhost:8080/profile/users"
},
"search": {
"href": "http://localhost:8080/users/search"
}
}
}
As of now, there are no users into the database and thats why user has an empty array in the above JSON.
_embedded - This is JSON element where details of all users will be part of this JSON element. _links - This is the section that contains the links to other related resources - HATEOAS.
Performing the REST Operations
Lets add some of the users to the User table using HTTP Post method. To do so, Use the postan which is our restful client.
Create a resource (POST)
create a POST call with the url http://localhost:8080, select body followed by raw and select the JSON(application/json) from the dropdown list. Enter some of the data as per the fields of User entity −
{
"firstName":"John",
"lastName":"Jacob",
"email":"john@gmail.com",
"salary":8500
}
Hit the Send button, and the user has been pushed to the database, the response will look like −
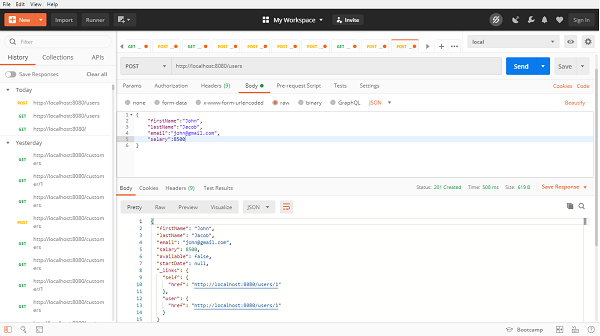
Above API has response status as 201 which means resource got created? If we observe the response content, this time the link will be having some unique id with the link http://localhost:8080/users/1. If we again click on the link, it will be a GET call, and you will get a response as same object.
{
"firstName": "John",
"lastName": "Jacob",
"email": "john@gmail.com",
"salary": 8500,
"available": false,
"startDate": null,
"_links": {
"self": {
"href": "http://localhost:8080/users/1"
},
"user": {
"href": "http://localhost:8080/users/1"
}
}
}
Similarly, we can add multiple uses to the database and can fetch through the link returned in the response.
Update a resource (PUT)
Launch a new tab in the post man, enter the user self-link with id http://localhost:8080/users/1, change the call type to PUT, select body followed by raw and then JSON. Enter the details of user as per entity fields in the body.
{
"firstName":"John",
"lastName":"Franklin",
"email":"john@gmail.com",
"salary":18500,
"available":true
}
In the above JSON, we have changed the lastName and salary from the previous one, also we have added one more field available which is true this time. Hit the send button, and the postman will return the updated resource −
{
"firstName": "John",
"lastName": "Franklin",
"email": "john@gmail.com",
"salary": 18500,
"available": true,
"startDate": null,
"_links": {
"self": {
"href": "http://localhost:8080/users/1"
},
"user": {
"href": "http://localhost:8080/users/1"
}
}
}
Rememebr the PUT call always update the entire object. For instance in above operation we just updated the lastName and slary, but still we have given the other information such as firstName and email. If we do not provide these information post updation it will be set to null. That means using PUT, we cannot update the partial object.
Updating a resource partialy(PATCH)
We can use PATCH call, for partial update of a resource, the process would be the same as PUT, however this time we can give only those fields information which we want to update. Let update the email address this time. To do so, create a PATCH call, with body and raw, enter the email address details in the body section −
{
"email":"john.franklin@gmail.com"
}
Hit the send button, the email has been updated without impacting other fields −
{
"firstName": "John",
"lastName": "Franklin",
"email": "john.franklin@gmail.com",
"salary": 18500,
"available": true,
"startDate": null,
"_links": {
"self": {
"href": "http://localhost:8080/users/1"
},
"user": {
"href": "http://localhost:8080/users/1"
}
}
}
Deleting a resource (DELETE)
Launch a new tab in the post man, enter the user self−link with id http://localhost:8080/users/1, change the call type to DELETE, and hit the Send button. Thats all our resource has been deleted. This time the response status will be 204. If we perform the GET operation on the same self−link this time we will get 404 status as Not Found, which means resource is not available.
HAL Browser
Spring provides HAL Browser application which when pointed to Spring Data REST API, it generates JavaSCript based restful client (HAL Client) on the run time. This whole process is done due to the dependency we added above related to HAL browser or explorer. This helps in generating the JavasCript based web pages which we can use in the web browser by navigating to our restful application. Lets check this by switching to the browser and enter url http://localhost:8080. Automatically Spring will generate an HTML and Javascript based web page which will look like −
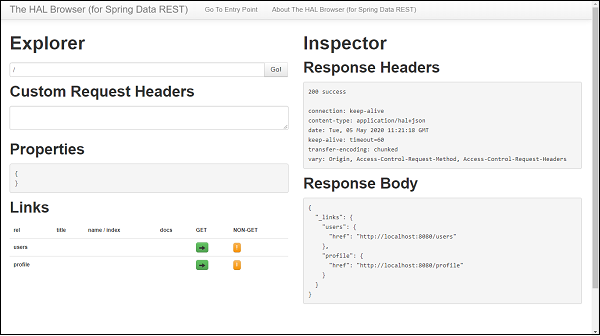
Performing REST operation with HAL Browser
On the HAL browser we can find buttons to perform GET as well as NON−GET operations. Let start with the GET one, Clink on the button, It send a GET request to our application and we will get 200 SUCCESS along with the response body. Similarly, we can perform a Non-GET operation, To Do so, click on the button under NON-GET section, A pop-up screen will get generated which will ask for the input against each field associated with the entity, enter the details which you want to update or create and then click on Make Request button. Thats it our resource has been created or updated based on the operation we performed.
Paging and Sorting
Spring Data REST supports Paging and Sorting by extending our repository with PagingAndSortingRepository which in turn extends the CrudRepository. Lets do this change in our repository −
public interface UserRepositories extends PagingAndSortingRepository<User,
Long> {
}
Paging
If we launch our application and we hit the url http://localhost:8080/users?page=0&size=1, this time we will get some extra element at the end in the response in links section −
{
"_embedded": {
"users": [
{
"firstName": "John",
"lastName": "Franklin",
"email": "john@gmail.com",
"salary": 18500,
"available": true,
"startDate": null,
"_links": {
"self": {
"href": "http://localhost:8080/users/1"
},
"user": {
"href": "http://localhost:8080/users/1"
}
}
}
]
},
"_links": {
"first": {
"href": "http://localhost:8080/users?page=0&size=1"
},
"self": {
"href": "http://localhost:8080/users{&sort}",
"templated": true
},
"next": {
"href": "http://localhost:8080/users?page=1&size=1"
},
"last": {
"href": "http://localhost:8080/users?page=1&size=1"
},
"profile": {
"href": "http://localhost:8080/profile/users"
},
"search": {
"href": "http://localhost:8080/users/search"
}
},
"page": {
"size": 1,
"totalElements": 2,
"totalPages": 2,
"number": 0
}
}
The above response consist of paging links inside links section. These links are first, next, and last etc., which represents the first page, next page and last page respectively. We can also find the page number and the size which represents the number of elements per page to be displayed. At the bottom of the response we can find a page object −
"page": {
"size": 1,
"totalElements": 2,
"totalPages": 2,
"number": 0
}
This contains the size which tells the number of items per page is being retrieved, totalElements represents the total number of records available in the daabase. totalPages reprsents the total number of pages as per total record and being displayed per page. Number represents the current page number which starts with 0. If we want to navigate to next page, then click on the next link inside link section http://localhost:8080/users?page=1&size=1, It will be a GET operation and it will display result for that page. Similarly if we want to go to the last page, we van go by clicking on the last link inside links section. Also if there is no next link available in the links section that means that is the last page and no further records are available, similarly if no prev link is available that means that is the start of page.
Sorting
For sorting the records we can user query param sort against field of the entity. Lets say we wat to sort the record based on the user ids and in descending order. Our final url will be http://localhost:8080/users?sort=id,desc, Lets hit this and this time our result will be in descending order
{
"_embedded": {
"users": [
{
"firstName": "asad",
"lastName": "ali",
"email": "asad@gmail.com",
"salary": 28500,
"available": false,
"startDate": null,
"_links": {
"self": {
"href": "http://localhost:8080/users/2"
},
"user": {
"href": "http://localhost:8080/users/2"
}
}
},
{
"firstName": "John",
"lastName": "Franklin",
"email": "john@gmail.com",
"salary": 18500,
"available": true,
"startDate": null,
"_links": {
"self": {
"href": "http://localhost:8080/users/1"
},
"user": {
"href": "http://localhost:8080/users/1"
}
}
}
]
},
"_links": {
"self": {
"href": "http://localhost:8080/users"
},
"profile": {
"href": "http://localhost:8080/profile/users"
},
"search": {
"href": "http://localhost:8080/users/search"
}
},
"page": {
"size": 20,
"totalElements": 2,
"totalPages": 1,
"number": 0
}
}
Similarly we can sort the record based on other fields of entity such as salary, name, etc. If we do not provide any order by default it will sort in ascending order.
Customizing URI Resources
If we look at the previous URI we worked with http://localhost:8080/users the users in the URI has been take from entity name. By default Spring data prepare our rest endpoint with entity name(by making it plural), if we want some custom defined URI then that also we can do with the help of annotation @RepositoryRestResource from org.springframework.data.rest.core. annotation.
@RepositoryRestResource(collectionResourceRel = "app-users", path = "app-us
ers")
public interface UserRepositories extends PagingAndSortingRepository<User,
Long> {
}
Now our rest end point will be http://localhost:8080/app-users and so on. We can run the application and can continue working around with the new rest endpoints.
Fetching resource based on Query methods
Lets say we want to fetch the record based on email instead of id. To do so, lets add a Query method in the repository.
@RepositoryRestResource(collectionResourceRel = "app-users", path = "app-us
ers")
public interface UserRepositories extends PagingAndSortingRepository<User,
Long> {
List<User> findByEmail(@Param("email") String email);
}
@Param is a query param annotation which is optional just in case we want to use some other param name. If we do not use this annotation by default arguments name will be picked up.
Lets go to the HAL browser or Postman client, Enter our search URL http://localhost:8080/app-users/search/findByEmail?email=john@gmail.com, It will return the response −
{
"_embedded": {
"app-users": [
{
"firstName": "asad",
"lastName": "ali",
"email": "john@gmail.com",
"salary": 28500,
"available": false,
"startDate": null,
"_links": {
"self": {
"href": "http://localhost:8080/app-users/2"
},
"user": {
"href": "http://localhost:8080/app-users/2"
}
}
}
]
},
"_links": {
"self": {
"href": "http://localhost:8080/app-users/search/findByEmail?email=joh
n@gmail.com"
}
}
}
Lets add some more Query methods as well as custom methods to repository,
List<User> findByFirstName(String firstname);
List<User> findByLastName(String lastname);
List<User> findByEmail(@Param("email") String email);
List<User> findByFirstNameAndLastName(String firstName, String lastName
);
List<User> findBySalaryLessThan(Long salary);
List<User> findByStartDateAfter(Date startdate);
List<User> findByStartDateBefore(Date startdate);
@Query("from User")
List<User> findAllUsers();
@Query("select u from User u where u.firstName=:name")
List<User> findAllUsersbyName(String name);
@Query("select u.firstName,u.lastName from User u")
List<Object[]> findUserPartialData();
@Modifying
@Transactional
@Query("delete from User where firstName=:fName")
void deleteUserByFirstName(String fName);
Lets find out all the RESTful APIs applicable for these methods. WE can find this by the resource API http://localhost:8080/app-users/search. If you hit in the web browser or Postman you can find all actionable links as follows.
{
"_links": {
"findByLastName": {
"href": "http://localhost:8080/app-users/search/findByLastName{?lastn
ame}",
"templated": true
},
"findByStartDateBefore": {
"href": "http://localhost:8080/app-users/search/findByStartDateBefore
{?startdate}",
"templated": true
},
"deleteUserByFirstName": {
"href": "http://localhost:8080/app-users/search/deleteUserByFirstName
{?fName}",
"templated": true
},
"findByEmail": {
"href": "http://localhost:8080/app-users/search/findByEmail{?email}",
"templated": true
},
"findAllUsers": {
"href": "http://localhost:8080/app-users/search/findAllUsers"
},
"findByFirstNameAndLastName": {
"href": "http://localhost:8080/app-users/search/findByFirstNameAndLas
tName{?firstName,lastName}",
"templated": true
},
"findByStartDateAfter": {
"href": "http://localhost:8080/app-users/search/findByStartDateAfter{
?startdate}",
"templated": true
},
"findAllUsersbyName": {
"href": "http://localhost:8080/app-users/search/findAllUsersbyName{?n
ame}",
"templated": true
},
"findBySalaryLessThan": {
"href": "http://localhost:8080/app-users/search/findBySalaryLessThan{
?salary}",
"templated": true
},
"findByFirstName": {
"href": "http://localhost:8080/app-users/search/findByFirstName{?firs
tname}",
"templated": true
},
"findUserPartialData": {
"href": "http://localhost:8080/app-users/search/findUserPartialData"
},
"self": {
"href": "http://localhost:8080/app-users/search"
}
}
}
Use the above resources APIs to perform certain actions.
Spring Data REST - Features
Exposes RESTful APIs for our domain model
Supports pagination through navigational links
Provides metadata about the model
Provides HAL browser support to leverage exposed data.
Supports multiple DataSource such as JPA, Cassandra, MongoDB, Solr, and Neo4j etc.
Allows the customization of resource.
Spring Data REST - Conclusion
In the end, we can conclude that Spring Data REST easily exposes the spring data repository as a RESTful APIs.
