- Spring Data Tutorial - Home
- Spring Data Apache Solr
- Overview
- Prerequisites
- Introduction
- What is Apache Solr?
- Getting Started
- Querying
- Features
- Conclusion
- Spring Data Cassandra
- Overview
- Prerequisites
- Introduction
- What is Cassandra?
- Getting Started
- Annotation AllowFiltering with Query Methods
- Partition and Clustering
- Coding hands-on on Partitioning and Clustering
- Features
- Conclusion
- Spring Data Couchbase
- Overview
- Prerequisites
- Introduction
- What is Couchbase?
- Getting Started
- Views
- CouchbaseTemplate
- Hands-on using CouchbaseTemplate
- Features
- Conclusion
- Spring Data Elasticsearch
- Overview
- Prerequisites
- Introduction
- What is ElasticSearch?
- Getting Started
- Querying
- Configuring ElasticsearchOperations bean
- Features
- Conclusion
- Spring Data JDBC
- Introduction
- Need of Spring Data JDBC
- Features
- Domain-Driven Design
- Prerequisites
- Getting Started
- Conclusion
- Spring Data JPA
- Background
- Introduction
- Prerequisites
- Getting Started
- Features
- Conclusion
- Spring Data MongoDB
- Overview
- Prerequisites
- Introduction
- What is MongoDB?
- Getting Started
- Query Methods
- Annotations
- Exposing REST end points
- Relationship
- Conclusion
- Spring Data Redis
- Overview
- Prerequisites
- Introduction
- What is Redis?
- Redis Java Clients
- Getting Started
- Features
- Conclusion
- Spring Data REST
- Background
- Introduction to Spring Data REST
- Prerequisites
- Getting Started
- Features
- Conclusion
- Spring Data Tutorial Useful Resources
- Spring Data Tutorial - Quick Guide
- Spring Data Tutorial - Useful Resources
- Spring Data Tutorial - Discussion
Spring Data REST - Getting Started
Like other Spring−based projects, you can start from scratch by creating a maven or Gradle based project from your favourite IDE. Follow below step by step process or you can bypass the basic setup steps that are already familiar with.
Adding Dependencies
If you have created normal Maven or Gradle projects then add below dependencies to your pom. Spring Data REST is built on top of Spring Data JPA so lets add the dependency for this followed by Spring Data REST dependency. We will also work with HAL based data and with hsqldb, so lets add them as well
For Maven
<dependency>
   <groupId>org.springframework.data</groupId>
   <artifactId>spring-data-jpa</artifactId>
   <version>2.2.6.RELEASE</version>
</dependency>
<dependency>
   <groupId>org.springframework.boot</groupId>
   <artifactId>spring-boot-starter-data-rest</artifactId>
   <version>2.2.6.RELEASE</version>
</dependency>
<dependency>
   <groupId>org.springframework.data</groupId>
   <artifactId>spring-data-rest-hal-browser</artifactId>
   <version>2.2.6.RELEASE</version>
</dependency>
<dependency>
   <groupId>com.h2database</groupId>
   <artifactId>h2</artifactId>
   <scope>runtime</scope>
</dependency>
If you have created your project as Spring Boot or Starting with Spring Initializr then your final list of dependencies will look like this −
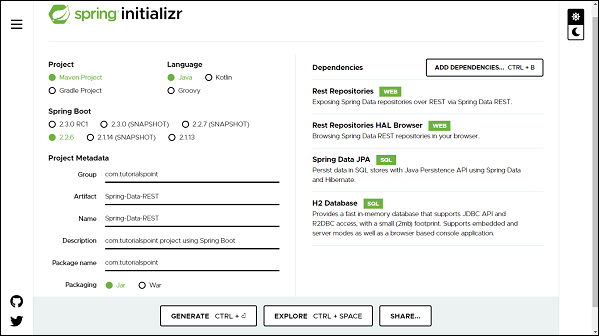
Note − The code sample and examples used in this tutorial has been created through Spring Initializr.
You can add database dependency as per of your choice, for illustration purpose this tutorial has used in−memory hsqldb database. The following is your final pom.xml file that is created when you choose Maven −
<?xml version="1.0" encoding="UTF-8"?>
<project xmlns="http://maven.apache.org/POM/4.0.0" xmlns:xsi="http://www.w3
.org/2001/XMLSchema-instance"
xsi:schemaLocation="http://maven.apache.org/POM/4.0.0 https://maven.apa
che.org/xsd/maven-4.0.0.xsd">
   <modelVersion>4.0.0</modelVersion>
   <parent>
      <groupId>org.springframework.boot</groupId>
      <artifactId>spring-boot-starter-parent</artifactId>
      <version>2.2.6.RELEASE</version>
      <relativePath/> <!-- lookup parent from repository -->
   </parent>
   <groupId>com.tutorialspoint</groupId>
   <artifactId>Spring-Data-REST</artifactId>
   <version>0.0.1-SNAPSHOT</version>
   <name>Spring-Data-REST</name>
   <description>Spring Data REST project using Spring Boot</description>
   <properties>
      <java.version>1.8</java.version>
   </properties>
   <dependencies>
      <dependency>
         <groupId>org.springframework.boot</groupId>
         <artifactId>spring-boot-starter-data-jpa</artifactId>
      </dependency>
      <dependency>
         <groupId>org.springframework.boot</groupId>
         <artifactId>spring-boot-starter-data-rest</artifactId>
      </dependency>
      <dependency>
         <groupId>org.springframework.data</groupId>
         <artifactId>spring-data-rest-hal-browser</artifactId>
      </dependency>
      <dependency>
         <groupId>com.h2database</groupId>
         <artifactId>h2</artifactId>
         <scope>runtime</scope>
      </dependency>
      <dependency>
         <groupId>org.springframework.boot</groupId>
         <artifactId>spring-boot-starter-test</artifactId>
         <scope>test</scope>
         <exclusions>
         <exclusion>
               <groupId>org.junit.vintage</groupId>
               <artifactId>junit-vintage-engine</artifactId>
            </exclusion>
         </exclusions>
      </dependency>
   </dependencies>
   <build>
      <plugins>
         <plugin>
            <groupId>org.springframework.boot</groupId>
            <artifactId>spring-boot-maven-plugin</artifactId>
         </plugin>
      </plugins>
   </build>
</project>
Creating the First REST API
Spring Data REST allows us to create a restful resource, just by creating an entity and repository. Since Spring Data REST works on top of Spring Data JPA, so the entity and repository creation will be using Spring Data JPA
Creating Entity
An entity in Spring Data JPA can be created using annotation @Entity from javax.persistence. Create a normal java class and add the entity annotation. This annotation instruct the Hibernate to create a table using the class definition. Lets have a look on below created User entity.
import javax.persistence.Entity;
import javax.persistence.GeneratedValue;
import javax.persistence.GenerationType;
import javax.persistence.Id;
@Entity
public class User {
   @Id
   @GeneratedValue(strategy = GenerationType.AUTO)
   private Long id;
   private String firstName;
   private String lastName;
   private String email;
   protected User() {
   }
   public User(String firstName, String lastName, String email) {
      this.firstName = firstName;
      this.lastName = lastName;
      this.email = email;
   }
   public Long getId() {
      return id;
   }
   public void setId(Long id) {
      this.id = id;
   }
   public String getFirstName() {
      return firstName;
   }
   public void setFirstName(String firstName) {
      this.firstName = firstName;
   }
   public String getLastName() {
      return lastName;
   }
   public void setLastName(String lastName) {
      this.lastName = lastName;
   }
   public String getEmail() {
      return email;
   }
   public void setEmail(String email) {
      this.email = email;
   }
   @Override
   public String toString() {
      return "User [id=" + id + ", firstName=" + firstName + ", lastName=
      " + lastName + ", email=" + email + "]";
   }
}
If you want to give a custom name to your entity use annotation @Table from javax.persistence. Syntax @Table(name="table_name"). Since Spring Data JPA works on top of JPA, and so all other annotation used above are from javax.persistence.
Default Constructor− defined above will be used by JPA and not by you and so declared as protected. The other parameterised constructor will be used y you to create an object of User to persist into the database. The annotation @Id is used against id property to recognise objects ID. The annotation GeneratedValue is to instruct the JPA that Id generation should happen automatically. The toString() is used for your convenience to print User properties.
Creating Repositories
Lets create an interface which will be our repository. In Spring Data JPA we need to extend CrudRepository from org.springframework.data.repository. CrudRepository gives us most commonly used CRUD methods like save (), delete (), findById (), findAll () and few others. Lets have a look on created repository.
import org.springframework.data.repository.CrudRepository;
import com.tutorialspoint.entities.User;
public interface UserRepositories extends CrudRepository<User, Long> {
}
Extending a CrudRepository automatically creates a bean against the interface name. In our case Spring will create a bean called userRepository. The CrudRepository takes a generic parameter which will be the entity name and its Id type. In our case it is User and Long respectively. Extending CrudRepository enables access to several most commonly used CRUD methods like save (), delete (), findById (), findAll () and few others. There is much more to learn about the methods inside the repository, we will be discussing this in the section of Query Methods in detail, but first lets perform some CRUD operation on the above−created entity. In legacy Java application, you were supposed to write an implementation class for UserRepository, but with Spring Data JPA you are not supposed to write any implementation of the UserRepository interface. Spring Data JPA automatically creates an implementation in the background for you, when you run your application.
Note − We are not required to create a database schema manually in Spring Data JPA, Hibernate will automatically translate the above−defined entity into the table.
Configuring the Data Source in application.properties file
If you are using database other thank H2, like MySQL, then first add dependencies and then configure the database credentials in your application properties file: If you have created your project using Spring Boot, it gives your application.properties file under the resource folder of your project. If not, you can create an application.properties file in src/main/resources/ folder. Once the file created enter the MySQL database details such as database name, username, and password as shown below. If you are not giving database details in the application.properties file and you have added dependency for hsqldb database then by default this database will be used by Spring Data JPA for your project.
spring.jpa.hibernate.ddl-auto=update
spring.datasource.url=jdbc:mysql://localhost:3306/tutorials_point
spring.datasource.username=mySqlUserName
spring.datasource.password=mySqlPassword
In the above configuration we have spring.jpa.hibernate.ddl−auto whose default value for MySQL is none and for H2 database is create−drop. All possible values are create, update,create−drop and none.
create − A database gets created every time but never drops on close.
update − A database gets changed as per entity structure.
create−drop − A database gets created every time but drops it once SessionFactory is closed
none − No change in the database structure.
Note − If we do not have our database structure, we should use create or update.
Test the REST API
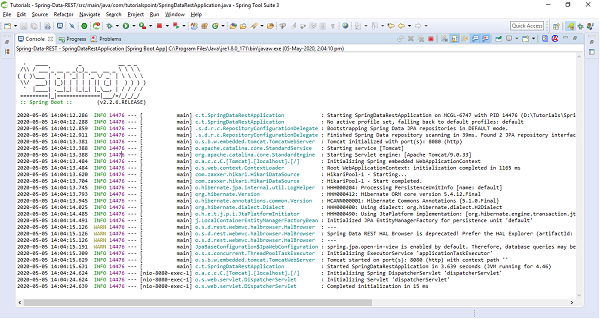
Once we are done with project setup, entity and repository creation, we can launch the project. Lets see our application by running it. Depending on how you have created the application, launch it (If it is a Spring Boot, then launch as a Spring boot or Java Application). If you have not mentioned the port in properties file then it will launches the application by default on port 8080. Post launching the application it will look like −
Note −
If you are getting any warning related to deprecation of HAL Browser, you can replace your HAL Browser dependency with below one. Once replaced, re−launch the application
<dependency>
   <groupId>org.springframework.data</groupId>
   <artifactId>spring-data-rest-hal-explorer</artifactId>
</dependency>
Since the server is running on port 8080, Now, Open the postman and enter url http://localhost:8080 and hit the Send button, you will get the response −
{
   "_links": {
      "users": {
         "href": "http://localhost:8080/users"
      },
      "profile": {
         "href": "http://localhost:8080/profile"
      }
   }
}
The above response consist of the list of services in the application, and also an additional service which we didnt expose called profile. This profile provides application metadata.
This to be noted that above response is structured as per the REST specification and guidelines which contains a uniform interface and and messages which are self−descriptive in nature.
Now lets understand what is happening in the background. Spring Data REST at run time scans through all the repositories that we have created and it exposes them out as restful resources. In our case the only restful resource is users, because we have only for repository for an entity called User.
Lets click on the href link http://localhost:8080/users, this url will return the response −
{
   "_embedded": {
   "users": []
   },
   "_links": {
      "self": {
         "href": "http://localhost:8080/users"
      },
      "profile": {
         "href": "http://localhost:8080/profile/users"
      },
      "search": {
         "href": "http://localhost:8080/users/search"
      }
   }
}
As of now, there are no users into the database and thats why user has an empty array in the above JSON.
_embedded - This is JSON element where details of all users will be part of this JSON element.
_links - This is the section that contains the links to other related resources - HATEOAS.
Performing the REST Operations
Lets add some of the users to the User table using HTTP Post method. To do so, Use the postan which is our restful client.
Create a resource (POST)
create a POST call with the url http://localhost:8080, select body followed by raw and select the JSON(application/json) from the dropdown list. Enter some of the data as per the fields of User entity −
{
   "firstName":"John",
   "lastName":"Jacob",
   "email":"john@gmail.com",
   "salary":8500
}
Hit the Send button, and the user has been pushed to the database, the response will look like −
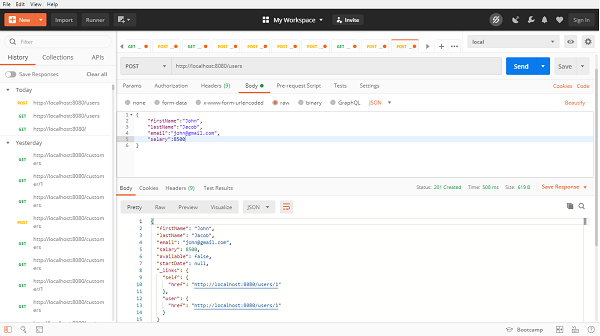
Above API has response status as 201 which means resource got created? If we observe the response content, this time the link will be having some unique id with the link http://localhost:8080/users/1. If we again click on the link, it will be a GET call, and you will get a response as same object.
{
   "firstName": "John",
   "lastName": "Jacob",
   "email": "john@gmail.com",
   "salary": 8500,
   "available": false,
   "startDate": null,
   "_links": {
      "self": {
         "href": "http://localhost:8080/users/1"
      },
      "user": {
         "href": "http://localhost:8080/users/1"
      }
   }
}
Similarly, we can add multiple uses to the database and can fetch through the link returned in the response.
Update a resource (PUT)
Launch a new tab in the post man, enter the user self-link with id http://localhost:8080/users/1, change the call type to PUT, select body followed by raw and then JSON. Enter the details of user as per entity fields in the body.
{
   "firstName":"John",
   "lastName":"Franklin",
   "email":"john@gmail.com",
   "salary":18500,
   "available":true
}
In the above JSON, we have changed the lastName and salary from the previous one, also we have added one more field available which is true this time. Hit the send button, and the postman will return the updated resource −
{
   "firstName": "John",
   "lastName": "Franklin",
   "email": "john@gmail.com",
   "salary": 18500,
   "available": true,
   "startDate": null,
   "_links": {
      "self": {
         "href": "http://localhost:8080/users/1"
      },
      "user": {
         "href": "http://localhost:8080/users/1"
      }
   }
}
Rememebr the PUT call always update the entire object. For instance in above operation we just updated the lastName and slary, but still we have given the other information such as firstName and email. If we do not provide these information post updation it will be set to null. That means using PUT, we cannot update the partial object.
Updating a resource partialy(PATCH)
We can use PATCH call, for partial update of a resource, the process would be the same as PUT, however this time we can give only those fields information which we want to update. Let update the email address this time. To do so, create a PATCH call, with body and raw, enter the email address details in the body section −
{
   "email":"john.franklin@gmail.com"
}
Hit the send button, the email has been updated without impacting other fields −
{
   "firstName": "John",
   "lastName": "Franklin",
   "email": "john.franklin@gmail.com",
   "salary": 18500,
   "available": true,
   "startDate": null,
   "_links": {
      "self": {
         "href": "http://localhost:8080/users/1"
      },
      "user": {
         "href": "http://localhost:8080/users/1"
      }
   }
}
Deleting a resource (DELETE)
Launch a new tab in the post man, enter the user self−link with id http://localhost:8080/users/1, change the call type to DELETE, and hit the Send button. Thats all our resource has been deleted. This time the response status will be 204. If we perform the GET operation on the same self−link this time we will get 404 status as Not Found, which means resource is not available.
HAL Browser
Spring provides HAL Browser application which when pointed to Spring Data REST API, it generates JavaSCript based restful client (HAL Client) on the run time. This whole process is done due to the dependency we added above related to HAL browser or explorer. This helps in generating the JavasCript based web pages which we can use in the web browser by navigating to our restful application. Lets check this by switching to the browser and enter url http://localhost:8080. Automatically Spring will generate an HTML and Javascript based web page which will look like −
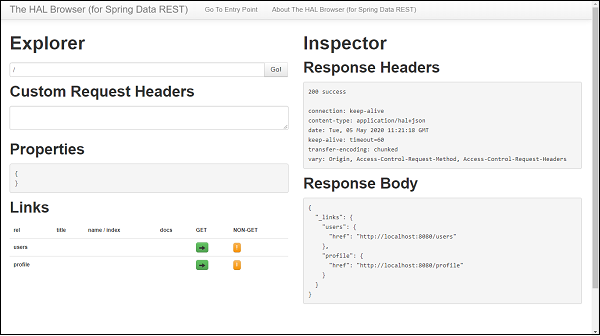
Performing REST operation with HAL Browser
On the HAL browser we can find buttons to perform GET as well as NON−GET operations. Let start with the GET one, Clink on the button, It send a GET request to our application and we will get 200 SUCCESS along with the response body. Similarly, we can perform a Non-GET operation, To Do so, click on the button under NON-GET section, A pop-up screen will get generated which will ask for the input against each field associated with the entity, enter the details which you want to update or create and then click on Make Request button. Thats it our resource has been created or updated based on the operation we performed.
Paging and Sorting
Spring Data REST supports Paging and Sorting by extending our repository with PagingAndSortingRepository which in turn extends the CrudRepository. Lets do this change in our repository −
public interface UserRepositories extends PagingAndSortingRepository<User,
Long> {
   }
Paging
If we launch our application and we hit the url http://localhost:8080/users?page=0&size=1, this time we will get some extra element at the end in the response in links section −
{
   "_embedded": {
      "users": [
         {
            "firstName": "John",
            "lastName": "Franklin",
            "email": "john@gmail.com",
            "salary": 18500,
            "available": true,
            "startDate": null,
            "_links": {
               "self": {
                  "href": "http://localhost:8080/users/1"
               },
               "user": {
                  "href": "http://localhost:8080/users/1"
               }
            }
         }
      ]
   },
   "_links": {
      "first": {
         "href": "http://localhost:8080/users?page=0&size=1"
      },
      "self": {
         "href": "http://localhost:8080/users{&sort}",
         "templated": true
      },
      "next": {
         "href": "http://localhost:8080/users?page=1&size=1"
      },
      "last": {
         "href": "http://localhost:8080/users?page=1&size=1"
      },
      "profile": {
         "href": "http://localhost:8080/profile/users"
      },
      "search": {
         "href": "http://localhost:8080/users/search"
      }
   },
   "page": {
      "size": 1,
      "totalElements": 2,
      "totalPages": 2,
      "number": 0
   }
}
The above response consist of paging links inside links section. These links are first, next, and last etc., which represents the first page, next page and last page respectively. We can also find the page number and the size which represents the number of elements per page to be displayed. At the bottom of the response we can find a page object −
"page": {
   "size": 1,
   "totalElements": 2,
   "totalPages": 2,
   "number": 0
}
This contains the size which tells the number of items per page is being retrieved, totalElements represents the total number of records available in the daabase. totalPages reprsents the total number of pages as per total record and being displayed per page. Number represents the current page number which starts with 0. If we want to navigate to next page, then click on the next link inside link section http://localhost:8080/users?page=1&size=1, It will be a GET operation and it will display result for that page. Similarly if we want to go to the last page, we van go by clicking on the last link inside links section. Also if there is no next link available in the links section that means that is the last page and no further records are available, similarly if no prev link is available that means that is the start of page.
Sorting
For sorting the records we can user query param sort against field of the entity. Lets say we wat to sort the record based on the user ids and in descending order. Our final url will be http://localhost:8080/users?sort=id,desc, Lets hit this and this time our result will be in descending order
{
   "_embedded": {
      "users": [
         {
            "firstName": "asad",
            "lastName": "ali",
            "email": "asad@gmail.com",
            "salary": 28500,
            "available": false,
            "startDate": null,
            "_links": {
               "self": {
                  "href": "http://localhost:8080/users/2"
               },
               "user": {
                  "href": "http://localhost:8080/users/2"
               }
            }
         },
         {
            "firstName": "John",
            "lastName": "Franklin",
            "email": "john@gmail.com",
            "salary": 18500,
            "available": true,
            "startDate": null,
            "_links": {
               "self": {
                  "href": "http://localhost:8080/users/1"
               },
               "user": {
                  "href": "http://localhost:8080/users/1"
               }
            }
         }
      ]
   },
   "_links": {
      "self": {
         "href": "http://localhost:8080/users"
      },
      "profile": {
         "href": "http://localhost:8080/profile/users"
      },
      "search": {
         "href": "http://localhost:8080/users/search"
      }
   },
   "page": {
      "size": 20,
      "totalElements": 2,
      "totalPages": 1,
      "number": 0
   }
}
Similarly we can sort the record based on other fields of entity such as salary, name, etc. If we do not provide any order by default it will sort in ascending order.
Customizing URI Resources
If we look at the previous URI we worked with http://localhost:8080/users the users in the URI has been take from entity name. By default Spring data prepare our rest endpoint with entity name(by making it plural), if we want some custom defined URI then that also we can do with the help of annotation @RepositoryRestResource from org.springframework.data.rest.core. annotation.
@RepositoryRestResource(collectionResourceRel = "app-users", path = "app-us
ers")
public interface UserRepositories extends PagingAndSortingRepository<User,
Long> {
}
Now our rest end point will be http://localhost:8080/app-users and so on. We can run the application and can continue working around with the new rest endpoints.
Fetching resource based on Query methods
Lets say we want to fetch the record based on email instead of id. To do so, lets add a Query method in the repository.
@RepositoryRestResource(collectionResourceRel = "app-users", path = "app-us
ers")
public interface UserRepositories extends PagingAndSortingRepository<User,
Long> {
   List<User> findByEmail(@Param("email") String email);
}
@Param is a query param annotation which is optional just in case we want to use some other param name. If we do not use this annotation by default arguments name will be picked up.
Lets go to the HAL browser or Postman client, Enter our search URL http://localhost:8080/app-users/search/findByEmail?email=john@gmail.com, It will return the response −
{
   "_embedded": {
      "app-users": [
         {
            "firstName": "asad",
            "lastName": "ali",
            "email": "john@gmail.com",
            "salary": 28500,
            "available": false,
            "startDate": null,
            "_links": {
               "self": {
                  "href": "http://localhost:8080/app-users/2"
               },
               "user": {
                  "href": "http://localhost:8080/app-users/2"
               }
            }
         }
      ]
   },
   "_links": {
      "self": {
         "href": "http://localhost:8080/app-users/search/findByEmail?email=joh
         n@gmail.com"
      }
   }
}
Lets add some more Query methods as well as custom methods to repository,
List<User> findByFirstName(String firstname);
List<User> findByLastName(String lastname);
List<User> findByEmail(@Param("email") String email);
List<User> findByFirstNameAndLastName(String firstName, String lastName
);
List<User> findBySalaryLessThan(Long salary);
List<User> findByStartDateAfter(Date startdate);
List<User> findByStartDateBefore(Date startdate);
@Query("from User")
List<User> findAllUsers();
@Query("select u from User u where u.firstName=:name")
List<User> findAllUsersbyName(String name);
@Query("select u.firstName,u.lastName from User u")
List<Object[]> findUserPartialData();
@Modifying
@Transactional
@Query("delete from User where firstName=:fName")
void deleteUserByFirstName(String fName);
Lets find out all the RESTful APIs applicable for these methods. WE can find this by the resource API http://localhost:8080/app-users/search. If you hit in the web browser or Postman you can find all actionable links as follows.
   {
   "_links": {
      "findByLastName": {
         "href": "http://localhost:8080/app-users/search/findByLastName{?lastn
         ame}",
         "templated": true
      },
      "findByStartDateBefore": {
         "href": "http://localhost:8080/app-users/search/findByStartDateBefore
         {?startdate}",
         "templated": true
      },
      "deleteUserByFirstName": {
         "href": "http://localhost:8080/app-users/search/deleteUserByFirstName
         {?fName}",
         "templated": true
      },
      "findByEmail": {
         "href": "http://localhost:8080/app-users/search/findByEmail{?email}",
         "templated": true
      },
      "findAllUsers": {
         "href": "http://localhost:8080/app-users/search/findAllUsers"
      },
      "findByFirstNameAndLastName": {
         "href": "http://localhost:8080/app-users/search/findByFirstNameAndLas
         tName{?firstName,lastName}",
         "templated": true
      },
      "findByStartDateAfter": {
         "href": "http://localhost:8080/app-users/search/findByStartDateAfter{
         ?startdate}",
         "templated": true
      },
      "findAllUsersbyName": {
         "href": "http://localhost:8080/app-users/search/findAllUsersbyName{?n
         ame}",
         "templated": true
      },
      "findBySalaryLessThan": {
         "href": "http://localhost:8080/app-users/search/findBySalaryLessThan{
         ?salary}",
         "templated": true
      },
      "findByFirstName": {
         "href": "http://localhost:8080/app-users/search/findByFirstName{?firs
         tname}",
         "templated": true
      },
      "findUserPartialData": {
         "href": "http://localhost:8080/app-users/search/findUserPartialData"
      },
      "self": {
         "href": "http://localhost:8080/app-users/search"
      }
   }
}
Use the above resources APIs to perform certain actions.
