- Spring Data Tutorial - Home
- Spring Data Apache Solr
- Overview
- Prerequisites
- Introduction
- What is Apache Solr?
- Getting Started
- Querying
- Features
- Conclusion
- Spring Data Cassandra
- Overview
- Prerequisites
- Introduction
- What is Cassandra?
- Getting Started
- Annotation AllowFiltering with Query Methods
- Partition and Clustering
- Coding hands-on on Partitioning and Clustering
- Features
- Conclusion
- Spring Data Couchbase
- Overview
- Prerequisites
- Introduction
- What is Couchbase?
- Getting Started
- Views
- CouchbaseTemplate
- Hands-on using CouchbaseTemplate
- Features
- Conclusion
- Spring Data Elasticsearch
- Overview
- Prerequisites
- Introduction
- What is ElasticSearch?
- Getting Started
- Querying
- Configuring ElasticsearchOperations bean
- Features
- Conclusion
- Spring Data JDBC
- Introduction
- Need of Spring Data JDBC
- Features
- Domain-Driven Design
- Prerequisites
- Getting Started
- Conclusion
- Spring Data JPA
- Background
- Introduction
- Prerequisites
- Getting Started
- Features
- Conclusion
- Spring Data MongoDB
- Overview
- Prerequisites
- Introduction
- What is MongoDB?
- Getting Started
- Query Methods
- Annotations
- Exposing REST end points
- Relationship
- Conclusion
- Spring Data Redis
- Overview
- Prerequisites
- Introduction
- What is Redis?
- Redis Java Clients
- Getting Started
- Features
- Conclusion
- Spring Data REST
- Background
- Introduction to Spring Data REST
- Prerequisites
- Getting Started
- Features
- Conclusion
- Spring Data Tutorial Useful Resources
- Spring Data Tutorial - Quick Guide
- Spring Data Tutorial - Useful Resources
- Spring Data Tutorial - Discussion
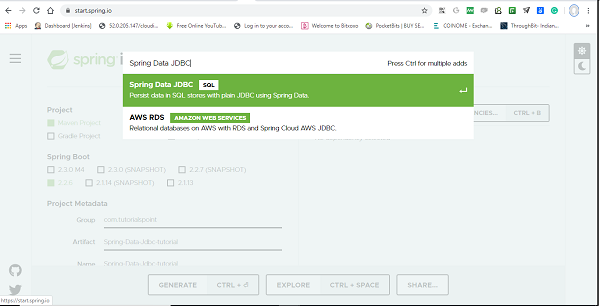
Spring Data JDBC - Getting started
Like other Spring-based projects, you can start from scratch by creating a maven or Gradle based project from your favourite IDE. Follow below step by step process or you can bypass the basic setup steps that are already familiar with.
Adding Dependencies.
If you have created normal Maven or Gradle projects then add below dependencies to your pom.
For Maven
<dependency>
   <groupId>org.springframework.data</groupId>
   <artifactId>spring-data-jdbc</artifactId>
   <version>1.1.6.RELEASE</version>
</dependency>
For Gradle
compile group: 'org.springframework.data', name: 'spring-data-jdbc', version:
'1.1.6.RELEASE'
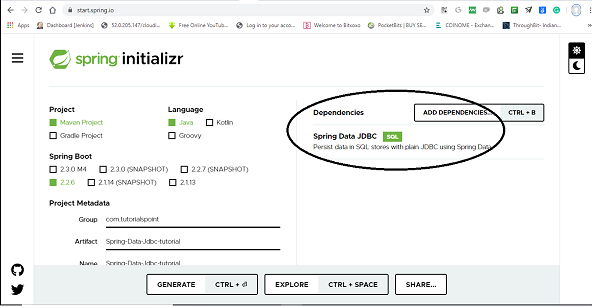
If you have created your project as Spring Boot or Starting with Spring Initializr then do not forget to add Spring Data Jdbc dependency.
Post selection of Spring Data Jdbc dependency, it will look like this.
The following is your pom.xml file that is created when you choose Maven −
<?xml version="1.0" encoding="UTF-8"?>
<project xmlns="http://maven.apache.org/POM/4.0.0" xmlns:xsi="http://www.w3.or
g/2001/XMLSchema-instance"
xsi:schemaLocation="http://maven.apache.org/POM/4.0.0 https://maven.apache
.org/xsd/maven-4.0.0.xsd">
   <modelVersion>4.0.0</modelVersion>
   <parent>
      <groupId>org.springframework.boot</groupId>
      <artifactId>spring-boot-starter-parent</artifactId>
      <version>2.2.6.RELEASE</version>
      <relativePath/> <!-- lookup parent from repository -->
   </parent>
   <groupId>com.tutorialspoint</groupId>
   <artifactId>Spring-Data-Jdbc-tutorials</artifactId>
   <version>0.0.1-SNAPSHOT</version>
   <name>Spring-Data-Jdbc-tutorials</name>
   <description>Demo project for Spring Data JDBC</description>
   <properties>
      <java.version>1.8</java.version>
   </properties>
   <dependencies>
      <dependency>
         <groupId>org.springframework.boot</groupId>
         <artifactId>spring-boot-starter-data-jdbc</artifactId>
      </dependency>
      <dependency>
         <groupId>org.springframework.boot</groupId>
         <artifactId>spring-boot-starter-test</artifactId>
         <scope>test</scope>
         <exclusions>
            <exclusion>
               <groupId>org.junit.vintage</groupId>
               <artifactId>junit-vintage-engine</artifactId>
            </exclusion>
         </exclusions>
      </dependency>
      <dependency>
         <groupId>org.hsqldb</groupId>
         <artifactId>hsqldb</artifactId>
         <scope>runtime</scope>
      </dependency>
   </dependencies>
   <build>
      <plugins>
         <plugin>
            <groupId>org.springframework.boot</groupId>
            <artifactId>spring-boot-maven-plugin</artifactId>
         </plugin>
      </plugins>
   </build>
</project>
You can add database dependency as per of your choice, Here in this tutorial we will work with hsqldb. Once dependencies are added, we can add couple of classes and interfaces which will act as our entities and repositories. Note- All the code covered in this tutorial has been generated through Spring Boot.
Creating Entities
Spring Data JDBC is very flexible when it comes to visibility, its recommended that entities are immutable i.e., all the fields are marked as final, but it is not mandatory. Spring Data JDBC used the default naming strategy that returns camel case into snake case. Although you can change it. also if you want to choose a different table names you can use @Table annotation and it works similarly for column with @Column annotation.
import org.springframework.data.annotation.Id;
import org.springframework.data.relational.core.mapping.Column;
public class Users {
   @Id
   private Long id;
   @Column("full_name") //optional, use if you want column name of your choic
   e
   private String fullName;
   @Column("date_of_birth") //Use only if you want column name of your choic
   e
   private LocalDate dob;
   public Users(Long id, String fullName, LocalDate dob) {
      this.id = id;
      this.fullName = fullName;
      this.dob = dob;
   }
   public static Users create(String name, LocalDate dateOfBirth) {
      return new Users(null, name, dateOfBirth);
   }
   @Override
   public String toString() {
      return "Users [id=" + id + ", fullName=" + fullName + ", dob=" + dob +
      "]";
   }
}
It is recommended that entity has single all argument constructor for the framework itself, and other constructors are modeled as a static factory method.
Key Note −
In Spring Data JDBC, the entity has only one special requirement and that is @Id annotation and that comes from org.springframework.data, if you have imported anything that comes from javax.persistence then probably you are doing something wrong. All other annotations like @Column, @Table etc are optional, you can use as per your requirements. Getter/Setter is also optional and depends on your use case.
Creating Repositories
Most of us know how the repository works, For those who dont Repositories could be created as an interface. We can extend our repository with either of the predefined interfaces i.e., Repository or CrudRepository from Spring Data. CrudRepository gives us most commonly used CRUD methods like save(), delete(), findById(), findAll() and few others. We can also add our custom methods, but we have to write a SQL query for them. To do so this framework comes with standard support for @Query annotation, where we can just write our query and another important note is that at this stage it only supports named parameters, so we cant reference parameters with its index number.
import java.util.List;
import org.springframework.data.jdbc.repository.query.Query;
import org.springframework.data.repository.CrudRepository;
import org.springframework.data.repository.query.Param;
import com.tutorialspoint.entities.Users;
public interface UsersRepositories extends CrudRepository<Users, Long> {
   @Query("select * from Users where full_name=:fullName")
   List<Users> findByName(@Param("fullName") String name);
}
Key Note −
Since Spring Data JDBC doesnt support derived queries, we need to use @Query annotation for our custom query, as follows
@Query(select * from Users where full_name=:fullName)
Perform CRUD Operation
Lets perform some CRUD operation and check if it is working. But wait a second, as we discussed earlier Spring Data JDBC doesnt support schema generation, so we need to do it manually. In real-world project we can use one of the database migration frameworks like Flyway, Liquibase etc.But here for the sake of simplicity we will use Spring Boot feature to bootstrap schema from the schema.sql file. So lets create the database schema for users table. Create a schema.sql file under the resource folder and add below SQL statement to that.
create table users(
   id integer identity primary key,
   full_name varchar(50),
   date_of_birth date
);
Lets turn on SQL logging to see what exactly queries are being executed. This can be done by adding a logging statement logging.level.sql=debug under application.properties file. Now lets perform below some CRUD operation. We will try to add some users to the table users and retrieve one of them by their name. Following is the code for the same.
import org.springframework.boot.ApplicationRunner;
import org.springframework.boot.SpringApplication;
import org.springframework.boot.autoconfigure.SpringBootApplication;
import org.springframework.context.annotation.Bean;
import com.tutorialspoint.entities.Users;
import com.tutorialspoint.repositories.UsersRepositories;
@SpringBootApplication
public class SpringDataJdbcTutorialsApplication {
   public static void main(String[] args) {
      SpringApplication.run(SpringDataJdbcTutorialsApplication.class, args);
   }
   @Bean
   ApplicationRunner applicationRunner(UsersRepositories usersRepositories) {
      return args -> {
         Users users1 = Users.create("Asad", LocalDate.of(1991, 03, 01));
         Users users2 = Users.create("Ali", LocalDate.of(1992, 03, 13));
         Users users3 = Users.create("Asad Ali", LocalDate.of(1991, 11, 17)
         );
         System.out.println(usersRepositories.save(users1));//persist user1
         System.out.println(usersRepositories.save(users2));//persist user2
         System.out.println(usersRepositories.save(users3));//persist user3
         System.out.println(usersRepositories.findByName("Asad"));//fech us
         er Asad
      };
   }
}
Your final project structure will look something like this.
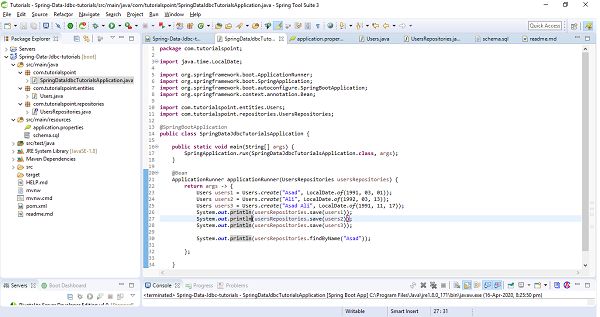
The above sample test code has used ApplicationRunner which will be executed on application startup. We have created three users and saved them in the database and executed the method findByName() to see if it is actually finding the correct one. Lets run the application as the Spring Boot App, and check the output. Notice below Statements in the output screenshot.
[INSERT INTO users (full_name, date_of_birth) VALUES (?, ?)]
Users [id=0, fullName=Asad, dob=1991-03-01]

[INSERT INTO users (full_name, date_of_birth) VALUES (?, ?)]
Users [id=1, fullName=Ali, dob=1992-03-13]

[INSERT INTO users (full_name, date_of_birth) VALUES (?, ?)]
Users [id=2, fullName=Asad Ali, dob=1991-11-17]

[select * from Users where full_name=?]
[Users [id=0, fullName=Asad, dob=1991-03-01]]

Relationships
Spring Data JDBC supports one to one and one to many relations, but there is no support for many to one and many to many but provides a different way to achieve it, of course through aggregate root principle of DDD. Lets discuss and try to implement each of them.
One to One
Suppose, above discussed entity Users has an address, Here we will treat Address as part Users entity (meaning Address will only be accessible for the Users). This means Users have fields pointing to Address, but there wont be any reference for the Users in the Address class. Now the Address entity will look something like this.
public class Address {
   private String addressLine;
   public Address(String addressLine) {
      this.addressLine = addressLine;
   }
   @Override
   public String toString() {
      return "Address [address_line=" + addressLine + "]";
   }
}
Lets apply some changes at Users side, and then Users entity will look like
import org.springframework.data.annotation.Id;
import org.springframework.data.relational.core.mapping.Column;
public class Users {
   @Id
   private Long id;
   @Column("full_name")
   private String fullName;
   @Column("date_of_birth")
   private LocalDate dob;
   private Address address;
   public Users(Long id, String fullName, LocalDate dob, Address address) {
      this.id = id;
      this.fullName = fullName;
      this.dob = dob;
      this.address = address;
   }
   public static Users create(String name, LocalDate dateOfBirth, Address add
   ress) {
      return new Users(null, name, dateOfBirth, address);
   }
   @Override
   public String toString() {
      return "Users [id=" + id + ", fullName=" + fullName + ", dob=" + dob +
      ", address=" + address + "]";
   }
}
We do not require to add any annotation like @OnetoOne in Spring Data JDBC. Spring Data JDBC automatically detects and knows that it is going to be one to one relationship. Lets create address schema, and add it to schema.sql file. There is no need to modify the Users table and in the address table just need to add one extra column that will be a foreign key to the Users table. By default the name of the column has to match the reference entity table name, so in this case it will be users. Below is the address schema.
create table address(
   users integer primary key references users(id),
   address_line varchar(250)
);
Now lets try to add some addresses to the above test sample, below are the changes, add it to your code and run it. I hope it works fine.
@Bean
ApplicationRunner applicationRunner(UsersRepositories usersRepositories) {
return args -> {
   Users users1 = Users.create("Asad", LocalDate.of(1991, 03, 01), ne
   w Address("Texas City"));
   Users users2 = Users.create("Ali", LocalDate.of(1992, 03, 13), new
   Address("Washington DC"));
   Users users3 = Users.create("Asad Ali", LocalDate.of(1991, 11, 17)
   , new Address("NY"));
   System.out.println(usersRepositories.save(users1));
   System.out.println(usersRepositories.save(users2));
   System.out.println(usersRepositories.save(users3));
   System.out.println(usersRepositories.findAll());
};
and the console output for print methods will be as follows.
Users [id=0, fullName=Asad, dob=1991-03-01, address=Address [address_line=Texas City]]
Users [id=1, fullName=Ali, dob=1992-03-13, address=Address [address_line=Washington DC]]
Users [id=2, fullName=Asad Ali, dob=1991-11-17, address=Address [address_line=NY]]
[Users [id=0, fullName=Asad, dob=1991-03-01, address=Address [address_line=Texas City]], Users
[id=1, fullName=Ali, dob=1992-03-13, address=Address [address_line=Washington DC]], Users
[id=2, fullName=Asad Ali, dob=1991-11-17, address=Address [address_line=NY]]]
We might have observed that, we have not created any separate repository for Address, and we always access Address through the Users. So if we want to delete an address for a user, we dont call delete() anywhere on Address entity/repository. Instead we set the address to null on the users side. Lets try how it works. Add a setter method for address in Users entity.
public void setAddress(Address address) {
   this.address = address;
}
and call this setter to set null value for the address to which you want to delete. Have a look on the below statements.
@Bean
ApplicationRunner applicationRunner(UsersRepositories usersRepositories) {
   return args -> {
      Users users = Users.create("Ali", LocalDate.of(1992, 03, 13), new
      Address("Washington DC"));
      System.out.println(usersRepositories.save(users));
      users.setAddress(null); // Delete addre
      ss by setting it to null
      System.out.println(usersRepositories.save(users));
   };
}
and output would be
Users [id=1, fullName=Ali, dob=1992-03-13, address=Address [address_line=Washington DC]]
Users [id=1, fullName=Ali, dob=1992-03-13, address=null]
One to Many
Spring Data JDBC is flexible with One to Many relationships and we can use either Set, List or Map to map the relationship between parent and child entity. I think the most common and easiest way would be to use the Set. So lets modify our use case a little bit. This time we will say a user is having more than one address. Now our Users class will look like
import org.springframework.data.annotation.Id;
import org.springframework.data.relational.core.mapping.Column;
public class Users {
   @Id
   private Long id;
   @Column("full_name")
   private String fullName;
   @Column("date_of_birth")
   private LocalDate dob;
   private Set<Address> address; //multiple address in the form of set
   public Users(Long id, String fullName, LocalDate dob, Set<Address> address
   ) {
      this.id = id;
      this.fullName = fullName;
      this.dob = dob;
      this.address = address;
   }
   public static Users create(String name, LocalDate dateOfBirth, Set<Address
   > address) {
      return new Users(null, name, dateOfBirth, address);
   }
   public void addAddress(Address address) {
      this.address.add(address);
   }
   @Override
   public String toString() {
      return "Users [id=" + id + ", fullName=" + fullName + ", dob=" + dob +
      ", address=" + address + "]";
   }
}
and as per the above changes, change a bit in our sample code as follows.
@Bean
ApplicationRunner applicationRunner(UsersRepositories usersRepositories) {
   return args -> {
      Set<Address> addressSet = new HashSet<Address>();
      addressSet.add(new Address("Texas City"));
      addressSet.add(new Address("Washington DC"));
      Users users = Users.create("Asad", LocalDate.of(1991, 03, 01), add
      ressSet);
      System.out.println(usersRepositories.save(users));
   };
}
Now, lets change database schema of address otherwise it will raise an error of duplicate primary key. We need to use here an id which will be the primary key from the reference. But there is no need to modify the Address class. Now our Address schema will be as follows.
create table address(
id serial primary key ,
users integer references users(id),
address_line varchar(250)
);
Executing the above sample code will give an output something like this.
Users [id=0, fullName=Asad, dob=1991-03-01, address=[Address [address_line=Tex
as City], Address [address_line=Washington DC]]]
Now we can say that both the addresses have been saved. Now lets suppose we want to modify the User name or dob. Lets try updating name and check what is happening. To do so add a setter method in Users class.
public void setName(String name) {
   this.fullName = name;
}
Now try updating name from sample code as follows.
@Bean
ApplicationRunner applicationRunner(UsersRepositories usersRepositories) {
   return args -> {
      Set<Address> addressSet = new HashSet<Address>();
      addressSet.add(new Address("Texas City"));
      addressSet.add(new Address("Washington DC"));
      Users users = Users.create("Asad", LocalDate.of(1991, 03, 01), add
      ressSet);
      System.out.println(usersRepositories.save(users));
      users.setName("Asad Ali"); //Update fullNam
      e
      System.out.println(usersRepositories.save(users));
   };
}
When we look at the console output and the debug query, it is deleting all the addresses before updating the user, and inserting again all the addresses against that user.
Executing prepared SQL statement [DELETE FROM address WHERE address.users = ?]
The reason is Spring Data JDBC unlike Hibernate doesnt use any type of proxies. So it doesnt track the changes and it doesnt have the way to know if the addresses have been removed or not. So instead it deletes all the children, and ask them again to re−insert if it is there. But this is something can potentially hit our performance because it may execute for huge collections with a lot of insert statements.
Many to Many
Lets try to have a look at the definition first, when we have two entities and one entity references many entities of another type and entity from the second type references many entities of the first type then this is called as many to many relationships between these two entities. In relational databases we model it as two different entities as two tables (Suppose book and author) and the relation between these two is kept in the so-called conjunction table (book_author). This table has an id of the first table and an id of the second table. As we discussed earlier Spring Data JDBC doesnt support this kind of relationship in the way other JPA frameworks provide and the reason is that there is a circular dependency between these two classes, also there is no clear ownership. So Spring Data JDBC comes with a different approach. Instead of referencing entities directly, you reference entities using ids, and this found the principle of Domain−Driven Design that says that if you two aggregates referencing them directly, you should refer them by ids. Lets try to implement this with an example and coding exercise. Consider we have two tables Authors and Books, Lets try to implement many to many relationship between them. Authors can have multiple Books and of course Books can be written by multiple authors. These two entities will look something like this.
import java.time.LocalDate;
import org.springframework.data.annotation.Id;
public class Authors {
   @Id
   private Long id;
   private String name;
   private LocalDate dob;
   public Long getId() {
      return id;
   }
   public String getName() {
      return name;
   }
   public void setName(String name) {
      this.name = name;
   }
   public LocalDate getDob() {
   return dob;
   }
   public void setDob(LocalDate dob) {
      this.dob = dob;
   }
   public void setId(Long id) {
      this.id = id;
   }
   @Override
   public String toString() {
      return "Authors [id=" + id + ", name=" + name + ", dob=" + dob + "]";
   }
}
and
import java.util.HashSet;
import java.util.Set;
import org.springframework.data.annotation.Id;
public class Books {
   @Id
   private Long id;
   private String isbn;
   private String title;
   private Set<AuthorsReference> authors = new HashSet<AuthorsReference>();
   public void addAuthor(Authors authors) {
      this.authors.add(new AuthorsReference(authors.getId()));
   }
   public Long getId() {
      return id;
   }
   public void setId(Long id) {
      this.id = id;
   }
   public String getIsbn() {
      return isbn;
   }
   public void setIsbn(String isbn) {
      this.isbn = isbn;
   }
   public String getTitle() {
      return title;
   }
   public void setTitle(String title) {
      this.title = title;
   }
   public Set<AuthorsReference> getAuthors() {
      return authors;
   }
   public void setAuthors(Set<AuthorsReference> authors) {
      this.authors = authors;
   }
   @Override
   public String toString() {
      return "Books [id=" + id + ", isbn=" + isbn + ", title=" + title + ",
      authors=" + authors + "]";
   }
}
There is a field of collection type Set in Book table i.e., AuthorReference, It will represent the conjunction table. Create a class with the same name, and just to make naming clear put the @Table annotation and say this is the relation between book and author (book_author). This class will have only one field which is author (id) of type long. Your final class will be as follows.
import org.springframework.data.relational.core.mapping.Table;
@Table("book_author")
public class AuthorsReference {
   private Long author;
   public AuthorsReference(Long author) {
      this.author = author;
   }
}
Now create repositories for Books and Authors, We are not required to create repository of AuthorsReference. Your repositories will be as follows.
import org.springframework.data.repository.CrudRepository;
import com.tutorialspoint.entities.Authors;
public interface AuthorsRepository extends CrudRepository<Authors, Long> {
}
and
import org.springframework.data.repository.CrudRepository;
import com.tutorialspoint.entities.Books;
public interface BooksRepository extends CrudRepository<Books, Long> {
}
Now, lets add SQL schemas for all the above three tables, i.e Books, Authors and AuthorsReference.
create table books(
   id integer identity primary key,
   title varchar(250),
   isbn varchar(250)
);
create table authors(
   id integer identity primary key,
   name varchar(50),
   dob date
);
create table book_author(
   author integer,
   books integer,
   primary key(books, author)
);
Now lets perform some CRUD operations and check if all good. Below is our test code, place it in ApplicationRunner section.
@Bean
ApplicationRunner applicationRunner(UsersRepositories usersRepositories) {
   return args -> {
      Authors authors = new Authors();
      authors.setName("Asad Ali");
      System.out.println(authorsRepository.save(authors));
      Books books = new Books();
      books.setTitle("An Introduction to Spring Data JDBC");
      books.setIsbn("5261327");
      books.addAuthor(authors);
      System.out.println(booksRepository.save(books));
   };
}
and the output of the print statements is as follows.
Authors [id=0, name=Asad Ali, dob=null]
Books [id=0, isbn=5261327, title=An Introduction to Spring Data JDBC, authors=[AuthorsReference
[author=0]]]
Key Observations w.r.t Aggregate root principle of DDD
Things to be noted from the above discussed relationship is that, do we have created repositories for each and every entity? The answer is No, we dont create a repository for entity, instead we created repository for aggregates. In the above examples entity Users was aggregate for entity Address, because these addresses alone dont really exist and they dont have meaning, so we created a repository for Users but not for Address. Similarly in the case of Books and AuthorsReference, we have created a repository for aggregate root Books but not for AuthorsReference. The keynote to remember here is that repositories always work on aggregates and we request to load or save whole aggregates.
