- Spring Data Tutorial - Home
- Spring Data Apache Solr
- Overview
- Prerequisites
- Introduction
- What is Apache Solr?
- Getting Started
- Querying
- Features
- Conclusion
- Spring Data Cassandra
- Overview
- Prerequisites
- Introduction
- What is Cassandra?
- Getting Started
- Annotation AllowFiltering with Query Methods
- Partition and Clustering
- Coding hands-on on Partitioning and Clustering
- Features
- Conclusion
- Spring Data Couchbase
- Overview
- Prerequisites
- Introduction
- What is Couchbase?
- Getting Started
- Views
- CouchbaseTemplate
- Hands-on using CouchbaseTemplate
- Features
- Conclusion
- Spring Data Elasticsearch
- Overview
- Prerequisites
- Introduction
- What is ElasticSearch?
- Getting Started
- Querying
- Configuring ElasticsearchOperations bean
- Features
- Conclusion
- Spring Data JDBC
- Introduction
- Need of Spring Data JDBC
- Features
- Domain-Driven Design
- Prerequisites
- Getting Started
- Conclusion
- Spring Data JPA
- Background
- Introduction
- Prerequisites
- Getting Started
- Features
- Conclusion
- Spring Data MongoDB
- Overview
- Prerequisites
- Introduction
- What is MongoDB?
- Getting Started
- Query Methods
- Annotations
- Exposing REST end points
- Relationship
- Conclusion
- Spring Data Redis
- Overview
- Prerequisites
- Introduction
- What is Redis?
- Redis Java Clients
- Getting Started
- Features
- Conclusion
- Spring Data REST
- Background
- Introduction to Spring Data REST
- Prerequisites
- Getting Started
- Features
- Conclusion
- Spring Data Tutorial Useful Resources
- Spring Data Tutorial - Quick Guide
- Spring Data Tutorial - Useful Resources
- Spring Data Tutorial - Discussion
Spring Data Couchbase - Getting Started
Like other Spring-based projects, you can start from scratch by creating a maven or Gradle based project from your favourite IDE. Follow below step by step process or you can bypass the basic setup steps that are already familiar with.
Adding Dependencies.
If you have created normal Maven or Gradle projects then add below dependencies to your pom. For Maven
<dependency>
   <groupId>org.springframework.boot</groupId>
   <artifactId>spring-boot-starter-data-couchbase</artifactId>
</dependency>
Above one is the Spring Data Couchbase dependency. If you have created your project as Spring Boot or Starting with Spring Initializr then your final list of dependencies wil look like this:
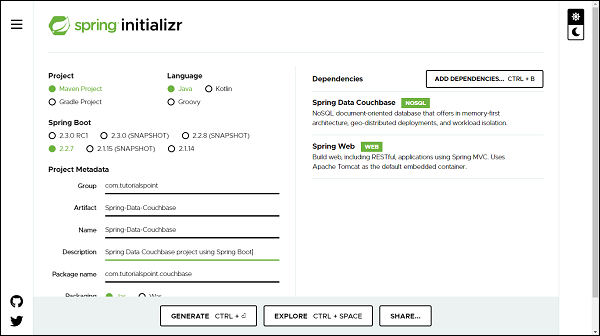
Note − The code sample and examples used in this tutorial has been created through Spring Initializr. The following is your final pom.xml file that is created when you choose Maven −
<?xml version="1.0" encoding="UTF-8"?>
<project xmlns="http://maven.apache.org/POM/4.0.0" xmlns:xsi="http://www.w3.org/2001/XMLSchema-instance"
xsi:schemaLocation="http://maven.apache.org/POM/4.0.0 https://maven.apache.org/xsd/maven-4.0.0.xsd">
   <modelVersion>4.0.0</modelVersion>
   <parent>
      <groupId>org.springframework.boot</groupId>
      <artifactId>spring-boot-starter-parent</artifactId>
      <version>2.2.7.RELEASE</version>
      <relativePath/> <!-- lookup parent from repository -->
   </parent>
   <groupId>com.tutorialspoint</groupId>
   <artifactId>Spring-Data-Couchbase</artifactId>
   <version>0.0.1-SNAPSHOT</version>
   <name>Spring-Data-Couchbase</name>
   <description>Spring Data Couchbase project using Spring Boot</description>
   <properties>
      <java.version>1.8</java.version>
   </properties>
   <dependencies>
      <dependency>
         <groupId>org.springframework.boot</groupId>
         <artifactId>spring-boot-starter-data-couchbase</artifactId>
      </dependency>
      <dependency>
         <groupId>org.springframework.boot</groupId>
         <artifactId>spring-boot-starter-test</artifactId>
         <scope>test</scope>
         <exclusions>
            <exclusion>
               <groupId>org.junit.vintage</groupId>
               <artifactId>junit-vintage-engine</artifactId>
            </exclusion>
         </exclusions>
      </dependency>
   </dependencies>
   <build>
      <plugins>
         <plugin>
            <groupId>org.springframework.boot</groupId>
            <artifactId>spring-boot-maven-plugin</artifactId>
         </plugin>
      </plugins>
   </build>
</project>
Creating Document
A Document is equivalent to a model/entity, it is an actual domain object and it will be created as a POJO. Lets define our first document −
import javax.validation.constraints.NotNull;
import org.springframework.data.couchbase.core.mapping.Document;
import com.couchbase.client.java.repository.annotation.Field;
import com.couchbase.client.java.repository.annotation.Id;
@Document(expiry = 0)
public class Customer {
   @Id
   private Long id;
   @NotNull
   private String name;
   private String email;
   @Field("income")
   private Double salary;
   public Customer() {
   }
   public Customer(Long id, String name, String email, Double salary) {
      this.id=id;
      this.name = name;
      this.email = email;
      this.salary = salary;
   }
   public Long getId() {
      return id;
   }
   public void setId(Long id) {
      this.id = id;
   }
   public String getName() {
      return name;
   }
   public void setName(String name) {
      this.name = name;
   }
   public String getEmail() {
      return email;
   }
   public void setEmail(String email) {
      this.email = email;
   }
   public Double getSalary() {
      return salary;
   }
   public void setSalary(Double salary) {
      this.salary = salary;
   }
   @Override
   public String toString() {
      return "Customer [id=" + id + ", name=" + name + ", email=" + email + ", salary=" + salary + "]";
   }
}
@Document: Unlike JPA where we used to mark our domain object with annotation @Entity, here we mark it with @Document from package org.springframework.data.couchbase.core.mapping, which represents it is a Couchbase document. It has an attribute called expiry, which is TTL of the document. @Id: This is for identity purposes and it is from the native Couchbase SDK package com.couchbase.client.java.repository.annotation. We can also use @Id from Spring Data.
If we use both @Id annotation (from Spring Data and native Couchbase SDK) on two different fields of the same class, the annotation from Spring Data will take precedence and that field will be used as the document key.
@Field("income"): @Field annotation is from native Couchbase SDK, it is used to mark the field. We can consider this as a @Column annotation from JPA. If we want to give some other name to our column then we can pass it to this annotation.
Creating a Repository
Lets define an interface which will be our repository: Lets define an interface which will be our repository −
import java.util.List;
import org.springframework.data.couchbase.repository.CouchbaseRepository;
import org.springframework.stereotype.Repository;
import com.tutorialspoint.couchbase.document.Customer;
@Repository
public interface CustomerRepository extends CouchbaseRepository<Customer, Long> {
   List<Customer> findByEmail(String string);
}
The process of creating a repository is similar to the repository creation in any Spring data−based project, the only difference here is that it extends CouchbaseRepository from org.springframework.data.couchbase.repository, which works on top of CrudRepository.
Configuring DataSource
We can configure Couchbase using application.properties file, using XML and using Java based configuration. We can choose either one among them. Lets discuss one by one.
XML Based Configurations
Below one is the equivalent XML configuration.
<?xml version="1.0" encoding="UTF-8"?>
<beans:beans xmlns:beans="http://www.springframework.org/schema/beans"
xmlns:xsi="http://www.w3.org/2001/XMLSchema-instance"
xmlns="http://www.springframework.org/schema/data/couchbase
xsi:schemaLocation="http://www.springframework.org/schema/beans
http://www.springframework.org/schema/beans/spring-beans.xsd
http://www.springframework.org/schema/data/couchbase
http://www.springframework.org/schema/data/couchbase/spring-couchbase.xsd">
   <couchbase:cluster>
      <couchbase:node>localhost</couchbase:node>
   </couchbase:cluster>
   <couchbase:clusterInfo login="tutorials_point" password="qwerty" />
   <couchbase:bucket bucketName="Tutorials_Point" bucketPassword="123456"/>
   <couchbase:repositories base-package="com.tutorialspoint.couchbase.repository"/>
</beans:beans>
Replace the cluster info, bucket and repositories details.
Java Based Configuration
Create a config file, say CouchbaseConfig, and extend AbstractCouchbaseConfiguration, this will ask to implement necessary methods which will be used for passing credentials as follows −
import java.util.Arrays;
import java.util.List;
import org.springframework.context.annotation.Configuration;
import org.springframework.data.couchbase.config.AbstractCouchbaseConfiguration;
import org.springframework.data.couchbase.repository.config.EnableCouchbaseRepositories;
@Configuration
@EnableCouchbaseRepositories(basePackages = { "com.tutorialspoint.couchbase.repository" })
public class CouchbaseConfig extends AbstractCouchbaseConfiguration {
   @Override
   protected List<String> getBootstrapHosts() {
      return Arrays.asList("127.0.0.1");
   }
   @Override
   protected String getBucketName() {
      return "Tutorials_Point";
   }
   @Override
   protected String getBucketPassword() {
      return "";
   }
}
Using application.properties file
Below one is the majorly used configuration, just replace the credentials.
spring.couchbase.bootstrap-hosts=127.0.0.1
spring.couchbase.bucket.name=Tutorials_Point
spring.couchbase.bucket.password=123456
spring.data.couchbase.auto-index=true
Performing CRUD Operation
Now lets perform below some CRUD operation. We will try adding some customers to the above document, and retrieve some of them by their id or name. Following is the code for the same.
import org.springframework.boot.CommandLineRunner;
import org.springframework.boot.SpringApplication;
import org.springframework.boot.autoconfigure.SpringBootApplication;
import org.springframework.context.annotation.Bean;
import com.tutorialspoint.couchbase.document.Customer;
import com.tutorialspoint.couchbase.repository.CustomerRepository;
@SpringBootApplication
public class SpringDataCouchbaseApplication {
   public static void main(String[] args) {
      SpringApplication.run(SpringDataCouchbaseApplication.class, args);
   }
   @Bean
   CommandLineRunner commandLineRunner(CustomerRepository customerRepository) {
      return new CommandLineRunner() {
         @Override
         public void run(String... args) throws Exception {
            // Persisting some documents
            customerRepository.save(new Customer(101l, "Duke", "duke@yahoo.com", 11000d));
            customerRepository.save(new Customer(102l, "Monty", "monty@yahoo.com", 22000d));
            customerRepository.save(new Customer(103l, "Carlos", "carlos@yahoo.com", 33000d));
            customerRepository.save(new Customer(104l, "Benjamin", "benjamin@yahoo.com", 44000d));
            // Fetching documents
            System.out.println(customerRepository.findById(101l));
            System.out.println(customerRepository.findByEmail("carlos@yahoo.com"));
            // Update record
            Customer customer = customerRepository.findById(101l).get();
            customer.setSalary(55000d);
            customer.setName("Duke Daniel");
            customerRepository.save(customer);
            System.out.println(customerRepository.findById(101l));
            // Delete Record
            customerRepository.deleteById(103l);
            System.out.println(customerRepository.findById(103l));
         }
      };
   }
}
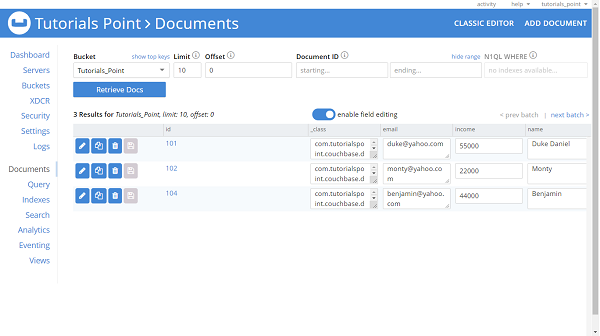
The above code has used CommandLineRunner which will be executed on application startup. We have created four customers and saved them in the database and executed the method findById() and findByEmail to retrieve the customers. We also tried updating one of the record and re− retrieve to check if it has been updated. Finally we are deleting one of the record. Lets run the application as the Spring Boot App, below is the output.
Optional [Customer [id=101, name=Duke, email=duke@yahoo.com, salary=11000.0]]
[Customer [id=103, name=Carlos, email=carlos@yahoo.com, salary=33000.0]]
Optional [Customer [id=101, name=Duke Daniel, email=duke@yahoo.com, salary=55000.0]]
Optional.empty
If we navigate to the Couchbase server dashboard, we can see that customer with id 103 is missing and rest three customer are available. Have a look at the image below.