- Cassandra - Home
- Cassandra - Introduction
- Cassandra - Architecture
- Cassandra - Data Model
- Cassandra - Installation
- Cassandra - Referenced Api
- Cassandra - Cqlsh
- Cassandra - Shell Commands
- Cassandra Table Operations
- Cassandra - Create Table
- Cassandra - Alter Table
- Cassandra - Drop Table
- Cassandra - Truncate Table
- Cassandra - Create Index
- Cassandra - Drop Index
- Cassandra - Batch
- Cassandra CURD Operations
- Cassandra - Create Data
- Cassandra - Update Data
- Cassandra - Read Data
- Cassandra - Delete Data
- Cassandra CQL Types
- Cassandra - CQL Datatypes
- Cassandra - CQL Collections
- CQL User Defined Datatypes
- Cassandra Useful Resources
- Cassandra - Quick Guide
- Cassandra - Useful Resources
- Cassandra - Discussion
Cassandra - Installation
Cassandra can be accessed using cqlsh as well as drivers of different languages. This chapter explains how to set up both cqlsh and java environments to work with Cassandra.
Pre-Installation Setup
Before installing Cassandra in Linux environment, we require to set up Linux using ssh (Secure Shell). Follow the steps given below for setting up Linux environment.
Create a User
At the beginning, it is recommended to create a separate user for Hadoop to isolate Hadoop file system from Unix file system. Follow the steps given below to create a user.
Open root using the command su.
Create a user from the root account using the command useradd username.
Now you can open an existing user account using the command su username.
Open the Linux terminal and type the following commands to create a user.
$ su
password:
# useradd hadoop
# passwd hadoop
New passwd:
Retype new passwd
SSH Setup and Key Generation
SSH setup is required to perform different operations on a cluster such as starting, stopping, and distributed daemon shell operations. To authenticate different users of Hadoop, it is required to provide public/private key pair for a Hadoop user and share it with different users.
The following commands are used for generating a key value pair using SSH −
- copy the public keys form id_rsa.pub to authorized_keys,
- and provide owner,
- read and write permissions to authorized_keys file respectively.
$ ssh-keygen -t rsa
$ cat ~/.ssh/id_rsa.pub >> ~/.ssh/authorized_keys
$ chmod 0600 ~/.ssh/authorized_keys
- Verify ssh:
ssh localhost
Installing Java
Java is the main prerequisite for Cassandra. First of all, you should verify the existence of Java in your system using the following command −
$ java -version
If everything works fine it will give you the following output.
java version "1.7.0_71"
Java(TM) SE Runtime Environment (build 1.7.0_71-b13)
Java HotSpot(TM) Client VM (build 25.0-b02, mixed mode)
If you dont have Java in your system, then follow the steps given below for installing Java.
Step 1
Download java (JDK <latest version> - X64.tar.gz) from the following link:
Then jdk-7u71-linux-x64.tar.gz will be downloaded onto your system.
Step 2
Generally you will find the downloaded java file in the Downloads folder. Verify it and extract the jdk-7u71-linux-x64.gz file using the following commands.
$ cd Downloads/
$ ls
jdk-7u71-linux-x64.gz
$ tar zxf jdk-7u71-linux-x64.gz
$ ls
jdk1.7.0_71 jdk-7u71-linux-x64.gz
Step 3
To make Java available to all users, you have to move it to the location /usr/local/. Open root, and type the following commands.
$ su
password:
# mv jdk1.7.0_71 /usr/local/
# exit
Step 4
For setting up PATH and JAVA_HOME variables, add the following commands to ~/.bashrc file.
export JAVA_HOME = /usr/local/jdk1.7.0_71
export PATH = $PATH:$JAVA_HOME/bin
Now apply all the changes into the current running system.
$ source ~/.bashrc
Step 5
Use the following commands to configure java alternatives.
# alternatives --install /usr/bin/java java usr/local/java/bin/java 2
# alternatives --install /usr/bin/javac javac usr/local/java/bin/javac 2
# alternatives --install /usr/bin/jar jar usr/local/java/bin/jar 2

# alternatives --set java usr/local/java/bin/java
# alternatives --set javac usr/local/java/bin/javac
# alternatives --set jar usr/local/java/bin/jar
Now use the java -version command from the terminal as explained above.
Setting the Path
Set the path of Cassandra path in /.bashrc as shown below.
[hadoop@linux ~]$ gedit ~/.bashrc

export CASSANDRA_HOME = ~/cassandra
export PATH = $PATH:$CASSANDRA_HOME/bin
Download Cassandra
Apache Cassandra is available at Download Link Cassandra using the following command.
$ wget http://supergsego.com/apache/cassandra/2.1.2/apache-cassandra-2.1.2-bin.tar.gz
Unzip Cassandra using the command zxvf as shown below.
$ tar zxvf apache-cassandra-2.1.2-bin.tar.gz.
Create a new directory named cassandra and move the contents of the downloaded file to it as shown below.
$ mkdir Cassandra
$ mv apache-cassandra-2.1.2/* cassandra.
Configure Cassandra
Open the cassandra.yaml: file, which will be available in the bin directory of Cassandra.
$ gedit cassandra.yaml
Note − If you have installed Cassandra from a deb or rpm package, the configuration files will be located in /etc/cassandra directory of Cassandra.
The above command opens the cassandra.yaml file. Verify the following configurations. By default, these values will be set to the specified directories.
data_file_directories /var/lib/cassandra/data
commitlog_directory /var/lib/cassandra/commitlog
saved_caches_directory /var/lib/cassandra/saved_caches
Make sure these directories exist and can be written to, as shown below.
Create Directories
As super-user, create the two directories /var/lib/cassandra and /var./log/cassandra into which Cassandra writes its data.
[root@linux cassandra]# mkdir /var/lib/cassandra
[root@linux cassandra]# mkdir /var/log/cassandra
Give Permissions to Folders
Give read-write permissions to the newly created folders as shown below.
[root@linux /]# chmod 777 /var/lib/cassandra
[root@linux /]# chmod 777 /var/log/cassandra
Start Cassandra
To start Cassandra, open the terminal window, navigate to Cassandra home directory/home, where you unpacked Cassandra, and run the following command to start your Cassandra server.
$ cd $CASSANDRA_HOME
$./bin/cassandra -f
Using the f option tells Cassandra to stay in the foreground instead of running as a background process. If everything goes fine, you can see the Cassandra server starting.
Programming Environment
To set up Cassandra programmatically, download the following jar files −
- slf4j-api-1.7.5.jar
- cassandra-driver-core-2.0.2.jar
- guava-16.0.1.jar
- metrics-core-3.0.2.jar
- netty-3.9.0.Final.jar
Place them in a separate folder. For example, we are downloading these jars to a folder named Cassandra_jars.
Set the classpath for this folder in .bashrcfile as shown below.
[hadoop@linux ~]$ gedit ~/.bashrc

//Set the following class path in the .bashrc file.

export CLASSPATH = $CLASSPATH:/home/hadoop/Cassandra_jars/*
Eclipse Environment
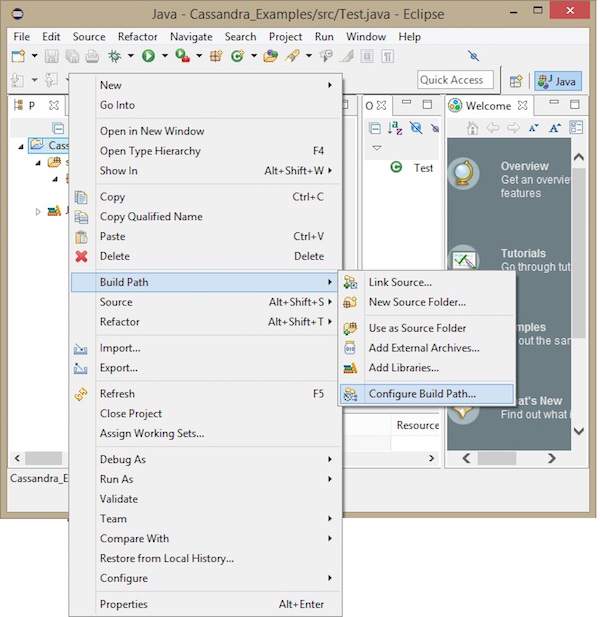
Open Eclipse and create a new project called Cassandra _Examples.
Right click on the project, select Build Path→Configure Build Path as shown below.
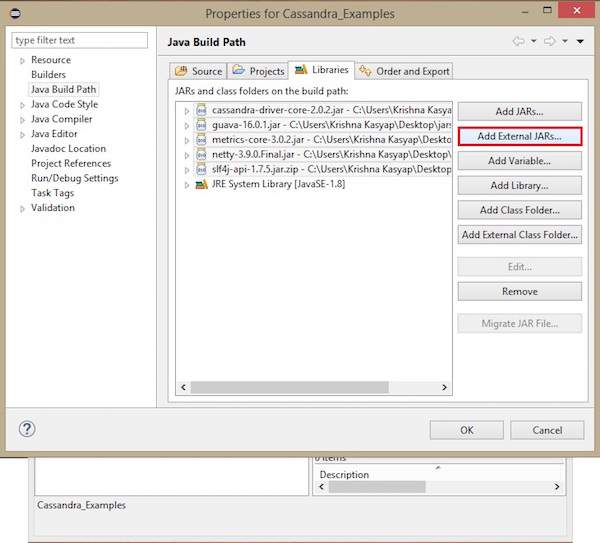
It will open the properties window. Under Libraries tab, select Add External JARs. Navigate to the directory where you saved your jar files. Select all the five jar files and click OK as shown below.
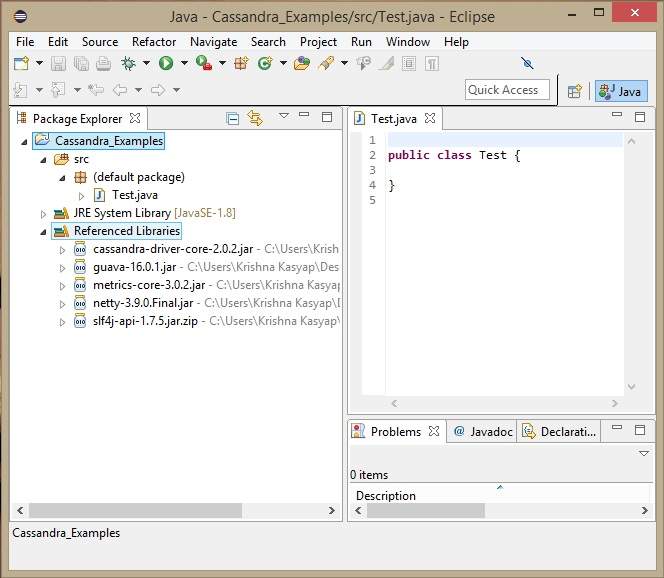
Under Referenced Libraries, you can see all the required jars added as shown below −
Maven Dependencies
Given below is the pom.xml for building a Cassandra project using maven.
<project xmlns = "http://maven.apache.org/POM/4.0.0"
   xmlns:xsi = "http://www.w3.org/2001/XMLSchema-instance"
   xsi:schemaLocation = "http://maven.apache.org/POM/4.0.0 http://maven.apache.org/xsd/maven-4.0.0.xsd">
   <build>
      <sourceDirectory>src</sourceDirectory>
      <plugins>
         <plugin>
            <artifactId>maven-compiler-plugin</artifactId>
            <version>3.1</version>

               <configuration>
                  <source>1.7</source>
                  <target>1.7</target>
               </configuration>

         </plugin>
      </plugins>
   </build>

   <dependencies>
      <dependency>
         <groupId>org.slf4j</groupId>
         <artifactId>slf4j-api</artifactId>
         <version>1.7.5</version>
      </dependency>

      <dependency>
         <groupId>com.datastax.cassandra</groupId>
         <artifactId>cassandra-driver-core</artifactId>
         <version>2.0.2</version>
      </dependency>

      <dependency>
         <groupId>com.google.guava</groupId>
         <artifactId>guava</artifactId>
         <version>16.0.1</version>
      </dependency>

      <dependency>
         <groupId>com.codahale.metrics</groupId>
         <artifactId>metrics-core</artifactId>
         <version>3.0.2</version>
      </dependency>

      <dependency>
         <groupId>io.netty</groupId>
         <artifactId>netty</artifactId>
         <version>3.9.0.Final</version>
      </dependency>
   </dependencies>

</project>
