- Android Basics
- Android - Home
- Android - Overview
- Android - Environment Setup
- Android - Architecture
- Android - Application Components
- Android - Hello World Example
- Android - Resources
- Android - Activities
- Android - Services
- Android - Broadcast Receivers
- Android - Content Providers
- Android - Fragments
- Android - Intents/Filters
- Android - User Interface
- Android - UI Layouts
- Android - UI Controls
- Android - Event Handling
- Android - Styles and Themes
- Android - Custom Components
- Android Advanced Concepts
- Android - Drag and Drop
- Android - Notifications
- Location Based Services
- Android - Sending Email
- Android - Sending SMS
- Android - Phone Calls
- Publishing Android Application
- Android Useful Examples
- Android - Alert Dialoges
- Android - Animations
- Android - Audio Capture
- Android - AudioManager
- Android - Auto Complete
- Android - Best Practices
- Android - Bluetooth
- Android - Camera
- Android - Clipboard
- Android - Custom Fonts
- Android - Data Backup
- Android - Developer Tools
- Android - Emulator
- Android - Facebook Integration
- Android - Gestures
- Android - Google Maps
- Android - Image Effects
- Android - ImageSwitcher
- Android - Internal Storage
- Android - JetPlayer
- Android - JSON Parser
- Android - Linkedin Integration
- Android - Loading Spinner
- Android - Localization
- Android - Login Screen
- Android - MediaPlayer
- Android - Multitouch
- Android - Navigation
- Android - Network Connection
- Android - NFC Guide
- Android - PHP/MySQL
- Android - Progress Circle
- Android - ProgressBar
- Android - Push Notification
- Android - RenderScript
- Android - RSS Reader
- Android - Screen Cast
- Android - SDK Manager
- Android - Sensors
- Android - Session Management
- Android - Shared Preferences
- Android - SIP Protocol
- Android - Spelling Checker
- Android - SQLite Database
- Android - Support Library
- Android - Testing
- Android - Text to Speech
- Android - TextureView
- Android - Twitter Integration
- Android - UI Design
- Android - UI Patterns
- Android - UI Testing
- Android - WebView Layout
- Android - Wi-Fi
- Android - Widgets
- Android - XML Parsers
- Android Useful Resources
- Android - Questions and Answers
- Android - Useful Resources
- Android - Discussion
Android - Localization
An android application can run on many devices in many different regions. In order to make your application more interactive, your application should handle text,numbers,files e.t.c in ways appropriate to the locales where your application will be used.
The way of changing string into different languages is called as localization
In this chapter we will explain , how you can localize your application according to different regions e.t.c. We will localize the strings used in the application, and in the same way other things can be localized.
Localizing Strings
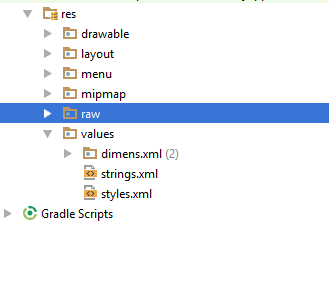
In order to localize the strings used in your application , make a new folder under res with name of values-local where local would be the replaced with the region.
For example, in the case of italy, the values-it folder would be made under res. It is shown in the image below −
Once that folder is made, copy the strings.xmlfrom default folder to the folder you have created. And change its contents. For example, i have changed the value of hello_world string.
Italy, res/values-it/strings.xml
<;?xml version="1.0" encoding="utf-8"?>
<resources>
   <string name="hello_world">Ciao mondo!</string>
</resources>
Spanish, res/values-it/strings.xml
<;?xml version="1.0" encoding="utf-8"?>
<resources>
   <string name="hello_world">Hola Mundo!</string>
</resources>
French, res/values-it/strings.xml
<;?xml version="1.0" encoding="utf-8"?>
<resources>
   <string name="hello_world">Bonjour le monde !</string>
</resources>
Apart from these languages, the region code of other languages have been given in the table below −
| Sr.No | Language & code |
|---|---|
| 1 | Afrikanns Code: af. Folder name: values-af |
| 2 | Arabic Code: ar. Folder name: values-ar |
| 3 | Bengali Code: bn. Folder name: values-bn |
| 4 | Czech Code: cs. Folder name: values-cs |
| 5 | Chinese Code: zh. Folder name: values-zh |
| 6 | German Code: de. Folder name: values-de |
| 7 | French Code: fr. Folder name: values-fr |
| 8 | Japanese Code: ja. Folder name: values-ja |
Example
To experiment with this example , you can run this on an actual device or in an emulator.
| Steps | Description |
|---|---|
| 1 | You will use Android studio to create an Android application under a package com.example.sairamkrishna.myapplication. |
| 2 | Modify the res/layout/activity_main to add respective XML components |
| 3 | Modify the res/values/string.xml to add necessary string components |
| 4 | Run the application and choose a running android device and install the application on it and verify the results |
Following is the modified content of the xml res/layout/activity_main.xml.
<?xml version="1.0" encoding="utf-8"?>
<RelativeLayout
   xmlns:android="http://schemas.android.com/apk/res/android"
   xmlns:tools="http://schemas.android.com/tools"
   android:layout_width="match_parent"
   android:layout_height="match_parent" android:paddingLeft="@dimen/activity_horizontal_margin"
   android:paddingRight="@dimen/activity_horizontal_margin"
   android:paddingTop="@dimen/activity_vertical_margin"
   android:paddingBottom="@dimen/activity_vertical_margin"
   tools:context=".MainActivity">

   <TextView android:text="Wifi"
      android:layout_width="wrap_content"
      android:layout_height="wrap_content"
      android:id="@+id/textview"
      android:textSize="35dp"
      android:layout_alignParentTop="true"
      android:layout_centerHorizontal="true" />

   <TextView
      android:layout_width="wrap_content"
      android:layout_height="wrap_content"
      android:text="Tutorials point"
      android:id="@+id/textView"
      android:layout_below="@+id/textview"
      android:layout_centerHorizontal="true"
      android:textColor="#ff7aff24"
      android:textSize="35dp" />

   <TextView
      android:layout_width="wrap_content"
      android:layout_height="wrap_content"
      android:text="@string/hindi"
      android:id="@+id/textView2"
      android:layout_below="@+id/textView"
      android:layout_centerHorizontal="true"
      android:layout_marginTop="50dp"
      android:textColor="#ff59ff1a"
      android:textSize="30dp" />

   <TextView
      android:layout_width="wrap_content"
      android:layout_height="wrap_content"
      android:text="@string/marathi"
      android:id="@+id/textView3"
      android:textSize="30dp"
      android:textColor="#ff67ff1e"
      android:layout_centerVertical="true"
      android:layout_centerHorizontal="true" />

   <TextView
      android:layout_width="wrap_content"
      android:layout_height="wrap_content"
      android:text="@string/arabic"
      android:id="@+id/textView4"
      android:layout_below="@+id/textView3"
      android:layout_centerHorizontal="true"
      android:layout_marginTop="42dp"
      android:textColor="#ff40ff08"
      android:textSize="30dp" />

   <TextView
      android:layout_width="wrap_content"
      android:layout_height="wrap_content"
      android:text="@string/chinese"
      android:id="@+id/textView5"
      android:layout_below="@+id/textView4"
      android:layout_alignLeft="@+id/textView3"
      android:layout_alignStart="@+id/textView3"
      android:layout_marginTop="42dp"
      android:textSize="30dp"
      android:textColor="#ff56ff12"
      android:layout_alignRight="@+id/textView3"
      android:layout_alignEnd="@+id/textView3" />

</RelativeLayout>
Following is the content of the res/values/string.xml.
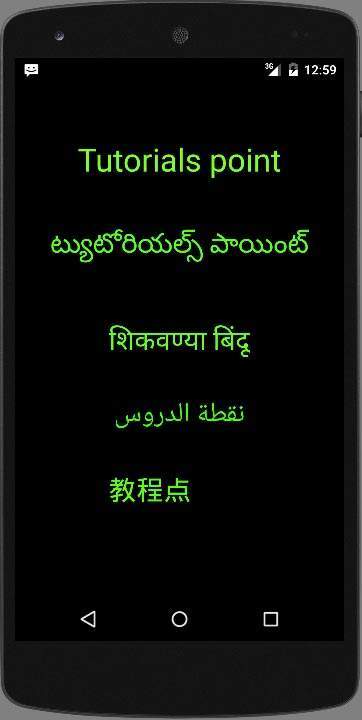
<resources>
   <string name="app_name">My Application</string>
   <string name="hello_world">Hello world!</string>
   <string name="action_settings">Settings</string>
   <string name="hindi">ట్యుటోరియల్స్ పాయింట్</string>
   <string name="marathi">शिकवण्या बिंदू</string>
   <string name="arabic">نقطة الدروس7</string>
   <string name="chinese">教程点</string>
</resources>
Let's try to run our application we just modified. I assume you had created your AVD while doing environment setup. To run the app from Android studio, open one of your project's activity files and click Run  icon from the toolbar. Android studio installs the app on your AVD and starts it and if everything is fine with your setup and application, it will display following Emulator window −