- Android Basics
- Android - Home
- Android - Overview
- Android - Environment Setup
- Android - Architecture
- Android - Application Components
- Android - Hello World Example
- Android - Resources
- Android - Activities
- Android - Services
- Android - Broadcast Receivers
- Android - Content Providers
- Android - Fragments
- Android - Intents/Filters
- Android - User Interface
- Android - UI Layouts
- Android - UI Controls
- Android - Event Handling
- Android - Styles and Themes
- Android - Custom Components
- Android Advanced Concepts
- Android - Drag and Drop
- Android - Notifications
- Location Based Services
- Android - Sending Email
- Android - Sending SMS
- Android - Phone Calls
- Publishing Android Application
- Android Useful Examples
- Android - Alert Dialoges
- Android - Animations
- Android - Audio Capture
- Android - AudioManager
- Android - Auto Complete
- Android - Best Practices
- Android - Bluetooth
- Android - Camera
- Android - Clipboard
- Android - Custom Fonts
- Android - Data Backup
- Android - Developer Tools
- Android - Emulator
- Android - Facebook Integration
- Android - Gestures
- Android - Google Maps
- Android - Image Effects
- Android - ImageSwitcher
- Android - Internal Storage
- Android - JetPlayer
- Android - JSON Parser
- Android - Linkedin Integration
- Android - Loading Spinner
- Android - Localization
- Android - Login Screen
- Android - MediaPlayer
- Android - Multitouch
- Android - Navigation
- Android - Network Connection
- Android - NFC Guide
- Android - PHP/MySQL
- Android - Progress Circle
- Android - ProgressBar
- Android - Push Notification
- Android - RenderScript
- Android - RSS Reader
- Android - Screen Cast
- Android - SDK Manager
- Android - Sensors
- Android - Session Management
- Android - Shared Preferences
- Android - SIP Protocol
- Android - Spelling Checker
- Android - SQLite Database
- Android - Support Library
- Android - Testing
- Android - Text to Speech
- Android - TextureView
- Android - Twitter Integration
- Android - UI Design
- Android - UI Patterns
- Android - UI Testing
- Android - WebView Layout
- Android - Wi-Fi
- Android - Widgets
- Android - XML Parsers
- Android Useful Resources
- Android - Questions and Answers
- Android - Useful Resources
- Android - Discussion
Android - Intents and Filters
An Android Intent is an abstract description of an operation to be performed. It can be used with startActivity to launch an Activity, broadcastIntent to send it to any interested BroadcastReceiver components, and startService(Intent) or bindService(Intent, ServiceConnection, int) to communicate with a background Service.
The intent itself, an Intent object, is a passive data structure holding an abstract description of an operation to be performed.
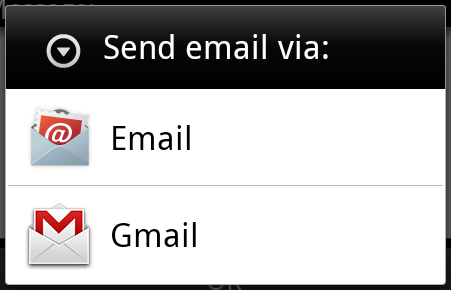
For example, let's assume that you have an Activity that needs to launch an email client and sends an email using your Android device. For this purpose, your Activity would send an ACTION_SEND along with appropriate chooser, to the Android Intent Resolver. The specified chooser gives the proper interface for the user to pick how to send your email data.
Intent email = new Intent(Intent.ACTION_SEND, Uri.parse("mailto:"));
email.putExtra(Intent.EXTRA_EMAIL, recipients);
email.putExtra(Intent.EXTRA_SUBJECT, subject.getText().toString());
email.putExtra(Intent.EXTRA_TEXT, body.getText().toString());
startActivity(Intent.createChooser(email, "Choose an email client from..."));
Above syntax is calling startActivity method to start an email activity and result should be as shown below −
For example, assume that you have an Activity that needs to open URL in a web browser on your Android device. For this purpose, your Activity will send ACTION_WEB_SEARCH Intent to the Android Intent Resolver to open given URL in the web browser. The Intent Resolver parses through a list of Activities and chooses the one that would best match your Intent, in this case, the Web Browser Activity. The Intent Resolver then passes your web page to the web browser and starts the Web Browser Activity.
String q = "tutorialspoint";
Intent intent = new Intent(Intent.ACTION_WEB_SEARCH );
intent.putExtra(SearchManager.QUERY, q);
startActivity(intent);
Above example will search as tutorialspoint on android search engine and it gives the result of tutorialspoint in your an activity
There are separate mechanisms for delivering intents to each type of component − activities, services, and broadcast receivers.
| Sr.No | Method & Description |
|---|---|
| 1 |
Context.startActivity() The Intent object is passed to this method to launch a new activity or get an existing activity to do something new. |
| 2 |
Context.startService() The Intent object is passed to this method to initiate a service or deliver new instructions to an ongoing service. |
| 3 |
Context.sendBroadcast() The Intent object is passed to this method to deliver the message to all interested broadcast receivers. |
Intent Objects
An Intent object is a bundle of information which is used by the component that receives the intent as well as information used by the Android system.
An Intent object can contain the following components based on what it is communicating or going to perform −
Action
This is mandatory part of the Intent object and is a string naming the action to be performed — or, in the case of broadcast intents, the action that took place and is being reported. The action largely determines how the rest of the intent object is structured . The Intent class defines a number of action constants corresponding to different intents. Here is a list of Android Intent Standard Actions
The action in an Intent object can be set by the setAction() method and read by getAction().
Data
Adds a data specification to an intent filter. The specification can be just a data type (the mimeType attribute), just a URI, or both a data type and a URI. A URI is specified by separate attributes for each of its parts −
These attributes that specify the URL format are optional, but also mutually dependent −
- If a scheme is not specified for the intent filter, all the other URI attributes are ignored.
- If a host is not specified for the filter, the port attribute and all the path attributes are ignored.
The setData() method specifies data only as a URI, setType() specifies it only as a MIME type, and setDataAndType() specifies it as both a URI and a MIME type. The URI is read by getData() and the type by getType().
Some examples of action/data pairs are −
| Sr.No. | Action/Data Pair & Description |
|---|---|
| 1 | ACTION_VIEW content://contacts/people/1 Display information about the person whose identifier is "1". |
| 2 |
ACTION_DIAL content://contacts/people/1 Display the phone dialer with the person filled in. |
| 3 |
ACTION_VIEW tel:123 Display the phone dialer with the given number filled in. |
| 4 |
ACTION_DIAL tel:123 Display the phone dialer with the given number filled in. |
| 5 |
ACTION_EDIT content://contacts/people/1 Edit information about the person whose identifier is "1". |
| 6 |
ACTION_VIEW content://contacts/people/ Display a list of people, which the user can browse through. |
| 7 |
ACTION_SET_WALLPAPER Show settings for choosing wallpaper |
| 8 |
ACTION_SYNC It going to be synchronous the data,Constant Value is android.intent.action.SYNC |
| 9 |
ACTION_SYSTEM_TUTORIAL It will start the platform-defined tutorial(Default tutorial or start up tutorial) |
| 10 |
ACTION_TIMEZONE_CHANGED It intimates when time zone has changed |
| 11 |
ACTION_UNINSTALL_PACKAGE It is used to run default uninstaller |
Category
The category is an optional part of Intent object and it's a string containing additional information about the kind of component that should handle the intent. The addCategory() method places a category in an Intent object, removeCategory() deletes a category previously added, and getCategories() gets the set of all categories currently in the object. Here is a list of Android Intent Standard Categories.
You can check detail on Intent Filters in below section to understand how do we use categories to choose appropriate activity corresponding to an Intent.
Extras
This will be in key-value pairs for additional information that should be delivered to the component handling the intent. The extras can be set and read using the putExtras() and getExtras() methods respectively. Here is a list of Android Intent Standard Extra Data
Flags
These flags are optional part of Intent object and instruct the Android system how to launch an activity, and how to treat it after it's launched etc.
| Sr.No | Flags & Description |
|---|---|
| 1 |
FLAG_ACTIVITY_CLEAR_TASK If set in an Intent passed to Context.startActivity(), this flag will cause any existing task that would be associated with the activity to be cleared before the activity is started. That is, the activity becomes the new root of an otherwise empty task, and any old activities are finished. This can only be used in conjunction with FLAG_ACTIVITY_NEW_TASK. |
| 2 |
FLAG_ACTIVITY_CLEAR_TOP If set, and the activity being launched is already running in the current task, then instead of launching a new instance of that activity, all of the other activities on top of it will be closed and this Intent will be delivered to the (now on top) old activity as a new Intent. |
| 3 |
FLAG_ACTIVITY_NEW_TASK This flag is generally used by activities that want to present a "launcher" style behavior: they give the user a list of separate things that can be done, which otherwise run completely independently of the activity launching them. |
Component Name
This optional field is an android ComponentName object representing either Activity, Service or BroadcastReceiver class. If it is set, the Intent object is delivered to an instance of the designated class otherwise Android uses other information in the Intent object to locate a suitable target.
The component name is set by setComponent(), setClass(), or setClassName() and read by getComponent().
Types of Intents
There are following two types of intents supported by Android
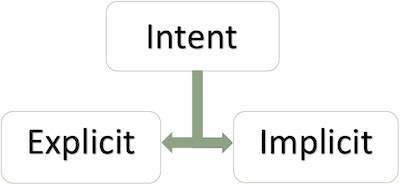
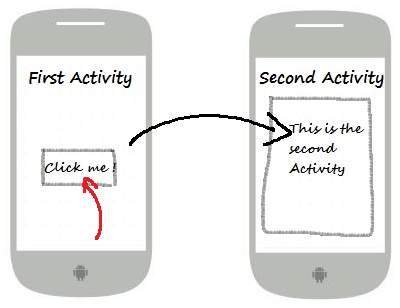
Explicit Intents
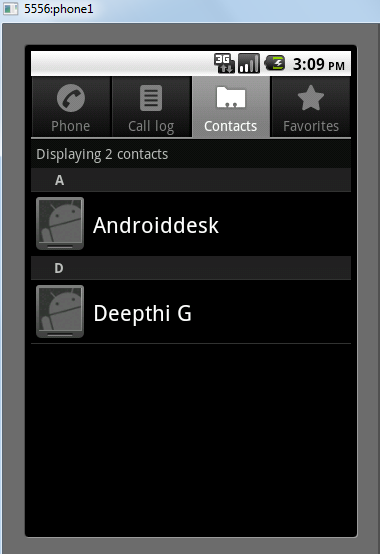
Explicit intent going to be connected internal world of application,suppose if you wants to connect one activity to another activity, we can do this quote by explicit intent, below image is connecting first activity to second activity by clicking button.
These intents designate the target component by its name and they are typically used for application-internal messages - such as an activity starting a subordinate service or launching a sister activity. For example −
// Explicit Intent by specifying its class name
Intent i = new Intent(FirstActivity.this, SecondActivity.class);

// Starts TargetActivity
startActivity(i);
Implicit Intents
These intents do not name a target and the field for the component name is left blank. Implicit intents are often used to activate components in other applications. For example −
Intent read1=new Intent();
read1.setAction(android.content.Intent.ACTION_VIEW);
read1.setData(ContactsContract.Contacts.CONTENT_URI);
startActivity(read1);
Above code will give result as shown below
The target component which receives the intent can use the getExtras() method to get the extra data sent by the source component. For example −
// Get bundle object at appropriate place in your code
Bundle extras = getIntent().getExtras();

// Extract data using passed keys
String value1 = extras.getString("Key1");
String value2 = extras.getString("Key2");
Example
Following example shows the functionality of a Android Intent to launch various Android built-in applications.
| Step | Description |
|---|---|
| 1 | You will use Android studio IDE to create an Android application and name it as My Application under a package com.example.saira_000.myapplication. |
| 2 | Modify src/main/java/MainActivity.java file and add the code to define two listeners corresponding two buttons ie. Start Browser and Start Phone. |
| 3 | Modify layout XML file res/layout/activity_main.xml to add three buttons in linear layout. |
| 4 | Run the application to launch Android emulator and verify the result of the changes done in the application. |
Following is the content of the modified main activity file src/com.example.My Application/MainActivity.java.
package com.example.saira_000.myapplication;

import android.content.Intent;
import android.net.Uri;
import android.support.v7.app.AppCompatActivity;
import android.os.Bundle;
import android.view.View;
import android.widget.Button;

public class MainActivity extends AppCompatActivity {
   Button b1,b2;

   @Override
   protected void onCreate(Bundle savedInstanceState) {
      super.onCreate(savedInstanceState);
      setContentView(R.layout.activity_main);

      b1=(Button)findViewById(R.id.button);
      b1.setOnClickListener(new View.OnClickListener() {

         @Override
         public void onClick(View v) {
            Intent i = new Intent(android.content.Intent.ACTION_VIEW,
               Uri.parse("http://www.example.com"));
            startActivity(i);
         }
      });

      b2=(Button)findViewById(R.id.button2);
      b2.setOnClickListener(new View.OnClickListener() {
         @Override
         public void onClick(View v) {
            Intent i = new Intent(android.content.Intent.ACTION_VIEW,
               Uri.parse("tel:9510300000"));
            startActivity(i);
         }
      });
   }
}
Following will be the content of res/layout/activity_main.xml file −
<?xml version="1.0" encoding="utf-8"?>
<RelativeLayout xmlns:android="http://schemas.android.com/apk/res/android"
   xmlns:tools="http://schemas.android.com/tools"
   android:layout_width="match_parent"
   android:layout_height="match_parent"
   android:paddingLeft="@dimen/activity_horizontal_margin"
   android:paddingRight="@dimen/activity_horizontal_margin"
   android:paddingTop="@dimen/activity_vertical_margin"
   android:paddingBottom="@dimen/activity_vertical_margin"
   tools:context=".MainActivity">

   <TextView
      android:id="@+id/textView1"
      android:layout_width="wrap_content"
      android:layout_height="wrap_content"
      android:text="Intent Example"
      android:layout_alignParentTop="true"
      android:layout_centerHorizontal="true"
      android:textSize="30dp" />

   <TextView
      android:id="@+id/textView2"
      android:layout_width="wrap_content"
      android:layout_height="wrap_content"
      android:text="Tutorials point"
      android:textColor="#ff87ff09"
      android:textSize="30dp"
      android:layout_below="@+id/textView1"
      android:layout_centerHorizontal="true" />

   <ImageButton
      android:layout_width="wrap_content"
      android:layout_height="wrap_content"
      android:id="@+id/imageButton"
      android:src="@drawable/abc"
      android:layout_below="@+id/textView2"
      android:layout_centerHorizontal="true" />

   <EditText
      android:layout_width="wrap_content"
      android:layout_height="wrap_content"
      android:id="@+id/editText"
      android:layout_below="@+id/imageButton"
      android:layout_alignRight="@+id/imageButton"
      android:layout_alignEnd="@+id/imageButton" />

   <Button
      android:layout_width="wrap_content"
      android:layout_height="wrap_content"
      android:text="Start Browser"
      android:id="@+id/button"
      android:layout_alignTop="@+id/editText"
      android:layout_alignRight="@+id/textView1"
      android:layout_alignEnd="@+id/textView1"
      android:layout_alignLeft="@+id/imageButton"
      android:layout_alignStart="@+id/imageButton" />

   <Button
      android:layout_width="wrap_content"
      android:layout_height="wrap_content"
      android:text="Start Phone"
      android:id="@+id/button2"
      android:layout_below="@+id/button"
      android:layout_alignLeft="@+id/button"
      android:layout_alignStart="@+id/button"
      android:layout_alignRight="@+id/textView2"
      android:layout_alignEnd="@+id/textView2" />
</RelativeLayout>
Following will be the content of res/values/strings.xml to define two new constants −
<?xml version="1.0" encoding="utf-8"?>
<resources>
   <string name="app_name">My Applicaiton</string>
</resources>
Following is the default content of AndroidManifest.xml −
<?xml version="1.0" encoding="utf-8"?>
<manifest xmlns:android="http://schemas.android.com/apk/res/android"
   package="com.example.saira_000.myapplication">

   <application
      android:allowBackup="true"
      android:icon="@mipmap/ic_launcher"
      android:label="@string/app_name"
      android:supportsRtl="true"
      android:theme="@style/AppTheme">
      <activity android:name=".MainActivity">
         <intent-filter>
            <action android:name="android.intent.action.MAIN" />
            <category android:name="android.intent.category.LAUNCHER" />
         </intent-filter>
      </activity>
   </application>
</manifest>
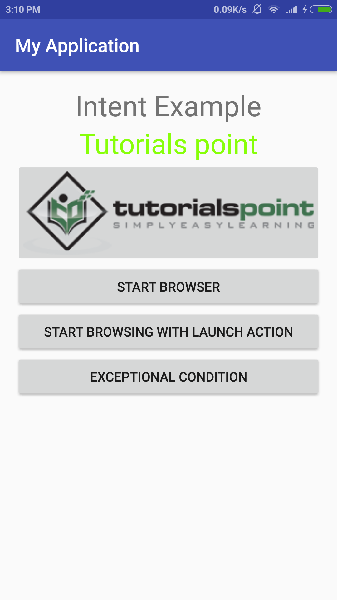
Let's try to run your My Application application. I assume you had created your AVD while doing environment setup. To run the app from Android Studio, open one of your project's activity files and click Run  icon from the toolbar.Android Studio installs the app on your AVD and starts it and if everything is fine with your setup and application, it will display following Emulator window −

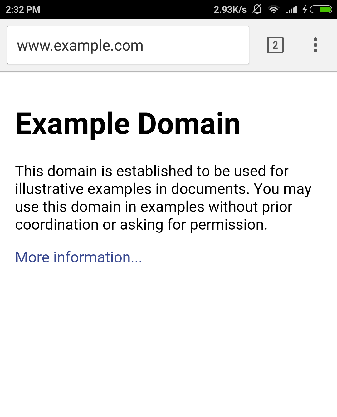
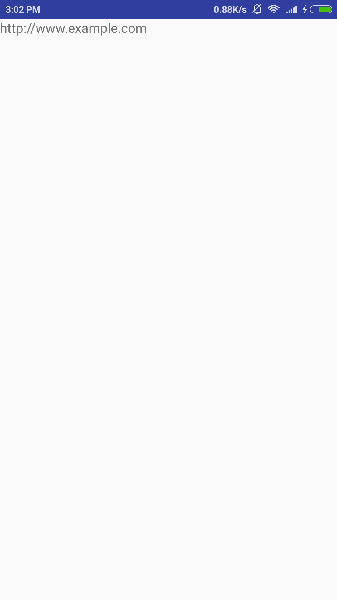
Now click on Start Browser button, which will start a browser configured and display http://www.example.com as shown below −
Similar way you can launch phone interface using Start Phone button, which will allow you to dial already given phone number.
Intent Filters
You have seen how an Intent has been used to call an another activity. Android OS uses filters to pinpoint the set of Activities, Services, and Broadcast receivers that can handle the Intent with help of specified set of action, categories, data scheme associated with an Intent. You will use <intent-filter> element in the manifest file to list down actions, categories and data types associated with any activity, service, or broadcast receiver.
Following is an example of a part of AndroidManifest.xml file to specify an activity com.example.My Application.CustomActivity which can be invoked by either of the two mentioned actions, one category, and one data −
<activity android:name=".CustomActivity"
   android:label="@string/app_name">

   <intent-filter>
      <action android:name="android.intent.action.VIEW" />
      <action android:name="com.example.My Application.LAUNCH" />
      <category android:name="android.intent.category.DEFAULT" />
      <data android:scheme="http" />
   </intent-filter>

</activity>
Once this activity is defined along with above mentioned filters, other activities will be able to invoke this activity using either the android.intent.action.VIEW, or using the com.example.My Application.LAUNCH action provided their category is android.intent.category.DEFAULT.
The <data> element specifies the data type expected by the activity to be called and for above example our custom activity expects the data to start with the "http://"
There may be a situation that an intent can pass through the filters of more than one activity or service, the user may be asked which component to activate. An exception is raised if no target can be found.
There are following test Android checks before invoking an activity −
A filter <intent-filter> may list more than one action as shown above but this list cannot be empty; a filter must contain at least one <action> element, otherwise it will block all intents. If more than one actions are mentioned then Android tries to match one of the mentioned actions before invoking the activity.
A filter <intent-filter> may list zero, one or more than one categories. if there is no category mentioned then Android always pass this test but if more than one categories are mentioned then for an intent to pass the category test, every category in the Intent object must match a category in the filter.
Each <data> element can specify a URI and a data type (MIME media type). There are separate attributes like scheme, host, port, and path for each part of the URI. An Intent object that contains both a URI and a data type passes the data type part of the test only if its type matches a type listed in the filter.
Example
Following example is a modification of the above example. Here we will see how Android resolves conflict if one intent is invoking two activities defined in , next how to invoke a custom activity using a filter and third one is an exception case if Android does not file appropriate activity defined for an intent.
| Step | Description |
|---|---|
| 1 | You will use android studio to create an Android application and name it as My Application under a package com.example.tutorialspoint7.myapplication;. |
| 2 | Modify src/Main/Java/MainActivity.java file and add the code to define three listeners corresponding to three buttons defined in layout file. |
| 3 | Add a new src/Main/Java/CustomActivity.java file to have one custom activity which will be invoked by different intents. |
| 4 | Modify layout XML file res/layout/activity_main.xml to add three buttons in linear layout. |
| 5 | Add one layout XML file res/layout/custom_view.xml to add a simple <TextView> to show the passed data through intent. |
| 6 | Modify AndroidManifest.xml to add <intent-filter> to define rules for your intent to invoke custom activity. |
| 7 | Run the application to launch Android emulator and verify the result of the changes done in the application. |
Following is the content of the modified main activity file src/MainActivity.java.
package com.example.tutorialspoint7.myapplication;

import android.content.Intent;
import android.net.Uri;
import android.support.v7.app.AppCompatActivity;
import android.os.Bundle;
import android.view.View;
import android.widget.Button;

public class MainActivity extends AppCompatActivity {
   Button b1,b2,b3;
   @Override
   protected void onCreate(Bundle savedInstanceState) {
      super.onCreate(savedInstanceState);
      setContentView(R.layout.activity_main);
      b1=(Button)findViewById(R.id.button);
      b1.setOnClickListener(new View.OnClickListener() {

         @Override
         public void onClick(View v) {
            Intent i = new Intent(android.content.Intent.ACTION_VIEW,
               Uri.parse("http://www.example.com"));
            startActivity(i);
         }
      });

      b2 = (Button)findViewById(R.id.button2);
      b2.setOnClickListener(new View.OnClickListener() {
         @Override
         public void onClick(View v) {
            Intent i = new Intent("com.example.
               tutorialspoint7.myapplication.
                  LAUNCH",Uri.parse("http://www.example.com"));
            startActivity(i);
         }
      });

      b3 = (Button)findViewById(R.id.button3);
      b3.setOnClickListener(new View.OnClickListener() {
         @Override
         public void onClick(View v) {
            Intent i = new Intent("com.example.
               My Application.LAUNCH",
                  Uri.parse("https://www.example.com"));
            startActivity(i);
         }
      });
   }
}
Following is the content of the modified main activity file src/com.example.My Application/CustomActivity.java.
package com.example.tutorialspoint7.myapplication;

import android.app.Activity;
import android.net.Uri;
import android.os.Bundle;
import android.widget.TextView;

/**
 * Created by TutorialsPoint7 on 8/23/2016.
 */
public class CustomActivity extends Activity {
   @Override
   public void onCreate(Bundle savedInstanceState) {
      super.onCreate(savedInstanceState);
      setContentView(R.layout.custom_view);
      TextView label = (TextView) findViewById(R.id.show_data);
      Uri url = getIntent().getData();
      label.setText(url.toString());
   }
}
Following will be the content of res/layout/activity_main.xml file −
<?xml version="1.0" encoding="utf-8"?>
<RelativeLayout
   xmlns:android="http://schemas.android.com/apk/res/android"
   xmlns:tools="http://schemas.android.com/tools"
   android:layout_width="match_parent"
   android:layout_height="match_parent"
   android:paddingBottom="@dimen/activity_vertical_margin"
   android:paddingLeft="@dimen/activity_horizontal_margin"
   android:paddingRight="@dimen/activity_horizontal_margin"
   android:paddingTop="@dimen/activity_vertical_margin"
   tools:context="com.example.tutorialspoint7.myapplication.MainActivity">

   <TextView
      android:id="@+id/textView1"
      android:layout_width="wrap_content"
      android:layout_height="wrap_content"
      android:text="Intent Example"
      android:layout_alignParentTop="true"
      android:layout_centerHorizontal="true"
      android:textSize="30dp" />

   <TextView
      android:id="@+id/textView2"
      android:layout_width="wrap_content"
      android:layout_height="wrap_content"
      android:text="Tutorials point"
      android:textColor="#ff87ff09"
      android:textSize="30dp"
      android:layout_below="@+id/textView1"
      android:layout_centerHorizontal="true" />

   <ImageButton
      android:layout_width="wrap_content"
      android:layout_height="wrap_content"
      android:id="@+id/imageButton"
      android:src="@drawable/abc"
      android:layout_below="@+id/textView2"
      android:layout_centerHorizontal="true" />

   <EditText
      android:layout_width="wrap_content"
      android:layout_height="wrap_content"
      android:id="@+id/editText"
      android:layout_below="@+id/imageButton"
      android:layout_alignRight="@+id/imageButton"
      android:layout_alignEnd="@+id/imageButton" />

   <Button
      android:layout_width="wrap_content"
      android:layout_height="wrap_content"
      android:text="Start Browser"
      android:id="@+id/button"
      android:layout_alignTop="@+id/editText"
      android:layout_alignLeft="@+id/imageButton"
      android:layout_alignStart="@+id/imageButton"
      android:layout_alignEnd="@+id/imageButton" />

   <Button
      android:layout_width="wrap_content"
      android:layout_height="wrap_content"
      android:text="Start browsing with launch action"
      android:id="@+id/button2"
      android:layout_below="@+id/button"
      android:layout_alignLeft="@+id/button"
      android:layout_alignStart="@+id/button"
      android:layout_alignEnd="@+id/button" />
   <Button
      android:layout_width="wrap_content"
      android:layout_height="wrap_content"
      android:text="Exceptional condition"
      android:id="@+id/button3"
      android:layout_below="@+id/button2"
      android:layout_alignLeft="@+id/button2"
      android:layout_alignStart="@+id/button2"
      android:layout_toStartOf="@+id/editText"
      android:layout_alignParentEnd="true" />
</RelativeLayout>
Following will be the content of res/layout/custom_view.xml file −
<?xml version="1.0" encoding="utf-8"?>
<LinearLayout xmlns:android="http://schemas.android.com/apk/res/android"
   android:orientation="vertical" android:layout_width="match_parent"
   android:layout_height="match_parent">
   <TextView android:id="@+id/show_data"
      android:layout_width="fill_parent"
      android:layout_height="400dp"/>
</LinearLayout>
Following will be the content of res/values/strings.xml to define two new constants −
<?xml version="1.0" encoding="utf-8"?>
<resources>
   <string name="app_name">My Application</string>
</resources>
Following is the default content of AndroidManifest.xml −
<?xml version="1.0" encoding="utf-8"?>
<manifest xmlns:android="http://schemas.android.com/apk/res/android"
   package="com.example.tutorialspoint7.myapplication">

   <application
      android:allowBackup = "true"
      android:icon = "@mipmap/ic_launcher"
      android:label = "@string/app_name"
      android:supportsRtl = "true"
      android:theme = "@style/AppTheme">
      <activity android:name = ".MainActivity">
         <intent-filter>
            <action android:name = "android.intent.action.MAIN" />
            <category android:name = "android.intent.category.LAUNCHER" />
         </intent-filter>
      </activity>

      <activity android:name="com.example.tutorialspoint7.myapplication.CustomActivity">

         <intent-filter>
            <action android:name = "android.intent.action.VIEW" />
            <action android:name = "com.example.tutorialspoint7.myapplication.LAUNCH" />
            <category android:name = "android.intent.category.DEFAULT" />
            <data android:scheme = "http" />
         </intent-filter>

      </activity>
   </application>

</manifest>
Let's try to run your My Application application. I assume you had created your AVD while doing environment setup. To run the app from Android Studio, open one of your project's activity files and click Run icon from the toolbar. Android Studio installs the app on your AVD and starts it and if everything is fine with your setup and application, it will display following Emulator window −
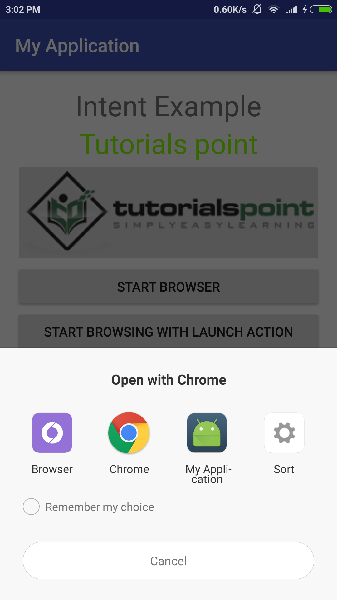
Now let's start with first button "Start Browser with VIEW Action". Here we have defined our custom activity with a filter "android.intent.action.VIEW", and there is already one default activity against VIEW action defined by Android which is launching web browser, So android displays following two options to select the activity you want to launch.
Now if you select Browser, then Android will launch web browser and open example.com website but if you select IndentDemo option then Android will launch CustomActivity which does nothing but just capture passed data and displays in a text view as follows −
Now go back using back button and click on "Start Browser with LAUNCH Action" button, here Android applies filter to choose define activity and it simply launch your custom activity
Again, go back using back button and click on "Exception Condition" button, here Android tries to find out a valid filter for the given intent but it does not find a valid activity defined because this time we have used data as https instead of http though we are giving a correct action, so Android raises an exception and shows following screen −