- Android Basics
- Android - Home
- Android - Overview
- Android - Environment Setup
- Android - Architecture
- Android - Application Components
- Android - Hello World Example
- Android - Resources
- Android - Activities
- Android - Services
- Android - Broadcast Receivers
- Android - Content Providers
- Android - Fragments
- Android - Intents/Filters
- Android - User Interface
- Android - UI Layouts
- Android - UI Controls
- Android - Event Handling
- Android - Styles and Themes
- Android - Custom Components
- Android Advanced Concepts
- Android - Drag and Drop
- Android - Notifications
- Location Based Services
- Android - Sending Email
- Android - Sending SMS
- Android - Phone Calls
- Publishing Android Application
- Android Useful Examples
- Android - Alert Dialoges
- Android - Animations
- Android - Audio Capture
- Android - AudioManager
- Android - Auto Complete
- Android - Best Practices
- Android - Bluetooth
- Android - Camera
- Android - Clipboard
- Android - Custom Fonts
- Android - Data Backup
- Android - Developer Tools
- Android - Emulator
- Android - Facebook Integration
- Android - Gestures
- Android - Google Maps
- Android - Image Effects
- Android - ImageSwitcher
- Android - Internal Storage
- Android - JetPlayer
- Android - JSON Parser
- Android - Linkedin Integration
- Android - Loading Spinner
- Android - Localization
- Android - Login Screen
- Android - MediaPlayer
- Android - Multitouch
- Android - Navigation
- Android - Network Connection
- Android - NFC Guide
- Android - PHP/MySQL
- Android - Progress Circle
- Android - ProgressBar
- Android - Push Notification
- Android - RenderScript
- Android - RSS Reader
- Android - Screen Cast
- Android - SDK Manager
- Android - Sensors
- Android - Session Management
- Android - Shared Preferences
- Android - SIP Protocol
- Android - Spelling Checker
- Android - SQLite Database
- Android - Support Library
- Android - Testing
- Android - Text to Speech
- Android - TextureView
- Android - Twitter Integration
- Android - UI Design
- Android - UI Patterns
- Android - UI Testing
- Android - WebView Layout
- Android - Wi-Fi
- Android - Widgets
- Android - XML Parsers
- Android Useful Resources
- Android - Questions and Answers
- Android - Useful Resources
- Android - Discussion
Android - Google Maps
Android allows us to integrate google maps in our application. You can show any location on the map , or can show different routes on the map e.t.c. You can also customize the map according to your choices.
Google Map - Layout file
Now you have to add the map fragment into xml layout file. Its syntax is given below −
<fragment
   android:id="@+id/map"
   android:name="com.google.android.gms.maps.MapFragment"
   android:layout_width="match_parent"
   android:layout_height="match_parent"/>
Google Map - AndroidManifest file
The next thing you need to do is to add some permissions along with the Google Map API key in the AndroidManifest.XML file. Its syntax is given below −
<!--Permissions-->

<uses-permission android:name="android.permission.ACCESS_NETWORK_STATE" />
<uses-permission android:name="android.permission.INTERNET" />
<uses-permission android:name="com.google.android.providers.gsf.permission.
   READ_GSERVICES" />
<uses-permission android:name="android.permission.WRITE_EXTERNAL_STORAGE" />

<!--Google MAP API key-->

<meta-data
   android:name="com.google.android.maps.v2.API_KEY"
   android:value="AIzaSyDKymeBXNeiFWY5jRUejv6zItpmr2MVyQ0" />
Customizing Google Map
You can easily customize google map from its default view , and change it according to your demand.
Adding Marker
You can place a maker with some text over it displaying your location on the map. It can be done by via addMarker() method. Its syntax is given below −
final LatLng TutorialsPoint = new LatLng(21 , 57);
Marker TP = googleMap.addMarker(new MarkerOptions()
   .position(TutorialsPoint).title("TutorialsPoint"));
Changing Map Type
You can also change the type of the MAP. There are four different types of map and each give a different view of the map. These types are Normal,Hybrid,Satellite and terrain. You can use them as below
googleMap.setMapType(GoogleMap.MAP_TYPE_NORMAL);
googleMap.setMapType(GoogleMap.MAP_TYPE_HYBRID);
googleMap.setMapType(GoogleMap.MAP_TYPE_SATELLITE);
googleMap.setMapType(GoogleMap.MAP_TYPE_TERRAIN);
Enable/Disable zoom
You can also enable or disable the zoom gestures in the map by calling the setZoomControlsEnabled(boolean) method. Its syntax is given below −
googleMap.getUiSettings().setZoomGesturesEnabled(true);
Apart from these customization, there are other methods available in the GoogleMap class , that helps you more customize the map. They are listed below −
| Sr.No | Method & description |
|---|---|
| 1 |
addCircle(CircleOptions options) This method add a circle to the map |
| 2 |
addPolygon(PolygonOptions options) This method add a polygon to the map |
| 3 |
addTileOverlay(TileOverlayOptions options) This method add tile overlay to the map |
| 4 |
animateCamera(CameraUpdate update) This method Moves the map according to the update with an animation |
| 5 |
clear() This method removes everything from the map. |
| 6 |
getMyLocation() This method returns the currently displayed user location. |
| 7 |
moveCamera(CameraUpdate update) This method repositions the camera according to the instructions defined in the update |
| 8 |
setTrafficEnabled(boolean enabled) This method Toggles the traffic layer on or off. |
| 9 |
snapshot(GoogleMap.SnapshotReadyCallback callback) This method Takes a snapshot of the map |
| 10 | stopAnimation() This method stops the camera animation if there is one in progress |
Example
Here is an example demonstrating the use of GoogleMap class. It creates a basic M application that allows you to navigate through the map.
To experiment with this example , you can run this on an actual device or in an emulator.
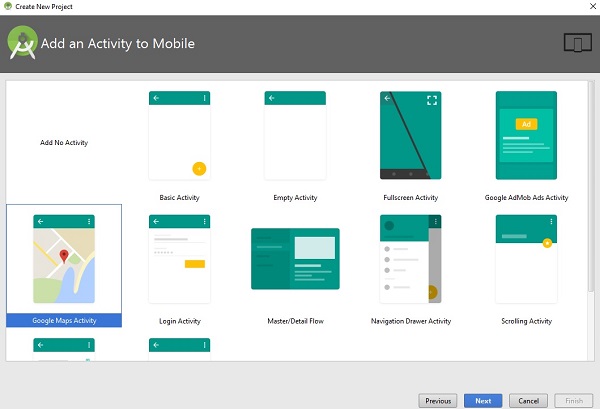
Create a project with google maps activity as shown below −
It will open the following screen and copy the console url for API Key as shown below −
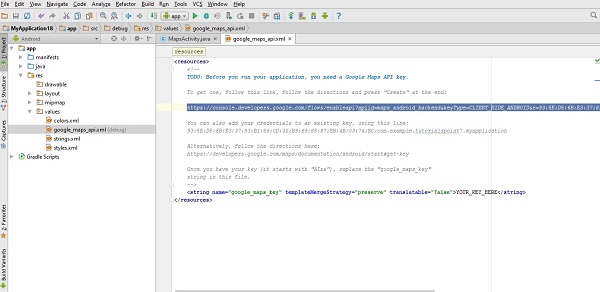
Copy this and paste it to your browser. It will give the following screen −
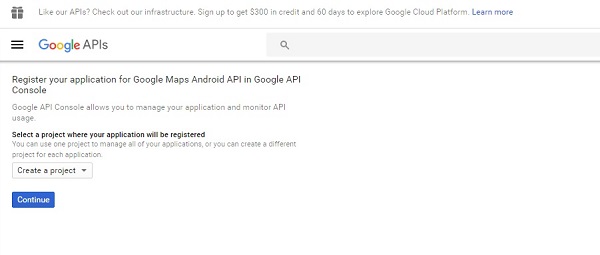
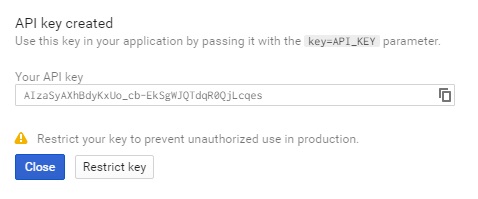
Click on continue and click on Create API Key then it will show the following screen
Here is the content of activity_main.xml.
<fragment xmlns:android="http://schemas.android.com/apk/res/android"
   xmlns:map="http://schemas.android.com/apk/res-auto"
   xmlns:tools="http://schemas.android.com/tools"
   android:id="@+id/map"
   android:name="com.google.android.gms.maps.SupportMapFragment"
   android:layout_width="match_parent"
   android:layout_height="match_parent"
   tools:context="com.example.tutorialspoint7.myapplication.MapsActivity" />
Here is the content of MapActivity.java.
In the below code we have given sample latitude and longitude details
package com.example.tutorialspoint7.myapplication;

import android.support.v4.app.FragmentActivity;
import android.os.Bundle;

import com.google.android.gms.maps.CameraUpdateFactory;
import com.google.android.gms.maps.GoogleMap;
import com.google.android.gms.maps.OnMapReadyCallback;
import com.google.android.gms.maps.SupportMapFragment;
import com.google.android.gms.maps.model.LatLng;
import com.google.android.gms.maps.model.MarkerOptions;

public class MapsActivity extends FragmentActivity implements OnMapReadyCallback {

   private GoogleMap mMap;

   @Override
   protected void onCreate(Bundle savedInstanceState) {
      super.onCreate(savedInstanceState);
      setContentView(R.layout.activity_maps);
      // Obtain the SupportMapFragment and get notified when the map is ready to be used.
      SupportMapFragment mapFragment = (SupportMapFragment) getSupportFragmentManager()
         .findFragmentById(R.id.map);
      mapFragment.getMapAsync(this);
   }

   /**
      * Manipulates the map once available.
      * This callback is triggered when the map is ready to be used.
      * This is where we can add markers or lines, add listeners or move the camera.
      * In this case, we just add a marker near Sydney, Australia.
      * If Google Play services is not installed on the device.
      * This method will only be triggered once the user has installed
         Google Play services and returned to the app.
   */

   @Override
   public void onMapReady(GoogleMap googleMap) {
      mMap = googleMap;
      // Add a marker in Sydney and move the camera
      LatLng TutorialsPoint = new LatLng(21, 57);
      mMap.addMarker(new
         MarkerOptions().position(TutorialsPoint).title("Tutorialspoint.com"));
      mMap.moveCamera(CameraUpdateFactory.newLatLng(TutorialsPoint));
   }
}
Following is the content of AndroidManifest.xml file.
<?xml version="1.0" encoding="utf-8"?>
<manifest xmlns:android="http://schemas.android.com/apk/res/android"
    package="com.example.tutorialspoint7.myapplication">

   <!--
      The ACCESS_COARSE/FINE_LOCATION permissions are not required to use
      Google Maps Android API v2, but you must specify either coarse or fine
      location permissions for the 'MyLocation' functionality.
   -->

   <uses-permission android:name="android.permission.ACCESS_FINE_LOCATION" />
   <uses-permission android:name="android.permission.ACCESS_COARSE_LOCATION" />
   <uses-permission android:name="android.permission.INTERNET" />
   <application
      android:allowBackup="true"
      android:icon="@mipmap/ic_launcher"
      android:label="@string/app_name"
      android:supportsRtl="true"
      android:theme="@style/AppTheme">

      <!--
         The API key for Google Maps-based APIs is defined as a string resource.
         (See the file "res/values/google_maps_api.xml").
         Note that the API key is linked to the encryption key used to sign the APK.
         You need a different API key for each encryption key, including the release key
         that is used to sign the APK for publishing.
         You can define the keys for the debug and
            release targets in src/debug/ and src/release/.
      -->

      <meta-data
         android:name="com.google.android.geo.API_KEY"
         android:value="AIzaSyAXhBdyKxUo_cb-EkSgWJQTdqR0QjLcqes" />

      <activity
         android:name=".MapsActivity"
         android:label="@string/title_activity_maps">
         <intent-filter>
            <action android:name="android.intent.action.MAIN" />
            <category android:name="android.intent.category.LAUNCHER" />
         </intent-filter>
      </activity>
   </application>

</manifest>
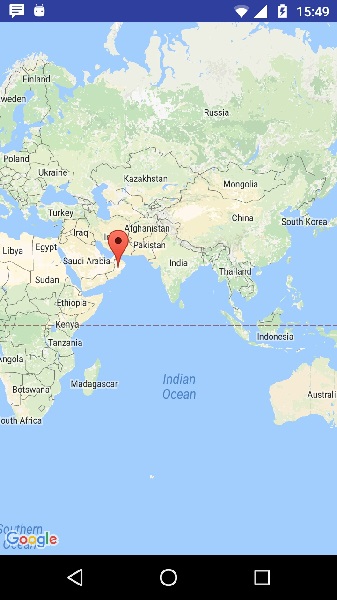
Output should be like this −