- Android Basics
- Android - Home
- Android - Overview
- Android - Environment Setup
- Android - Architecture
- Android - Application Components
- Android - Hello World Example
- Android - Resources
- Android - Activities
- Android - Services
- Android - Broadcast Receivers
- Android - Content Providers
- Android - Fragments
- Android - Intents/Filters
- Android - User Interface
- Android - UI Layouts
- Android - UI Controls
- Android - Event Handling
- Android - Styles and Themes
- Android - Custom Components
- Android Advanced Concepts
- Android - Drag and Drop
- Android - Notifications
- Location Based Services
- Android - Sending Email
- Android - Sending SMS
- Android - Phone Calls
- Publishing Android Application
- Android Useful Examples
- Android - Alert Dialoges
- Android - Animations
- Android - Audio Capture
- Android - AudioManager
- Android - Auto Complete
- Android - Best Practices
- Android - Bluetooth
- Android - Camera
- Android - Clipboard
- Android - Custom Fonts
- Android - Data Backup
- Android - Developer Tools
- Android - Emulator
- Android - Facebook Integration
- Android - Gestures
- Android - Google Maps
- Android - Image Effects
- Android - ImageSwitcher
- Android - Internal Storage
- Android - JetPlayer
- Android - JSON Parser
- Android - Linkedin Integration
- Android - Loading Spinner
- Android - Localization
- Android - Login Screen
- Android - MediaPlayer
- Android - Multitouch
- Android - Navigation
- Android - Network Connection
- Android - NFC Guide
- Android - PHP/MySQL
- Android - Progress Circle
- Android - ProgressBar
- Android - Push Notification
- Android - RenderScript
- Android - RSS Reader
- Android - Screen Cast
- Android - SDK Manager
- Android - Sensors
- Android - Session Management
- Android - Shared Preferences
- Android - SIP Protocol
- Android - Spelling Checker
- Android - SQLite Database
- Android - Support Library
- Android - Testing
- Android - Text to Speech
- Android - TextureView
- Android - Twitter Integration
- Android - UI Design
- Android - UI Patterns
- Android - UI Testing
- Android - WebView Layout
- Android - Wi-Fi
- Android - Widgets
- Android - XML Parsers
- Android Useful Resources
- Android - Questions and Answers
- Android - Useful Resources
- Android - Discussion
Android - Drag and Drop
Android drag/drop framework allows your users to move data from one View to another View in the current layout using a graphical drag and drop gesture. As of API 11 drag and drop of view onto other views or view groups is supported.The framework includes following three important components to support drag & drop functionality −
Drag event class.
Drag listeners.
Helper methods and classes.
The Drag/Drop Process
There are basically four steps or states in the drag and drop process −
Started − This event occurs when you start dragging an item in a layout, your application calls startDrag() method to tell the system to start a drag. The arguments inside startDrag() method provide the data to be dragged, metadata for this data, and a callback for drawing the drag shadow.
The system first responds by calling back to your application to get a drag shadow. It then displays the drag shadow on the device.
Next, the system sends a drag event with action type ACTION_DRAG_STARTED to the registered drag event listeners for all the View objects in the current layout.
To continue to receive drag events, including a possible drop event, a drag event listener must return true, If the drag event listener returns false, then it will not receive drag events for the current operation until the system sends a drag event with action type ACTION_DRAG_ENDED.
Continuing − The user continues the drag. System sends ACTION_DRAG_ENTERED action followed by ACTION_DRAG_LOCATION action to the registered drag event listener for the View where dragging point enters. The listener may choose to alter its View object's appearance in response to the event or can react by highlighting its View.
The drag event listener receives a ACTION_DRAG_EXITED action after the user has moved the drag shadow outside the bounding box of the View.
Dropped − The user releases the dragged item within the bounding box of a View. The system sends the View object's listener a drag event with action type ACTION_DROP.
Ended − Just after the action type ACTION_DROP, the system sends out a drag event with action type ACTION_DRAG_ENDED to indicate that the drag operation is over.
The DragEvent Class
The DragEvent represents an event that is sent out by the system at various times during a drag and drop operation. This class provides few Constants and important methods which we use during Drag/Drop process.
Constants
Following are all constants integers available as a part of DragEvent class.
| Sr.No. | Constants & Description |
|---|---|
| 1 |
ACTION_DRAG_STARTED Signals the start of a drag and drop operation. |
| 2 |
ACTION_DRAG_ENTERED Signals to a View that the drag point has entered the bounding box of the View. |
| 3 | ACTION_DRAG_LOCATION Sent to a View after ACTION_DRAG_ENTERED if the drag shadow is still within the View object's bounding box. |
| 4 | ACTION_DRAG_EXITED Signals that the user has moved the drag shadow outside the bounding box of the View. |
| 5 | ACTION_DROP Signals to a View that the user has released the drag shadow, and the drag point is within the bounding box of the View. |
| 6 |
ACTION_DRAG_ENDED Signals to a View that the drag and drop operation has concluded. |
Methods
Following are few important and most frequently used methods available as a part of DragEvent class.
| Sr.No. | Constants & Description |
|---|---|
| 1 | int getAction() Inspect the action value of this event.. |
| 2 | ClipData getClipData() Returns the ClipData object sent to the system as part of the call to startDrag(). |
| 3 |
ClipDescription getClipDescription() Returns the ClipDescription object contained in the ClipData. |
| 4 |
boolean getResult() Returns an indication of the result of the drag and drop operation. |
| 5 |
float getX() Gets the X coordinate of the drag point. |
| 6 | float getY() Gets the Y coordinate of the drag point. |
| 7 | String toString() Returns a string representation of this DragEvent object. |
Listening for Drag Event
If you want any of your views within a Layout should respond Drag event then your view either implements View.OnDragListener or setup onDragEvent(DragEvent) callback method. When the system calls the method or listener, it passes to them a DragEvent object explained above. You can have both a listener and a callback method for View object. If this occurs, the system first calls the listener and then defined callback as long as listener returns true.
The combination of the onDragEvent(DragEvent) method and View.OnDragListener is analogous to the combination of the onTouchEvent() and View.OnTouchListener used with touch events in old versions of Android.
Starting a Drag Event
You start with creating a ClipData and ClipData.Item for the data being moved. As part of the ClipData object, supply metadata that is stored in a ClipDescription object within the ClipData. For a drag and drop operation that does not represent data movement, you may want to use null instead of an actual object.
Next either you can extend extend View.DragShadowBuilder to create a drag shadow for dragging the view or simply you can use View.DragShadowBuilder(View) to create a default drag shadow that's the same size as the View argument passed to it, with the touch point centered in the drag shadow.
Example
Following example shows the functionality of a simple Drag & Drop using View.setOnLongClickListener(), View.setOnTouchListener()and View.OnDragEventListener().
| Step | Description |
|---|---|
| 1 | You will use Android studio IDE to create an Android application and name it as My Application under a package com.example.saira_000.myapplication. |
| 2 | Modify src/MainActivity.java file and add the code to define event listeners as well as a call back methods for the logo image used in the example. |
| 3 | Copy image abc.png in res/drawable-* folders. You can use images with different resolution in case you want to provide them for different devices. |
| 4 | Modify layout XML file res/layout/activity_main.xml to define default view of the logo images. |
| 5 | Run the application to launch Android emulator and verify the result of the changes done in the application. |
Following is the content of the modified main activity file src/MainActivity.java. This file can include each of the fundamental lifecycle methods.
package com.example.saira_000.myapplication;

import android.app.Activity;

import android.content.ClipData;
import android.content.ClipDescription;

import android.support.v7.app.ActionBarActivity;
import android.os.Bundle;
import android.util.Log;

import android.view.DragEvent;
import android.view.Menu;
import android.view.MenuItem;
import android.view.MotionEvent;
import android.view.View;

import android.widget.ImageView;
import android.widget.RelativeLayout;


public class MainActivity extends Activity {
   ImageView img;
   String msg;
   private android.widget.RelativeLayout.LayoutParams layoutParams;

   @Override
   protected void onCreate(Bundle savedInstanceState) {
      super.onCreate(savedInstanceState);
      setContentView(R.layout.activity_main);
      img=(ImageView)findViewById(R.id.imageView);

      img.setOnLongClickListener(new View.OnLongClickListener() {
         @Override
         public boolean onLongClick(View v) {
            ClipData.Item item = new ClipData.Item((CharSequence)v.getTag());
            String[] mimeTypes = {ClipDescription.MIMETYPE_TEXT_PLAIN};

            ClipData dragData = new ClipData(v.getTag().toString(),mimeTypes, item);
            View.DragShadowBuilder myShadow = new View.DragShadowBuilder(img);

            v.startDrag(dragData,myShadow,null,0);
            return true;
         }
      });

      img.setOnDragListener(new View.OnDragListener() {
         @Override
         public boolean onDrag(View v, DragEvent event) {
            switch(event.getAction()) {
               case DragEvent.ACTION_DRAG_STARTED:
               layoutParams = (RelativeLayout.LayoutParams)v.getLayoutParams();
               Log.d(msg, "Action is DragEvent.ACTION_DRAG_STARTED");

               // Do nothing
               break;

               case DragEvent.ACTION_DRAG_ENTERED:
               Log.d(msg, "Action is DragEvent.ACTION_DRAG_ENTERED");
               int x_cord = (int) event.getX();
               int y_cord = (int) event.getY();
               break;

               case DragEvent.ACTION_DRAG_EXITED :
               Log.d(msg, "Action is DragEvent.ACTION_DRAG_EXITED");
               x_cord = (int) event.getX();
               y_cord = (int) event.getY();
               layoutParams.leftMargin = x_cord;
               layoutParams.topMargin = y_cord;
               v.setLayoutParams(layoutParams);
               break;

               case DragEvent.ACTION_DRAG_LOCATION  :
               Log.d(msg, "Action is DragEvent.ACTION_DRAG_LOCATION");
               x_cord = (int) event.getX();
               y_cord = (int) event.getY();
               break;

               case DragEvent.ACTION_DRAG_ENDED   :
               Log.d(msg, "Action is DragEvent.ACTION_DRAG_ENDED");

               // Do nothing
               break;

               case DragEvent.ACTION_DROP:
               Log.d(msg, "ACTION_DROP event");

               // Do nothing
               break;
               default: break;
            }
            return true;
         }
      });

      img.setOnTouchListener(new View.OnTouchListener() {
         @Override
         public boolean onTouch(View v, MotionEvent event) {
            if (event.getAction() == MotionEvent.ACTION_DOWN) {
               ClipData data = ClipData.newPlainText("", "");
               View.DragShadowBuilder shadowBuilder = new View.DragShadowBuilder(img);

               img.startDrag(data, shadowBuilder, img, 0);
               img.setVisibility(View.INVISIBLE);
               return true;
            } else {
               return false;
            }
         }
      });
   }
}
Following will be the content of res/layout/activity_main.xml file −
In the following code abc indicates the logo of tutorialspoint.com
<RelativeLayout xmlns:android="http://schemas.android.com/apk/res/android"
   xmlns:tools="http://schemas.android.com/tools"
   android:layout_width="match_parent"
   android:layout_height="match_parent"
   android:paddingLeft="@dimen/activity_horizontal_margin"
   android:paddingRight="@dimen/activity_horizontal_margin"
   android:paddingTop="@dimen/activity_vertical_margin"
   android:paddingBottom="@dimen/activity_vertical_margin"
   tools:context=".MainActivity">

   <TextView
      android:layout_width="wrap_content"
      android:layout_height="wrap_content"
      android:text="Drag and Drop Example"
      android:id="@+id/textView"
      android:layout_alignParentTop="true"
      android:layout_centerHorizontal="true"
      android:textSize="30dp" />

   <TextView
      android:layout_width="wrap_content"
      android:layout_height="wrap_content"
      android:text="Tutorials Point"
      android:id="@+id/textView2"
      android:layout_below="@+id/textView"
      android:layout_centerHorizontal="true"
      android:textSize="30dp"
      android:textColor="#ff14be3c" />>

   <ImageView
      android:layout_width="wrap_content"
      android:layout_height="wrap_content"
      android:id="@+id/imageView"
      android:src="@drawable/abc"
      android:layout_below="@+id/textView2"
      android:layout_alignRight="@+id/textView2"
      android:layout_alignEnd="@+id/textView2"
      android:layout_alignLeft="@+id/textView2"
      android:layout_alignStart="@+id/textView2" />

</RelativeLayout>
Following will be the content of res/values/strings.xml to define two new constants −
<?xml version="1.0" encoding="utf-8"?>
<resources>
   <string name="app_name">My Application</string>
</resources>
Following is the default content of AndroidManifest.xml −
<?xml version="1.0" encoding="utf-8"?>
<manifest xmlns:android="http://schemas.android.com/apk/res/android"
   package="com.example.saira_000.myapplication" >

   <application
      android:allowBackup="true"
      android:icon="@drawable/ic_launcher"
      android:label="@string/app_name"
      android:theme="@style/AppTheme" >

      <activity
         android:name=".MainActivity"
         android:label="@string/app_name" >

         <intent-filter>
            <action android:name="android.intent.action.MAIN" />
            <category android:name="android.intent.category.LAUNCHER" />
         </intent-filter>

      </activity>

   </application>
</manifest>
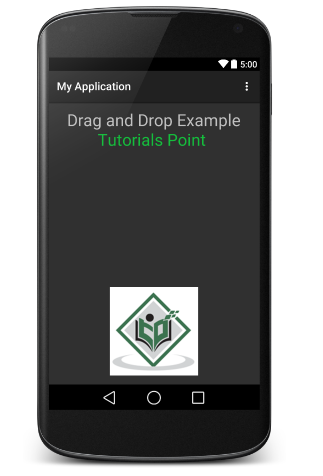
Let's try to run your My Application application. I assume you had created your AVD while doing environment setup. To run the app from Android Studio, open one of your project's activity files and click Run  icon from the toolbar. Android studio installs the app on your AVD and starts it and if everything is fine with your setup and application, it will display following Emulator window −
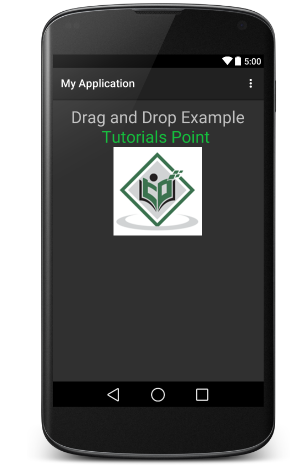
Now do long click on the displayed TutorialsPoint logo and you will see that logo image moves a little after 1 seconds long click from its place, its the time when you should start dragging the image. You can drag it around the screen and drop it at a new location.