- SoapUI Basics
- SoapUI - Introduction
- SoapUI - Capabilities
- SoapUI - NG Pro
- SoapUI - Installation & Configuration
- SoapUI - WSDL
- SoapUI - Project
- SoapUI - TestSuite
- SoapUI - TestCase
- SoapUI - TestStep
- SoapUI - Request & Response
- SoapUI - Properties
- SoapUI - Property Transfer
- SoapUI - Logs Pane
- SoapUI - Assertions
- SoapUI - Troubleshooting
- SoapUI - Performance Testing
- SoapUI - Load Testing
- SoapUI - RESTful Web Services
- SoapUI - JDBC Connection
- SoapUI - JDBC Property
- SoapUI - JDBC Assertion
- SoapUI Useful Resources
- SoapUI - Quick Guide
- SoapUI - Useful Resources
- SoapUI - Discussion
SoapUI - Quick Guide
SOAP - Introduction
SOAP is the acronym for Simple Object Access Protocol. It is defined by World Wide Web Consortium (W3C) at https://www.w3.org/TR/2000/NOTE-SOAP-20000508 as follows −
SOAP is a lightweight protocol for the exchange of information in a decentralized, distributed environment. It is an XML based protocol that consists of three parts: an envelope that defines a framework for describing what is in a message and how to process it; a set of encoding rules for expressing instances of application-defined data types; and a convention for representing remote procedure calls and responses.
SOAP - Important Features
Following are some important features of SOAP.
It is a communication protocol designed to communicate via Internet.
It can extend HTTP for XML messaging.
It provides data transport for Web services.
It can exchange complete documents or call a remote procedure.
It can be used for broadcasting a message.
It is both platform and language independent.
It is the XML way of defining what information is sent and how.
It enables client applications to easily connect to remote services and invoke remote methods.
Although SOAP can be used in a variety of messaging systems and can be delivered via a variety of transport protocols, the initial focus of SOAP is remote procedure calls transported via HTTP. Other frameworks such as CORBA, DCOM, and Java RMI provide similar functionality to SOAP, but SOAP messages are written entirely in XML and are therefore uniquely platform- and language-independent.
SOAP - Messages
A SOAP message is an ordinary XML document containing the following elements −
Envelope − Defines the start and the end of the message. It is a mandatory element.
Header − Contains any optional attributes of the message used in processing the message, either at an intermediary point or at the ultimate end-point. It is an optional element.
Body − Contains the XML data comprising the message being sent. It is a mandatory element.
Fault − An optional Fault element that provides information about errors that occur while processing the message.
All these elements are declared in the default namespace for the SOAP envelope −
https://www.w3.org/2001/12/soap-envelope
The default namespace for SOAP encoding and data types is −
https://www.w3.org/2001/12/soap-encoding
Note − All these specifications are subject to change. Thus, keep updating yourself with the latest specifications available on the W3 website.
SOAP - Message Structure
The following block depicts the general structure of a SOAP message −
<?xml version = "1.0"?>
<SOAP-ENV:Envelope
xmlns:SOAP-ENV = "http://www.w3.org/2001/12/soap-envelope"
SOAP-ENV:encodingStyle = "http://www.w3.org/2001/12/soap-encoding">
   <SOAP-ENV:Header>
      ...
      ...
   </SOAP-ENV:Header>
   <SOAP-ENV:Body>
      ...
      ...
      <SOAP-ENV:Fault>
         ...
         ...
      </SOAP-ENV:Fault>
   </SOAP-ENV:Body>
</SOAP_ENV:Envelope>
SOAP - What is REST?
REST is the acronym for Representational State Transfer. It can be defined as an architectural style of designing softwares. REST is not a specification or W3C standard. Hence, it is easier to work with RESTful Services. It doesnt require any middleware specification framework.
REST - Important Features
Following are some important features of REST.
It relies on stateless, client-server, cacheable communication protocol virtually in all cases, HTTP is used.
It is light-weighted alternative of WebService and RPC (Remote Procedure Call) like SOAP-WSDL.
It represents everything in unique ID or URIs.
It makes the use of standard HTTP methods, such as GET, POST, PUT, DELETE.
It links sources together.
REST resources could have multiple representations.
Any named information is considered as a Resource. For example: An image, a person, a document, all can be considered as an example of resource and represented as a unique ID or a URI.
World Wide Web itself, based on HTTP, can be viewed as REST based architecture.
REST services are Platform and Language independent. Since it is based on HTTP standards, it can easily work in the presence of firewalls. Like WebServices, REST doesnt offer any inbuilt security, session management, QoS guarantee but these can be added by building on top of HTTP. For encryption, REST can be used on top of HTTPS.
SoapUI - Introduction
SoapUI is a tool which can be used for both functional and non-functional testing. It is not limited to web services, though it is the de-facto tool used in web services testing.
SoapUI - Important Features
Following are some important features of SoapUI.
It is capable of performing the role of both client and service.
It enables the users to create functional and non-functional tests quickly and in an efficient manner using a single environment.
It is licensed under the terms of the GNU Leaser General Public Licence (LGPL).
It is purely implemented using JAVA platform.
It supports Windows, Mac, multiple Linux dialects.
It allows testers to execute automated functional, regression, compliance, and load tests on different Web API.
It supports all the standard protocols and technologies to test all kinds of APIs.
SoapUI can be used to test complete RESTful API and SOAP Web Service testing. It supports Functional Testing, Performance Testing, Interoperability Testing, Regression Testing, Load Testing, and much more.
It is user friendly as well as it is easy to convert functional test into non-functional tests such as Load, Stress testing.
SoapUI - Capabilities
SoapUI is rich in the following five aspects −
- Functional Testing
- Security Testing
- Load Testing
- Protocols and Technologies
- Integration with other tools
Lets learn more about each of these capabilities.
Functional Testing
SoapUI allows the testers to write functional API tests in SoapUI.
SoapUI supports Drag-Drop feature that accelerates the script development.
SoapUI supports debugging of tests and allows testers to develop data driven tests.
SoapUI supports multiple environments making it easy to switch among QA, Dev, and Prod environments.
SoapUI allows advanced scripting (the tester can develop their custom code depending on the scenarios).
Security Testing
SoapUI performs a complete set of vulnerability scan.
SoapUI prevents SQL Injection to secure the databases.
SoapUI scans for stack overflows, caused by documents huge in size.
SoapUI scans for cross-site scripting, which occurs when service parameters are exposed in messages.
SoapUI performs fuzzing scan and boundary scan to avoid erratic behavior of the services.
Load Testing
SoapUI distributes the load tests across n number of LoadUI agents.
SoapUI simulates high volume and real-world load testing with ease.
SoapUI allows advanced custom reporting to capture performance parameters.
SoapUI allows end-to-end system performance monitoring.
Protocols & Technologies
SoapUI supports a wide range of protocols −
- SOAP Simple Object Access Protocol
- WSDL Web Service Definition Language
- REST Representational State Transfer
- HTTP Hyper Text Transmission Protocol
- HTTPS Hyper Text Transmission Protocol Secured
- AMF Action Message Format
- JDBC Java Database Connectivity
- JMS Java Messaging Service
Integration with Other Tools
- Apache Maven Project
- HUDSON
- JUnit
- Apache Ant and more.
SoapUI - NG Pro
SoapUI is an open source free version tool with basic features of testing, while SoapUI NG Pro is a commercialized tool having advanced features of reporting, data-driven functionality and much more.
Comparison
The following table compares and contrasts the various features of SoapUI and SoapUI NG Pro.
| Features | SoapUI | SoapUI NG Pro |
|---|---|---|
| Supported Technologies | ||
| SOAP | Yes | Yes |
| WSDL/WADL | Yes | Yes |
| REST | Yes | Yes |
| JMS | Yes | Yes |
| AMF | Yes | Yes |
| JDBC | Yes | Yes |
| HTTP | Yes | Yes |
| General Features | ||
| Standalone Application | Yes | Yes |
| Multi Environment Support | No | Yes |
| Floating Licence | No | Yes |
| WSDL Coverage | No | Yes |
| Request/Response Coverage | No | Yes |
| Message Assertion | Yes | Yes |
| Test Refactoring | No | Yes |
| Running multiple tests | Yes | Yes |
| Data Source Driven Test | No | Yes |
| Scripting Libraries | No | Yes |
| Unit Reporting | No | Yes |
| Manual test steps | Yes | Yes |
| Reporting | ||
| Junit Reports | No | Yes |
| Report Data Export | No | Yes |
| WSDL HTML Report | Yes | Yes |
| Test Suite Coverage | No | Yes |
| Test Case Coverage | No | Yes |
| Assertion Coverage | No | Yes |
| Message Recording Coverage | No | Yes |
SoapUI - Installation & Configuration
SoapUI is a cross-platform tool. It supports Windows, Linux, and Mac operating systems.
Prerequisites
Processor − 1GHz or higher 32-bit or 64-bit processor.
RAM − 512MB of RAM.
Hard Disk Space − Minimum 200MB of hard disk space for installation.
Operating System Version − Windows XP or later, MAC OS 10.4 or later.
JAVA − JAVA 6 or later.
Download Process
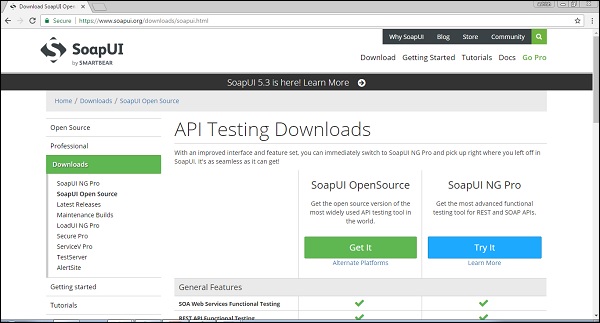
Step 1 − Go to www.soapui.org and click Download SoapUI.
Step 2 − Click Get It to download SoapUI Open Source. It will start downloading 112MB .exe file in the system. Wait till the download process is complete.
Installation Process
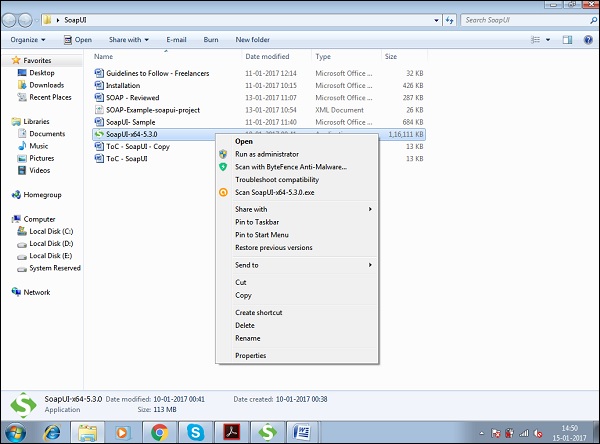
Step 1 − After downloading, run the .exe file as Run as administrator.
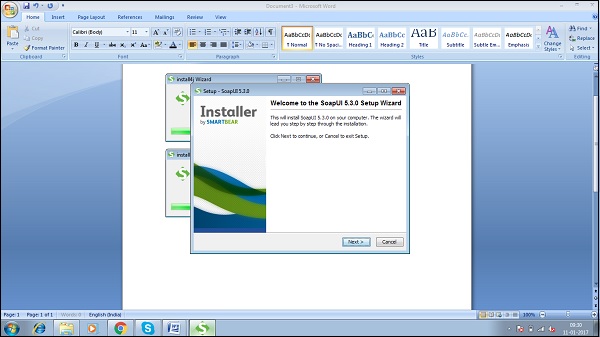
Windows will start the set up process as shown in the following screenshot.

Step 2 − Once set up, the process window displays the following screen, click Next.
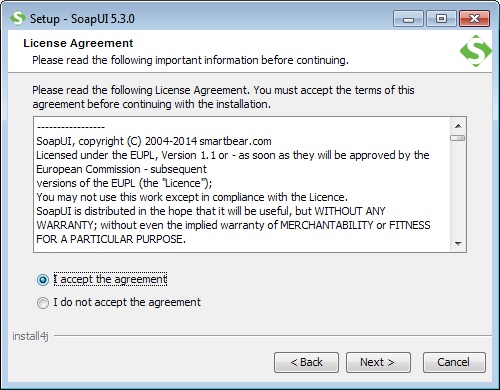
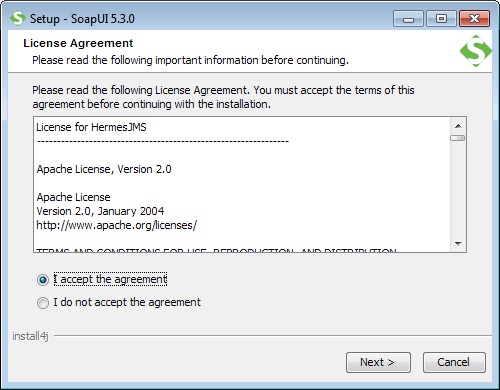
Step 3 − Accept the license agreement and click Next.
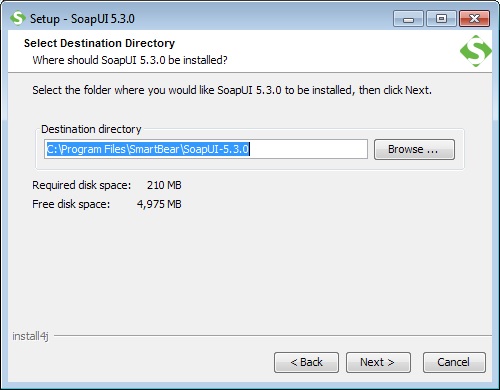
Step 4 − Choose the installation directory or keep it as the default path selected by the system. Click Next.
Step 5 − Choose the components that you want to install. Click Next.
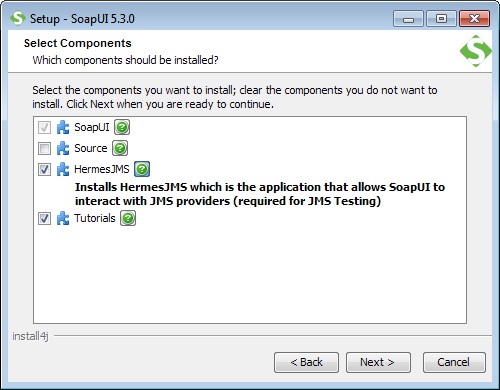
Step 6 − Accept the License Agreement for HermesJMS and click Next.
Step 7 − Select the target directory to save tutorials and click Next.

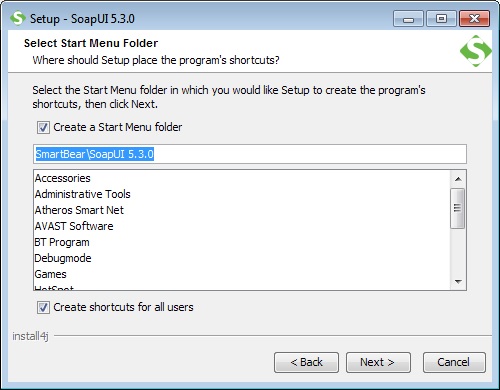
Step 8 − Choose the start menu folder location or else leave the default location as is and click 'Next'.
Step 9 − Enable the checkbox 'create a desktop icon' and click 'Next'.
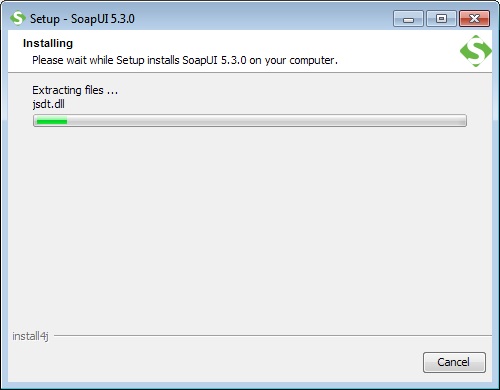
Now, the installation starts. It will take a few minutes to complete.
Step 10 − After completion of installation, click Finish in the following wizard.
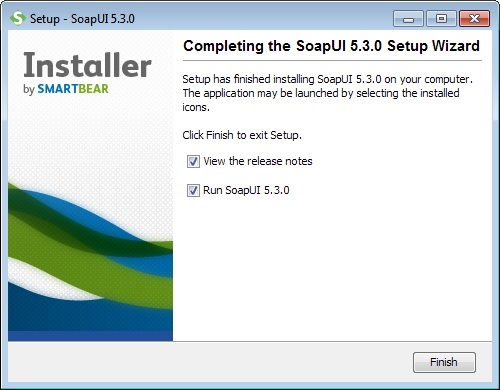
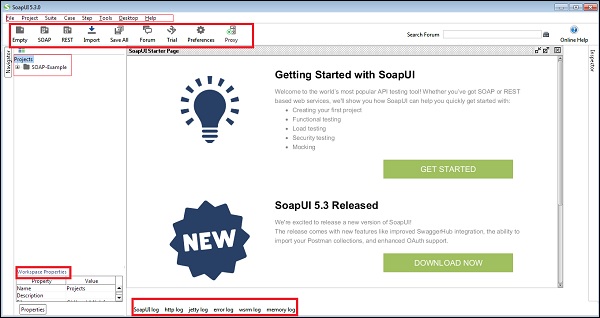
Upon clicking on Finish, SoapUI is launched.
- Menu bar
- Tool bar
- Project Navigation Bar
- Workspace Properties
- Log Panel
Configuration Process
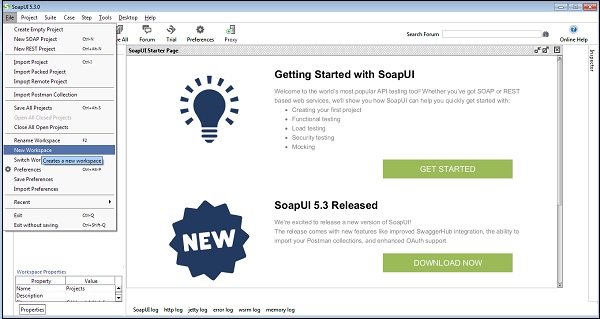
The first step is to create a workspace that can contain multiple projects.
Step 1 − Go to File → New Workspace.
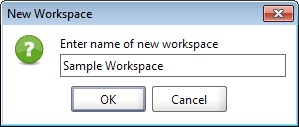
Step 2 − Add the name of workspace and click OK.
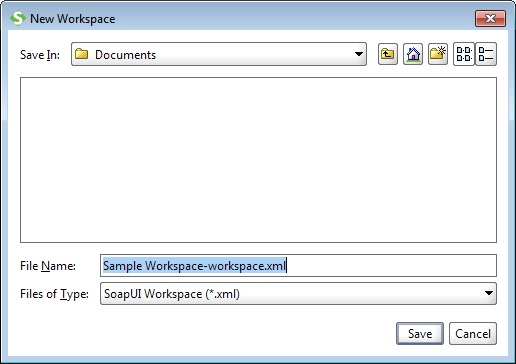
Step 3 − Now, select the path where workspace xml will be saved.
Step 4 − Select the path and click Save.
Workspace is created as shown in the following screenshot. Workspace properties is also exhibited.

SoapUI - WSDL
WSDL stands for Web Services Description Language. It is a standard format for describing a web service. WSDL was developed jointly by Microsoft and IBM. WSDL is pronounced as 'wiz-dull' and spelled out as 'W-S-D-L'.
WSDL A Brief History
WSDL 1.1 was submitted as a W3C Note by Ariba, IBM, and Microsoft for describing services for the W3C XML Activity on XML Protocols in March 2001.
WSDL 1.1 has not been endorsed by the World Wide Web Consortium (W3C), however it has just released a draft for version 2.0 that will be a recommendation (an official standard), and thus endorsed by the W3C.
WSDL Points to Note
WSDL is an XML-based protocol for information exchange in a decentralized and distributed environment. Some of the other features of WSDL are as follows −
WSDL definitions describe how to access a web service and what operations it will perform.
It is a language for describing how to interface with XML-based services.
It is an integral part of Universal Description, Discovery, and Integration (UDDI), an XML-based worldwide business registry.
WSDL is the language that UDDI uses.
WSDL Usage
WSDL is often used in combination with SOAP and XML Schema to provide web services over the Internet. A client program connecting to a web service can read the WSDL to determine what functions are available on the server. Any special datatypes used are embedded in the WSDL file in the form of XML Schema. The client can then use SOAP to actually call one of the functions listed in the WSDL.
Understanding WSDL
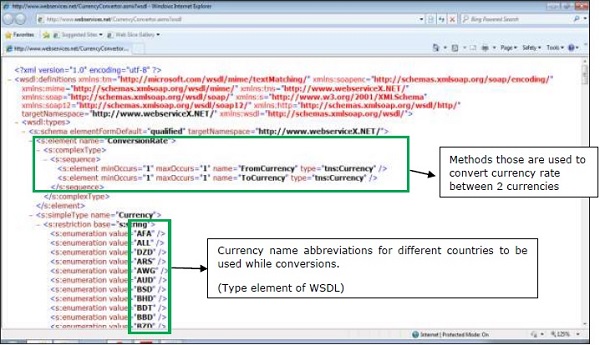
WSDL breaks down the web services into three specific, identifiable elements that can be combined or reused once defined.
The three major elements of WSDL that can be defined separately are −
- Types
- Operations
- Binding
A WSDL document has various elements, but they are contained within these three main elements, which can be developed as separate documents and then they can be combined or reused to form complete WSDL files.
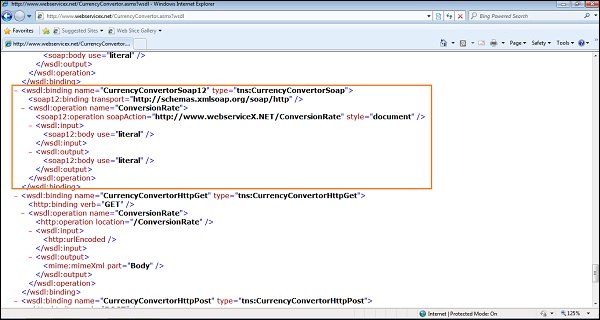
In this tutorial, we are following CurrencyConverter WSDL: http://www.webservicex.net
Format and Elements
CurrencyConverter WSDL will look like the following −
WSDL Port Type
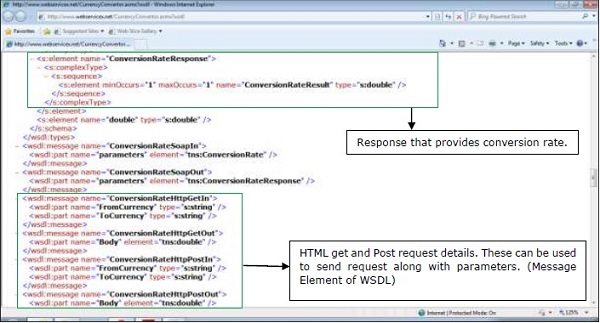
The <portType> element combines multiple message elements to form a complete one-way or round-trip operation. For example, a <portType> can combine one request and one response message into a single request/response operation. This is most commonly used in SOAP services. A portType can define multiple operations.
Example
- The portType element defines a single operation, called ConversionRate.
- The operation consists of a single input message ConversionRateHttpPostIn.
- The operation for Output message is ConversionRateHttpPostOut.
Patterns of Operation
WSDL supports four basic patterns of operation −
One Way
The service receives a message. The operation therefore has a single input element. The grammar for one-way operation is −
<wsdl:definitions .... >
   <wsdl:portType .... > *
      <wsdl:operation name = "nmtoken">
         <wsdl:input name = "nmtoken"? message = "qname"/>
      </wsdl:operation>
   </wsdl:portType >
</wsdl:definitions>
Request Response
The service receives a message and sends a response. The operation therefore has one input element, followed by one output element. To encapsulate errors, an optional fault element can also be specified. The grammar for a request-response operation is −
<wsdl:definitions .... >
   <wsdl:portType .... > *
      <wsdl:operation name = "nmtoken" parameterOrder = "nmtokens">
         <wsdl:input name = "nmtoken"? message = "qname"/>
         <wsdl:output name = "nmtoken"? message = "qname"/>
         <wsdl:fault name = "nmtoken" message = "qname"/>*
      </wsdl:operation>
   </wsdl:portType >
</wsdl:definitions>
Solicit Response
The service sends a message and receives a response. The operation therefore has one output element, followed by one input element. To encapsulate errors, an optional fault element can also be specified. The grammar for a solicit-response operation is −
<wsdl:definitions .... >
   <wsdl:portType .... > *
      <wsdl:operation name = "nmtoken" parameterOrder = "nmtokens">
         <wsdl:output name = "nmtoken"? message = "qname"/>
         <wsdl:input name = "nmtoken"? message = "qname"/>
         <wsdl:fault name = "nmtoken" message = "qname"/>*
      </wsdl:operation>
   </wsdl:portType >
</wsdl:definitions>
Notifications
The service sends a message. The operation therefore has a single output element. Following is the grammar for a notification operation −
<wsdl:definitions .... >
   <wsdl:portType .... > *
      <wsdl:operation name = "nmtoken">
         <wsdl:output name = "nmtoken"? message = "qname"/>
      </wsdl:operation>
   </wsdl:portType >
</wsdl:definitions>
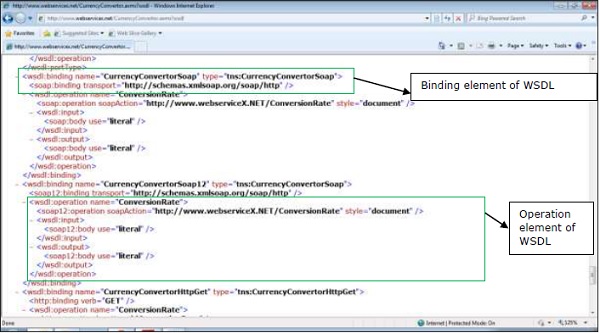
WSDL Binding & Service
The <binding> element provides specific details on how a portType operation will actually be transmitted over the wire.
The bindings can be made available via multiple transports including HTTP GET, HTTP POST, or SOAP.
The bindings provide concrete information on what protocol is being used to transfer portType operations.
The bindings provide information where the service is located.
For SOAP protocol, the binding is <soap:binding>, and the transport is SOAP messages on top of HTTP protocol.
You can specify multiple bindings for a single portType.
Service
The <service> element defines the ports supported by the web service. For each of the supported protocols, there is one port element. The service element is a collection of ports.
Web service clients can learn the following from the service element −
- Where to access the service,
- Through which port to access the web service, and
- How the communication messages are defined.
The service element includes a documentation element to provide human-readable documentation.
<wsdl:service name = "CurrencyConvertor">
   <wsdl:port name = "CurrencyConvertorSoap" binding = "tns:CurrencyConvertorSoap">
      <soap:address location = "http://www.webservicex.net/CurrencyConvertor.asmx" />
   </wsdl:port>
   <wsdl:port name = "CurrencyConvertorSoap12"binding = "tns:CurrencyConvertorSoap12>
      <soap12:address location = "http://www.webservicex.net/CurrencyConvertor.asmx" />
   </wsdl:port>
   <wsdl:port name = "CurrencyConvertorHttpGet" binding = "tns:CurrencyConvertorHttpGet">
      <http:address location = "http://www.webservicex.net/CurrencyConvertor.asmx" />
   </wsdl:port>
   <wsdl:portname = "CurrencyConvertorHttpPost"binding = "tns:CurrencyConvertorHttpPost">
      <http:address location = "http://www.webservicex.net/CurrencyConvertor.asmx" />
   </wsdl:port>
</wsdl:service>
SoapUI - Project
The SoapUI project is the central point in all SoapUI testing. Once the project is created, the user can create and run functional tests, load tests, create mock services, and much more.
In this chapter, we will discuss two things - How to −
- Create a SOAP project
- Add a WSDL
Create a SOAP Project
Step 1 − In the navigator on the left side of the screen, right-click on the Project and select New SOAP Project.
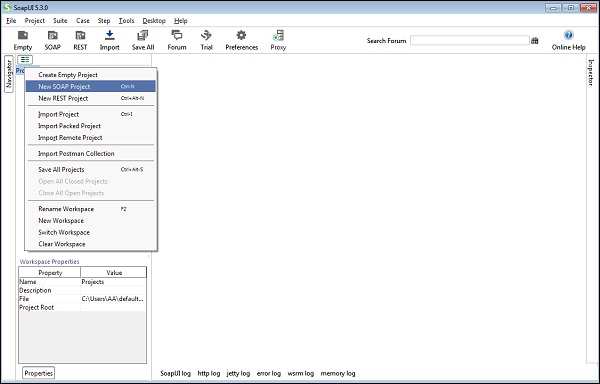
Or go to File and select New Soap Project.
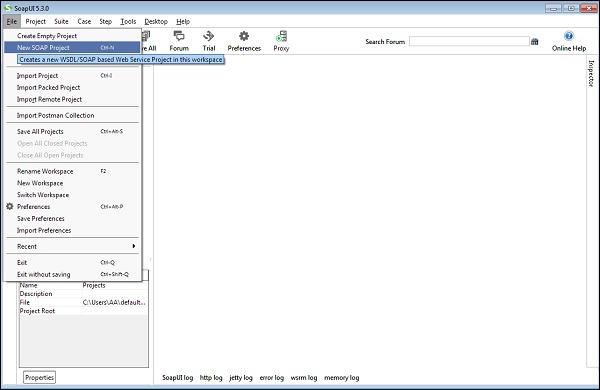
On selection, a new pop-up window opens -New Soap Project.
Step 2 − Project Name: Enter a project name - it is the user input field. Initial WSDL: It is not mandatory. It depends on the user. The user can provide WSDL or add after the creation of Project.
In this case, we create a project and add the WSDL later.
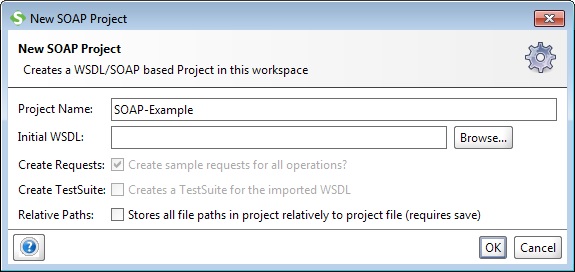
Step 3 − Click OK. It will create a new project and will be visible on the left side navigation panel.
Add a WSDL
SOAP Projects are based on WSDL. It is not necessary to start by importing a WSDL, but it makes testing easier since the WSDL contains all information that is required to test a webservice such as information about the requests and responses, what they contain and much more, which simplifies SoapUI testing.
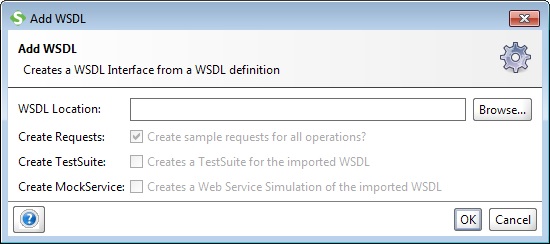
Step 1 − To add a WSDL, right-click on the Project name (SOAP Example) and select Add WSDL.
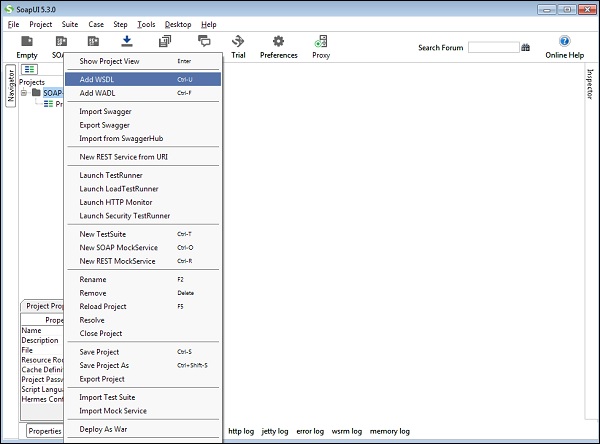
On selection, WSDL wizard is displayed.
Step 2 − WSDL Location: Enter a WSDL as http://www.webservicex.com or browse it from the computer.
Step 3 − As soon as WSDL is entered, 3 checkboxes Create Requests, Create TestSuite, Create MockServices will be enabled. Based on requirement, the user can check one or multiple checkboxes.
By default, the checkbox of Create Requests is checked.
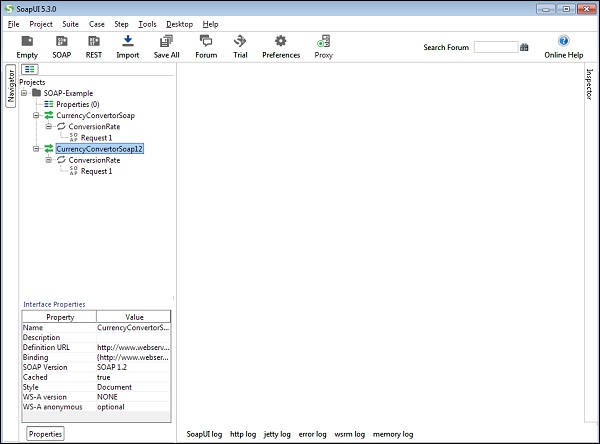
Step 4 − Click OK. WSDL is added successfully in the Project. It can be verified by observing the left navigation panel. Inside the project, there are multiple operations, and requests are added according to WSDL.
Details View
To get more details of the Project, double-click the Project Name, it will open a new window with various details.
In Overview tab, various information is provided such as −
File Path − It displays the location of the saved project xml.
Interface Summary − Interface name and WSDL associated with it.
Test Summary − It displays test suites, test cases, test steps, assertions added to the project.
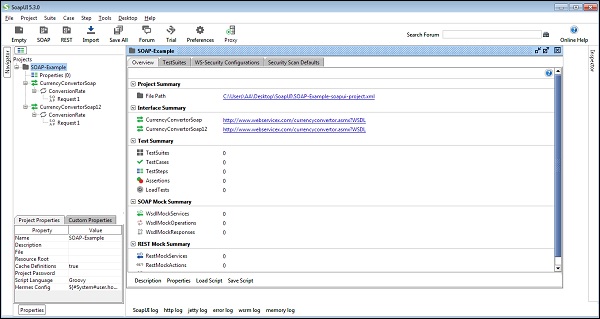
The user can double-click the Interface Name to get the interface details. It will open a new window and display the WSDL related information. These are very useful for browsing and examining a WSDL.
In Overview tab, it lists WSDL Definitions, Definition parts, and Operation details.
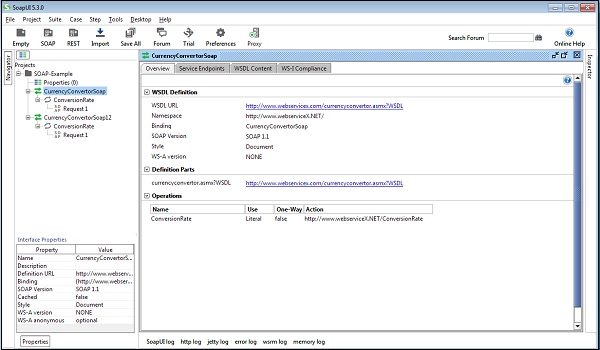
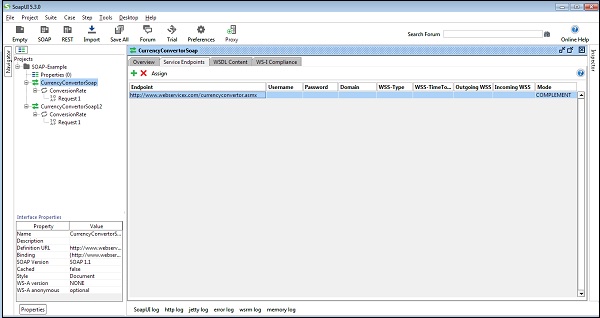
Similarly, Service Endpoints lists the details of endpoints.
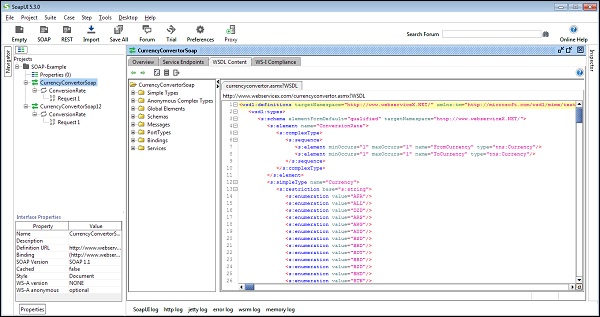
In WSDL Content tab, all details of WSDL in XML/schema format are provided as shown in the following screenshot.
SoapUI - TestSuite
TestSuite is a collection of Test Cases that can be used for grouping functional tests into logical units. Any number of TestSuites can be created inside a SoapUI project to support massive testing scenarios.
Creation of TestSuite
Step 1 − Within a project, right-click on the interface (next to the project name) and then click Generate TestSuite.
Here, SOAP Example is a Project name while CurrencyConvertorSoap and CurrencyConvertorSoap12 are interfaces.
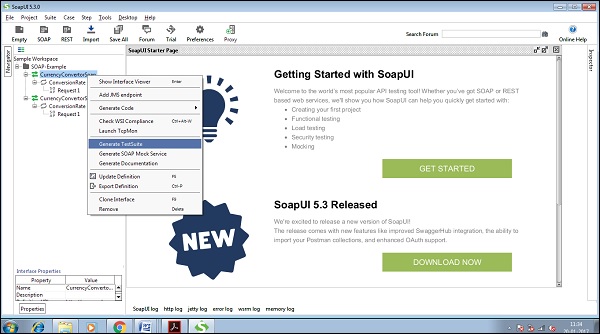
Step 2 − A new wizard opens. Select the choices based on the requirement.
Step 3 − Once the selection is made, click OK.
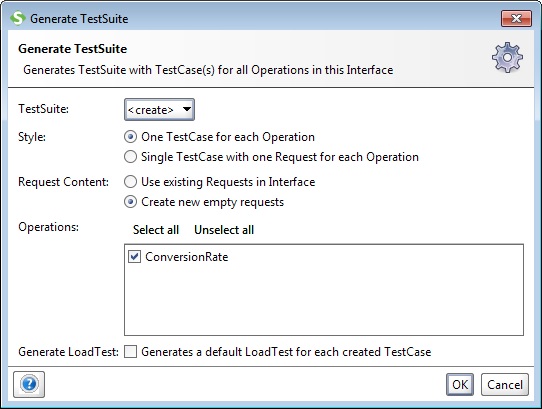
Step 4 − Check the checkbox of Generate LoadTest. This will generate a LoadTest for each TestCase created in this TestSuite.
Step 5 − Enter the TestSuite name in the new wizard and then click OK.

The created TestSuite displays in the navigation panel as shown in the following screenshot.
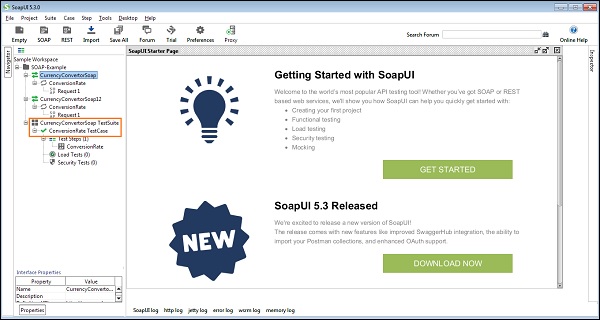
Step 6 − Double-click the TestSuite Name, and the TestSuite window opens at the right panel. Since there no TestCases are added, it is blank.
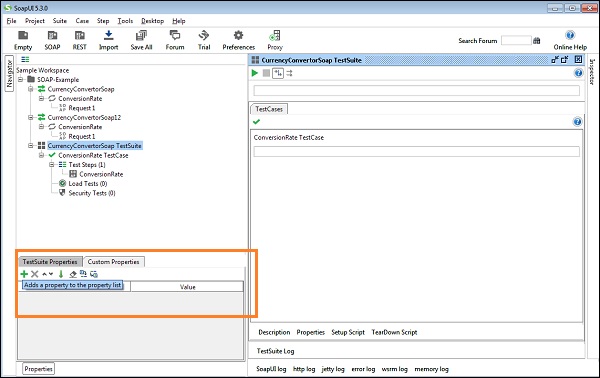
TestSuite properties can be seen at the bottom of the Navigation Panel. New Custom Properties can be added at the TestSuite level.
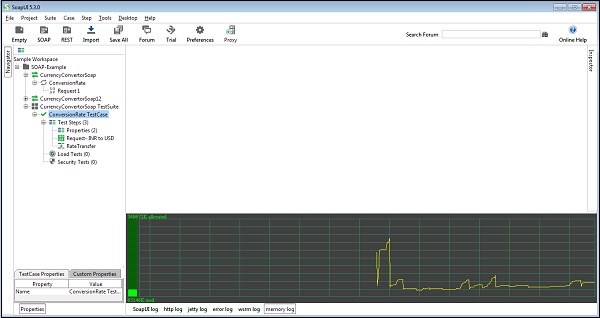
SoapUI - TestCase
A TestCase is a collection of TestSteps assembled to test some specific aspect of web service(s). The user can add n number of TestCases to a TestSuite and even modularize them to call each other for complex testing scenarios.
Creation of TestCase
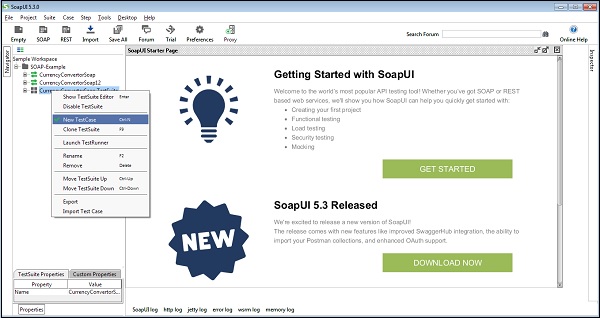
Step 1 − Within a TestSuite, the user can add multiple test cases. Right-click on the Test Suite and select New Test Case.
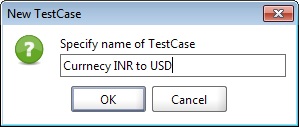
Step 2 − Enter the name of the TestCase and click OK.
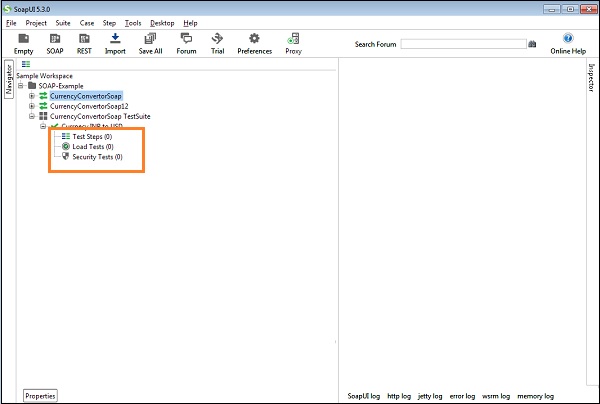
The created TestCase has zero test steps as of now. TestCase is added with zero TestSteps for all kinds of tests available. Once the TestSteps are added, the numbers in the bracket would change automatically. The functional TestStep should go into 'Test Steps' while a performance TestStep should go into 'Load Test', and a security TestStep should go into 'Security Tests'.
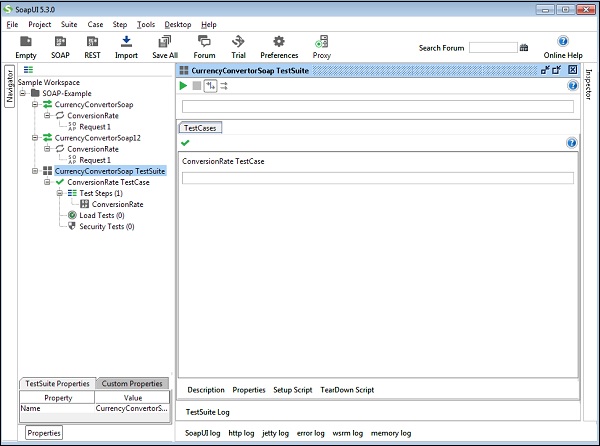
Step 3 − Double-click the TestCase Name, and a TestCase window opens on the right hand side panel. Since there are no TestSteps added, it is blank as seen in the following screenshot.

SoapUI - TestStep
TestSteps are the "building blocks" of functional tests in SoapUI. These are added to a TestCase and used to control the flow of execution and validate the functionality of the web service(s) to be tested.
Insertion of TestStep
Step 1 − Right-click on TestSteps. Add Step and select an appropriate TestStep from the list. For example, if the user has to test a REST WebService, the user would select the REST Test Request.
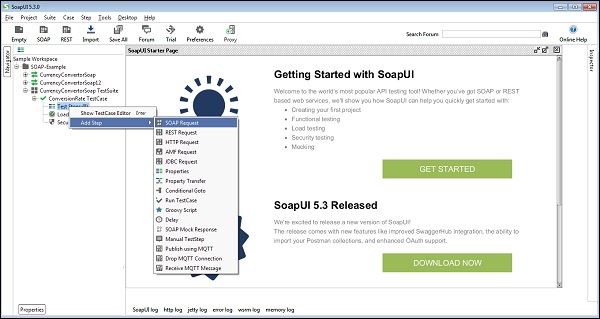
Step 2 − Add a TestStep to validate the imported SOAP request by selecting TestSteps → Add Step → SOAP Request.
Step 3 − Enter the name of the TestStep and click OK in the wizard.
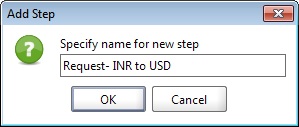
Upon clicking 'OK', a dialog box pops up to select the operation to invoke. All the operations are listed, and the users can select the operation that they would like to invoke.
There are two operations that will be listed. Both the Operations are the same except the SOAP version used. CurrencyConvertorSoap uses SOAP version 1.1 whereas, CurrencyConvertorSoap12 uses SOAP version 1.2.
Step 4 − Select first one CurrencyConvertorSoap and click OK.
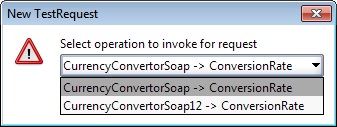
While adding a TestCase, different standard assertions can be added. Assertions are also called as checkpoints/validation points of SOAP request/response.
Step 5 − Let us create a TestCase with a default option which means creating a TestStep WITHOUT any of the following validation points −
- Verifies if the response message is SOAP, upon executing the test.
- Verifies if the response schema is valid.
- Verifies if the SOAP response contains FAULT.
Step 6 − Upon clicking OK, the following request XML screenshot pops up.
The test step count is now incremented to one as a functional TestStep added. Similarly, upon adding load and security TestSteps, the corresponding number automatically increases based on the number of steps added.
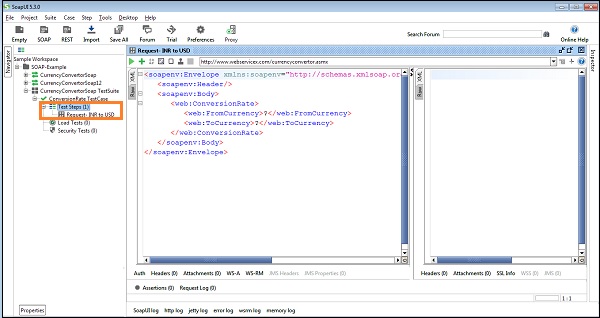
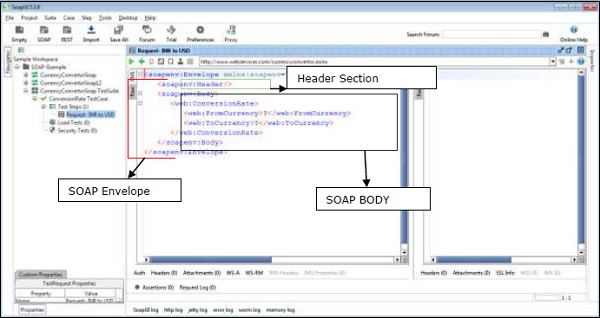
SoapUI - Request & Response
Request Setup
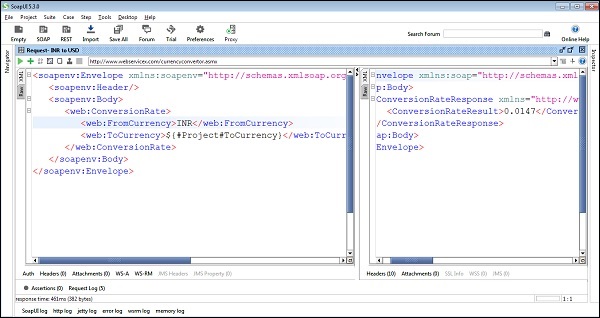
Here, we will perform the conversion of the currency from INR to USD.
- FromCurrency INR
- ToCurrency USD
Next, enter these inputs in the place of the question mark which will be sent as a request XML. After placing those values into the corresponding XML tags, click 'Submit request' button to check the response.
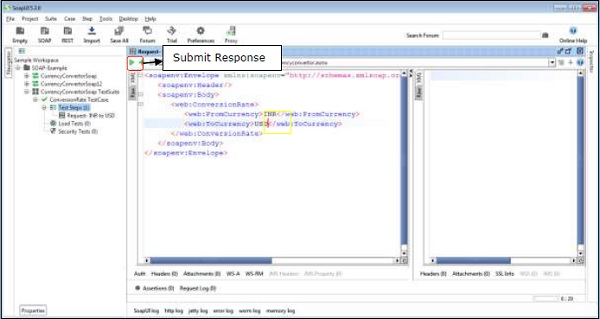
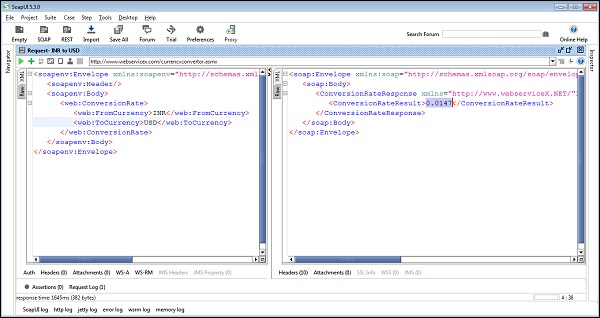
Response
Upon submitting a request, the web service request is processed by the web-server and sends back a response as shown in the following screenshot.
By reading the response, it can be concluded that 1 unit of INR = 0.0147 units of USD.
HTTP Request
SOAP messages are transported by HTTP protocol. To view the HTTP request, click RAW at SoapUI Request window (left side).
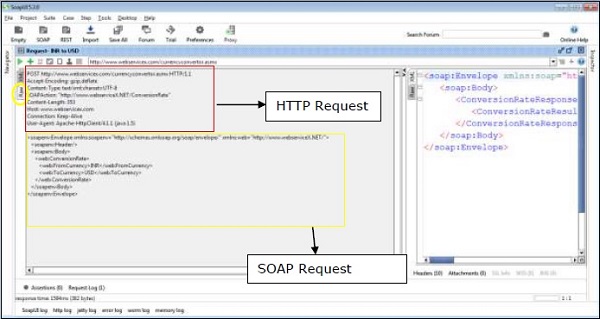
The Request is posted to the web-server. Hence, the POST method of Http is used.
The SOAP Request is transported in the body of the http message, which is shown as follows.
POST http://www.webservicex.com/currencyconvertor.asmx HTTP/1.1
Accept-Encoding: gzip,deflate
Content-Type: text/xml;charset = UTF-8
SOAPAction: "http://www.webserviceX.NET/ConversionRate"
Content-Length: 353
Host: www.webservicex.com
Connection: Keep-Alive
User-Agent: Apache-HttpClient/4.1.1 (java 1.5)
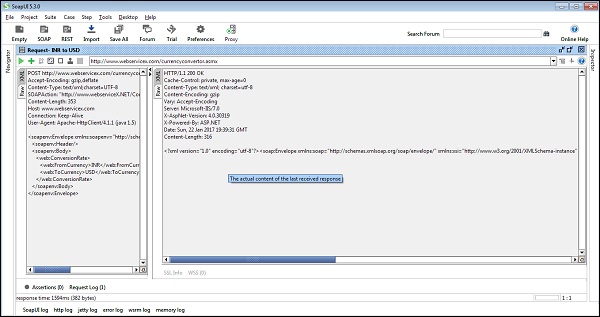
HTTP Response
Click the 'RAW' Tab in SOAP-UI Response Window to understand how the response is sent via HTTP.
After processing the request, the http response code (200) is shown which means it is a success. The web-server has processed it successfully.
The SOAP response is sent back to the client as part of the body of the HTTP message.
HTTP/1.1 200 OK
Cache-Control: private, max-age = 0
Content-Type: text/xml; charset = utf-8
Content-Encoding: gzip
Vary: Accept-Encoding
Server: Microsoft-IIS/7.0
X-AspNet-Version: 4.0.30319
X-Powered-By: ASP.NET
Date: Sun, 22 Jan 2017 19:39:31 GMT
Content-Length: 316
Following HTTP codes are used to send in responses by the Web-server and are very useful for debugging.
| HTTP Code | Description |
|---|---|
1xx: |
Informational − This means a request was received and there is a continuing process. |
2xx: |
Success − The action was successfully received, understood, and accepted. |
3xx: |
Redirection − This means further action must be taken in order to complete the request. |
4xx: |
Client Error − This means the request contains a bad syntax or cannot be fulfilled. |
5xx: |
Server Error − The server failed to fulfil an apparently valid request. |
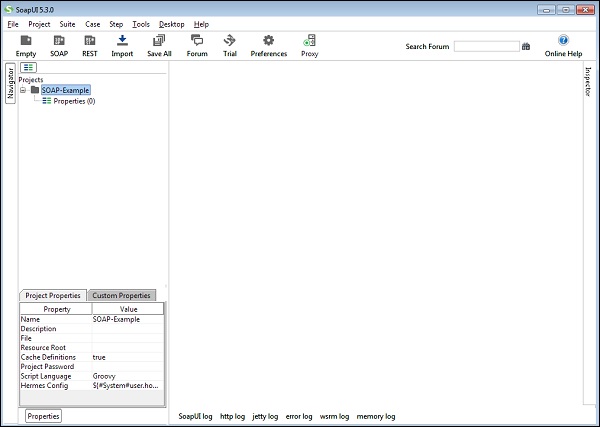
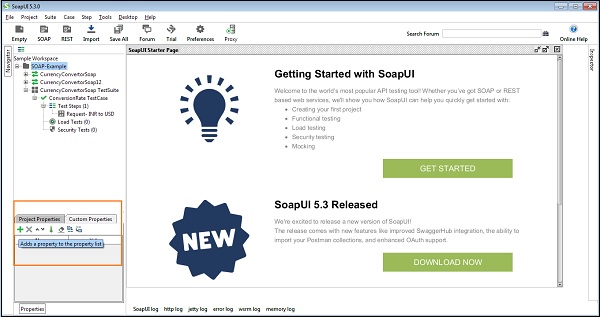
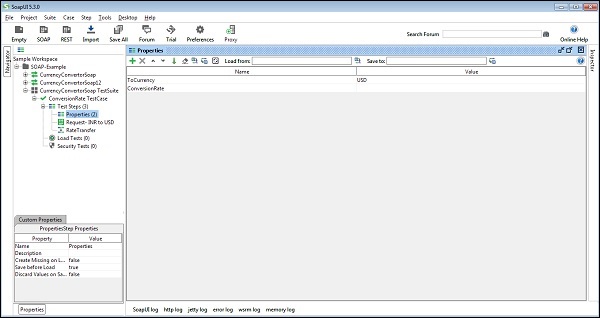
SoapUI - Properties
Properties are a central aspect of more advanced testing with SoapUI. Functional Testing properties are used to parameterize the execution and functionality of tests.
Properties can be used to hold the endpoints of services, making it easy to change the actual endpoints used during test execution.
Properties can be used to hold authentication credentials, making it easy to manage these in a central place or an external file.
Properties can be used to transfer and share session ids during test execution, so multiple test steps or test cases can share the same sessions.
Defining Properties
Properties can be defined at many levels in a project.
Properties that are common at the project-level can be defined at the Project level.
Similarly, TestSuite and TestCase specific properties can be defined at their respective levels.
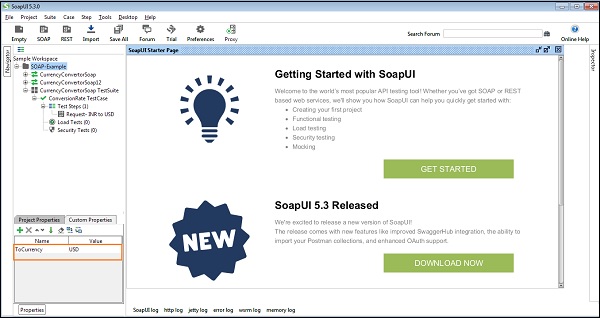
Project specific properties are defined in the Custom Properties tab.
For example, a property ToCurrency can be defined at the Project level by clicking the "+" symbol and entering the Property Name and Value.
Accessing Property
A property can be accessed anywhere in the Project by using Property Expansion.
Structure would be as −
${#Project#PropertyName} For Project Level
${#TestSuite#PropertyName} For Test Suite level
${#TestCase#PropertyName} For Test Case level
${TestStepName#PropertyName} For Test Step level
${#MockService#PropertyName} For MockService property
${#Global#PropertyName} For Global properties, found in File → Preference → Global properties tab. This property can be used across all projects
${#System#PropertyName} For System Property, found in Help → System properties
${#Env#PropertyName} For environment variable
The same structure can be placed at Request XML to get the value of specific attribute during run-time.
A property can also be considered as a variable in a computer program. If the user wants to define something which can be used somewhere else too, Properties are very useful. Properties can also define dynamically but it is dependent on Groovy script.
SoapUI - Property Transfer
Sometimes there is a requirement to extract some value from a response message and include it in the subsequent request(s). In such a case, we need to have a mechanism to retrieve a specified value and transfer it to the other elements of the project. SoapUI supports such functionality through the Property Transfer TestStep.
Adding Property Transfer
Step 1 − Select the TestCase or TestStep, right-click → Add Steps → Property Transfer.
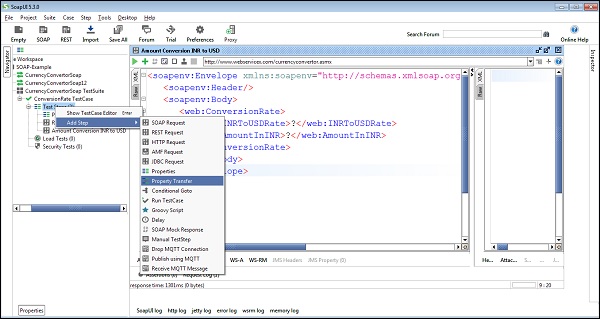
Step 2 − Enter the TestStep name and Click OK.
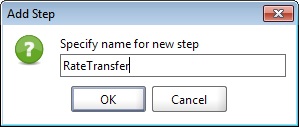
Step 3 − RateTransfer step is added and a new wizard will open.
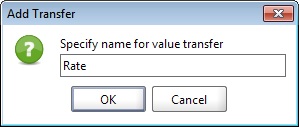
Step 4 − Click the Adds a new property transfer icon + at the top-left corner in the property transfer window. It will be prompted to enter a name for the transfer. Enter Rate and click OK.
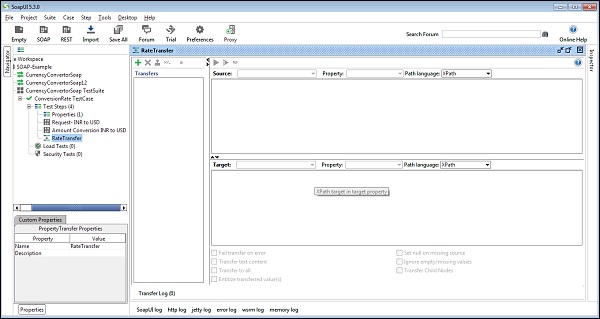
Transferring a Property
Once the transfer is created, Source and Target panes need to specify the relevant XPath expressions to extract and replace the property values. In the drop-down box next to Source, various levels of SoapUI projects are listed that can be used as the source of property transfers. By default, the closest TestStep will be shown.
In this case, it is the Request INR to USD TestStep. The drop-down list next to Property shows the source property which is used in the transfer, which can either be request, response, or service endpoint.
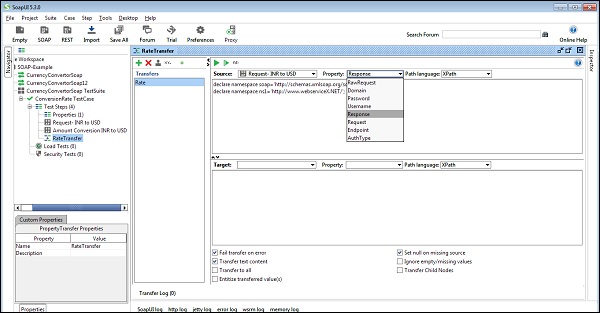
Step 1 − Select Response and go to Path language. The user can select XPath, Xquery, or Jason to define the property. In this case, select XPath.
Step 2 − To get the declaration of source xml, click ns and specify XPath.
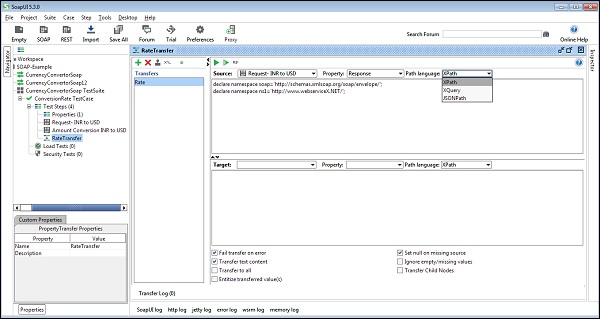
Step 3 − Specify the target where the value extracted from the above XPath expression is to be transferred. The target pane is used at the bottom of the property transfer window for that.
Step 4 − Transfer extracted value of ConversionRateResult from response of RequestINRtoUSD step.
Target − Properties
Property − ConversionRate (a new property added, it doesnt have any value initially).
Step 5 − Once the test case runs successfully, property ConversionRate gets updated based on the response.
Following is the screenshot initially.
Following is the screenshot after a successful run.

Similarly, Target may be a next Request XML. If Target is SOAP request, we need to provide XPath to identify the target attribute.
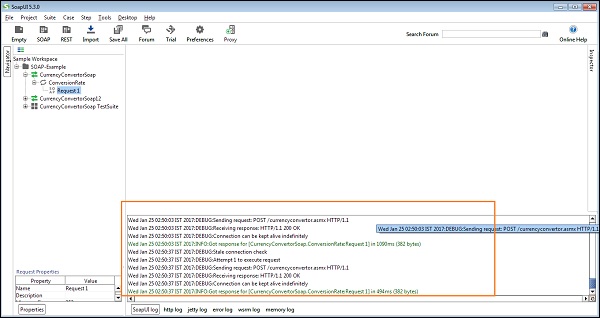
SoapUI - Logs Pane
Logs pane stores the complete information regarding the transaction between the client and the server. Users will be able to see the various tabs of the log pane. We will discuss the most commonly used log panes while working with SoapUI in this chapter.
SoapUI Log
SoapUI log displays the response information from the web-server. The same information is stored in soapui.log file of the SOAP-UI installed folder under 'bin' directory.
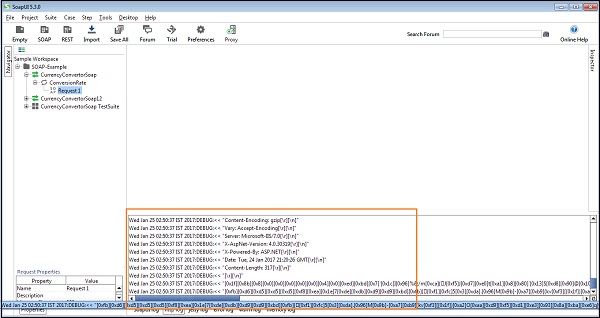
HTTP Log
HTTP log displays all the HTTP packet transfer. All the information in 'RAW' is shown in HTTP log.
Error Log
Error log displays all the errors encountered during the entire project session. The same information is available in 'soapui-errors.log' present in the 'bin' directory of the SoapUI installed location.
Memory Log
This tab monitors the memory consumption and displays it in the form of the chart as shown in the following screenshot. It is really helpful when a memory intensive operation is performed.
SoapUI - Assertions
Assertion can be interpreted as a checkpoint or a validation point. Once a request is sent to a web server, a response is received. It is required to validate the response which contains the data as expected or not. In order to validate the response, SoapUI has an assertions feature.
Points to Note
Assertions are used to validate the message received by a TestStep during execution.
It compares the part of the message or the entire message to some expected value.
Any number of assertions can be added to a TestStep, each validating some different aspect and content of the response message.
After a TestStep executes, all its assertions are applied to the received response and if any of them fail the TestStep is marked as failed in the TestCase view.
Failed entry shows in the test execution log.
Type of Assertions
SoapUI supports a wide range of assertions in response.
Following are the list of assertions supported by SoapUI.
| Assertion | Description |
|---|---|
| Property Content | |
| Contains | Checks for the existence of the specified string. It also supports regular expression. |
| Not Contains | Checks for the non-existence of the specified string. It also supports regular expression. |
| XPath Match | Uses XPath expression to select the target node and its values. Compares the result of an XPath expression to an expected value. |
| XQuery Match | Uses an Xquery expression to select the content from the target property. Compares the result of an XQuery expression to an expected value. |
| Compliance, Status, Standards | |
| HTTP DOwnload All Resource | Downloads all resources referred to be an HTML document (images, scripts, etc.) and validates that they are all available. Applicable to any property containing HTML. |
| Invalid HTTP Status Codes | Checks that the target TestStep received an HTTP result with a status code not in the list of defined codes. Applicable to any TestStep that receives HTTP messages. |
| Not SOAP Fault | Validates that the last received message is not a SOAP Fault. Applicable to SOAP TestSteps. |
| Schema Compliance | Validates that the last received message is compliant with the associated WSDL or WADL schema definition. Applicable to SOAP and REST Test Steps. The schema definition URL supports Property Expansions (e.g. ${#System#my.wsdl.endpoint}/services/PortType? wsdl). |
| SOAP Fault | Validates that the last received message is a SOAP Fault. Applicable to SOAP TestSteps SOAP Request - validates that the last received request is a valid SOAP Request. Applicable to MockResponse Test Steps only. |
| SOAP Response | Validates that the last received response is a valid SOAP Response. Applicable to SOAP TestRequest Steps only. |
| Valid HTTP Status Codes | Checks that the target TestStep received an HTTP result with a status code in the list of defined codes. Applicable to any TestStep that receives HTTP messages. |
| WS-Addressing Request | Validates that the last received request contains valid WS-Addressing Headers. Applicable to MockResponse TestSteps only. |
| WS-Addressing Response | Validates that the last received response contains valid WS-Addressing Headers. Applicable to SOAP TestRequest Steps only. |
| WS-Security Status | Validates that the last received message contained valid WS-Security headers. Applicable to SOAP Test Steps. |
| Script | |
| Script Assertion | Allows the users to execute a custom script to perform user-defined validations. Applicable to TestSteps only (i.e. not properties) |
| SLA | |
| Response SLA | Validates if the response time of the last received response was within the defined limit. Applicable to Script TestSteps and TestSteps that send requests and receive responses. |
| JMS | |
| JMS Status | Validates that the JMS request of the target TestStep is executed successfully. Applicable to Request TestSteps with a JMS endpoint. |
| JMS Timeout | Validates that the JMS statement of the target TestStep did not take longer than the specified duration. Applicable to Request TestSteps with a JMS endpoint. |
| Security | |
| Sensitive Information Exposure | Verifies if the response message does not expose sensitive information about the target system. We can use this assertion for REST, SOAP and HTTP TestSteps. |
| JDBC | |
| JDBC Status | Validates that the JDBC request of the target TestStep executed successfully. Applicable to JDBC TestSteps only. |
| JDBC Timeout | Validates that the JDBC statement of the target TestStep did not take longer than the specified duration. Applicable to JDBC TestSteps only. |
SoapUI - Troubleshooting
In SoapUI, the users face many generic common issues that could be sort out with a little alertness. Some of these most common issues are the following −
Issue − Namespace is defined wrongly. Use the correct namespace. The namespace should be the URL where the web service is located.
Solution − If an error is thrown while developing a scripting assertion, use 'log.info' to print the contents of the variables.
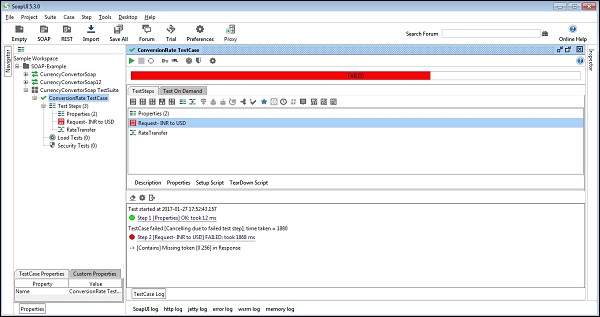
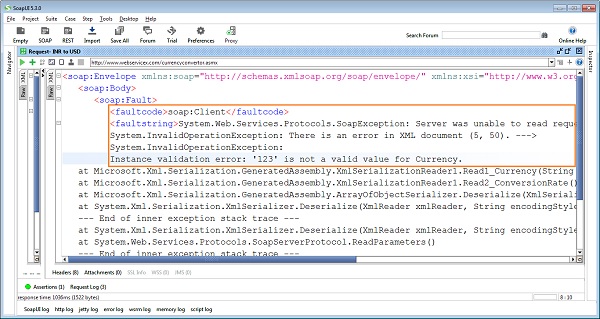
Issue − If a fault-code is received as response XML, it may be due to the invalid input.
Solution − Verify the input of request XML.
Example − In the currency converter, if the input of the 'FromCurrency' is '123' which is not existing, the output throws a fault code as 'SOAP-Client' which means that the issue is with the parameter that is being passed from the client side.
Request

Response
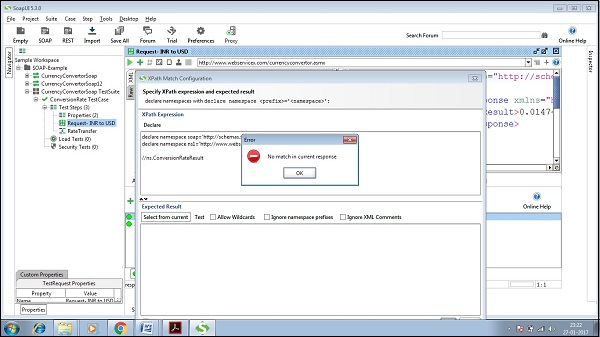
Issue − No match in current response when using XPath or XQuery.
Solution −
- Use the correct syntax while defining XPath or XQuery.
- Verify colon is used and not dot while declaring the namespace.
- Ensure that XPath and XQuery are correct.
SoapUI - Performance Testing
Performance testing is one of the most common important checkpoints in Web Service testing. Performance Testing is defined as artificially creating or simulating the load and measuring how the environment handles it.
This means it doesnt necessary have to be how a system performs under high load, it can also be how it performs under base load or expected load. It doesnt even have to be structured, automated, or created in TestWare such as SoapUI; simply refreshing the web browser over and over again very fast is also a Load Test.
Types of Performance Testing
Following are the types of Performance Testing −
Baseline Testing − Examines how a system performs under expected or normal load and creates a baseline against which the other types of tests can be compared.
Load Testing − Includes increasing the load and see how the system behaves under higher load. During Load Tests, the user can monitor response times, throughput, server condition and much more. The goal of Load Testing is not to break the target environment.
Soak Testing − The goal of testing is to make sure no unwanted behavior emerges over a longer period of time.
Scalability Testing − Scalability Testing is very much like Load Testing, however instead of increasing the number of requests, it increases the size or the complexity of the requests sent. For example, sending large requests, large attachments, or deeply nested requests.
Key Aspects in Web Service
Two aspects stand out in the unique characteristics of Web Service performance.
First Aspect
On the server side, XML/JSON processing is going on, both XML/JSON parsing and serialization. The thing that often fails first is the processing of the payloads. The reasons of failure can be multifold; it can be in the platform, the weaknesses of the application server, or it can be an implementation issue in the shape of unnecessarily complex WSDLs. It could also mean that the code is making a request to a database that is slow in responding.
Testing Aspect − The complexity of parsing the XML/JSON payload means that there is a need to put extra focus on Scalability Testing. It also means that WSDLs should be examined closely. If the requests and responses are either complex or larger, or if they include large attachments, focus should be on emphasizing the complexity and see how it behaves under load.
Second Aspect
Another factor frequently encountered is security. Secure sites behind HTTPS have considerably lower performance and in Web Service testing we can add a layer of WSSecurity to the layer of HTTP security, decreasing the performance even more.
Testing Aspect − The issue of security means, there is a need to focus on performing testing of requests that are secure. If the entire Web Service is secure it means Load Testing is more important, especially if WS-Security and token handling is used.
SoapUI - Load Testing
Load testing is a specific form of performance testing that is conducted to assess the behavior of the system under a specific load. In SoapUI, we generally use the term "load testing" for all types of non-functional testing, however SoapUI supports all types of performance assessments of web services such as load, stress, and endurance.
Points to Note
Load testing is quite unique in SoapUI; a functional test case that allows creating and modifying performance tests quickly.
The main differentiator is that performance tests in SoapUI generally is created from the existing functional tests. This allows to quickly create advanced performance tests.
Web Service performance can be validated under different load scenarios. Maintain functional validations to see that they don't break under load, run several load tests simultaneously to see how they affect each other and much more.
Creation of Load Test
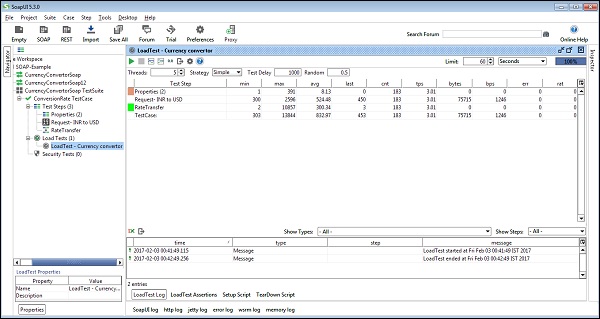
Step 1 − Right-click Functional Test Case and select New Load Test.
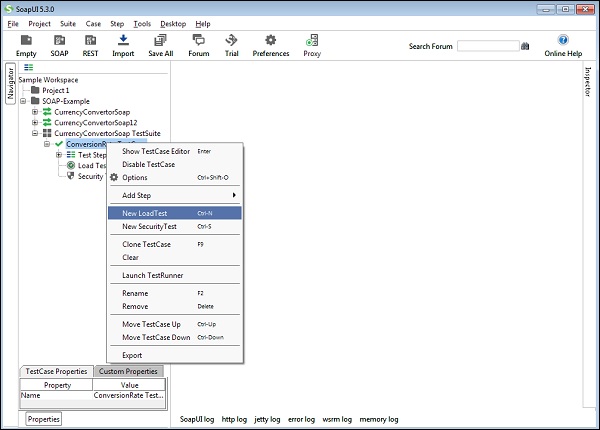
Step 2 − Enter the name of Load Test and click OK in the dialog wizard.
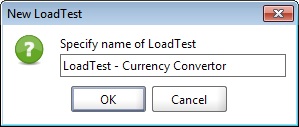
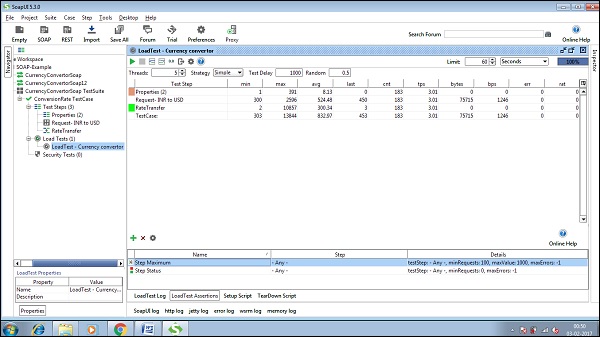
Load Test will open and the Load Test is created as shown in the following screenshot.
Execution of Load Test
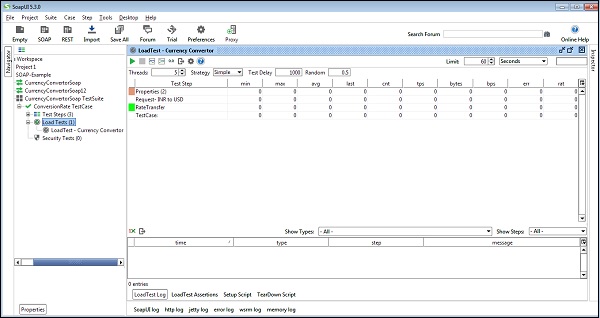
When a new Load Test is created, it is preconfigured to run for 60 seconds (top right) with 5 threads using the Simple load strategy.
Modify these values as per requirement and Run. Note − The user should be aware of Load Testing configuration and concepts.
The user will see the statistics table in the middle, beginning with collecting data and after 60 seconds should have a finished LoadTest.
Adding an Assertion
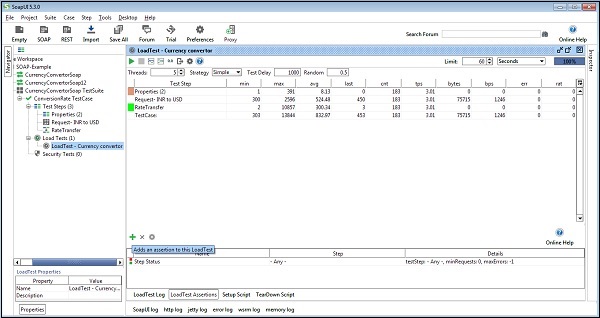
Step 1 − In the LoadTest editor, select the LoadTest Assertion tab at the bottom of the editor.
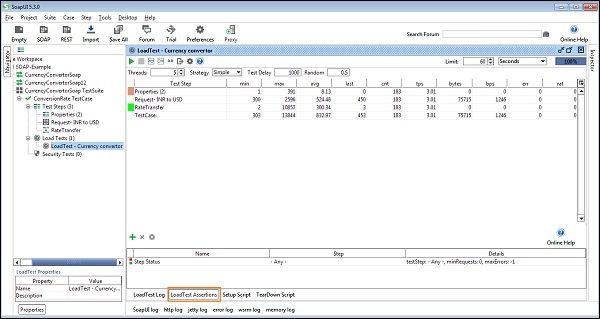
Step 2 − Click the Add Assertion button in the LoadTest Assertion menu bar to add an assertion.
Step 3 − The Add Assertion dialog will open. Select Step Maximum. Select Maximum sets a Max Time in milliseconds that the responses are allowed to take, if the time exceeds what we've set, the test will fail. Click OK.
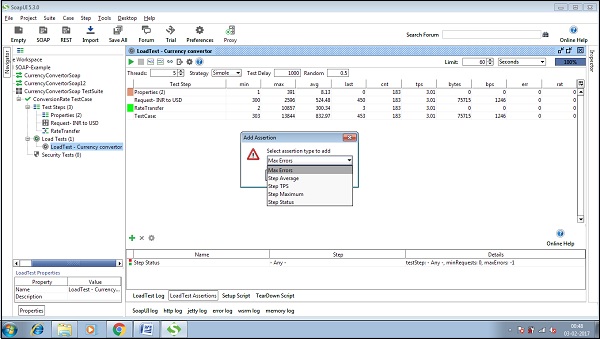
Step 4 − The TestStep Max Assertion window will open. As seen in the following screenshot, we allow a max response of one second, 1000 milliseconds. Let's not modify anything. Click Ok.
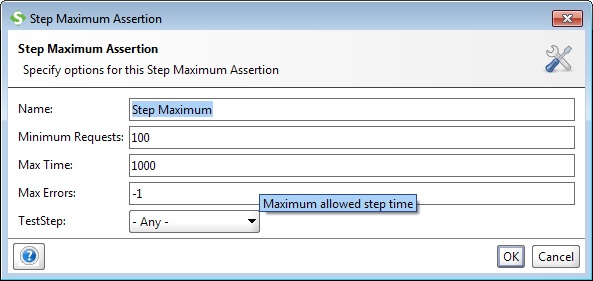
The Step Maximum assertion will now be successfully added.
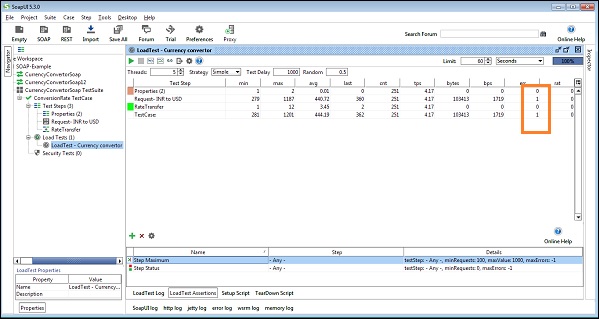
Step 5 − Now run the test again. If the responses take too long, you should see the numbers in the err column add up quickly.
SoapUI - RESTful Web Services
A web service is a collection of open protocols and standards used for exchanging data between applications or systems. Software applications written in various programming languages and running on various platforms can use web services to exchange data over computer networks such as the Internet in a manner similar to inter-process communication on a single computer. This interoperability (e.g., between Java and Python, or Windows and Linux applications) is due to the use of open standards.
Web services based on REST Architecture are known as RESTful Web Services. These web services use HTTP methods to implement the concept of REST architecture. A RESTful web service usually defines a URI (Uniform Resource Identifier), which is a service that provides resource representation such as JSON and a set of HTTP methods.
All REST testing capabilities of SoapUI are based on a logical representation known as REST service. We should not confuse this with the term "service" here, since it is not a service implementation but a mapping of the RESTful service that is being invoked. We can add as many REST Services as we can in a SoapUI project. Each represents a particular RESTful service. They are as follows −
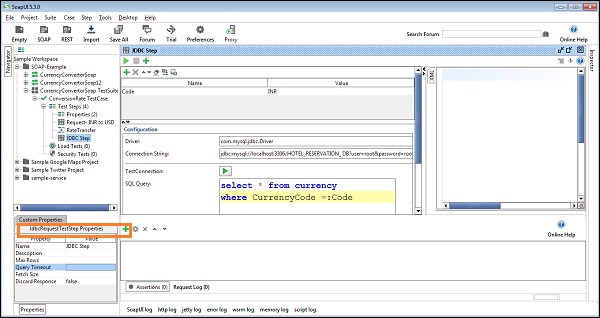
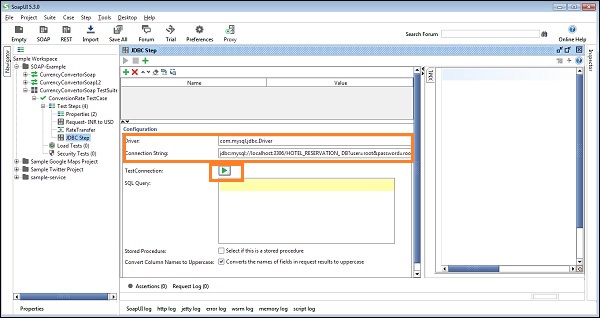
SoapUI - JDBC Connection
SoapUI allows managing database operation using a TestStep called JDBC Request.
Step 1 − Right-click on TestStep and select Add Step → JDBC Request.
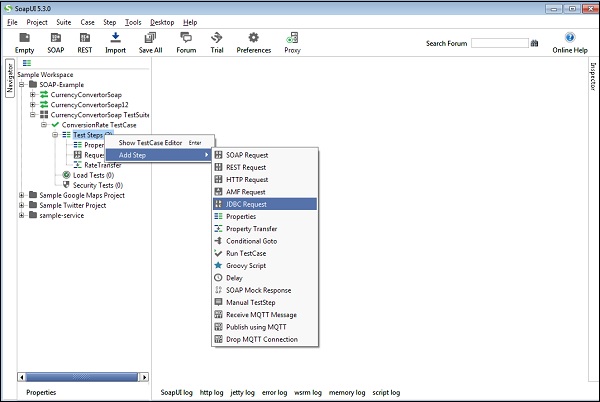
Step 2 − Enter the step name and click OK.

JDBC Step is added. Double-click step, and the JDBC wizard will open.

To create a JDBC connection, the user needs to provide valid Driver and Connection String. These parameters are used to identify the type of database and create a connection to use the database.
For MySQL, database driver can be com.mysql.jdbc.Driver. Similarly, for other database, there is a predefined driver that can be found by the document section of the database.
Step 3 − Connection String should be in the following format −
Jdbc:mysql://[host]:[port]/[database]?[property][=value]
Here, property is the username and password along with other parameters required to connect with a database.
For example,
jdbc:mysql://localhost:8089/xxx_DB?user=root&password=root
Step 4 − Click Test Connection. On successful connection, it will display SUCCESS otherwise provide the details of failure.
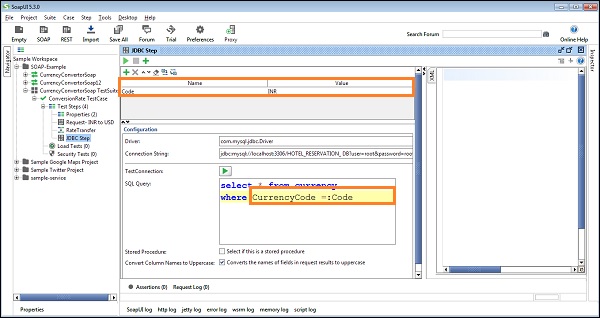
SoapUI - JDBC Property
JDBC has its own Add property section that can be used as a variable in SQL Query.
Lets see how it behaves −
Suppose, SQL Query that needs to perform in JDBC step is Select * from Currency where CurrencyCode = xxx.
In this scenario, CurrencyCode can be changed based on the request input. If the user provides a hard-coded value, JDBC step wont execute for those currency given in request.
To overcome such scenarios, JDBC supports the add property, where a property Code can be defined and it will keep changing using Property Transfer Step.
SQL Query will run based on the current value of Property Code and SQL Query will parameterize the CurrencyCode =:Code.
Click Add Property + and the name as Code and give value or keep blank to use Property Transfer step to provide it.
SoapUI - JDBC Assertion
JDBC Request can also make use of most of the assertions with SOAP request TestSteps. In SoapUI, most of these assertions are independent from TestSteps. Hence, the assertions such as Contains and XPath Match can be used with JDBC Request TestStep.
By clicking the Add an assertion icon at the top menu of JDBC Request TestStep, the user can find out what assertions are supported by the TestStep.
In addition to the generic assertions, there are two JDBC Request TestStep specific assertions −
JDBC Timeout − This assertion can be used to verify whether the current SQL query is executed within the specified Query Timeout property value.
JDBC Status − In order to check whether the SQL statement is executed successfully, we can use the JDBC Status assertion.
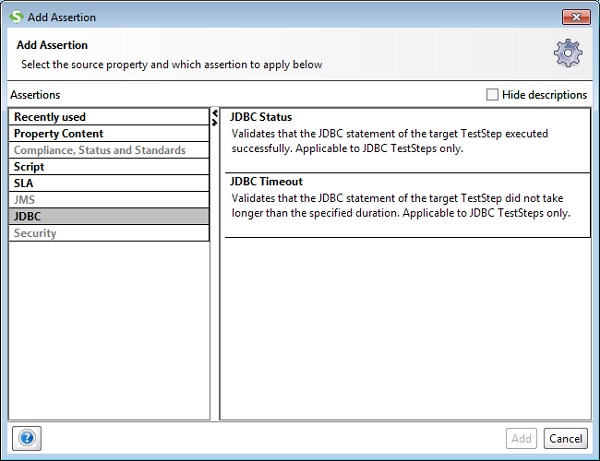
To set the Query Timeout, provide the value respective of Property Query Timeout on the left side of the screen. Please keep in mind, it accepts value in milliseconds (ms).