- Kivy - Home
- Kivy Basics
- Kivy - Getting Started
- Kivy - Installation
- Kivy - Architecture
- Kivy - File Syntax
- Kivy - Applications
- Kivy - Hello World
- Kivy - App Life Cycle
- Kivy - Events
- Kivy - Properties
- Kivy - Inputs
- Kivy - Behaviors
- Kivy Buttons
- Kivy - Buttons
- Kivy - Button Events
- Kivy - Button Colors
- Kivy - Button Size
- Kivy - Button Position
- Kivy - Round Buttons
- Kivy - Disabled Buttons
- Kivy - Image Button
- Kivy Widgets
- Kivy - Widgets
- Kivy - Label
- Kivy - Text Input
- Kivy - Canvas
- Kivy - Line
- Kivy - Checkbox
- Kivy - Dropdown List
- Kivy - Windows
- Kivy - ScrollView
- Kivy - Carousel
- Kivy - Slider
- Kivy - Images
- Kivy - Popup
- Kivy - Switch
- Kivy - Spinner
- Kivy - Splitter
- Kivy - Progress Bar
- Kivy - Bubble
- Kivy - Tabbed Panel
- Kivy - Scatter
- Kivy - Accordion
- Kivy - File Chooser
- Kivy - Color Picker
- Kivy - Code Input
- Kivy - Modal View
- Kivy - Toggle Button
- Kivy - Camera
- Kivy - Tree View
- Kivy - reStructuredText
- Kivy - Action Bar
- Kivy - Video Player
- Kivy - Stencil View
- Kivy - VKeyboard
- Kivy - Touch Ripple
- Kivy - Audio
- Kivy - Videos
- Kivy - Spelling
- Kivy - Effects
- Kivy - Input Recorder
- Kivy - OpenGL
- Kivy - Text
- Kivy - Text Markup
- Kivy - Settings
- Kivy Layouts
- Kivy - Layouts
- Kivy - Float Layout
- Kivy - Grid Layouts
- Kivy - Box Layouts
- Kivy - Stack Layout
- Kivy - Anchor Layout
- Kivy - Relative Layout
- Kivy - Page Layout
- Kivy - Recycle Layout
- Kivy - Layouts in Layouts
- Kivy Advanced Concepts
- Kivy - Configuration Object
- Kivy - Atlas
- Kivy - Data Loader
- Kivy - Cache Manager
- Kivy - Console
- Kivy - Animation
- Kivy - Multistroke
- Kivy - Clock
- Kivy - SVGs
- Kivy - UrlRequest
- Kivy - Clipboard
- Kivy - Factory
- Kivy - Gesture
- Kivy - Language
- Kivy - Graphics
- Kivy - Drawing
- Kivy - Packaging
- Kivy - Garden
- Kivy - Storage
- Kivy - Vector
- Kivy - Utils
- Kivy - Inspector
- Kivy - Tools
- Kivy - Logger
- Kivy - Framebuffer
- Kivy Applications and Projects
- Kivy - Drawing App
- Kivy - Calculator App
- Kivy - Stopwatch App
- Kivy - Camera Handling
- Kivy - Image Viewer
- Kivy - Bezier
- Kivy - Canvas Stress
- Kivy - Circle Drawing
- Kivy - Widget Animation
- Kivy - Miscellaneous
- Kivy Useful Resources
- Kivy - Quick Guide
- Kivy - Useful Resources
- Kivy - Discussion
Kivy - Relative Layout
The behavior of Relative Layout is very similar to that of FloatLayout. The main difference between the two is that positioning coordinates of child widgets in a relative layout are relative to the layout size and not the window size as is the case of float layout.
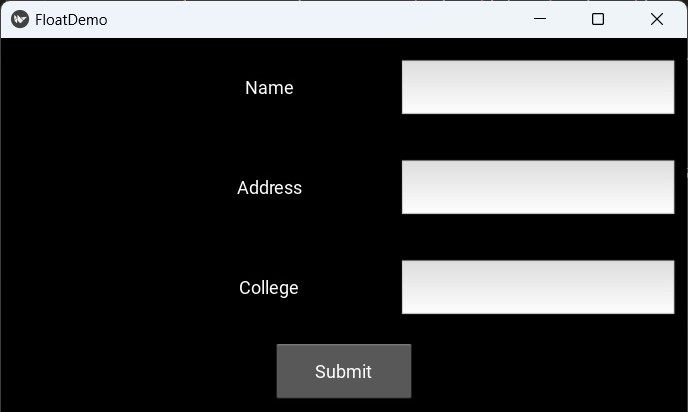
To understand what it means, consider the following UI designed with FloatLayout.
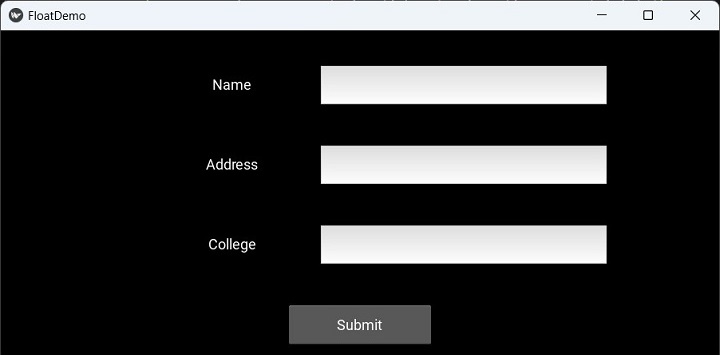
When you resize the window, because of the absolute positioning in float layout, the placement of widgets is not proportional to the resized window. As a result, the interface design is not consistent.
The relative layout doesn't have such effect because the size and position of widgets is relative to the layout.
When a widget with position (0,0) is added to a RelativeLayout, the child widget will also move when the position of the RelativeLayout is changed. Coordinates of the child widgets are always relative to the parent layout.
The RelativeLayout class is defined in the "kivy.uix.relativelayout" module.
from kivy.uix.relativelayout import RelativeLayout
rlo = RelativeLayout(**kwargs)
Example
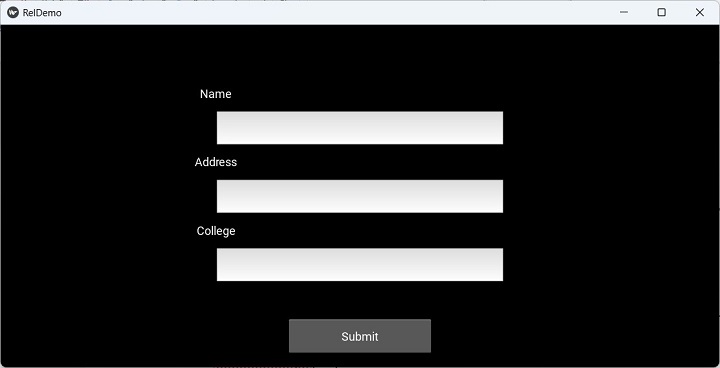
The following code assembles labels, text boxes and a submit button in RelativeLayout.
from kivy.app import App
from kivy.uix.label import Label
from kivy.uix.button import Button
from kivy.uix.textinput import TextInput
from kivy.uix.relativelayout import RelativeLayout
from kivy.core.window import Window

Window.size = (720, 400)

class RelDemoApp(App):
   def build(self):
      rlo = RelativeLayout()

      l1 = Label(
         text="Name", size_hint=(.2, .1),
         pos_hint={'x': .2, 'y': .75}
      )
      rlo.add_widget(l1)
      t1 = TextInput(
         size_hint=(.4, .1), pos_hint={'x': .3, 'y': .65}
      )
      rlo.add_widget(t1)
      l2 = Label(
         text="Address", size_hint=(.2, .1),
         pos_hint={'x': .2, 'y': .55}
      )
      rlo.add_widget(l2)
      t2 = TextInput(
         multiline=True, size_hint=(.4, .1),
         pos_hint={'x': .3, 'y': .45}
      )
      rlo.add_widget(t2)
      l3 = Label(
         text="College", size_hint=(.2, .1),
         pos_hint={'x': .2, 'y': .35}
      )
      rlo.add_widget(l3)
      t3 = TextInput(
         size_hint=(.4, .1), pos=(400, 150),
         pos_hint={'x': .3, 'y': .25}
      )
      rlo.add_widget(t3)
      b1 = Button(
         text='Submit', size_hint=(.2, .1),
         pos_hint={'center_x': .5, 'center_y': .09}
      )
      rlo.add_widget(b1)
      return rlo

RelDemoApp().run()
Output
When the above code is executed, the application window shows the UI as follows −
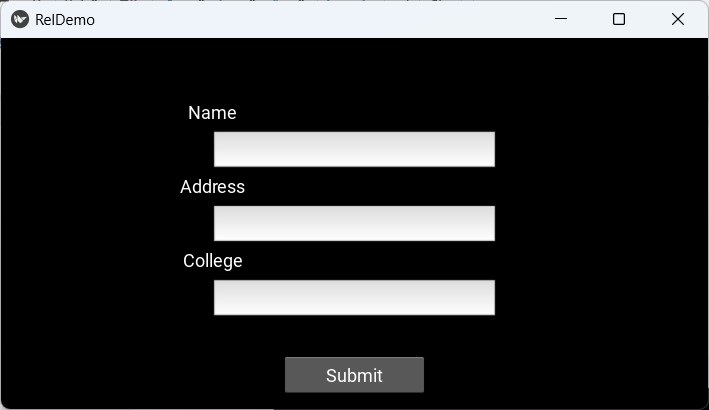
Note that unlike in the case of FloatLayout, resizing the window doesn't alter the proportional sizing and positioning of the widgets.
"kv" design language script
The "kv" file for producing the above UI instead of build() method in the App class is as follows −
RelativeLayout:
   Label:
      text:"Name"
      size_hint:(.2, .1)
      pos_hint:{'x':.2, 'y':.75}

   TextInput:
      size_hint:(.4, .1)
      pos_hint:{'x':.3, 'y':.65}

   Label:
      text:"Address"
      size_hint:(.2, .1)
      pos_hint:{'x':.2, 'y':.55}

   TextInput:
      multiline:True
      size_hint:(.4, .1)
      pos_hint:{'x':.3, 'y':.45}

   Label:
      text:"College"
      size_hint:(.2, .1)
      pos_hint:{'x':.2, 'y':.35}

   TextInput:
      size_hint:(.4, .1)
      pos:(400, 150)
      pos_hint:{'x':.3, 'y':.25}

   Button:
      text:'Submit'
      size_hint : (.2, .1)
      pos_hint : {'center_x':.5, 'center_y':.09}
