- Kivy - Home
- Kivy Basics
- Kivy - Getting Started
- Kivy - Installation
- Kivy - Architecture
- Kivy - File Syntax
- Kivy - Applications
- Kivy - Hello World
- Kivy - App Life Cycle
- Kivy - Events
- Kivy - Properties
- Kivy - Inputs
- Kivy - Behaviors
- Kivy Buttons
- Kivy - Buttons
- Kivy - Button Events
- Kivy - Button Colors
- Kivy - Button Size
- Kivy - Button Position
- Kivy - Round Buttons
- Kivy - Disabled Buttons
- Kivy - Image Button
- Kivy Widgets
- Kivy - Widgets
- Kivy - Label
- Kivy - Text Input
- Kivy - Canvas
- Kivy - Line
- Kivy - Checkbox
- Kivy - Dropdown List
- Kivy - Windows
- Kivy - ScrollView
- Kivy - Carousel
- Kivy - Slider
- Kivy - Images
- Kivy - Popup
- Kivy - Switch
- Kivy - Spinner
- Kivy - Splitter
- Kivy - Progress Bar
- Kivy - Bubble
- Kivy - Tabbed Panel
- Kivy - Scatter
- Kivy - Accordion
- Kivy - File Chooser
- Kivy - Color Picker
- Kivy - Code Input
- Kivy - Modal View
- Kivy - Toggle Button
- Kivy - Camera
- Kivy - Tree View
- Kivy - reStructuredText
- Kivy - Action Bar
- Kivy - Video Player
- Kivy - Stencil View
- Kivy - VKeyboard
- Kivy - Touch Ripple
- Kivy - Audio
- Kivy - Videos
- Kivy - Spelling
- Kivy - Effects
- Kivy - Input Recorder
- Kivy - OpenGL
- Kivy - Text
- Kivy - Text Markup
- Kivy - Settings
- Kivy Layouts
- Kivy - Layouts
- Kivy - Float Layout
- Kivy - Grid Layouts
- Kivy - Box Layouts
- Kivy - Stack Layout
- Kivy - Anchor Layout
- Kivy - Relative Layout
- Kivy - Page Layout
- Kivy - Recycle Layout
- Kivy - Layouts in Layouts
- Kivy Advanced Concepts
- Kivy - Configuration Object
- Kivy - Atlas
- Kivy - Data Loader
- Kivy - Cache Manager
- Kivy - Console
- Kivy - Animation
- Kivy - Multistroke
- Kivy - Clock
- Kivy - SVGs
- Kivy - UrlRequest
- Kivy - Clipboard
- Kivy - Factory
- Kivy - Gesture
- Kivy - Language
- Kivy - Graphics
- Kivy - Drawing
- Kivy - Packaging
- Kivy - Garden
- Kivy - Storage
- Kivy - Vector
- Kivy - Utils
- Kivy - Inspector
- Kivy - Tools
- Kivy - Logger
- Kivy - Framebuffer
- Kivy Applications and Projects
- Kivy - Drawing App
- Kivy - Calculator App
- Kivy - Stopwatch App
- Kivy - Camera Handling
- Kivy - Image Viewer
- Kivy - Bezier
- Kivy - Canvas Stress
- Kivy - Circle Drawing
- Kivy - Widget Animation
- Kivy - Miscellaneous
- Kivy Useful Resources
- Kivy - Quick Guide
- Kivy - Useful Resources
- Kivy - Discussion
Kivy - Float Layout
In Kivy, FloatLayout gives you complete control over the placement of widgets. It enforces no restrictions on how a widget is positioned and how it is sized. FloatLayout honors the "pos_hint" and the "size_hint" properties of its children.
The FloatLayout class is defined in the "kivy.uix.floatlayout" module.
from kivy.uix.floatlayout import FloatLayout
layout = FloatLayout(**kwargs)
You can specify the layout size with size parameter. It is a tuple of width and height in pixels.
layout = FloatLayout(size=(300, 300))
When a widget is placed in a FloatLayout object with add_widget() method, will adopt the same size as the layout.
You can specify "size_hint", "pos_hint", "pos" and "size" properties to define the size and position of a widget in FloatLayout.
button = Button(
   text='TutorialsPoint',
   size_hint=(.4, .3),
   pos=(100, 100))
This will position a button at 100,100 coordinates (measured from bottomleft) and of size 40% of the layout width, 30% of layout height.
FloatLayout supports the two main methods, inherited from the Widget class: add_widget() and remove_widget().
The basic usage of FloatLayout is shown below −
class FloatApp(App):
   def build(self):
      flo = FloatLayout()
      l1 = Label(text="TutorialsPoint")
      flo.add_widget(l1)
      return flo
You can also use the "kv" file to populate the application window as shown below −
FloatLayout:
   Label:
      text : 'TutorialsPoint'
Example
Let us design a form with three labels, three text input boxes − one which is a multiline text box, and a submit button.
A FloatLayout object is used for the purpose. The labels are placed at 200 px as x-coordinate value, the text boxes at 400 px as x coordinate value. Labels and text boxes have width that is 10% of the layout. The single button is placed horizontally in the center.
from kivy.app import App
from kivy.uix.label import Label
from kivy.uix.button import Button
from kivy.uix.textinput import TextInput
from kivy.uix.floatlayout import FloatLayout
from kivy.graphics import Color, Rectangle
from kivy.core.window import Window

Window.size = (720,350)

class FloatApp(App):
   def build(self):
      flo = FloatLayout()
      l1 = Label(
         text="Name", size_hint=(.2, .1),
         pos=(200, 350), color = [1,1,1,1]
      )
      with l1.canvas:
         Color(0, 1, 0, 0.25)
         Rectangle(pos=l1.pos, size=(350, 50))
      flo.add_widget(l1)
      t1 = TextInput(size_hint=(.4, .1), pos=(400, 350))
      flo.add_widget(t1)

      l2 = Label(
         text="Address", size_hint=(.2, .1),
         pos=(200, 250),color = [1,1,1,1]
      )
      with l2.canvas:
         Color(0, 1, 0, 0.25)
         Rectangle(pos=l2.pos, size=(350, 50))
      flo.add_widget(l2)
      t2 = TextInput(
         multiline=True, size_hint=(.4, .1), pos=(400, 250)
      )
      flo.add_widget(t2)

      l3 = Label(
         text="College", size_hint=(.2, .1),
         pos=(200, 150), color = [1,1,1,1]
      )
      with l3.canvas:
         Color(0, 1, 0, 0.25)
         Rectangle(pos=l3.pos, size=(350, 50))
      flo.add_widget(l3)
      t3 = TextInput(size_hint=(.4, .1), pos=(400, 150))
      flo.add_widget(t3)

      b1 = Button(
         text='Submit', size_hint = (.2, .1),
         pos_hint = {'center_x':.5, 'center_y':.09}
      )
      flo.add_widget(b1)

      return flo

FloatApp().run()
Output
When you run this code, it will produce an output window like this one −
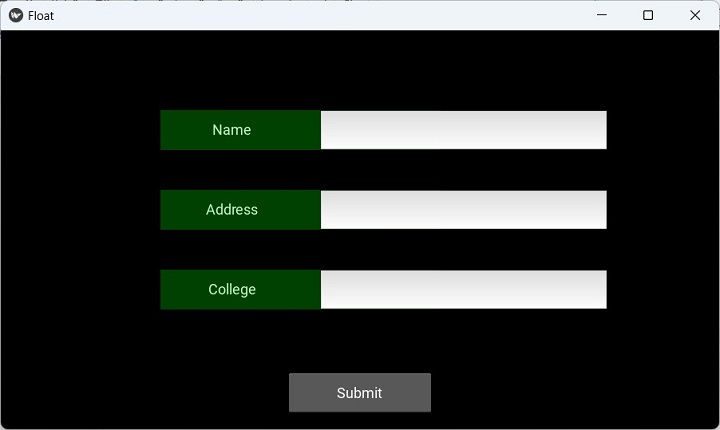
Note that the labels are given background color by drawing a rectangle on the label canvas with RGBA color value (0, 1, 0, 0.25).
If you wish to use a "kv" file instead of designing the UI in the build() method, here is the "kv" language script −
FloatLayout:
   Label:
      id:l1
      text:"Name"
      size_hint:(.2, .1)
      pos:(200, 350)
      color : [1,1,1,1]
      canvas:
         Color :
            rgba: 0, 1, 0, 0.25
         Rectangle:
            pos:self.pos
            size : (350, 50)

   Label:
      id:l2
      text:"Address"
      size_hint:(.2, .1)
      pos:(200, 250)
      color : [1,1,1,1]
      canvas:
         Color :
            rgba: 0, 1, 0, 0.25
         Rectangle:
            pos:self.pos
            size : (350, 50)

   Label:
      id:l3
      text:"College"
      size_hint:(.2, .1)
      pos:(200, 150)
      color : [1,1,1,1]
      canvas:
         Color :
            rgba: 0, 1, 0, 0.25
         Rectangle:
            pos:self.pos
            size : (350, 50)

   TextInput:
      id:t1
      size_hint:(.4, .1)
      pos:(400, 350)
   TextInput:
      id:t2
      multiline:True
      size_hint:(.4, .1)
      pos:(400, 250)
   TextInput:
      id:t3
      size_hint:(.4, .1)
      pos:(400, 150)
   Button:
      id:b1
      text:'Submit'
      size_hint : (.2, .1)
      pos_hint : {'center_x':.5, 'center_y':.09}
