- Kivy - Home
- Kivy Basics
- Kivy - Getting Started
- Kivy - Installation
- Kivy - Architecture
- Kivy - File Syntax
- Kivy - Applications
- Kivy - Hello World
- Kivy - App Life Cycle
- Kivy - Events
- Kivy - Properties
- Kivy - Inputs
- Kivy - Behaviors
- Kivy Buttons
- Kivy - Buttons
- Kivy - Button Events
- Kivy - Button Colors
- Kivy - Button Size
- Kivy - Button Position
- Kivy - Round Buttons
- Kivy - Disabled Buttons
- Kivy - Image Button
- Kivy Widgets
- Kivy - Widgets
- Kivy - Label
- Kivy - Text Input
- Kivy - Canvas
- Kivy - Line
- Kivy - Checkbox
- Kivy - Dropdown List
- Kivy - Windows
- Kivy - ScrollView
- Kivy - Carousel
- Kivy - Slider
- Kivy - Images
- Kivy - Popup
- Kivy - Switch
- Kivy - Spinner
- Kivy - Splitter
- Kivy - Progress Bar
- Kivy - Bubble
- Kivy - Tabbed Panel
- Kivy - Scatter
- Kivy - Accordion
- Kivy - File Chooser
- Kivy - Color Picker
- Kivy - Code Input
- Kivy - Modal View
- Kivy - Toggle Button
- Kivy - Camera
- Kivy - Tree View
- Kivy - reStructuredText
- Kivy - Action Bar
- Kivy - Video Player
- Kivy - Stencil View
- Kivy - VKeyboard
- Kivy - Touch Ripple
- Kivy - Audio
- Kivy - Videos
- Kivy - Spelling
- Kivy - Effects
- Kivy - Input Recorder
- Kivy - OpenGL
- Kivy - Text
- Kivy - Text Markup
- Kivy - Settings
- Kivy Layouts
- Kivy - Layouts
- Kivy - Float Layout
- Kivy - Grid Layouts
- Kivy - Box Layouts
- Kivy - Stack Layout
- Kivy - Anchor Layout
- Kivy - Relative Layout
- Kivy - Page Layout
- Kivy - Recycle Layout
- Kivy - Layouts in Layouts
- Kivy Advanced Concepts
- Kivy - Configuration Object
- Kivy - Atlas
- Kivy - Data Loader
- Kivy - Cache Manager
- Kivy - Console
- Kivy - Animation
- Kivy - Multistroke
- Kivy - Clock
- Kivy - SVGs
- Kivy - UrlRequest
- Kivy - Clipboard
- Kivy - Factory
- Kivy - Gesture
- Kivy - Language
- Kivy - Graphics
- Kivy - Drawing
- Kivy - Packaging
- Kivy - Garden
- Kivy - Storage
- Kivy - Vector
- Kivy - Utils
- Kivy - Inspector
- Kivy - Tools
- Kivy - Logger
- Kivy - Framebuffer
- Kivy Applications and Projects
- Kivy - Drawing App
- Kivy - Calculator App
- Kivy - Stopwatch App
- Kivy - Camera Handling
- Kivy - Image Viewer
- Kivy - Bezier
- Kivy - Canvas Stress
- Kivy - Circle Drawing
- Kivy - Widget Animation
- Kivy - Miscellaneous
- Kivy Useful Resources
- Kivy - Quick Guide
- Kivy - Useful Resources
- Kivy - Discussion
Kivy - Animation
Applying animation effects to a widget is one of the most attractive features of Kivy framework. In Kivy, the animation functionality is defined in Animation class included in kivy.animation module. The same module also includes AnimationTransition class. It is a collection of functions to apply animation transition effects.
To use animation effect, the Kivy application should −
First decide on which property of a widget to animate,
Set up an object of Animation class,
Set the final value of the property,
Call the start() method of Animation object, passing the widget as an argument.
To animate a Widget's x or y position, simply specify the target x/y values where you want the widget positioned at the end of the animation −
rom kivy.animation import Animation
anim = Animation(x=100, y=100)
anim.start(widget)
This will animate the x and y positions of the widget from its original position to 100,100 taking by default a duration one second.
You can ask for animating multiple properties. For example, to animate the position and size use −
anim = Animation(x=50, size=(80, 80))
anim.start(widget)
You can also specify a transition (or t) property of the Animation object to apply transition effects.
Using the '+' operator between two Animation objects joins the animations sequentially.
anim = Animation(x=50) + Animation(size=(80, 80), duration=2)
This will animate the widget to x=50 over 1 second, then animate the size to (80, 80) over the next two seconds.
On the other hand, the '&' operator joins animations in parallel. The following example will perform simultaneous animation of the position to (80, 10) over 1 second, the size to (800, 800) −
anim = Animation(pos=(80, 10))
anim &= Animation(size=(800, 800), duration=2.)
If the program is implementing 'sequence' animations, the animation can be set to be repeated in a loop by setting anim.repeat = True.
The Animation class has the following properties and methods −
duration or d − Duration of the animation, in seconds, defaults to 1.
transition or t − Transition function for animate properties. It can be the name of a method from AnimationTransition.
step or s − float. Step in milliseconds of the animation. Defaults to 0, which means the animation is updated for every frame. If you want to animate at 30 FPS, use s=1/30.
cancel() − Cancel the animation previously applied to a widget.
cancel_all() − Cancel all animations that concern a specific widget / list of properties.
start() − Start the animation on a widget.
stop() − Stop the animation previously applied to a widget, triggering the on_complete event.
stop_all() − Stop all animations that concern a specific widget / list of properties.
Example
With the help of the following "kv" script, a button and a label are placed in a vertical box layout. The button is bound to animating() method.
<MyLayout>
BoxLayout:
orientation: "vertical"
size: root.width, root.height
padding: 50
spacing: 20
Label:
id: my_label
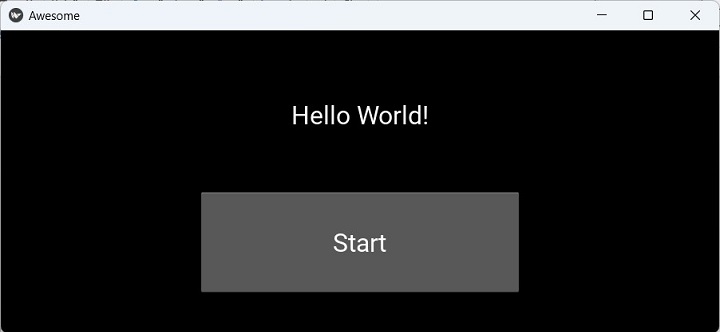
text: "Hello World!"
font_size: 32
Button:
text: "Start"
font_size: 32
size_hint: .5, .5
pos_hint: {"center_x": 0.5}
on_release: root.animating(self)
This "kv" script is loaded in the App class. The animating() method applies position, background color and size animation effects on the button when clicked.
from kivy.app import App
from kivy.uix.widget import Widget
from kivy.lang import Builder
from kivy.animation import Animation
from kivy.core.window import Window
Window.size = (720, 400)
class MyLayout(Widget):
def animating(self, widget, *args):
animate = Animation(
pos=(widget.pos[0], Window.height - 50)
)
animate += Animation(pos=(widget.pos[0], 0))
animate += Animation(
background_color=(0, 0, 1, 1),
duration=1
)
animate += Animation(size_hint=(1, 1))
animate += Animation(size_hint=(.5, .5))
animate += Animation(pos_hint={"center_x": 0.1})
animate += Animation(pos_hint={"center_x": 0.5})
animate.start(widget)
# Create a callback
animate.bind(on_complete=self.my_callback)
def my_callback(self, *args):
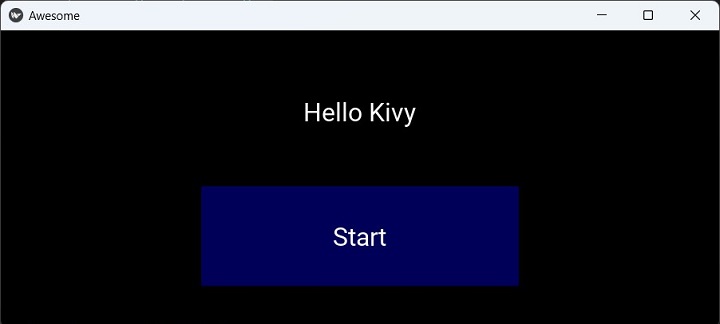
self.ids.my_label.text = "Hello Kivy"
class AwesomeApp(App):
def build(self):
return MyLayout()
if __name__ == '__main__':
AwesomeApp().run()
Output
Run the above program. You should see a label and a button below it.
Click the button to start the animation effects. The button moves up and down, left and right, grows and shrinks in size, and changes color.