- Kivy - Home
- Kivy Basics
- Kivy - Getting Started
- Kivy - Installation
- Kivy - Architecture
- Kivy - File Syntax
- Kivy - Applications
- Kivy - Hello World
- Kivy - App Life Cycle
- Kivy - Events
- Kivy - Properties
- Kivy - Inputs
- Kivy - Behaviors
- Kivy Buttons
- Kivy - Buttons
- Kivy - Button Events
- Kivy - Button Colors
- Kivy - Button Size
- Kivy - Button Position
- Kivy - Round Buttons
- Kivy - Disabled Buttons
- Kivy - Image Button
- Kivy Widgets
- Kivy - Widgets
- Kivy - Label
- Kivy - Text Input
- Kivy - Canvas
- Kivy - Line
- Kivy - Checkbox
- Kivy - Dropdown List
- Kivy - Windows
- Kivy - ScrollView
- Kivy - Carousel
- Kivy - Slider
- Kivy - Images
- Kivy - Popup
- Kivy - Switch
- Kivy - Spinner
- Kivy - Splitter
- Kivy - Progress Bar
- Kivy - Bubble
- Kivy - Tabbed Panel
- Kivy - Scatter
- Kivy - Accordion
- Kivy - File Chooser
- Kivy - Color Picker
- Kivy - Code Input
- Kivy - Modal View
- Kivy - Toggle Button
- Kivy - Camera
- Kivy - Tree View
- Kivy - reStructuredText
- Kivy - Action Bar
- Kivy - Video Player
- Kivy - Stencil View
- Kivy - VKeyboard
- Kivy - Touch Ripple
- Kivy - Audio
- Kivy - Videos
- Kivy - Spelling
- Kivy - Effects
- Kivy - Input Recorder
- Kivy - OpenGL
- Kivy - Text
- Kivy - Text Markup
- Kivy - Settings
- Kivy Layouts
- Kivy - Layouts
- Kivy - Float Layout
- Kivy - Grid Layouts
- Kivy - Box Layouts
- Kivy - Stack Layout
- Kivy - Anchor Layout
- Kivy - Relative Layout
- Kivy - Page Layout
- Kivy - Recycle Layout
- Kivy - Layouts in Layouts
- Kivy Advanced Concepts
- Kivy - Configuration Object
- Kivy - Atlas
- Kivy - Data Loader
- Kivy - Cache Manager
- Kivy - Console
- Kivy - Animation
- Kivy - Multistroke
- Kivy - Clock
- Kivy - SVGs
- Kivy - UrlRequest
- Kivy - Clipboard
- Kivy - Factory
- Kivy - Gesture
- Kivy - Language
- Kivy - Graphics
- Kivy - Drawing
- Kivy - Packaging
- Kivy - Garden
- Kivy - Storage
- Kivy - Vector
- Kivy - Utils
- Kivy - Inspector
- Kivy - Tools
- Kivy - Logger
- Kivy - Framebuffer
- Kivy Applications and Projects
- Kivy - Drawing App
- Kivy - Calculator App
- Kivy - Stopwatch App
- Kivy - Camera Handling
- Kivy - Image Viewer
- Kivy - Bezier
- Kivy - Canvas Stress
- Kivy - Circle Drawing
- Kivy - Widget Animation
- Kivy - Miscellaneous
- Kivy Useful Resources
- Kivy - Quick Guide
- Kivy - Useful Resources
- Kivy - Discussion
Kivy - Factory
The factory class in Kivy is used to automatically register any class or module and instantiate classes from it anywhere in your project. The Factory class is defined in the "kivy.factory" module.
Factory Pattern is a software architecture pattern in object-oriented programming. A factory is an object for creating other objects. It is a function or method that returns objects or class from some method call that returns a "new" object may be referred to as a "factory", as in factory method or factory function.
The "kivy.factory.Factory" class creates instances of classes and adds them to the widget tree. The widget tree controls elements on a user interface.
Here is an example of creating a custom button class registered with Factory.
from kivy.factory import Factory
from kivy.uix.button import Button

Factory.register('MyCustomButton', cls=Button)

btn = MyCustomButton( text: "Click me")
Similarly, you can create a class with Factory −
from kivy.factory import Factory
from kivy.uix.label import Label

class MyLabel(Label):
   pass

Factory.register('MyLabel', cls=MyLabel)
lbl = MyLabel(text: "Hello world")
By default, the first classname you register via the factory is permanent. If you wish to change the registered class, you need to unregister the classname before you re-assign it.
from kivy.factory import Factory
Factory.register('NewWidget', cls=NewWidget)
widget = Factory.NewWidget()
Factory.unregister('NewWidget')
Factory.register('NewWidget', cls=CustomWidget)
customWidget = Factory.NewWidget()
Example
The following Kivy application uses Factory to register a MyPopup class which is a Popup widget in Kivy library.
The Kivy App class code is as follows −
from kivy.app import App
from kivy.uix.widget import Widget
from kivy.lang import Builder
from kivy.core.window import Window

Window.size = (720,400)

Builder.load_file('popup.kv')

class MyLayout(Widget):
   pass

class FactorydemoApp(App):
   def build(self):
      return MyLayout()

FactorydemoApp().run()
In order to populate the app window, use the following "kv" script (popup.kv)
#:import Factory kivy.factory.Factory

<MyPopup@Popup>
   auto_dismiss: False
   size_hint: 0.6, 0.4
   pos_hint: {"x":0.2, "top": 0.9}

   title: "Popup Box"

   BoxLayout:
      orientation: "vertical"
      size: root.width, root.height
      Label:
         text: "Hello Kivy"
         font_size: 24
      Button:
         text: "Close"
         font_size: 24
         on_release: root.dismiss()

<MyLayout>
   BoxLayout:
      orientation: "vertical"
      size: root.width, root.height

      Label:
         text: "Factory Example"
         font_size: 32
      Button:
         text: "Click here"
         font_size: 32
         on_release: Factory.MyPopup().open()
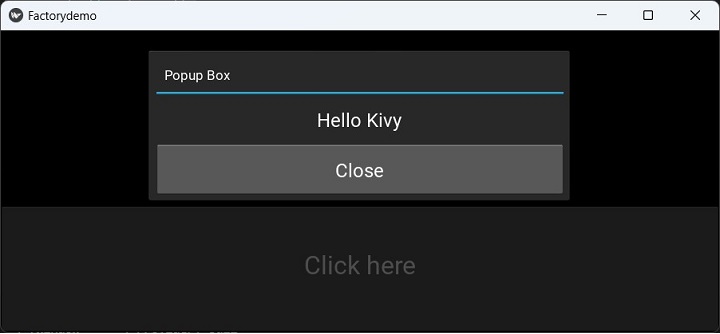
As you can see, the MyPopup class is registered in the Factory and its open() method is called when the button is clicked
Output
Run the program to display the window with the "Click here" button. On clicking it, the popup appears on the application window.