- Kivy - Home
- Kivy Basics
- Kivy - Getting Started
- Kivy - Installation
- Kivy - Architecture
- Kivy - File Syntax
- Kivy - Applications
- Kivy - Hello World
- Kivy - App Life Cycle
- Kivy - Events
- Kivy - Properties
- Kivy - Inputs
- Kivy - Behaviors
- Kivy Buttons
- Kivy - Buttons
- Kivy - Button Events
- Kivy - Button Colors
- Kivy - Button Size
- Kivy - Button Position
- Kivy - Round Buttons
- Kivy - Disabled Buttons
- Kivy - Image Button
- Kivy Widgets
- Kivy - Widgets
- Kivy - Label
- Kivy - Text Input
- Kivy - Canvas
- Kivy - Line
- Kivy - Checkbox
- Kivy - Dropdown List
- Kivy - Windows
- Kivy - ScrollView
- Kivy - Carousel
- Kivy - Slider
- Kivy - Images
- Kivy - Popup
- Kivy - Switch
- Kivy - Spinner
- Kivy - Splitter
- Kivy - Progress Bar
- Kivy - Bubble
- Kivy - Tabbed Panel
- Kivy - Scatter
- Kivy - Accordion
- Kivy - File Chooser
- Kivy - Color Picker
- Kivy - Code Input
- Kivy - Modal View
- Kivy - Toggle Button
- Kivy - Camera
- Kivy - Tree View
- Kivy - reStructuredText
- Kivy - Action Bar
- Kivy - Video Player
- Kivy - Stencil View
- Kivy - VKeyboard
- Kivy - Touch Ripple
- Kivy - Audio
- Kivy - Videos
- Kivy - Spelling
- Kivy - Effects
- Kivy - Input Recorder
- Kivy - OpenGL
- Kivy - Text
- Kivy - Text Markup
- Kivy - Settings
- Kivy Layouts
- Kivy - Layouts
- Kivy - Float Layout
- Kivy - Grid Layouts
- Kivy - Box Layouts
- Kivy - Stack Layout
- Kivy - Anchor Layout
- Kivy - Relative Layout
- Kivy - Page Layout
- Kivy - Recycle Layout
- Kivy - Layouts in Layouts
- Kivy Advanced Concepts
- Kivy - Configuration Object
- Kivy - Atlas
- Kivy - Data Loader
- Kivy - Cache Manager
- Kivy - Console
- Kivy - Animation
- Kivy - Multistroke
- Kivy - Clock
- Kivy - SVGs
- Kivy - UrlRequest
- Kivy - Clipboard
- Kivy - Factory
- Kivy - Gesture
- Kivy - Language
- Kivy - Graphics
- Kivy - Drawing
- Kivy - Packaging
- Kivy - Garden
- Kivy - Storage
- Kivy - Vector
- Kivy - Utils
- Kivy - Inspector
- Kivy - Tools
- Kivy - Logger
- Kivy - Framebuffer
- Kivy Applications and Projects
- Kivy - Drawing App
- Kivy - Calculator App
- Kivy - Stopwatch App
- Kivy - Camera Handling
- Kivy - Image Viewer
- Kivy - Bezier
- Kivy - Canvas Stress
- Kivy - Circle Drawing
- Kivy - Widget Animation
- Kivy - Miscellaneous
- Kivy Useful Resources
- Kivy - Quick Guide
- Kivy - Useful Resources
- Kivy - Discussion
Kivy - Button Position
Placing the widgets at their appropriate positions is the key to design an ergonomic user interface. In Kivy, the positioning of buttons (as also the other widgets) is largely controlled by the layouts used. In this chapter, we shall learn how to place a button at a certain position on a Kivy application window.
The first factor that decides the positioning is the layout. In Kivy, layouts are the containers used to arrange widgets in a particular manner. For example −
A BoxLyout places the widgets sequentially, either in vertical or horizontal order.
If you use GridLayout, the widget position is decided by the rows and cols properties.
A FloatLayout puts no restrictions on placement. You can put a button or any other widget at any position by assigning its absolute coordinates.
Window size
To place a button at a certain position, we first define the size of the application window. The "size" property of Window object helps you to set the desired size.
from kivy.core.window import Window
Window.size = (720,400)
Kivy's window coordinate system defines the position of widgets and touch events dispatched to them. It places (0, 0) at the bottom left corner of the window. Obviously, the top-right corner of the window corresponds to (1,1).
The Button class inherits "pos" and "pos_hint" properties from the Widget class. They help in determining the position of button on the window surface.
Position properties
pos − This property is a tuple of coordinate values "x" and "y" along the horizontal and vertical axis, measured from the bottom-left corner of the window. For example −
button = Button(text ='Hello world', pos =(20, 20))
pos_hint − This property provides a hint for the position of a widget. It allows you to set the position of the widget inside its parent layout. The property is a dictionary of upto 8 keys determining the position −
- x
- y
- left
- right
- top
- bottom
- center_x
- center_y
The keys 'x', 'right' and 'center_x' will use the parent width. The keys 'y', 'top' and 'center_y' will use the parent height. For example, if you want to set the top of the button to be at 10% height of its parent layout, you can write −
button = Button(text ='Hello world', pos_hint={'top': 0.1})
"pos_hint" is an ObjectProperty. is not used by all layouts.
Layouts supporting positioning
FloatLayout − Supports "pos_hint" properties. The values are numbers between 0 and 1 indicating a proportion to the window size.
RelativeLayout − The positioning properties (pos, x, center_x, right, y, center_y, and top) are relative to the Layout size and not the window size.
BoxLayout − only the "x" keys (x, center_x, and right) work in the vertical orientation and (y, center_y,top) in horizontal orientation. An same rule applies for the fixed positioning properties (pos, x, center_x, right, y, center_y, and top).
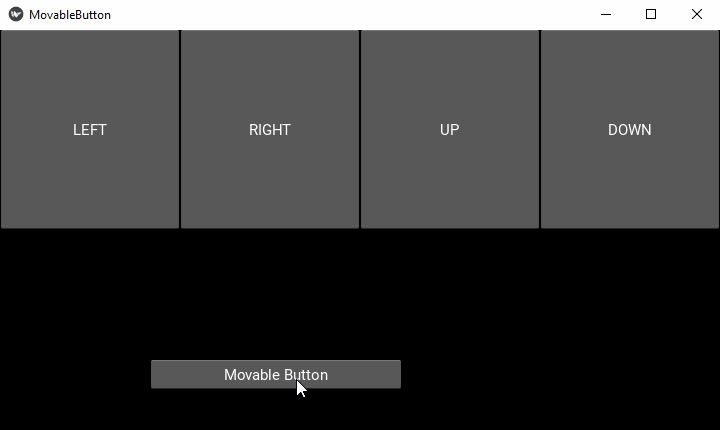
In the code below, we have placed a horizontal BoxLayout and a FloatLayout inside the upper vertical BoxLayout. The upper horizontal box houses four buttons: LEFT, RIGHT, TOP and BOTTOM. Inside the FloatLaout, we have a button placed with "pos" properties.
The App class has one method called movebtn() which identifies the caption of the button pressed and changes the "x" or "y" position of the button
def movebtn(self,instance):
   if instance.text =='RIGHT':
      self.btn.pos[0]=self.btn.pos[0]+10

   if instance.text == 'LEFT':
      self.btn.pos[0] = self.btn.pos[0]-10

   if instance.text == 'UP':
      self.btn.pos[1] = self.btn.pos[1]+10

   if instance.text == 'DOWN':
      self.btn.pos[1] = self.btn.pos[1]-10
The RIGHT and LEFT button press causes the "x" position to be incremented or devremented by 10 pixels. Similarly, TOP and BOTTOM buttons change the "y" value by 10.
Example 1
The complete code is given below −
from kivy.app import App
from kivy.uix.button import Button
from kivy.config import Config
from kivy.uix.floatlayout import FloatLayout
from kivy.uix.boxlayout import BoxLayout

Config.set('graphics', 'width', '720')
Config.set('graphics', 'height', '400')
Config.set('graphics', 'resizable', '1')

class MovableButtonApp(App):
   def movebtn(self,instance):
      if instance.text =='RIGHT':
         self.btn.pos[0]=self.btn.pos[0]+10

      if instance.text == 'LEFT':
         self.btn.pos[0] = self.btn.pos[0]-10

      if instance.text == 'UP':
         self.btn.pos[1] = self.btn.pos[1]+10

      if instance.text == 'DOWN':
         self.btn.pos[1] = self.btn.pos[1]-10

   def build(self):
      mblo = BoxLayout(orientation='vertical')
      blo = BoxLayout(orientation ='horizontal')
      b1 = Button(text='LEFT')
      b1.bind(on_press=self.movebtn)
      b2 = Button(text = 'RIGHT')
      b2.bind(on_press=self.movebtn)
      b3 = Button(text = 'UP')
      b3.bind(on_press=self.movebtn)
      b4 = Button(text = 'DOWN')
      b4.bind(on_press=self.movebtn)
      blo.add_widget(b1)
      blo.add_widget(b2)
      blo.add_widget(b3)
      blo.add_widget(b4)

      mblo.add_widget(blo)
      flo = FloatLayout()
      self.btn = Button(text='Movable Button', size_hint= (.350, .150))
      flo.add_widget(self.btn)
      mblo.add_widget(flo)
      return mblo
MovableButtonApp().run()
Output
When you run the program, you should see four buttons at the top, and a movable button at the left-bottom corner. Press the buttons and see the movable button changing its position.
Here is another example to demonstrate use of button positioning. Let us define a MovableButton class that extends Button class. We define on_touch_down(), on_touch_up() and on_touch_move() methods to process the touch events.
The on_touch_down() method checks if the touch event occurred within the button's bounds, handle the touch event by setting the widget as the current touch target.
def on_touch_down(self, touch):
   if self.collide_point(*touch.pos):
      touch.grab(self)
      return True
   return super().on_touch_down(touch)
If the touch event is being handled by our button, update its position by using the on_button_move() method −
def on_touch_move(self, touch):
   if touch.grab_current == self:
      self.pos = (self.pos[0] + touch.dx, self.pos[1] + touch.dy)
Finally, release the button as the current touch target and handle the touch event.
def on_touch_up(self, touch):
   if touch.grab_current == self:
      touch.ungrab(self)
      return True
   return super().on_touch_up(touch)
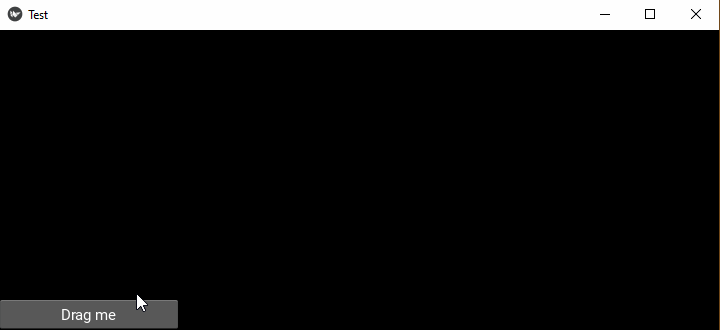
The build() method constructs the window with just a button at the left_bottom position
def build(self):
   return MovableButton(text='Drag me', size_hint= (.250, .100))
Example 2
The complete code is given below −
from kivy.app import App
from kivy.uix.button import Button
from kivy.config import Config
from kivy.uix.floatlayout import FloatLayout

Config.set('graphics', 'width', '720')
Config.set('graphics', 'height', '300')
Config.set('graphics', 'resizable', '1')

class MovableButton(Button):
   def on_touch_down(self, touch):
      if self.collide_point(*touch.pos):
         touch.grab(self)
         return True
      return super().on_touch_down(touch)

   def on_touch_move(self, touch):
      if touch.grab_current == self:
         self.pos = (self.pos[0] + touch.dx, self.pos[1] + touch.dy)

   # Override the on_touch_up method to update
   # the widget's position when the touch event ends
   def on_touch_up(self, touch):
      if touch.grab_current == self:
         touch.ungrab(self)
         return True
      return super().on_touch_up(touch)

class TestApp(App):
   def build(self):
      return MovableButton(text='Drag me', size_hint=(.250, .100))

if __name__ == "__main__":
   TestApp().run()
Output
Run the above code. Keep the mouse button pressed and drag the button anywhere across the window.