- Kivy - Home
- Kivy Basics
- Kivy - Getting Started
- Kivy - Installation
- Kivy - Architecture
- Kivy - File Syntax
- Kivy - Applications
- Kivy - Hello World
- Kivy - App Life Cycle
- Kivy - Events
- Kivy - Properties
- Kivy - Inputs
- Kivy - Behaviors
- Kivy Buttons
- Kivy - Buttons
- Kivy - Button Events
- Kivy - Button Colors
- Kivy - Button Size
- Kivy - Button Position
- Kivy - Round Buttons
- Kivy - Disabled Buttons
- Kivy - Image Button
- Kivy Widgets
- Kivy - Widgets
- Kivy - Label
- Kivy - Text Input
- Kivy - Canvas
- Kivy - Line
- Kivy - Checkbox
- Kivy - Dropdown List
- Kivy - Windows
- Kivy - ScrollView
- Kivy - Carousel
- Kivy - Slider
- Kivy - Images
- Kivy - Popup
- Kivy - Switch
- Kivy - Spinner
- Kivy - Splitter
- Kivy - Progress Bar
- Kivy - Bubble
- Kivy - Tabbed Panel
- Kivy - Scatter
- Kivy - Accordion
- Kivy - File Chooser
- Kivy - Color Picker
- Kivy - Code Input
- Kivy - Modal View
- Kivy - Toggle Button
- Kivy - Camera
- Kivy - Tree View
- Kivy - reStructuredText
- Kivy - Action Bar
- Kivy - Video Player
- Kivy - Stencil View
- Kivy - VKeyboard
- Kivy - Touch Ripple
- Kivy - Audio
- Kivy - Videos
- Kivy - Spelling
- Kivy - Effects
- Kivy - Input Recorder
- Kivy - OpenGL
- Kivy - Text
- Kivy - Text Markup
- Kivy - Settings
- Kivy Layouts
- Kivy - Layouts
- Kivy - Float Layout
- Kivy - Grid Layouts
- Kivy - Box Layouts
- Kivy - Stack Layout
- Kivy - Anchor Layout
- Kivy - Relative Layout
- Kivy - Page Layout
- Kivy - Recycle Layout
- Kivy - Layouts in Layouts
- Kivy Advanced Concepts
- Kivy - Configuration Object
- Kivy - Atlas
- Kivy - Data Loader
- Kivy - Cache Manager
- Kivy - Console
- Kivy - Animation
- Kivy - Multistroke
- Kivy - Clock
- Kivy - SVGs
- Kivy - UrlRequest
- Kivy - Clipboard
- Kivy - Factory
- Kivy - Gesture
- Kivy - Language
- Kivy - Graphics
- Kivy - Drawing
- Kivy - Packaging
- Kivy - Garden
- Kivy - Storage
- Kivy - Vector
- Kivy - Utils
- Kivy - Inspector
- Kivy - Tools
- Kivy - Logger
- Kivy - Framebuffer
- Kivy Applications and Projects
- Kivy - Drawing App
- Kivy - Calculator App
- Kivy - Stopwatch App
- Kivy - Camera Handling
- Kivy - Image Viewer
- Kivy - Bezier
- Kivy - Canvas Stress
- Kivy - Circle Drawing
- Kivy - Widget Animation
- Kivy - Miscellaneous
- Kivy Useful Resources
- Kivy - Quick Guide
- Kivy - Useful Resources
- Kivy - Discussion
Kivy - Circle Drawing
In this chapter, we shall dynamically draw a circle on a Kivy application window. The idea is to set the value of width, height, and the center point of circle with four Kivy slider widgets and refresh the size and the position on a box layout canvas.
The "kivy.graphics" module includes the Ellipse class. A circle is actually an ellipse with equal width and height.
Syntax
The syntax to draw an ellipse on the canvas of any widget is −
with widget.canvas:
   Color(1, 1, 1)
   Ellipse(
      pos=(w, h), size=(cx, cy),
      angle_start=0, angle_end=360
)
Sliders are to be used to select the values of "w", "h", "cx" and "cy". The intended appearance of our application window is as follows −
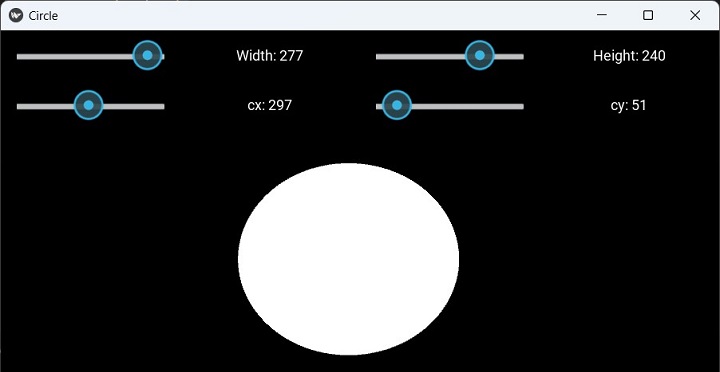
The main layout uses a vertical box layout. It includes two horizontal box, each housing two sliders and two labels. In the first, width and height selectors are placed; and in the second, X and Y coordinates of the ellipse can be selected. The top vertical box then adds a FloatLayout, whose canvas is the target for drawing.
The following "kv" file assembles the above widget structure.
Example
BoxLayout:
   orientation: 'vertical'
   BoxLayout:
      size_hint_y: None
      height: sp(50)
      BoxLayout:
         orientation: 'horizontal'
         Slider:
            id: wd
            min: 100
            max: 300
            value: 200
         Label:
            text: 'Width: {}'.format(int(wd.value))
         Slider:
            id: ht
            min: 100
            max: 300
            value: 200
         Label:
            text: 'Height: {}'.format(int(ht.value))
   BoxLayout:
      size_hint_y: None
      height: sp(50)
      BoxLayout:
         orientation: 'horizontal'
         Slider:
            id: cx
            min: 10
            max: 600
            value: 360
         Label:
            text: 'cx: {}'.format(int(cx.value))
         Slider:
            id: cy
            min: 10
            max: 300
            value: 50
         Label:
            text: 'cy: {}'.format(int(cy.value))

   FloatLayout:
      canvas:
         Color:
            rgb: 1, 1, 1
         Ellipse:
            pos: cx.value, cy.value
            size: wd.value, ht.value
            angle_start: 0
            angle_end: 360
All you need to do is load this "kv" file in our Kivy App code. Call the load_file() method of "kivy.lang.Builder" class inside the build() method.
from kivy.app import App
from kivy.lang import Builder
from kivy.core.window import Window

Window.size = (720,400)
class CircleApp(App):
   def build(self):
      return Builder.load_file('circledemo.kv')

CircleApp().run()
That's it. Run the program, and you will get the circle drawn at the starting position. Slide the controls for different values and see the circle changing its position and size.
If you wish to use pure Python code to compose the application window appearance, you can do so by manually placing the required widgets inside the build() method as follows −
def build(self):
   # main layout
   lo = BoxLayout(orientation='vertical', size=Window.size)

   # for width and height sliders
   sliders_wh = BoxLayout(size_hint_y=None, height=50)

   slb1 = BoxLayout(orientation='horizontal')
   self.sl1 = Slider(min=100, max=300, value=200)
   l1 = Label(text='Width: {}'.format(int(self.sl1.value)))
   slb1.add_widget(self.sl1)
   slb1.add_widget(l1)
   self.sl2 = Slider(min=100, max=300, value=200)
   l2 = Label(text='Height: {}'.format(int(self.sl2.value)))
   slb1.add_widget(self.sl2)
   slb1.add_widget(l2)
   sliders_wh.add_widget(slb1)

   # for cx and cy sliders
   sliders_xy = BoxLayout(size_hint_y=None, height=50)
   slb2 = BoxLayout(orientation='horizontal')
   self.sl3 = Slider(min=10, max=600, value=360)
   l3 = Label(text='cx: {}'.format(int(self.sl3.value)))
   slb2.add_widget(self.sl3)
   slb2.add_widget(l3)
   self.sl4 = Slider(min=10, max=300, value=50)
   l4 = Label(text='cy: {}'.format(int(self.sl4.value)))
   slb2.add_widget(self.sl4)
   slb2.add_widget(l4)
   sliders_xy.add_widget(slb2)

   lo.add_widget(sliders_wh)
   lo.add_widget(sliders_xy)

   self.flo = FloatLayout() # circle canvas

   lo.add_widget(self.flo)

   # redraw cicle
   self.ev = Clock.schedule_interval(self.callback, .3)
   return lo
However, to keep on refreshing the shape and position of circle on the canvas, we need to schedule a periodic event, clear the canvas to wipe out the existing circle and redraw it with instantaneous values of width, height, cx and cy.
The following callback method has to be added in the App class −
def callback(self, dt):
   self.flo.canvas.clear()
   with self.flo.canvas:
      Color(1, 1, 1)
      Ellipse(
         pos=(self.sl3.value, self.sl4.value),
         size=(self.sl1.value, self.sl2.value),
         angle_start=0, angle_end=360
      )
You can now run the code. Exactly the same result will be obtained as with the "kv" file version.
