IPython
- IPython - Introduction
- IPython - Installation
- IPython - Getting Started
- Running & Editing Python Script
- IPython - History Command
- IPython - System Commands
- IPython - Command Line Options
- Dynamic Object Introspection
- IPython - IO Caching
- Setting IPython as Default Python Environment
- Importing Python Shell Code
- IPython - Embedding IPython
- IPython - Magic Commands
Jupyter
- Project Jupyter - Overview
- Jupyter Notebook - Introduction
- Working With Jupyter Online
- Installation and Getting Started
- Jupyter Notebook - Dashboard
- Jupyter Notebook - User Interface
- Jupyter Notebook - Types of Cells
- Jupyter Notebook - Editing
- Jupyter Notebook - Markdown Cells
- Cell Magic Functions
- Jupyter Notebook - Plotting
- Converting Notebooks
- Jupyter Notebook - IPyWidgets
QtConsole
- QtConsole - Getting Started
- QtConsole - Multiline Editing
- QtConsole - Inline Graphics
- QtConsole - Save to Html
- QtConsole - Multiple Consoles
- Connecting to Jupyter Notebook
- Using github and nbviewer
JupyterLab
- JupyterLab - Overview
- Installation & Getting Started
- JupyterLab - Interface
- JupyterLab - Installing R Kernel
Jupyter Resources
Selected Reading
Connecting to Jupyter Notebook
There is a %qtconsole magic command available for use with Jupyter notebook. This invokes the QtConsole as a slave terminal to notebook frontend. As a result, data between notebook and Qtconsole terminal can be shared.
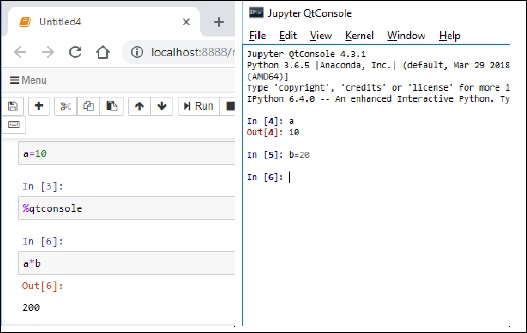
You can see that the variable in notebook is accessible within qtconsole window. Also, a new variable in Qtconsole is used back in notebook.
Observe that the input and output cells are numbered incrementally between the two.

Advertisements