- Astro JS Tutorial
- Astro JS - Home
- Astro JS - Overview
- Astro JS vs Next JS
- Astro JS vs React JS
- Astro JS Setup
- Astro JS - Installation
- Astro JS - Project Structure
- Astro JS - Pages
- Astro JS Architecture
- Astro JS - Islands
- Astro JS - Islands Architecture
- Astro JS Routing
- Astro JS - Routing
- Astro JS - Dynamic Routing
- Astro JS - Redirecting Routes
- Astro JS - i18n Routing
- Astro JS Configuration
- Astro JS - Configuration
- Astro JS - Editor Setup
- Astro JS - TypeScript Configuration
- Astro JS - Environment Variables
- Astro JS Build UI
- Astro JS - Components
- Astro JS - Slots
- Astro JS - Layouts
- Astro JS - Fonts
- Astro JS - Scripts
- Astro JS Create Website
- Astro JS - Markdown Contents
- Astro JS - Add Images
- Astro JS - Manage Content
- Astro JS - Content Collections
- Astro JS - Data Fetching
- Astro JS Styling and CSS
- Astro JS - Styling
- Astro JS - CSS Integration
- Astro JS - CSS Cascading Order
- Astro JS Integrations
- Astro JS - React Integrations
- Astro JS - Svelte Integrations
- Astro JS - Solid Integrations
- Astro JS - Vue Integrations
- Astro JS Adapters
- Astro JS - Netlify Adapter
- Astro JS - Cloudflare Adapter
- Astro JS Testing and Deployment
- Astro JS - Testing
- Astro JS - Deployment
- Astro JS Advanced Topics
- Astro JS - State Management
- Astro JS - Prefetching
- Astro JS - Middleware
- Astro JS - Endpoints
- Astro JS - Authentication
- Astro JS - Bun Environment
- Astro JS - Docker
- Astro JS - View Transition
- Astro JS - Transition Directives
- Astro JS - Astro DB
- Astro JS - Bundling
- Astro JS Useful Resources
- Astro JS - Interview Questions
- Astro JS - Cheatsheet
Astro JS - Interview Questions and Answers
In this article, we have made a list of Astro interview questions that will help you prepare for your next Astro job interview. These questions cover basic, medium, and advanced topics related to Astro development.
Interview Questions and Answers on Astro Framework
This list of Astro interview questions will cover all the important topics related to Astro development. These questions are suitable for both freshers and experienced developers who are preparing for a Astro job interview. If you are a fresher, you can start covering basic questions first and then move on to medium and advanced questions. If you know something about Astro or have some experience, you can start with medium or advanced questions.
Astro Basic Interview Questions
These questions are designed to test your basic knowledge of Astro. These questions are suitable for freshers and beginners who are just starting with Astro development.
1. What is Astro and how is it different from React?
Astro is open source JavaScript based web framework for building content-rich websites like blogs, documentation, portfolios, and more. Astro is known as the ultimate web framework, because of it's island based architecture to reduce the JavaScript load at client side of websites. By default, it ships zero JavaScript to the client-side, which makes the website load faster.
React on the other hand, is a JavaScript library for building user interfaces. It is developed by Facebook for creating beautiful and interactive user interfaces that are compatible with web browsers and mobile devices. React is more popular and widely used in the industry than Astro.
2. What are advantages of using Astro over other web frameworks?
Astro has several advantages over other web frameworks like React, Vue, and Angular. Some of the advantages include:
- Ships Zero JS − By default, Astro uses no JavaScript at client-side, which makes the website load faster.
- Server-First Design: Astro is programmed to move expensive rendering to the server. This makes user device run faster.
- Node Ecosystem − Astro uses Node.js ecosystem, just like other frameworks. This make easy to develop and configure.
- Island Architecture − Astro uses an island based architecture to reduce the JavaScript load of websites.
- Multi-Framework Integration − Astro supports integration with multiple frameworks like React, Preact, Svelte, Vue, Solid, HTMX, web components, and more.
3. What are the limitations of using Astro?
Astro is still in development, and hence there are some limitations to using Astro. Some of the limitations include:
- No Single Page App − Astro is not a single page application (SPA) framework. Astro is a static site generator, which means it generates static HTML files.
- No SRR by Default − Astro does not support server-side rendering by default. It supports SSR by using adapters.
- No middleware − Astro does not support middleware component as there in Next.js.
- Not Recommended for full-stack websites − Astro is not recommended for full-stack websites. Astro is designed for content-rich websites.
4. Mention some key features of Astro?
Some of the key features of Astro are:
- Island Architecture − Astro uses an island based architecture to reduce the JavaScript load of websites. The majority of pages are loaded with static HTML with smaller “islands” of JavaScript that are lazily loaded when the user scrolls to them.
- Multi-Framework Integration − Astro supports integration with multiple frameworks like React, Preact, Svelte, Vue, Solid, HTMX, web components, and more.
- Zero JS − By default, Astro uses no JavaScript at client-side, which makes the website faster.
- Server-First Design − Astro is programmed to move expensive rendering to the server. This makes user device run faster.
- Markdown Support − Astro supports markdown files, which makes it easy to create content-rich websites.
5. How to setup a new Astro project?
Astro runs on Node.js server, so to setup a Astro project, first you need to install Node.js (version v18.17.1 or newer) on your system. To create an astro application, open your terminal/powershell in the folder where you want to build the app. Then run the following command (same for mac/linux/windows).
>> npm create astro@latest
After running this, you will be prompted to give a name for your project. Enter a suitable name, and then you will be asked to install the dependencies. After the installation is complete, you can run the project by running the following command in the terminal/powershell.
>> npm run dev
After running this, you will be able to see the project running on your browser. You can access the project by visiting http://localhost:3000 in your browser.
6. Explain Astro's project structure?
Astro uses a flat file structure for project organization similar to other frameworks. The main difference is that Astro uses `src` folder instead of `pages` folder and .astro file extension instead of .jsx file extension. Following is the project structure of a typical Astro project.
astro-project
     /public/
        robots.txt
        favicon.svg
     /src/
        /blog/
           post1.md
        /components/
           Button.jsx
        /images/
        /layouts/
           PostLayout.astro
        /pages/
           /posts/
              index.astro
        /styles/
    |
     astro.config.mjs
     package.json
     tsconfig.json
7. Explain the directories and files in the src folder?
The src/ folder is where you should store all of your source code. Astro processes, optimizes, and bundles files in `src/` to create the final website that is shipped to the browser. Some files like astro components are not even sent to browser, they are used at build time to generate the static HTML files. Some other files like CSS, are sent to browser after optimizing and bundling with other files. The `src/` folder stores following folders and files.
- pages/* - Stores pages responsible for routing and data loading etc.
- layouts/* - Stores layout, which are the reusable UI structure.
- components/* - Stores astro components.
- images/* - Folder to store images.
- styles/* - Folder to store CSS files.
- markdown files - Markdown file can be stored at any location inside src folder with .md extension.
8. What is the purpose of the public folder?
The public/ directory is used to store files and assets in your project that do not need to be processed during Astro's build process. The files in this folder will be copied into the build folder untouched, and then your site will be built. This mechanism allows you to store common assets that do not require any processing, like some images and fonts, or special files such as robots.txt and manifest.webmanifest. You can also place CSS and JavaScript files here, but that will not be bundled and optimized by Astro.
9. What is the Astro configuration file?
The astro configuration file or 'astro.config.mjs' file is used to configure your Astro project. It allows you to set options such as the output directory, the public directory, and the dev server settings. You can also use this file to define custom commands and scripts for your project. For example, the configuration file below defines i18n routes for the project.
// File: astro.config.mjs

import { defineConfig } from "astro/config"
export default defineConfig({
  i18n: {
    locales: ["es", "en", "pt-br"],
    defaultLocale: "en",
  }
})
10. Compare the architecture of Astro and Next.js
Astro and Next.js are both static site generators, but they have different architecture. Astro is a framework that uses a flat file structure for project organization, while Next.js uses a directory structure.
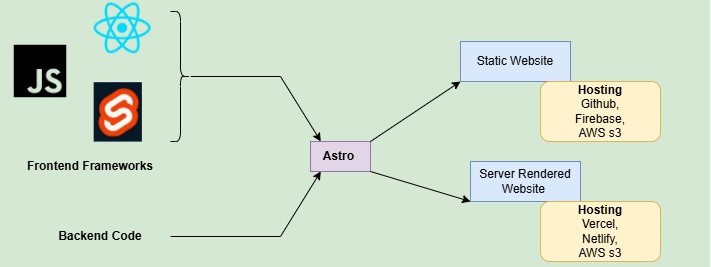
The flowchart shows the working of Astro framework. Astro supports any frontend framework for UI code, which then combined with backend code to generate full stack website. The static websites can be hosted on platforms like GitHub, Firebase, and AWS S3, while server-rendered websites are commonly hosted on Vercel, Netlify, or AWS S3.
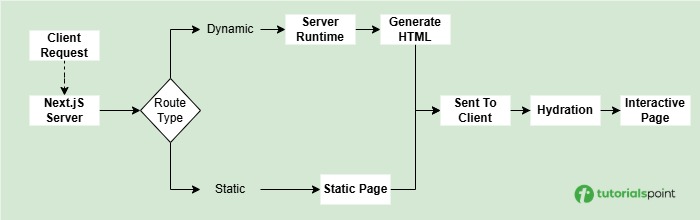
The flowchart above, shows the working of Next.js framework. As Next.js is a full-stack framework, it have deal with both frontend and backend code. For static routes, HTML is generated at build time itself, while for dynamic routes, Next.js uses server-side rendering to generate HTML at request time. Then, the HTML is sent to the client, where javascript hydrates the page.
11. What is Astro dev toolbar? How to disable it?
Astro dev toolbar is a special menu available in Astro development mode. When the development server is running, Astro will display the development toolbar at the bottom of every page in your local browser preview. This toolbar contains useful tools for debugging and inspecting your site during development. It is enabled by default and will appear when you hover over the bottom of the page.
To disable the dev toolbar, you can set the devToolbar.enabled option to false in your astro.config.mjs file. This will prevent the toolbar from appearing in your local browser preview.
// File: astro.config.mjs

import { defineConfig } from "astro/config"
export default defineConfig({
  devToolbar: {
    enabled: false,
  }
})
12. What are pages in Astro?
In Astro JS, pages are the building blocks of your application. The pages are markdown or HTML files that define the content and layout of your application. This Pages will be rendered as static HTML files and can be accessed directly by users without using any client side JavaScript. This makes pages lightweight and fast to load. All the pages in Astro JS are defined in the 'src/pages' directory. Astro JS supports the following file types for pages:
- Markdown files (.md or .mdx)
- HTML files (.html)
- Astro components (.astro)
- Endpoints (.js or .ts)
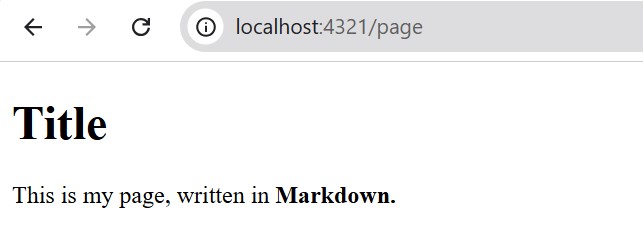
13. How to create markdown pages in Astro?
To create a markdown page in Astro, you can create a new markdown file with the .md extension in the src/pages directory. For example, to create a markdown page called 'about.md', you can create a new file called 'about.md' in the 'src/pages' directory. Astro will automatically render the markdown file as a page.
---
    title: 'My Markdown page'
---
# Title

This is my page, written in **Markdown.**
14. What are endpoints in Astro?
Endpoints are special files in Astro that are used to define server-side APIs at client side. Any .ts or .js file in the src/pages directory is considered an endpoint. Endpoints can be used to fetch data from a database, perform calculations, setup authentication, or generate dynamic content.
15. How to create an endpoint in Astro?
Follow the steps below to create an endpoint in Astro:
- Create a API File: First, open your Astro project and navigate to the src/pages directory. Create a new file with the .ts or .js extension. For example, create a file named hello.ts.
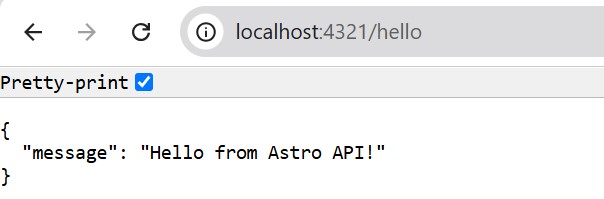
- Define Endpoint Function: In the file created in the previous step, define a simple javascript function that returns a JSON object. For example, the following code defines an endpoint function that returns a JSON object with a message property.
  // File: src/pages/hello.ts

  export async function GET() {
      return new Response(JSON.stringify(
          { message: "Hello from Astro API!" }),
          {headers: { "Content-Type": "application/json" }
      });
}
Access the Endpoint: Now, your endpoint is ready. You can access it by navigating to the URL http://localhost:4321/hello.
Astro Medium Level Interview Questions
These questions are designed to test your medium-level knowledge of Astro. These questions are suitable for those who have some experience with Astro but need to brush up on their knowledge.
16. What is custom 404 error page? How to create it?
Custom 404 error page is a special page that is displayed when a user tries to access a page that does not exist. In astro, you can define a custom 404 error page using the src/pages/404.astro file. Here is an example of a custom 404 error page. This page will be displayed when a user tries to access a page that does not exist.
  <!-- File: src/pages/404.astro -->

  <html lang="en">
      <head>
          <title>404: Page Not Found</title>
      </head>
      <body>
          <main>
              <h1>404</h1>
              <p>Page Not Found</p>
              <a href="/">Go back home</a>
          </main>
      </body>
  </html>

17. What is an Astro Island?
The astro islands are enhanced interactive UI component inside a static HTML page that can be hydrated on demand at client-side. The island reduces the JavaScript load at client-side and improves loading speed. Island in astro can be of two types, client island or server island. A client island is an interactive JavaScript UI component that is hydrated separately from the rest of the page, while a server island is a UI component that server-renders its dynamic content separately from the rest of the page.
18. How to create an Astro Island?
In the section below, we will create a simple Astro island using React js.
Step 1: Create a React Component: The code below, create a counter React component at 'src/' directory. The component will have a button that will increase the count by 1. This counter component will in an island of Astro page.
// File: src/components/Counter.jsx

import { useState } from "react";

export default function Counter() {
    const [count, setCount] = useState(0);

    return (
      <button onClick={() => setCount(count + 1)}>
          Count: {count}
      </button>
    );
}
Step 2: Use the Component in Astro Page: The code below defines an Astro page at 'src/pages/index.astro'. The page imports the Counter component and renders it in the page. The Counter component loads JavaScript only when needed using the 'client:load' directive.
<!-- File: src/pages/index.astro -->

---
    import Welcome from '../components/Welcome.astro';
    import Layout from '../layouts/Layout.astro';
    import Counter from "../components/Counter.jsx";
---

<Layout>
    <Welcome />
    <h1>Welcome to Astro</h1>
    <p>This content is static.</p>

    <!-- Interactive Island -->
    <Counter client:visible />
</Layout>
Step 3: Output: In the output image below, you can see that we successfully setup the island in Astro page. The island component will be loaded when user scrolls to it. We verified this by visiting browser dev tools.
19. How routing works in Astro?
Routing is a technique used in web applications to easily navigate between different directories of an application. Astro uses a custom routing system that is similar to Next.js. In Astro, the routing system is based on file structure of project, which means the structure of 'src/pages/' directory will define URLs of components in the application. For example, if you have a file 'src/pages/about.astro' in your project, then the URL for this component will be '/about'. Similarly,
src/pages/index.astro        -> localhost:4321/
src/pages/about.astro        -> localhost:4321/about
src/pages/about/index.astro  -> localhost:4321/about
src/pages/about/me.astro     -> localhost:4321/about/me
src/pages/posts/1.md         -> localhost:4321/posts/1
20. What are the types of routing in Astro?
Astro supports two types of routing:
1. Static Routing: Static routing is a file based routing system, where each routing file have a fixed URL. The structure and naming of the file will determine the URL of the component and it will same for every user that visits the application. In astro, the '.astro', '.md' and '.html' files inside 'src/pages/' directory will be treated as static routing files. This will automatically become page of your website. Learn more about static routing in the Routing chapter.
2. Dynamic Routing: In dynamic routing, the URL of the component is determined from the parameters defined in filename. The filename is a pattern that matches the URL of the component. To learn more about dynamic routing, see the Dynamic Routing chapter.
21. How to define dynamic routing in Astro?
This code define a simple dynamic routing page using getStaticPaths() function.
<!-- File: src/pages/cars/[car].astro -->

---
    export function getStaticPaths() {
    return [
        {params: {car: 'ferrari'}},
        {params: {car: 'lambo'}},
        {params: {car: 'bugatti'}},
    ];
    }

    const { car } = Astro.params;
---
<div>Your car is {car}!</div>
The output is shown below GIF.
22. How to navigate between pages in Astro?
Astro uses standard HTML <a> tag to navigate between pages. There no any dedicated <Link> component supported in Astro JS as there in Next JS. See the example below.
<!-- File: src/pages/about.astro -->

<!DOCTYPE html>
<html lang="en">
    <head>
        <title>About Page</title>
    </head>
    <body>
        <h1>About Us</h1>
        <h2>Welcome to Our Story</h2>
        <a href="/">Go back home</a>
    </body>
</html>
23. How to define route redirecting in Astro?
In Astro, you can specify the rules for redirects in the 'astro.config.mjs' file. The 'redirects' property in the config file is an array of objects that define the redirect rules. Each object in the array has the following properties:
- source: The source URL pattern to match. This can be a string or a regular expression.
- destination: The destination URL to redirect to. This can be a string or a function that returns a string.
In the code below, we define a redirect rule for the '/old-page' URL to the '/new-page' URL.
// File: /astro.config.mjs

import { defineConfig } from 'astro/config';

export default defineConfig({
  redirects: {
    '/old-page': '/new-page',
    '/blog': 'https://example.com/blog'
  }
});
24. What is internationalization routing?
Internationalization is a routing features in Astro, that allows to built multi language websites by managing contents and routes based on user's language preference. By setting up internationalization, the Astro application will automatically handles routing for different locales. For example, if the user support English (en) and Spanish (es), then the routes might look like /en/about and /es/about. Learn how to create internationalization routes.
25. What are astro components? Show Example
Astro components are the building blocks of an Astro application. They are similar to React components, but with a few key differences. They are HTML-only templating components with no client-side runtime and use the .astro file extension. An astro component is made of two parts, component script and component template. The component script is written in frontmatter of the component file, and the component template is written in the body of the component file. The file will be stored with .astro extension.
Here is an example of an Astro component that displays a header with a title and a navigation menu.
<!-- File: /src/pages/header.astro -->

---
const title = "Header Component";
---
<header>
    <h1>{title}</h1>
    <nav>
        <ul>
            <li><a href="/">Home</a></li>
            <li><a href="/about">About</a></li>
            <li><a href="/contact">Contact</a></li>
        </ul>
    </nav>
26. Explain component scripts and component templates in Astro
The component scripts are JavaScript code enclosed inside the component script fence (---) in the Astro component. The component scripts are used to define the behavior of the Astro component. The component templates are the HTML code outside the component script fence (---) in the Astro component. The component templates are used to define the structure of the Astro component. The component scripts and component templates are combined to create the final Astro component.
27. What is the component props?
Component props are the properties that are passed to the Astro component from the parent component. The props are used to pass data and configuration options to the Astro component. The props are defined in the component script and can be accessed in the component template using the {props} syntax.
---
// Usage: <GreetingHeadline greeting="Howdy" name="Partner" />
const { greeting, name } = Astro.props;
---

<h2>{greeting}, {name}!</h2>
This component, when imported and rendered in other Astro components, layouts or pages, can pass these props as attributes:
---
import GreetingHeadline from './GreetingHeadline.astro';
const name = 'Tutorialspoint';
---
<h1>Greeting Card</h1>
<GreetingHeadline greeting="Hi" name={name} />
<p>I hope you have a wonderful day!</p>
28. What are slots? How it is used in Astro?
Slots are a way to define placeholders in Astro components, where the parent component can pass content to be rendered inside the child component. When you create a new component in astro, you can define areas where content should be inserted using the <slot /> element. Now, when you use the component in any other part of your project, you can fill those slots with whatever content you want.
In the code below, we have created a simple card component with three slots: header, main, and footer. The slots are defined using the <slot /> element.
<!-- src/components/Card.astro -->

<div class="card">
    <header>
        <slot name="header">Default header content</slot>
    </header>
    <main>
        <slot>Default content goes here</slot>
    </main>
    <footer>
        <slot name="footer">Default footer content</slot>
    </footer>
</div>
Now, we will import and use the component in the index page, then we will fill the slots with custom content.
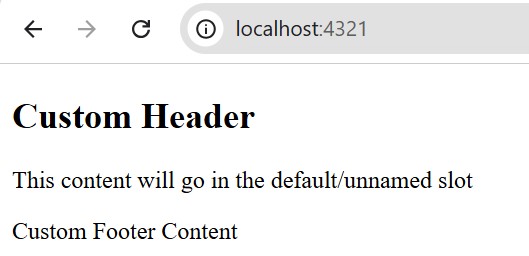
<!-- src/pages/index.astro -->
---
import Card from '../components/Card.astro';
---

<Card>
  <h2 slot="header">Custom Header</h2>

  <p>This content will go in the default/unnamed slot</p>

  <p slot="footer">Custom Footer Content</p>
</Card>
In the output, you can see that even though we imported card to index page, all the contents inside card is replaced with contents of slot.
29. What are the types of slots in Astro?
Astro slots are of two types:
- Named Slots: Named slots are used when you want to insert content into a specific slot. You can define a slot with a name attribute and then fill it with content using the slot attribute.
- Unnamed Slots: Unnamed slots are used when you want to insert content into the default slot. You can define a slot without a name attribute and then fill it with content without using the slot attribute.
30. How to use layout component in Astro?
Layout components are special components that are used to define the structure of your application. The term 'layout' in Astro refer to the Astro components that provide common UI elements shared across pages, such as headers, navigation bars, and footers. The layout components in Astro provides Markdown pages with a page shell to specify where individual page content should be added. Layout components are defined in the 'src/layouts' directory.
To use layout component, first, we need to create a basic layout component. The layout component will contain the basic structure of the page, such as <html>, <head>, <body>, and a navigation bar.
// src/layouts/Layout.astro

---
const { title } = Astro.props;
---
<html lang="en">
    <head>
        <h1 title={title}/>
    </head>
    <body>
        <nav>
        <a href="#">Home</a>
        <a href="#">Posts</a>
        <a href="#">Contact</a>
        </nav>
        <h1>{title}</h1>
        <article>
        <slot /> <!-- your content is injected here -->
        </article>
    </body>
</html>
Now, we have to import and use the layout component in the index page of our Astro project.
// src/pages/index.astro

---
import MySiteLayout from '../layouts/Layout.astro';
---
<MySiteLayout title="Home Page">
  <p>My page content, wrapped in a layout!</p>
</MySiteLayout>
Astro Advanced Interview Questions
These questions are designed to test your advanced knowledge of Astro. These questions are suitable for those who have a deep understanding of Astro and its features.
31. How to use local fonts in Astro?
To use custom fonts in astro, you can add the font files in the project directory and import them in the Astro component. Follow the steps below to add local fonts in Astro:
- Add Font Files: Add font files in your public/font directory of project. For example, public/fonts/american-scribe.woff
- Import the Font: Import the font in your global CSS file using the @font-face rule.
@font-face {
    font-family: 'American Scribe';
    src: url('/fonts/american-scribe.woff') format('woff');
}
Use Font in Astro Component: To use the font in your project, you can apply the font-family property to the element. The 'sans-serif' is the fallback font if the custom font is not available.
body {
    font-family: 'American Scribe', sans-serif;
}
32. What is fontsource? How to use it in Astro?
The fontsource is a package that simplifies using Google Fonts and other open-source fonts in your project. It will provide npm modules you can install for the fonts you want to use. You can install the fontsource package for Roboto using the following command:
npm install @fontsource/roboto
Import the font package in the component where you want to use the font. Usually, you will want to do this in a common layout component to make sure the font is available across your site. The import will automatically add the necessary @font-face rules needed to set up the font.
---
import '@fontsource/roboto';
---

<style>
body {
   font-family: 'Roboto', sans-serif;
}
</style>
33. How styling is done in Astro? Show Example
Astro framework has built-in support for CSS for applying styles to the components. You can use internal CSS, external CSS, and global styles in Astro. Also, Astro supports integration of tailwind css, or any other CSS pre preprocessors.
The code below shows a simple example of how to use internal CSS to style an Astro component.
/ src/pages/index.astro
---
---
<!DOCTYPE html>
<html lang="en">
<head>
    <title>Home Page</title>
    <style>
    body {
        font-family: Arial, sans-serif;
        display: flex;
        justify-content: center;
        align-items: center;
        background-color: #f0f0f0;
    }
    .container {
        text-align: center;
        background: white;
        border-radius: 8px;
    }
    </style>
</head>
<body>
    <div class="container">
    <h1>Welcome to Astro</h1>
    <p>This is a simple home page.</p>
    </div>
</body>
</html>
34. What is scoped styles in Astro?
The scoped styles refer to the styles that are applied to a specific component only. In Astro, you can use the scoped attribute to apply styles to a specific component. The CSS that you write inside of an Astro component is automatically encapsulated inside of that component.
The following example shows how scoped styles work in Astro.
<!-- Style Written Inside Component -->
<style>
    h1 {
        color: red;
    }

    .text {
        color: blue;
    }
</style>

<!-- Style Compiled to the Component -->
<style>
    h1[data-astro-cid-hhnqfkh6] {
        color: red;
    }

    .text[data-astro-cid-hhnqfkh6] {
        color: blue;
    }
</style>
35. How to apply inline styles in Astro?
Inline styles are styles that are applied directly to an element using the style attribute. Let's see an example.
The following example shows how to use inline styles in Astro.
---
---
<!DOCTYPE html>
<html lang="en">
<head>
    <title>Home Page</title>
</head>
<body>
    <div>
        <h1 style={{ fontSize: "2rem" }}>
            Astro Inline Style
        </h1>
        <p style={{ color: "brown", textDecoration: "underline" }}>
            This is paragraph 1
        </p>
        <p style="color: brown; text-decoration: underline;">
            This is paragraph 2
        </p>
    </div>
</body>
</html>
36. How CSS cascading rules are evaluated in Astro?
Cascading order is a set of rules to evaluate multiple sources of CSS. For example, if you import multiple CSS files or use inline styles, the cascading order determines which styles will be applied to the elements. When conflicting CSS rules apply to the same element, browsers first use specificity and then order of appearance to determine which value to show. Learn what is CSS Specificity.
In Astro, CSS rules are evaluated in this order of appearance:
- CSS of <link> tags (lowest precedence)
- The imported styles
- The scoped styles using <style> tag (highest precedence)
The Astro's cascading preference does not works over CSS specificity. That is, using scoped styles does not increase the specificity of your CSS, but they will take precedence over other styles of the same specificity.
37. How to integrate Tailwind CSS in Astro?
Astro uses vite plugin to support Tailwind CSS. You can use Tailwind CSS in Astro by installing the plugin. The following steps show how to integrate Tailwind CSS in Astro:
Install Tailwind CSS: First, you need to install Tailwind CSS in your Astro project. You can install Tailwind CSS using the following command:
>> npx astro add tailwind
Import Tailwind CSS: After installing Tailwind CSS, you need to import it in your Astro project. You can import Tailwind CSS in your Astro project using the following command:
// src/styles/global.css

@tailwind base;
Use Tailwind CSS: After importing Tailwind CSS, you can use it in your Astro project. You can use Tailwind CSS classes in your Astro project as shown below:
// src/pages/index.astro

---
import "../styles/global.css";
---
<style>
    .container {
        @apply bg-blue-500 text-white p-4;
    }
</style>
38. How to integrate Sass in Astro?
To use Sass in Astro, you need to install the Sass plugin. Run the following command to install the Sass plugin in Astro:
>> npm install sass
Now, to use SASS keep "scss" as valve for lang attribute in <style> tag. Let's see an example.
// src/pages/index.astro

<style lang="scss">
    $color: blue;
    .container {
        background-color: $color;
    }
</style>
39. How to integrate Stylus in Astro?
To use Stylus in Astro, you need to install the Stylus plugin. Run the following command to install the Stylus plugin in Astro:
>> npm install stylus
Now, to use Stylus keep "stylus" as valve for lang attribute in <style> tag. Let's see an example.
// src/pages/index.astro

<style lang="stylus">
    $color = blue;
    .container {
        background-color: $color;
    }
</style>
40. What is prefetching in Astro? How to enable prefetching?
The prefetching is a performance optimization technique, that loads new routes, page assets, and other media in the background before the user clicks on a link. This technique can help to reduce the loading time of the next page and provide a better user experience.
To enable prefetching in Astro, you need to set the prefetch option to true in the astro.config.mjs file. Here is an example of how to enable prefetching in Astro:
// File: astro.config.mjs

import { defineConfig } from 'astro/config';

export default defineConfig({
    prefetch: true
});
41. What are prefetch strategies in Astro?
Astro supports 4 prefetch strategies for various use cases:
- hover (default): Prefetch when you hover over or focus on the link.
- tap: Prefetch just before you click on the link.
- viewport: Prefetch as the links enter the viewport.
- load: Prefetch all links on the page after the page is loaded.
42. What is middleware? How to create a authentication middleware?
Middleware is mechanism that allows you to intercept and process incoming HTTP requests before they reach your page or API route. The middleware is typically defined in src/middleware.ts or src/middleware.js files. The JavaScript function defined in the middleware file will receive a context object and can modify it or return a new context object. The functions defined in middleware can be used to modify the request, add headers, handle authentication, logging, and perform other tasks before passing control to the final handler.
To create a authentication middleware, you need to define a middleware function that checks if the user is authorized to access the requested resource in a web application. If the user is not authorized, the middleware function can return a 401 Unauthorized response. Here is an example of how to create a middleware function:
// src/middleware.ts

import type { MiddlewareHandler } from 'astro';

const authMiddleware: MiddlewareHandler = async (context, next) => {
    const user = context.request.headers.get('Authorization');

    if (!user) {
        return new Response('Unauthorized', { status: 401 });
    }
    return next(); // Allow request if authorized
};

export default authMiddleware;
43. What is view transition?
View Transition is a feature in astro, that updates the page content without the browser’s normal, full-page navigation refresh. It provide a seamless animations between pages, making a better user experience. Astro uses browser's view transition API enable transition between pages in website.
- Provide builtin animations such as, fade, slide, between page loads
- Support for both forwards and backwards navigation animations.
- The animations are fully customizable.
- An option to setup fallback behavior for browsers that do not support the view transition API.
- Automatic support for prefers-reduced-motion.
44. What is Astro DB?
Astro DB is a fully managed SQL database designed and integrated into the Astro ecosystem. Astro DB automatically handles database schema definitions and migrations, which reduces manual work and speeds up the development process. Astro DB is built on top of SQLite, a lightweight and fast SQL database engine. Developers can work with a local SQLite database during development, which can be easily connected to a hosted SQL database in production.
Astro DB offers several features, such as:
- Automated Schema Management: Astro DB handles database schema definitions and migrations automatically, reducing manual intervention and potential error
- Integration with Astro: Astro DB is built to work effortlessly within the Astro ecosystem. It provide a unified development experience
- Local and Hosted Development: Developers can work with a local SQLite database during development, which can be seamlessly connected to a hosted SQL database in production
45. What are astro testing frameworks?
Testing frameworks allow you to specify expectations about how your code should behave in a particular situation, and then compare these to the actual behavior of your current code. If the actual behavior does not match the expected behavior, the test fails. Common testing frameworks are:
- Jest: A JavaScript testing framework that works with React and other JavaScript libraries. It is widely used for unit and integration testing.
- Mocha: A flexible JavaScript test framework for Node.js and the browser. It is often used with assertion libraries like Chai.
- Cypress: A end-to-end testing framework that can be used to write tests in JavaScript.
- Playwright: A Node.js library to automate Chromium, Firefox, and WebKit with a single API.
