- Astro JS Tutorial
- Astro JS - Home
- Astro JS - Overview
- Astro JS vs Next JS
- Astro JS vs React JS
- Astro JS Setup
- Astro JS - Installation
- Astro JS - Project Structure
- Astro JS - Pages
- Astro JS Architecture
- Astro JS - Islands
- Astro JS - Islands Architecture
- Astro JS Routing
- Astro JS - Routing
- Astro JS - Dynamic Routing
- Astro JS - Redirecting Routes
- Astro JS - i18n Routing
- Astro JS Configuration
- Astro JS - Configuration
- Astro JS - Editor Setup
- Astro JS - TypeScript Configuration
- Astro JS - Environment Variables
- Astro JS Build UI
- Astro JS - Components
- Astro JS - Slots
- Astro JS - Layouts
- Astro JS - Fonts
- Astro JS - Scripts
- Astro JS Create Website
- Astro JS - Markdown Contents
- Astro JS - Add Images
- Astro JS - Manage Content
- Astro JS - Content Collections
- Astro JS - Data Fetching
- Astro JS Styling and CSS
- Astro JS - Styling
- Astro JS - CSS Integration
- Astro JS - CSS Cascading Order
- Astro JS Integrations
- Astro JS - React Integrations
- Astro JS - Svelte Integrations
- Astro JS - Solid Integrations
- Astro JS - Vue Integrations
- Astro JS Adapters
- Astro JS - Netlify Adapter
- Astro JS - Cloudflare Adapter
- Astro JS Testing and Deployment
- Astro JS - Testing
- Astro JS - Deployment
- Astro JS Advanced Topics
- Astro JS - State Management
- Astro JS - Prefetching
- Astro JS - Middleware
- Astro JS - Endpoints
- Astro JS - Authentication
- Astro JS - Bun Environment
- Astro JS - Docker
- Astro JS - View Transition
- Astro JS - Transition Directives
- Astro JS - Astro DB
- Astro JS - Bundling
- Astro JS Useful Resources
- Astro JS - Interview Questions
- Astro JS - Cheatsheet
Astro JS - Installation and Setup
In this chapter, we will learn how to install, setup and run Astro project in local environment.
Prerequisites
Before you start, make sure you have the following installed on your system.
- Node.js (version v18.17.1 or newer)
- The VScode text editor with Astro Extension
- Learn basics of React JS and Next JS
Install From CLI Wizard
After setting up Node.js, the Astro will be available to access from the command line. The section below will guide you through the astro project setup.
Step 1: Create a New Project
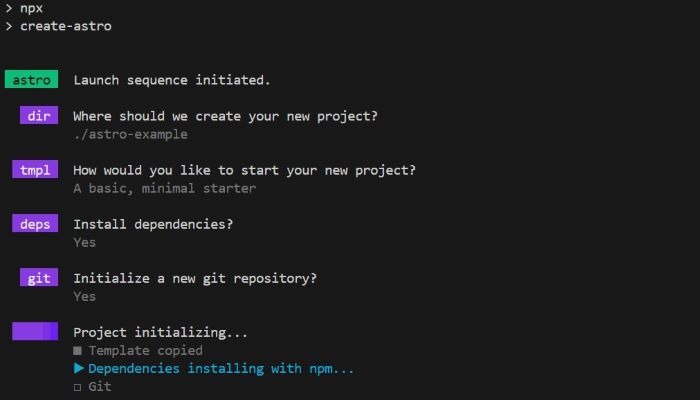
Open your terminal or command prompt and navigate to the directory where you want to create your Astro project. Run the following command to create a new Astro project:
>> npm create astro@latest
This command will create a new Astro project in the current directory. You will be prompted to enter a name for your project. Enter a suitable name, and then you will be asked to install the dependencies. See the screenshot below.
Step 2: Install Dependencies
If you have skipped installation of dependencies in the previous step, you can manually install them by running the following command in the terminal/powershell.
// Move to the project directory
>> cd astro-example

// Install dependencies
>> npm install
Step 3: Run the Project
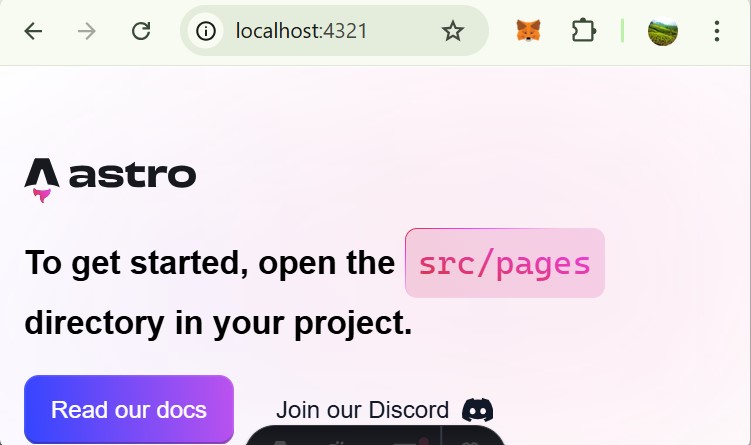
After the installation is complete, you can run the project in development mode by running the following command in the terminal/powershell.
>> npm run dev
After running this, you will be able to see output on your browser. You can access the project by visiting http://localhost:4321 in your browser.
Work in Dev Mode
The Astro project is set up and ready to go. You can start working on your project in dev mode. Astro will listen for live file changes in your src/ directory and update your site preview as you build, so you will not need to restart the server as you make changes during development. You will always be able to see an up-to-date version of your site in your browser when the dev server is running.
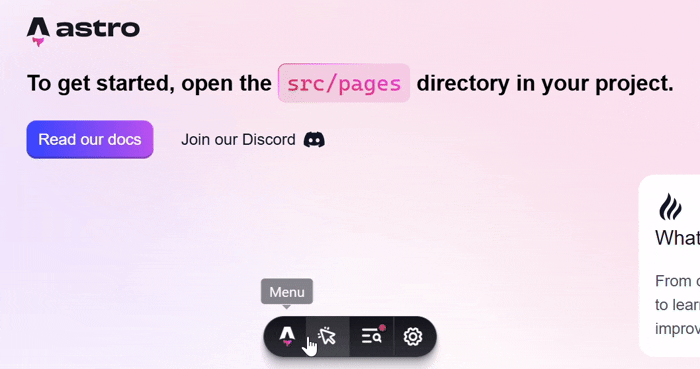
Astro Dev Toolbar
When the development server is running, Astro will display a development toolbar at the bottom of every page in your local browser preview. This toolbar contains useful tools for debugging and inspecting your site during development. It is enabled by default and will appear when you hover over the bottom of the page.
Disable Dev Toolbar
You can disable the dev toolbar by setting the devToolbar.enabled option to false in your astro.config.mjs file. This will prevent the toolbar from appearing in your local browser preview.
// File: astro.config.mjs

import { defineConfig } from "astro/config";

export default defineConfig({
   devToolbar: {
      enabled: false
   }
})
To disable the dev toolbar for yourself on a specific project, run the astro preferences command.
>> astro preferences disable devToolbar
