- Yii Tutorial
- Yii - Home
- Yii - Overview
- Yii - Installation
- Yii - Create Page
- Yii - Application Structure
- Yii - Entry Scripts
- Yii - Controllers
- Yii - Using Controllers
- Yii - Using Actions
- Yii - Models
- Yii - Widgets
- Yii - Modules
- Yii - Views
- Yii - Layouts
- Yii - Assets
- Yii - Asset Conversion
- Yii - Extensions
- Yii - Creating Extensions
- Yii - HTTP Requests
- Yii - Responses
- Yii - URL Formats
- Yii - URL Routing
- Yii - Rules of URL
- Yii - HTML Forms
- Yii - Validation
- Yii - Ad Hoc Validation
- Yii - AJAX Validation
- Yii - Sessions
- Yii - Using Flash Data
- Yii - Cookies
- Yii - Using Cookies
- Yii - Files Upload
- Yii - Formatting
- Yii - Pagination
- Yii - Sorting
- Yii - Properties
- Yii - Data Providers
- Yii - Data Widgets
- Yii - ListView Widget
- Yii - GridView Widget
- Yii - Events
- Yii - Creating Event
- Yii - Behaviors
- Yii - Creating a Behavior
- Yii - Configurations
- Yii - Dependency Injection
- Yii - Database Access
- Yii - Data Access Objects
- Yii - Query Builder
- Yii - Active Record
- Yii - Database Migration
- Yii - Theming
- Yii - RESTful APIs
- Yii - RESTful APIs in Action
- Yii - Fields
- Yii - Testing
- Yii - Caching
- Yii - Fragment Caching
- Yii - Aliases
- Yii - Logging
- Yii - Error Handling
- Yii - Authentication
- Yii - Authorization
- Yii - Localization
- Yii - Gii
- Gii – Creating a Model
- Gii – Generating Controller
- Gii – Generating Module
- Yii Useful Resources
- Yii - Quick Guide
- Yii - Useful Resources
- Yii - Discussion
Yii - Assets
An asset is a file (css, js, video, audio or image, etc.) that may be referenced in a web page. Yii manages assets in asset bundles. The purpose of an asset bundle is to have a group of related JS or CSS files in the code base and to be able to register them within a single PHP call. Asset bundles can also depend on other asset bundles.
Inside the assets folder, you will find the asset bundle for the basic application template −
<?php
   namespace app\assets;
   use yii\web\AssetBundle;
   /**
   * @author Qiang Xue <qiang.xue@gmail.com>
   * @since 2.0
   */
   class AppAsset extends AssetBundle {
      public $basePath = '@webroot';
      public $baseUrl = '@web';
      public $css = [
         'css/site.css',
      ];
      public $js = [];
      public $depends = [
         'yii\web\YiiAsset',
         'yii\bootstrap\BootstrapAsset',
      ];
   }
?>
The above class specifies that the asset files are located inside the @webroot folder, which corresponds to the URL @web. The bundle contains no JS files and a single CSS file. The bundle depends on other bundles −
yii\web\YiiAsset and yii\bootstrap\BootstrapAsset.
Properties of AssetBundle
Following are the properties of AssetBundle.
basePath − Defines a web-accessible directory that contains the asset files in this bundle.
baseUrl − Specifies the URL corresponding to the basePath property.
js − Defines an array of the JS files contained in this bundle.
css − Defines an array of the CSS files contained in this bundle.
depends − Defines an array of the asset bundles that this bundle depends on. It means that CSS and JS files of the current asset bundle will be included after the bundles, which are declared by the depends property.
sourcePath − Defines the root directory that contains the asset files. You should set this property if the root directory is not web accessible. Otherwise, you should set the basePath and baseUrl properties.
cssOptions − Defines the options that will be passed to the yii\web\View∷registerCssFile function.
jsOptions − Defines the options that will be passed to the yii\web\View::registerJsFile function.
publishOptions: Specifies the options that will be passed to the yii\web\AssetManager::publish function.
Classification of Assets
Depending on location, assets can be classified as −
Source Assets − The assets are located in the directory that cannot be directly accessed via web. They should be copied to a web directory in order to use source assets in a page. This process is called asset publishing.
Published Assets − The assets are located in a web accessible directory
External Assets − The assets are located on another web server.
Using Asset Bundles
Step 1 − Inside the assets folder, create a new file called DemoAsset.php with the following content.
<?php
   namespace app\assets;
   use yii\web\AssetBundle;
   class DemoAsset extends AssetBundle {
      public $basePath = ‘@webroot’;
      public $baseUrl = ‘@web’;
      public $js = [‘js/demo.js’];
   }
?>
Step 2 − We have just declared a new asset bundle with a single demo.js file. Now, inside the web/js folder, create a file called demo.js with this code.
console.log("hello from demo asset");
Step 3 − To register the newly created asset bundle, go to the views/layouts directory and at the top of the main.php file, add the following line.
\app\assets\DemoAsset::register($this);
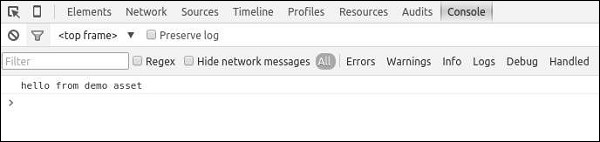
Step 4 − If point your web browser at http://localhost:8080/index.php, you should see the following chrome console output.
You can also define the jsOptions and cssOptions properties to customize the way that CSS and JS files are included in a page. By default, JS files are included before the closing body tag.
Step 5 − To include JS files in the head section, modify the DemoAsset.php file in the following way.
<?php
   namespace app\assets;
   use yii\web\AssetBundle;
   use yii\web\View;
   class DemoAsset extends AssetBundle {
      public $basePath = '@webroot';
      public $baseUrl = '@web';
      public $js = ['js/demo.js'];
      public  $jsOptions = ['position' => View::POS_HEAD];
   }
?>
Step 6 − Now go to http://localhost:8080/index.php, you should see that the demo.js script is included in the head section of the page.

It is a common practice for a web application, running in production mode, to enable HTTP caching for assets. By doing so, the last modification timestamp will be appended to all published assets.
Step 7 − Go to the config folder and modify the web.php file as shown in the following code.
<?php
   $params = require(__DIR__ . '/params.php');
   $config = [
      'id' => 'basic',
      'basePath' => dirname(__DIR__),
      'bootstrap' => ['log'],
      'components' => [
         'assetManager' => [
            'appendTimestamp' => true,
         ],
         'request' => [
            // !!! insert a secret key in the following (if it is empty) - this is
               //required by cookie validation
            'cookieValidationKey' => 'ymoaYrebZHa8gURuolioHGlK8fLXCKjO',
         ],
         'cache' => [
            'class' => 'yii\caching\FileCache',
         ],
         'user' => [
            'identityClass' => 'app\models\User',
            'enableAutoLogin' => true,
         ],
         'errorHandler' => [
            'errorAction' => 'site/error',
         ],
         'mailer' => [
            'class' => 'yii\swiftmailer\Mailer',
            // send all mails to a file by default. You have to set
            // 'useFileTransport' to false and configure a transport
            // for the mailer to send real emails.
            'useFileTransport' => true,
         ],
         'log' => [
            'traceLevel' => YII_DEBUG ? 3 : 0,
            'targets' => [
               [
                  'class' => 'yii\log\FileTarget',
                  'levels' => ['error', 'warning'],
               ],
            ],
         ],
         'db' => require(__DIR__ . '/db.php'),
      ],
      'modules' => [
         'hello' => [
            'class' => 'app\modules\hello\Hello',
         ],
      ],
      'params' => $params,
   ];
   if (YII_ENV_DEV) {
      // configuration adjustments for 'dev' environment
      $config['bootstrap'][] = 'debug';
      $config['modules']['debug'] = [
         'class' => 'yii\debug\Module',
      ];
      $config['bootstrap'][] = 'gii';
      $config['modules']['gii'] = [
         'class' => 'yii\gii\Module',
      ];
   }
   return $config;
?>
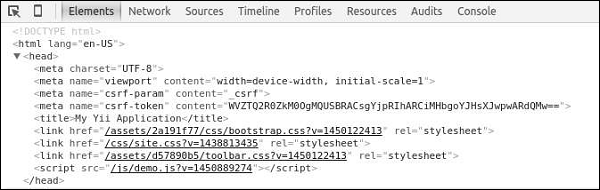
We have added the AssetManager component and set the appendTimestamp property.
Step 8 − Now type http://localhost:8080/index.php in the address bar of the web browser. You will notice that all the assets now have a timestamp as shown in the following image.
Core Yii Assetbundles
Following are the Core Yii Assetbundles.
yii\web\JqueryAsset − Includes the jquery.js file.
yii\web\YiiAsset − Includes the yii.js file, which implements a mechanism of organizing JS code in modules.
yii\bootstrap\BootstrapAsset − Includes the CSS file from the Twitter Bootstrap framework.
yii\bootstrap\BootstrapPluginAsset − Includes the JS file from the Twitter Bootstrap framework.
yii\jui\JuiAsset − Includes the CSS and JS files from the jQuery UI library.